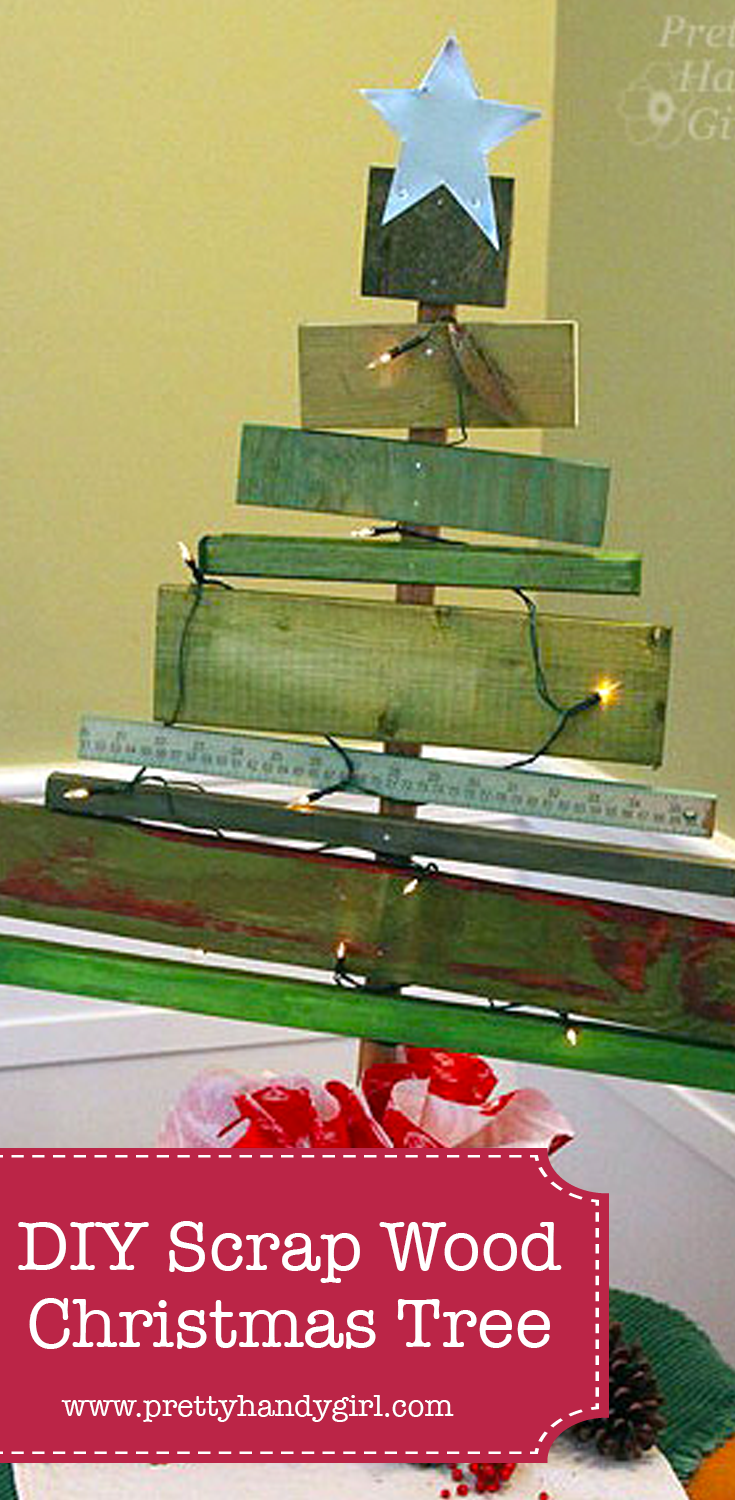
Thanks to my Facebook fan, Heather H., for the ultimate compliment on this lantern. She asked if I got it at Pier 1! Nope Heather, I got it at the Habitat ReStore and it found its way into my hands in this condition:

After a Women Build meeting at the Habitat ReStore a month ago, I spied that dusty relic. An old discarded hanging light fixture. I grabbed it and promptly paid $5 for it. Then I got to chatting with the clerk at the ReStore and absentmindedly walked out without my lantern. By the time I remembered, the ReStore had already closed. It was sad… it was tragic… I didn’t know when I’d be reunited with my light fixture because the ReStore is about 25 minutes away from my home. But, there is a happy ending to my story, my mother-in-law (who gives a good name to all MILs out there) offered to swing by the ReStore the following day to pick up my lantern for me. Hugs to her for reuniting us. But, I had to laugh at the look of skepticism she gave me as she handed over the dusty light. She couldn’t see its true potential, but I could.

How about you? Would you have passed this light fixture by? Or would you have seen the potential?

Well, next time you see a light fixture like that, grab it and I’ll show you how to transform it.

Materials:

  • Old lantern style light fixture
  • Pliers
  • Wire cutters
  • Two screwdrivers (at least one needs to be flat head)
  • Damp rag
  • Sandpaper
  • Plastic drop cloth
  • Kilz spray primer
  • Rustoleum Lagoon spray paint
  • Rub n’ Buff Gold Color
  • Paper towels
Difficulty: Easy
Step 1. Disassemble the lantern by unscrewing all the parts.

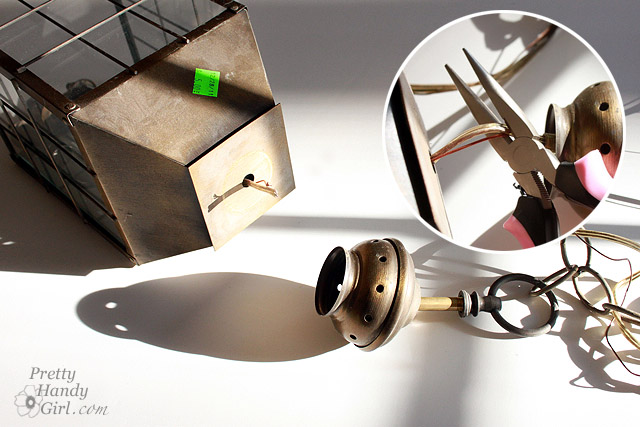
Step 2. Use wire cutters to cut the wire to the light housings.

Step 3. Pull the light sockets, bulbs and lighting out of the lantern.

Step 4. Remove the finial from the bottom of the lighting and set it aside with the lantern. Discard or keep the lighting parts for some other project.

Step 5. If there is a chain attached to the lantern, insert the two screwdrivers into the link attaching it to the lantern. Rotate the two screwdrivers in opposite directions as shown to pry the chain link apart.

Step 6. Pry up the tabs on the lantern that are holding the glass in place. Remove the glass panels and set them aside.

These are the parts that I kept for the lantern:

Step 7. Wipe all the parts with the damp rag to remove any dust and debris. Then scuff the lantern parts with sandpaper and wipe off any remaining dust.

Step 8. Set the lantern and parts outside on the drop cloth.  Spray them with Kilz primer, flip the pieces over and spray again.

Step 9. When the primer has dried, inspect the lantern for any paint drips that need to be sanded smooth.

Step 10. Spray paint the lantern and parts with Rustoleum Lagoon. Flip everything after the first coat is dry and spray a second coat of paint.

Step 11. After the lantern has dried thoroughly, reassemble the lantern.

Screw the finial onto the inside of the lantern where the lighting used to attach.

Step 11. Wipe a small amount of rub n’ buff on a dry paper towel. Rub it on the cross bars of the lantern.

Step 12. Clean the lantern glass with windex and a clean rag. Then insert the glass panels back into the lantern.

Admire your new aqua beauty!

The hardest part of this project was trying to decide where to display my lantern. I could see it in every room of our home!

But, ultimately I gave it a place of prominence on our mantle. And included an old picture inside it.

Have you seen these old light fixtures? Could you ever guess that they could be turned into beautiful decorating gems?
Have a great weekend y’all. I hope you make a trip to your local Habitat ReStore and search for your own lantern.

I hope you’ll join Heather and some other friends on Facebook so you can see what I’m up to next!

Sharing with Tater Tots and Jello Weekend Wrap Up Party


Book Page Rose Wreath

Are you drawn to the amber color of aging book pages? Do you love the scrolling detail on an ornate ceiling medallion? Do you like roses? Yes, yes, and yes?! Well, this post has your name written all over it!

I must say, I really enjoyed photographing this tutorial. The dimensions and shadows in the rose and medallion lend themselves so nicely to photography.

Before we start, I need to give credit where credit is due. I saw a beautiful  paper rose bouquet on 100 Layer Cake the other day, and knew I wanted to make one giant one. The bouquet was created by Valerie Lloyd for a wedding.  So beautiful and unique!

I had not taken down our Christmas decorations on the mantle (I know, slacker that I am.) But, this project propelled my desire to create a Valentine’s Day themed mantle.

Material:

  • Old book
  • Scissors
  • Hot glue gun
  • Hot glue sticks
  • Ceiling medallion
  • Small piece of cardboard
  • Ribbon
Difficulty: Easy
Step 1. Start by tearing a dozen pages out of an old book. (Check Goodwill and thrift stores. You’re bound to find some for this project.)

Book Page Rose Wreath

Step 2. Cut out petal shapes from the book pages. Make some slightly larger and some smaller for the insides of the rose.

Book Page Rose Wreath

Step 3. Curl the top edges of the petal back.

Book Page Rose Wreath

Step 4. Fold the petal in half lengthwise. The curled edges will be on the outside of the fold.

Book Page Rose Wreath

Step 5. Roll several of the smaller petals into a tube shape for the center of the rose.

Book Page Rose Wreath

You should have a decent pile of petals collected before proceeding.

Book Page Rose Wreath

Step 6. Cut a long piece of ribbon to feed through the center of the medallion. It is important to add the ribbon now before you build out your rose and cover the hole.

Plug in your glue gun and let it warm up.

Book Page Rose Wreath

Step 7. Cut a piece of cardboard large enough to cover the center of the medallion. Run a line of hot glue around the center hole on the back of the medallion. Place the cardboard over the hole.

Book Page Rose Wreath

Step 8. Squeeze a large dollop of glue into the center of the cardboard (on the front side of the medallion.) Press one of the small petal tubes into the center of the glue. Hold it until the glue hardens and sets.

Book Page Rose Wreath

Squeeze more glue around the base of the first petal. Wrap a few more of the small petal tubes around the first one.

Book Page Rose Wreath

Experiment with folding the base of each petal or leave them open (your choice.) Variety will make your rose look more “real.”

Book Page Rose Wreath

Step 9.  Continue working around the rose from the center out until you have a very full paper rose.

Book Page Rose Wreath

Step 10. Let the hot glue cool. Fluff the rose and add any petals where you think your rose might need more.

Book Page Rose Wreath

Tie a bow at the top of the ribbon and hang your beautiful wreath!

Book Page Rose Wreath

Stand back and admire your new romantic book page wreath.

Book Page Rose Wreath

What did I tell you? This rose is so beautiful and fun to photograph.

Book Page Rose Wreath

I’d love to hear from you if you make your own! Very rewarding and a relatively easy project.

Book Page Rose Wreath

I hope you are having a fabulous week!

Book Page Rose Wreath

Pin for later!

 Book Page Rose Wreath

It’s true, I JUST took down the rest of the Christmas decorations. Yes — I know it is February — but honestly I’ve been a bit busy lately. I carved out a little time to spray paint a lantern and hot glue a new wreath. And that was all it took to put me in the mood to decorate for the season.

I wanted some cozy warmth and a little brightness on our mantle, so I hung a soft faux fur throw up. To avoid nailing into the brick, I used a wooden dowel rod that spans the width of the throw. I added two screw eyes in either end of the rod and fishing line that feeds through the eye hooks and wraps around nails that are secured into the crown moulding on either side of the fireplace.

I really like the softness of the throw.

A berry wrapped white bird on top of a paper wrapped book helps bring in a little more romantic red.

Michael’s has this crackle vase on clearance now, but be careful about filling it with water because it will leak. Inserting a small yogurt container inside made it possible for me to use it for fresh flowers.

I am really excited about the book page wreath I made, but I think I’m more excited about that old light fixture that I revamped. One of my facebook fans thought it was from Pier 1. That was the ultimate compliment for something I paid $5 for at the Habitat ReStore!

The paint color I used on the lantern is Rustoleum’s Lagoon, and it has sent me on a big aqua kick!

More books and a plant to balance the right side of the mantle.

I’ll have a tutorial for this book page wreath on Wednesday, so get busy finding an old book and a ceiling medallion!

I used the chandelier turned candelabra to bring some Valentine’s whimsy to our kitchen table.

The hearts on a stick were purchased from the Dollar Tree, I just slipped green straws over the stems to beef them up a little.

I did pull the stems off the rest of the hearts and piled them in this other lantern with some faux grass.

A few recycled jars pulled together make a crisp and clean flower arrangement. We have some flowers blooming in our yard already (only about one month early), but I picked up these agapantus and alstroemeria (peruvian lilies) from the grocery store.

 I think of my sister everytime I see agapanthus, because they grow right outside her front door! Lucky duck.

My friend, Leen the Graphics Queen will recognize this bottle from our antiquing trip to Southport, NC. I’d never been to Southport before, but I will definitely have to go again. It is a really neat little town by the sea.

I couldn’t neglect the mudroom.  This is where my tree branch heart wreath hangs out.

Because this is our family’s main entrance, I chose some sweet smelling daphne and daffodils to create a fragrant and colorful welcome home.

I couldn’t truly welcome spring yet (since technically it is still a month and a half away.) So, I scribbled “Hello Spring?” on the chalkboard.

I hope you have a fabulous February and a sweet Valentine’s Day.

 P.s. How many of you watched the SuperBowl (or at least the commercials and/or halftime show) last night? What were your favorite commercials? I have to say I really liked the VW, Doritos and E-Trade commercial. And my son and I were up off the couch and dancing with Madonna! I thought she rocked the halftime show.


Brrrr! Anyone else experiencing the dipping temperatures? I really don’t like the cold unless it is going to snow. If it snows, I’ll put up with the sub-zero artic blast because I know we couldn’t have snow without the cold. But, if it isn’t going to snow, you can take your cold temperatures and get the heck out of here!

For this reason, I thought we needed to give Mother Nature a little hint, hint, nudge, nudge, and then a boldly displayed sign:

Cute garden flag, don’t you think?! Would you believe me if I told you that the flag is made from Dollar Tree placemats? Yup, I wouldn’t lie to you. I bought two because I wanted to decorate both sides and only one side of the placemat has a sheen to it. But, for $1 each, who can complain.

Stick around and I’ll show you how I made the flag. But, first, I have a confession to make…

…Do you secretly loathe glitter? Me, too!

When Pretty Handsome Guy sweeps up errant glitter from the kitchen floor, he’ll say, “The person who invented glitter never had children.” Then we both laugh. We were both in the camp of Glitter Haters Anonymous and detested any bedazzled art projects that came home from school. But, this week I snuck out of the camp under the radar and tried out a new product: Tulip® Fashion Glitterâ„¢ Shimmer Transfer Sheets and  Tulip® Fashion Glitterâ„¢ Shimmer Fabric Paint. Pretty Handsome Guy doesn’t know yet, but I think I’m changing my tune about glitter thanks to Tulip Shimmer products.

Why you ask? It is elementary, my dear Watson. The glitter stays put on the transfer sheets and in the fabric paint! No more sweeping up underneath the glittered project. No more random speck of glitter on the tip of my nose like a Rudolf wanna be. The shimmer products hold their glitter!

Materials:

Instructions:

Mark  a line 2″ from the top of the “flag” placemat using the chalk (this will be your stitching line for the rod pocket. Then draw your design below the pocket line.

Punch out snowflakes from the Tulip Fashion Glitter Shimmer transfer sheet. Because the sheets are thick, it is easier if you peel up the top sheet and only punch through the transfer sheet.

Cut out the rest of your design (you can leave the top sheet on if you are cutting with scissors.) After the designs are cut out, remove the top sheets.

It can be confusing to determine which pieces you removed the top sheet from, so look at the pieces from an angle and look for any reflection or shine on the top sheet of plastic.

If you pull the top sheet off too quickly, it can pull the glitter with it (see below.) Go slow, and if it does happen — don’t stress it — just cut a new one.

Position all the snowflakes and any other transfer sheet pieces on top of the flag. Pay attention to make sure the glitter side is up and the glue transfer side is down. 

Lay a clean rag on top of the pieces and iron the design onto the placemats according to the directions. (The placemats I used are polyester, so I used that setting on my iron. And it took about 30 – 40 seconds to get the transfer sheet glue to heat up enough to stick to the placemats.)

Remove the cloth and check to make sure that the design is adhered to the flag/placemat.

Before painting my snowman, I did a little test on the backside of my placemat to determine if the Tulip Fashion Glitter Shimmer fabric paint was transparent or opaque. It is transparent, so I chose the Tulip Soft fabric paint to fill in the snowman.

Paint your snowman, arms, hat, eyes and mouth using the Tulip Soft fabric paint. Using the smaller brush, paint the words too.

After the fabric paint has dried, dampen a clean cloth and gently wipe off the chalk.

Now is the time to add the Tulip Fashion Glitter Shimmer Fabric Paint magical glitter dust! I call it that because it really looks magical and the gel slowly disappears as it dries and leaves the glitter trail behind. Tinkerbell would be proud. Brush on curves and curly-q’s. You can brush on top of the words and the snowman because it will dry transparent.

Look at that beautiful magic glitter dust!

When the Tulip Fashion Glitter Shimmer Fabric Paint…ahem…I mean magical glitter dust has dried, pin your two placemats together rights sides facing out.

Stitch one line across the top. Stitch a second line across the marked pole pocket.

Leave the two sides of the pocket open and stitch down the sides and across the bottom (as shown.)

Thread the flag onto a standard sized decorative flag bracket.

And then challenge Mother Nature to “Bring it on!” (Be prepared, you might have to do a snow dance too. But that is a whole other tutorial!)

I have to tell you that the Tulip Fashion Glitter Shimmer products really surprised me. I truly loathe loose glitter, but these products really held the glitter in place. There might be a few pieces of glitter that are dislodged when you peel the transfer paper top sheet off, but honestly I didn’t notice and I never found any on me. I highly recommend these products. Especially if you have kids that love glitter!

You can find the Tulip product line at these retailers. Selections may vary per store.


Disclosure: This post has been sponsored by Tulip Products,  iLoveToCreate®, a Duncan Enterprises Company. I was sent some samples of the Tulip® Fashion Glitter™ Shimmer Transfer Sheets and Tulip® Fashion Glitter™ Shimmer Fabric Paint. I already owned the Tulip Soft Fabric paint. I was also paid a small fee in return for writing a post about my experience using the products. The ideas and opinions are strictly my own. I will never let any compensation (monetary or free product) keep me from giving you (the reader) a straight up and honest review.

scrap_wood_christmas_tree

Holiday decorating is in full swing in my house. We bought our tree today and Pretty Handsome Guy and the boys decorated it today while I worked on the cute little scrap wood Christmas tree above.

When I saw the scrap wood DIY Christmas Tree made by Creative Chaos, I fell in love and knew I had to make one too.

Having an ever growing scrap wood pile also helped convince me to make it.

I decided to try dyeing the wood scraps! You read that correctly, dye the wood. Did you know that you can use RIT dye to color more than just fabric?! Check out the RIT Dye website to learn more about all the techniques and materials you can dye. You will be amazed! Plus, RIT created a RIT Formula Guide that will give you 500 formulas to mix your own custom colors!

Seriously, that is an amazing array of colors!

Building the scrap wood tree is a super easy project that doesn’t take much skill. There is a fair amount of waiting time (waiting for the wood to soak up the dye and waiting for concrete to harden) but I’m sure you can find something more productive to do than watching cement dry.

Materials:

(I’ve included affiliate links for your convenience. I earn a small percentage from a purchase using these links. There is no additional cost to you. You can read more about affiliate links here.)


Cut your wood scraps to create a triangular form when stacked on top of one another. Cut one long strip to use as the tree trunk.

Dyeing the Wood:

Lay out three 5 gallon buckets (or mix the colors one at a time and use the same bucket.) Set out the dye colors (dark green, apple green & teal) and salt or vinegar onto a plastic sheet. RIT Dye works best when mixed with hot water. Our water heater is set on a safe hot temperature so as not to burn our boys’ hands. Therefore, I decided to add a little bit of boiling water to my mixture to increase the temperature.

Follow the directions on the RIT container. I added 1/2  bottle of RIT Dye to 3 gallons of water (1/2 gallon of which was the boiling water.) Then mix in 1 cup of vinegar (or salt) in each bucket. (I tried both and didn’t notice any major differences between using salt or vinegar, so you can use either for dyeing wood.)

Put on rubber gloves. Stir until the dye is well mixed.

Split up your wood and dip each into the desired color. Because the wood will float, you may need to clamp a piece of wood to hold your larger scraps below the liquid. Then flip the wood to dye both ends of the scrap. The smaller pieces can be floated right side down for color absorption on the side you’ll see.

After 30 minutes remove the wood and let it dry. (Look at that scrumptious color! And the cool thing is that the grain still shows through.)

While you are waiting for the dye to dry. Stain the tree trunk strip by dipping a paper towel into Minwax Early American stain and rubbing it on the wood. Alternatively, you could stain the trunk with RIT Dye in a brown color.

*A note about pre-painted or sealed scraps. The wood needs to be unpainted, unsealed, or unstained in order to accept the RIT dye color. I tried dyeing these two strips and obviously it didn’t work too well.

No worries though, I mixed up some green acrylic paint and some water and then painted them separately.


Building the Tree:

Position the scraps in the desired location on the trunk.

Gently hammer the scraps to the trunk strip with brad nails. Make sure the nails will go through the scrap and about halfway through the trunk.


Making the Cement Base:

*If you want to stake your tree in the ground, feel free to skip this step.

Wash out the plastic container. Fill the container with cement mixture from the stepping stones kit. Follow the directions on the package. (I ended up using only half the kit, so I halved the directions.) Slowly add water and stir the cement mixture until it is thick and heavy, but not crumbly.

When you have the right consistency, gently bang the container on the ground to get some of the air bubbles out and to level the top. Slide the tree trunk stake into the cement.

Level the tree from side to side and front to back. Then secure the tree with clamps (or other props) while it dries overnight.

In the morning, squeeze the sides of the container to release the cement base. Remove the container and brush off any cement crumbs from the base.

Cut a piece of fabric in a circle large enough to cover the base.

Gather the fabric up and tie it with a ribbon to secure it in place.


Adding the Star:

Trace a star shape onto a scrap of sheet metal (duct material) or a metal can. Cut out the shape using tin snips. Wear gloves to protect your hands from the sharp edges.

Position the star so it overlaps the top piece of scrap wood on the tree. Hammer two brad nails through the star and into the wood.

Decorate your tree with some holiday lights. (I found a set of battery powered LED lights at Target. They aren’t as bright, but it eliminates having to plug in a light cord and having a tripping hazard.)

I like the variety in color I got from using the three different colors of RIT dye. I am really loving my little table top tree. He kind of reminds me of a Charlie Brown Christmas tree, but I’m not sure why.


I have to tell you that I was so excited when I saw the color of the Teal RIT Dye, that I couldn’t resist throwing some old scarves into the bucket with the wood.

I had two scarves, one was light green and the other light blue. The green one never accepted the dye even after an hour of soaking. Obviously, the scarf was made of polyester, which will not accept dye. The light blue one came out beautifully. I attempted to recreate an ombré technique as described on the RIT Dye website, but didn’t read the directions until after the scarf had been sitting still in the dye for about 10 minutes. This gave me a sharp dye line, but it isn’t really noticeable when wearing it.  Next time I’ll know to keep dipping and moving the fabric.

This forgotten scarf has now been relegated to my wear almost everyday scarves!


Disclosure: This post has been sponsored by RIT Dye. I was sent several bottles of RIT Dye and paid a small fee in return for writing a post about my experience using their product. The ideas and opinions are strictly my own. I will never let any compensation (monetary or free product) keep me from giving you (the reader) a straight up and honest review.

Pin for later!