Ceiling Medallion Peppermint Wreath | Pretty Handy Girl

I just got back from Pretty Handsome Guy’s office party. We had a blast, and the evening was defined by a surprise entertainer: Doug E. Fresh who showed up to work the crowd. I have to tell you that I wasn’t too familiar with him. So when we saw him before entering the party, I was introduced to him as Doug E. Fresh. I ALMOST said, “Uh, so should I call you Dougie or Mr. Fresh?” Thank goodness I said neither and just stuck with the polite, “Hi, nice to meet you.” Within minutes of entering the room, he had the crowd moving and groovin’!

I truly enjoyed the party because I got to chat with two other “Handy Girls”. One of them reminded me that I haven’t publicized the date for my next ReStore talk! (Thanks Heath for jogging my frazzled brain!)

So, consider this your official invitation! Saturday, December 10th at 1pm, I will be speaking at the NEW Cary ReStore located at 181 High House Rd. Cary, NC 27511.  I can’t promise that Doug E. Fresh will be there, but I can tell you that it will be a fun talk with lots of cool idea for ornaments, a wreath, an advent calendar and other holiday decor. If you come, I hope you’ll stay a little afterwards so I can meet you. 😉

Want to give the grandparents something special from your son or daughter? But, you cringe at the thought of them throwing away another construction paper ornament? I guarantee, these  are 10 of the most special gifts that your children (all age range) can make for that someone special in their lives!


Happy Day After Thanksgiving! I don’t know about you, but despite the week I had last week, I am very grateful and thankful for modern medicine and trained surgeons who can take all the broken pieces and put them back together again. Humpty Dumpty never had it so good!

My seven year old is thankful for something completely different. When asked yesterday morning what he was thankful for he said (very seriously), “My bottom.” I tried so hard not to laugh, and was able to utter a quick “Why?”. He replied, “So we won’t explode!” Oh the thoughts of a seven year old boy. ;-D

I hope everyone got their fill of food and family time! And most of all I hope you got a little R&R. You may be looking around wondering where Tool Tutorial Friday is. Well, I’m sorry to tell you that it is on break (no pun intended.) After all the stress from my son’s broken his arm last week, I decided to give myself a much needed reprieve from blogging. No worries though, Tool Tutorial Friday will be back next week as previously scheduled.

I hope you won’t be too mad and disappointed with me. But, seriously, you don’t want to sit here and learn how to use another power tool today! You want to take some time to unwind and enjoy your family, right?!

In the meantime, I do have the Tomboy Tools magnetic hammer winner: Roxanne Lucchesi!
She says, “I have been wanting to tell you how much I love your blog. And now I REALLY love it. It is so great that you are taking the time to post these tutorials. I cannot tell you how much I appreciate them. I recently added a table saw to my collection of tools. Mind you, I have never used a table saw, but have always wanted one. Now you have empowered me to actually get out there and use it. Thank you!”

Thanks so much Roxanne, comments like yours are what make all the efforts I put into my blog worth it!

And a big thank you to my sponsor:

Laura from Tomboy Tools, who graciously offers a hammer a week for the Tool Tutorial Friday series. Laura is a super sweet mompreneur who also wants to empower women to take on their own DIY project. If you get a chance, check out the other tools she sells!

And, for you reading pleasure and gift inspirations I leave you with the Handmade Holiday Decor eBook! This is a fabulous ebook put together by the even more fabulous Myra from My Blessed Life and Mandi from Life Your Way. Just think about it! One ebook with all your favorite bloggers and holiday decor tutorials in one spot! There are a few of my tutorials (pages 12 & 24) inside along with some other fabulous bloggers:  Pink and Polka Dot, Creative Kristi, SAS Interiors, The Country Chic Cottage, Ten June, The House of Smiths,  The Inspired Room, The Idea Room, Serenity Now, Infarrantly Creative, Mod Podge Rocks and MANY more!

If the preview above is not working for you, click here if you wish to download your own PDF version of the Handmade Holiday Decor eBook.

Happy Holidays, y’all! See you next week!

When Courtney (The Joy of Decorating) organized the Raleigh group for I <3 Thrifting Day she took us to an “off the beaten” path shop. Tucked into an industrial zone off Capital Blvd. in Raleigh, you would miss it unless you were specifically looking for it.

Here are just a few of the inspirational photos I took on my visit to Revival Antiques & Accessories:

Old bead board or flooring pieces cut, painted and turned into a coat rack!


A pendant light made from corrugated cardboard!

Here’s a closer look at the cardboard.

Give me chippy paint or give me death! Okay, I know I’m being dramatic, but I seriously love anything rustic with chipping paint.

Decorative scroll embellishment on an armoire.

Just think how easy these ampersand pillows would be to make!

Hello, does this vignette remind you of Miss Mustard Seed? Me too.

Painted and numbered chippy buckets.

Another scale and a buggy wheel. Makes my wheels churn thinking what I could make with it.

I just love the detail on this drawer pull (and of course the chippy paint.)

Bare wire framed pendants are very popular right now.

I think I like the pendant even more because of the antique light bulb.

Antique cameras are sculptural and easy to decorate with.

I spotted this shelf made from old shutters.

Or you could turn an old shutter into a coat rack.

This armoire is too stunning for words!

If I owned this dresser, her name would be buttercup.

Old typewriter keys are just graphic goodness.

This tool caddy is adorable, but I bet it would be easy to make. I think I could use Julie’s (Follow Your Heart Woodworking) tool caddy tutorial that appeared on Funky Junk Donna’s.

A cute little nook shelf. Complete with (you guessed it) chippy paint and beadboard.

This birdcage photo display gives me a few ideas. How about you?

2nd only to chippy paint, I love blue bottles!

Little antique crates can be found everywhere at ReVival Antiques.

A buoy birdhouse! How adorable.

{Yawn!} That’s it for today, I’m ready for my cat nap.

If you liked anything you saw in this post, be sure to visit or contact:

Revival Antiques & Accessories
1505 Capital Blvd, Suite 14-A
Raleigh, NC 27603

919-833-3444
www.revival-antiques.com

Disclaimer: This is NOT a sponsored post. Revival Antiques doesn’t know me, they didn’t poke or prod me to write this. It is just one of those places that I thought you might like to visit with me. So, I brought you along for the visual tour.

Today you have been invited to take a house tour at my friend Holly’s home. Holly is a good friend of mine, so luckily I didn’t have to beg too much for her to let us into her home. But, before we go in I want to tell you a little more about her. She wears many hats. She is a wife and mother of two boys first and foremost. But, she also runs Storywood Designs, a furniture refinishing business and Framed by Storywood, her Etsy Shop. She has a wonderful eye for color and design (which is evident in her furniture pieces and home décor.) When I first walked into her home, I knew I could live there and not have to change a thing.

Holly and her husband bought their 1980 home a few years ago. There were plenty of touches from previous owners that she worked with or covered in a creative way. I scanned the real estate flyer (sorry about the quality) to give you an idea what their house looked like when they bought it. The changes they made are phenomenal and yet they didn’t break the bank to do it.

Are you ready for the tour? Wipe your feet and come on it. Do you like the initial on her door?

She sells them in her Etsy shop!

Here we are in the living room, but this is what the room looked like a mere 3 yrs. ago:

And here is the living room today!

I know armoires are starting to go out of style, but this one is gorgeous with the cut out panels! If she ever tries to get rid of it, I’m grabbing it!

They painted the fireplace white and it really brightens up the room. See, I can appreciate a painted white fireplace, even though I repainted ours to look like brick.


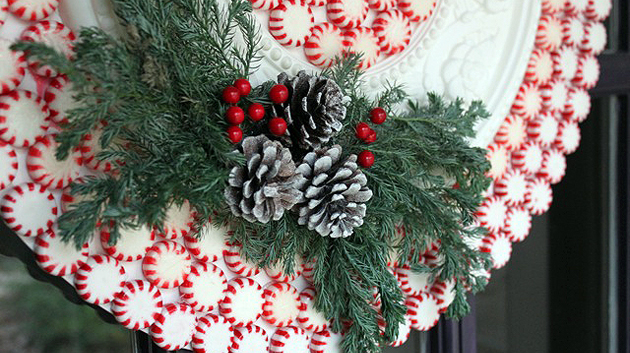
I love all her fall décor. Especially the lit pumpkins on the hearth.


Beside the fireplace are sweet built-in cupboards and cabinets with wood countertops. It adds charm to the small niche.


Now we make our way into her kitchen  — my favorite room and the most stunning transformation. This was the kitchen before:


Get ready to catch your jaw before it hits the floor.


The pendant light adds lots of warmth and texture to the space.


Adding corbels under the upper cabinets was a genius idea for adding instant charm. I am itching to do the same thing to our kitchen cabinets. When I do, you can be sure I’ll share a tutorial.


Holly and her husband made the kitchen table. The wood was whistling for my attention the entire time I was photographing the kitchen. And with lines like this, how could I help but stare?


By removing many of the upper cabinet doors they made the kitchen feel larger and more airy.


Did you see those little decorative tiles? Would you believe that they had hideous country scenes before. Holly simply painted over the scenes and added a stencil! What a smart idea!


Just in case you wondered (because I definitely wanted to know), the base cabinets got a coat of white sage paint by Olympic. (Holly says that Olympic discontinued the color so Lowe’s had to custom mix it in their kitchen and bath enamel paint.) The top cabinets and walls are painted Benjamin Moore Lancaster White.


Setting out a little lamp adds some warmth to this corner of the kitchen.


The breakfast area has built-in benchs on two sides. The pillows make the space feel cozy.


One of Holly’s frames turned into a chalkboard:


Okay, right this way to the dining room.


I really want to display my blue and white china like she has done on this wall.


Adjacent to the dining room is her sitting room. Here is the before picture of that room:


She and I (well mostly Holly) just repainted the room a very neutral gray. I can’t believe what a big difference it made.


The china cabinet is a recent refinishing project that Holly just completed. The distressing on this piece is perfect!


Check out those layers of paint and glaze. Scrumptious!


And the bowed front and curved glass make this cabinet unique.


Speaking of distressing, here is another one of Holly’s tables that she refinished. This little table would make a perfect breakfast table or just a side table. It is for sale right now!

I’m jealous of her talent. Maybe I can convince her to take me as her understudy.


Thank you Holly and family for letting us tour your home. Your hard work really shows in your beautiful home.

Did you see the cute little red and white mushrooms in my terrariums that I made? They were super easy to make. I can show you how and this will only take a second.

Materials:

Instructions:

Mark the height you want your mushrooms to be on the dowel rod. Add 1/2″ to the height for anchoring it into the soil. Cut your dowel rod (or a branch in a pinch.)

Spray your cut dowel rods (or branches) with spray primer. Be sure to coat all sides. Spray the acorn caps at the same time.

Spray paint your acorn caps red.

After the paint has dried, glue the acorn tops to the dowel rods using E-6000 glue.

Let the glue harden (about 30 minutes.) Add some dots of white paint onto the red caps.

Press your adorable little mushroom into the soil in your terrarium and then sit and wait for a fairy to move in.

See, I told you it would only take a second! Well, besides waiting for the paint to dry, this project takes less than five minutes.

I have a mushroom leftover, but I don’t have any more terrariums. Any ideas what I can do with a little lone mushroom?

UPrinting.com Giveaway Winner

I have to tell you that I really enjoyed reading all your comments on the UPrinting giveaway. Some of you had some amazing photos that you really wanted to have printed. And some of you brought tears to my eyes when reading about photos of loved ones who have passed on. You made me think about both my grandmothers who passed away over 5 years ago and who I still miss almost daily. I wish I had a photo canvas for each and everyone of you. If you didn’t win, I really hope you will look into having your photo printed as a rolled canvas and stretch it yourself to save money. Your photos are too precious not to! (Oh, don’t make me cry again.)

We do have ourselves a winner of the UPrinting.com rolled canvas! And she has a special photo in mind.

Deborah wrote: “Thank you for posting this. I would never have known you can do this yourself. I would love to have my favorite picture of my 3 kids printed in a huge size for over out sofa in the living room.”

Deborah is a blogger and homeschooling mother of three children. This month she is writing a series (inspired by The Nester) on 31 days to Slash Your Budget Painlessly on her blog Green Willow Pond.

Green Willow Pond

She has some great tips and ideas on saving money. From making your own linen napkins to making your own laundry detergent! Truly a woman after my own frugal heart.

Congratulations Deborah. Please check your email and get back to me asap to claim your prize.