
I don’t know about you, but I’ve been fighting a losing battle lately. I have begged, yelled, and threatened my boys to stop putting stickers and tape on the walls.

I think my youngest one upped me, he put tape and stickers on his door! I had given up the battle until I came across this magnetic chalkboard from Less-Than-Perfect Life of Bliss:

And this burlap bulletin board from Between Blue & Yellow:
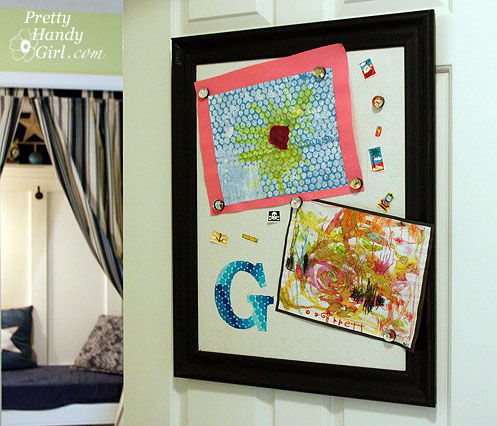
Those two boards got me thinking. If I married the two ideas, I could have a magnetic fabric display board! Luckily I have a stash of old picture frames in the attic. I grabbed the biggest one I had and painted it black and within a few hours I had a magnetic display board for my son’s door!

Here is how to create your own:
Materials:

- Painter’s Drop Cloth
- Contrasting Decorative Fabric
- Double sided fusible interfacing
- Scissors
- Sheet metal flat sheet* ($10 in duct work aisle of Lowe’s or Home Depot)
- Duct Tape
- Sharpie Marker
- Tin snips
- Gloves
- Picture frame
- Double sided foam tape (optional)
- Strong magnets
*Be sure to bring a magnet to test the sheet metal. Some of them aren’t magnetic.
Instructions for making the magnetic frame:
Start by measuring the opening in the back of your frame. Mark those measurements on the sheet metal using a sharpie marker.

Using tin snips, cut the sheet metal. Believe it or not, this was very easy, but gloves are a must because the edges are sharp.

Cut out the drop cloth about two inches larger than the sheet metal. Trim the corners off the fabric.

Fold the edges over and secure with Duct Tape.

Did you know that Scotch has a whole line of Duct Tape? There are five different kinds, and they each have a different use! REALLY! See for yourself.

I didn’t know about them either until they sent me these to try out. I haven’t used them yet, but I will be soon. And I promise to tell you what I honestly think. Until then, I wonder how I could make them into a cool vase.
Instructions for Applique Monogram:
To add an applique to the fabric, print out a large letter from your computer. Then fuse a square of fabric (large enough to fit the letter onto) to the double sided fusible interfacing. Follow the instructions on the interfacing package.

Pin the printout on top of the fabric and cut it out.

Peel the back off the interfacing …
![]()
…and iron it onto your fabric covered sheet metal.

Make sure the letter is securely fused to the drop cloth.

Insert the board into the frame.

Secure the board into the frame by using a staple gun and stapling at an angle into the frame.

Add a wire or hanger to the back of your frame.
Hang the frame on the wall, door, or wherever you like. Because I was hanging the display frame onto the door (and because 4 year olds are notorious for slamming their doors), I added some double stick foam tape to the back side of the frame.

YES, I know what I said, but Mommies are allowed to use tape ;-).

I used some of the glass bead magnets we made last summer and now my son can put up his artwork and stickers without incurring the wrath of Mommy!

Now that is what I call one handsome art display!
Looking for some more creative ideas for displaying your child’s artwork? Check out my article on Parentables today: 8 Great Ways to Display Your Child’s Artwork.


