Last week when I finally  said adios to the Hollywood style strip light, I was eager to put in some energy efficient light bulbs.

While purchasing the light fixture I also checked out the light bulb display. I found myself being drawn to the bulb comparison display at Home Depot. I looked at the different lights and their color effect in the “display room”. Confident with my new knowledge, I walked out with several Soft light CFLs in my bag. But, when I got home and installed them I was NOT happy! They were harsh, bluish and just made the bathroom feel cold and clinical. I can’t tell you how many times this has happened to me. Those displays are so deceiving! They don’t REALLY show you what the bulbs will look like in your home. And don’t even get me started on the paint chip displays! Let’s just say you should NEVER EVER make a final decision on paint at the store!

One of my facebook fans mentioned that she really liked Ottlite bulbs, and that they were just like daylight. I promptly contacted the company and they shipped me out several bulbs to try.

It was at this point that I decided an unscientific test was in order. I started out systematically using just four bulbs, but then I bought a $30 (gulp!) LED lightbulb at the grocery store. And soon, all scientific conditions were thrown to the wind. So, I hope none of you yell at me for my lack of consistency. The test was more for myself , but I figured there might be a few inquiring minds.

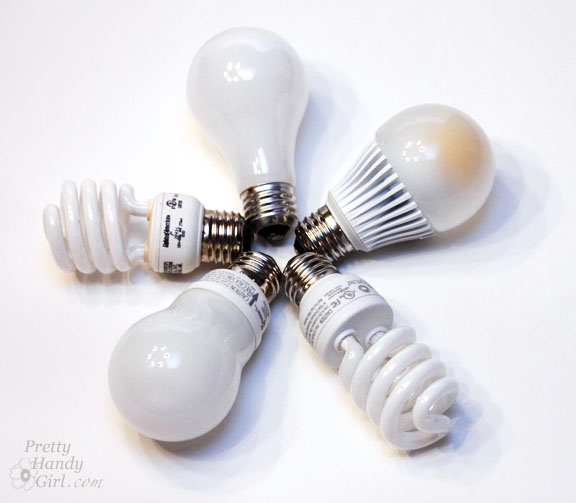
One  more note on the unscientific-ness of my experiment. All the photographs were taken using the fluorescent setting on my camera (to try to give the best view of the CFLs. Which will explain why the incandescent bulbs look extra yellow. I kept the exact same shutter speed and aperture in each setting. Only the bulbs changed in each photo. These were the various bulbs I used in my test:

I hope you find this comparison as helpful as I did!

First up was an outdoor setting. This light fixture lights up our side door entrance. I was using the regular CFL in the fixture, but it was so cold in appearance and looked odd with the warm yellow light the lanterns by our front door emit.

I really liked the Philips Ambient LED in this fixture and was about to choose that one, but then read that it wasn’t recommended for outdoor or damp locations. Boo. Ultimately I decided on the the incandescent 60 watt bulb. In the meantime I will be on the lookout for a outdoor approved LED lightbulb.

The living room table lamp was the most forgiving light situation. The white shade and medium green walls made most of the light bulbs look good. But, ultimately I decided I liked the Sylvania CFL light bulb best in this fixture.

Our foyer is small, dark and has bright yellow walls. This is also the light we leave on all night to protect sleepwalkers who might otherwise tumble down the stairs. All the bulbs looked pretty good in this location except the Ottlite. It was too harsh, bright and cold feeling.

Ultimately I decided I liked the Philps LED light bulb here. This bulb was by far my favorite light bulb. But, with a hefty price tag of $30, I can’t be buying more than one or two of them!


Our master bedroom was the only location that I liked the Ottlite. The lamp shades have a beige color. This tones down the harsh white of the Ottlite. Plus, it was the only bulb that didn’t make my wall color look sickly brownish gray.

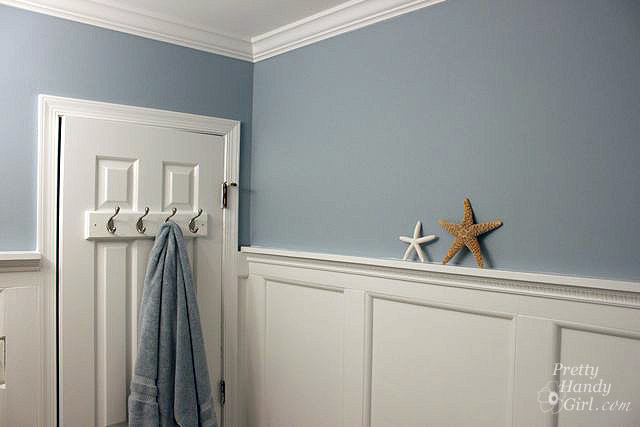
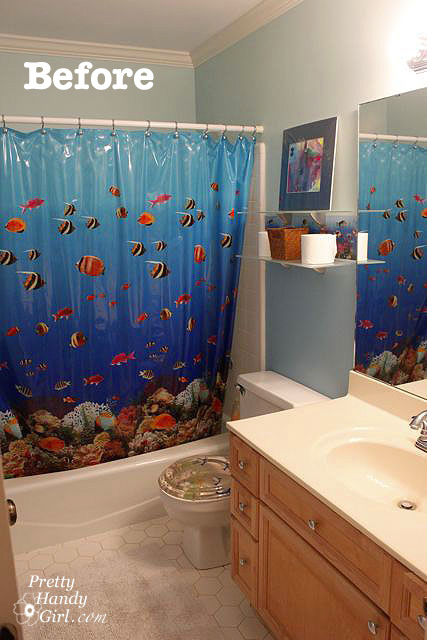
Finally, the room that started this whole pursuit of scientific knowledge: The kids’ bathroom, which has many requirements. The bulbs can’t be too dim that guests can’t see themselves in the mirror. And yet the room can’t be too bright to blind anyone who turns the light on in the wee hours of the night. The light couldn’t be too cold or bluish in cast. Basically I had a lot of requirements for this light fixture.

I also had our friend, Greg, model for me to show the lighting on skin tones.


I felt like Goldilocks in this room (too bright, too dark, too blue!)

1. The incandescents were not very eco-friendly.

2. The soft white CFLS were okay, but still a little harsh and bluish cast.

3. Regular CFL bulbs, these were pretty bad. They were darker and I really didn’t like the light color.

4. The Ottlite was way too bright and harsh for the blue and white bathroom. So, I finally figured out the perfect bulb formula.

That’s right, I’m a bulb mixer. We found that two soft white CFLs and one incandescent light bulb was the magic formula. The two soft white CFLs gives enough light and energy savings without being too clinical. But, the incandescent works to soften the bluish cast.

So although I can’t tell you that I found the PERFECT light bulb. And I still can’t embrace the CFLs, I work with them to try to go easy on my energy bill and lesson my carbon footprint. I mix bulbs in our multi-light (non-dimming) fixtures. I do have to warn you though, if you use CFLs in a closed fixture (like the one shown below with the dome removed.) They will not last as long as they are supposed to.

I also noticed a big difference between the “soft white” CFL bulbs I bought. The Sylvania ones were not nearly as warm as the Ecosmart ones, proving that all CFLs are not created equal.

I did find that I liked different bulbs in different locations. And ultimately I made a decision that allowed me to be eco-conscious but also be happy with our lighting.

But, I really hope that the Philips Ambient LED bulbs will come down in price. They use the least amount of energy, don’t get hot, and give off a light that is very close to an incandescent. So for those of us that still love incandescents, there is hope!


Disclosure: I was NOT paid by any companies to review the above mentioned light bulbs. Ottlite did send me bulbs for free, but I was not swayed to write a positive review. This post is my honest and unswayed opinion.

When I last showed you my boy’s bathroom, it looked like this:

Nemo and Dory would have enjoyed life living in the kids’ bathroom. But, alas, I was serenaded by a beautiful new mirror (actually a new MirrorMate frame.) And so I set to work helping this bathroom grow up.

Here is that beautiful temptress, Ms. Gramercy Martini. Isn’t she lovely.

With curves and details like that, I had to build board and batten moulding that would match her beauty.

And, what bathroom couldn’t use a sweet spot to display some beautiful flowers? I really like this built in shelf, it was really easy to construct it.

The wall color is Blue Slate by Benjamin Moore. And I used the new bath & spa Aura paint which has a matte finish! I have yet to clean it yet, but I’ll let you know how it does.

These two starfish friends are happy to perch on the 3″ deep moulding ledge. Yes, I expect them to make a suicidal dive one day, but my boys haven’t bothered them yet.


Finding just the “right” shower curtain was a little challenging. I would have loved to put in a floral or feminine curtain, but I have to respect that there are two little men that will be using this bathroom 95% of the time.

I am sooo glad I ditched the hollywood strip light for these beauties:


Just a close up view of the battens where they meet the floor. Now wouldn’t that have looked weird if I had left the baseboard tiles there?


Here is a better view of the vanity, new light fixture and the MirrorMate frame.

I have one more project for the empty wall. I took down the old chrome towel bar, but I have a fantastic idea for a new one. You’ll just have to wait and see what I came up with. In the meantime, the hooks on the door work well for hanging towels up.

So, go ahead let me know what you think! Do you miss the Nemo room? Or are you loving the grown up beach retreat? And am I crazy for making this bathroom look this good for my 5 & 7 year old boys? By the way, Pretty Handsome Son #1 tried to convince me that the bathroom would look better with black and pink stripes! I am seriously going to have to paint his closet like that because he has been asking for the same color scheme for 2 years now!

Kristin from The DIY Forums interviewed me last week. She posted the interview yesterday and the second half is today.

You can learn a few new facts about me. Like what I really DON’T like to do at 8.5 months pregnant!

And how I learned my DIY skills.

I hope you’ll stop by to read the interview.

If you are just joining me and missed the tutorial for building board and batten moulding, you can view that tutorial HERE. Today I want to show you how to hide the holes, seams and how to paint the board and batten moulding. Plus, how I paint the wall so it looks more like wood and not like drywall.

Start by taping off the moulding. I used ScotchBlue painter’s tape with edge lock technology because 3M just sent me these rolls to try out.

If you are re-painting the crown moulding and the door, tape them off as well.

Usually I fill the nail holes with wood putty. Then I fill seams with caulk. To view a tutorial on filling holes with wood putty, click HERE.

I actually just read about a neat tip on Diane’s blog (who also just added board and batten moulding in her bathroom.)  She uses ice cubes and cold water for working with caulk. I’ve never tried this, but am happy to report that it really helps smooth the caulk and keeps it from sticking to your fingers.


Which caused me to amend the Pretty Handy Girl’s tried-and-true caulking method:

  1. Squeeze out your bead of caulk, using a caulk gun.
  2. Dip finger in the ice cold water.
  3. Run your finger along the bead to smooth it.

Seal every seam in your moulding and then let it dry.

Once all the putty and caulk has dried, get the primer out. Paint primer on all the wood moulding using a paint brush. In the center (drywall areas), you can roll on the primer.

But, before the primer dries use the brush to spread it in long vertical strokes.

After the primer has dried, go ahead and add one coat of paint. Follow the same direction of strokes with the brush as you did when priming.

I made a video to show you the technique I used to give the wall a wood grain texture. Please forgive the painting clothes and unwashed hair! I haven’t hired a hair, makeup and costume stylist yet.

I have yet to be able to get away with only one coat of paint. If you look close you can still see some of the blue wall color showing through.

After the paint has dried, it is time to remove the tape. Anywhere that you caulked between the wood and the tape, you need to score the caulk to give it a clean edge when you remove the tape.

Remove the tape and looky at that clean edge! I’ve used ScotchBlue painter’s tape before, but I can honestly tell you that the new Edge lock technology is a big improvement. As long as you press the edges down firmly there is hardly any places where paint seeped underneath. The only places seepage occurred was where there was a dimple or imperfection in the wall.

One thing I didn’t caulk was the light switch plate which I had to cut to fit next to the batten. I will probably go back and add a little caulk between the switch plate and the moulding.


I hope you learned something today. Coming up next, the bathroom reveal!

Board & Batten moulding is very popular right now. And why not? It is easy to work with and looks great (after it is painted)! If you remember, I used board and batten in my  my son’s closet turned reading nook last year.

I decided to create a similar look in the boys’ bathroom. Only this time I wanted to round the edges of the battens for more visual interest. I’m warning you now, this tutorial is a bit photo intensive. But, how else would I give you a step-by-step tutorial?

I started by purchasing my lumber at Lowe’s. Did you know you can buy cheap furring strips for your battens? It will save you money. Especially if you don’t mind sifting through the stacks to find the straighter boards and sanding the face of your boards after cutting them. I bought 1x4x8 boards for the battens. And 1x3x8 boards for the upper ledge. I also purchased quarter round moulding and decorative moulding for underneath the upper ledge.

Removing Baseboard Tiles:

The bathroom had baseboard tiles that had to be removed. I grabbed a few tools and made quick work of removing them. The ear muffs and safety glasses were definitely a must!

Score the edges of the tile with a utility knife.

Hammer a flat pry bar behind the tiles.

Remove each tile one at a time.


Take some time to patch any holes that are in your wall. You can view a tutorial on patching drywall HERE. I needed my walls to be as smooth as possible since I wasn’t going to add board behind the battens.

Installing Board and Batten Moulding:

Mark the height where you want the top of your moulding to be. I used 5′ as the height, but then ended up lining up the bottom of my boards on the 5′ mark. So, for the 8′ ceiling room, the top of my moulding was at 65″. Use a level mark as a guide line across the width of your room.

Next measure the widths of the sections that your horizontal boards will be attached to.

Cut your boards to size.

Test fit your boards.

I cut the board that butted up to my mirror at a 30 degree bevel.

Once you have cut all the boards and they fit. Sand down the face and edges.

A nail gun and compressor are not a necessity, but they do make the job a lot easier! Otherwise, you will be doing a lot of hammering and nailing while holding boards in place.

I used the compressor at 110psi, which worked well for the 1″ pine boards. I used 2″ nails for the boards and battens and 1.5″ nails for the quarter round.

Be sure to wear your safety gear. The compressor is LOUD and no need to risk your eyesight. I know, you are jealous of how attractive I look in my safety gear (not!)

For the horizontal top boards, I added some construction adhesive. This is not 100% necessary unless you have monkeys for children. And I do, so the extra adhesive seemed like a good idea.

Press the board onto the wall.

Shoot several 2″ nails into the moulding to hold it in place. Be sure to angle your nails to make it more secure.

That board shouldn’t go anywhere now!


Repeat the same steps for the baseboard boards (minus the construction adhesive.)

Next, measure the vertical distance between the top and baseboard battens. Be sure to measure at the exact location that a vertical batten will go. I’m sure your heights will vary.

Cut all your vertical boards and sand them down.

When you are figuring out the spacing, be sure to take into account if you will be adding a towel bar or other fixtures to the wall. My old towel bar was 24″ wide, so I made sure to space the battens to accommodate the towel bar.

While installing the battens you may run into a few inconveniences. Like, a toilet or something that can’t be moved. To deal with the toilet, I cut a piece of cardstock the same width as my batten. Then I slid it behind the toilet and scribed around the edge of the toilet.

Then I cut along my line and transferred the line to my batten.


Use a jigsaw to cut out the scribed profile (I tried to use my Dremel Trio to cut out the small section, but it failed miserably. I think the Trio is best used for thin stock like the back of a bookcase.)


Then you can install your batten around the “inconvenient” object.

By now your room should resemble something like this:

Installing Quarter Round Moulding:

Now comes the step that requires a little more precision. Cutting the quarter round moulding can be a little tricky, but don’t fear I know you can handle it. Remember the old carpenter’s adage, “Measure twice, cut once.”

Well, I admit it, I forgot! Ugh. Even I can make mistakes, so don’t be afraid to mess up once in a while. We all learn from our mistakes:

You will need to meaure the width and heights of the rectangle between your battens. Be precise for better accuracy and less caulk later!

Set your miter saw at a 45 degree angle.


This is what it should look like. The saw should be straight up and down at a 90 degree angle from the saw stand (in other words, no bevel cut).


Cut your quarter round so that the longest point on the moulding equals the measurement you took from the rectangle. You may have to face the “round” edge in towards the fence for some cuts. And it might take a few cuts to figure out the angles. But, I know you can do it. Once you have all your quarter round cut and dry fit, you can proceed with the install.

Remember those “inconvenient” objects. End your quarter round right before the toilet.

Add a 30 degree angle when butting up to objects like light switch covers and outlets.

Load the 1.5″ trim nails into your nail gun. Aim your nail gun into the quarter round at an angle so the nail ends up going through the quarter round and into the battens.


Hey, you are about 80% of the way done with installing the moulding!

Installing the top ledge and decorative trim moulding:

Cut the top ledges to size and sand them down. It is a good idea to round any exposed corners with the sander. This will undoubtedly prevent future dents to the head.

Lay the ledge boards on top of the upper battens. If your walls are uneven, your ledge will likely look like this.

No biggie. Grab your grade school compass. And set the two arms to the width of the widest gap. Then drag your compass along the ledge and the wall.

Get out your trusty jigsaw again and cut off that scribed line (have I told you how much I love my Porter Cable Jigsaw?! It pays to buy good quality power tools.)

Ahhh, much better. Any smaller gaps will be filled in with caulk later.

Nail the ledge into the batten below it. You can use construction glue for extra stability. (Yes, it is monkey protection for us.)

My favorite part of the moulding project is adding a little extra “bling”. I chose this decorative moulding to sit below the ledge and to give it extra support (again I have monkeys!)

Don’t forget to cut a 30 degree angle wherever you cut a batten at that angle.

Nail the decorative moulding onto the batten just below the ledge.

Now doesn’t that look beautiful?!

Fixing a few nail problems:

Remember how I said I make mistakes too? Well, here are two easy mistakes to fix when using a nail gun. When the nail doesn’t go all the way in (this usually happens if you don’t keep pressure on the gun when you squeeze the trigger), simply use a hammer and a nail set to hammer it into the wood.

Occasionally a nail may hit something when entering and end up popping out. Grab the end of the nail and pull it all the way through the wood. You may take some wood with it, but you can patch it with wood putty.


I’ll be back to show you how to caulk and paint this beautiful moulding! And then the final reveal of my Boys’ Fishy to Fabulous Bathroom! Finally, a bonus post on creating a branch towel bar.


Photobucket” border=”0″ alt=”Photobucket”>