I am amazed that we’ve had great weather for the entire two weeks of the DIY Talent Parade! Are you enjoying the parade so far?! Well, get ready to have your socks knocked off today. Our talented guest is an amazing multi-tasking mother of four. She cooks, she sews, she crafts and she makes everything she touches beautiful! Amy is beautiful inside and out which makes it no surprise that she has the talent to turn ordinary objects into gorgeous creations. Like this t-shirt turned bolero.

Wait, I think I see her coming this way…ummm…is she dancing? Why yes, she is! My goodness is there anything this girl can’t do?! Turn your heads this way and welcome the very lovely and very talented Amy from Positively Splendid. Read more

With a tweet and a whistle and a song in her heart, our next DIY Talent Parade participant is gliding….wait, no make that flying down the street! Whoa, well, I’m sure you’ve guessed by now that this talented gal is part avian. That’s right, I have the beautiful and exotic (because she’s from the Netherlands,) Marianne also known to her readers as Songbird.

Marianne, is truly a sweet and graceful creature. And she loves to surround herself with beauty wherever she nests. I secretly dream of flying across the ocean to be a guest in her home one day.

Her home is purely dreamy!

At Songbird Blog, you can learn all types of romantic decorating and decor tips. In addition to her top 7 tips for spraypainting.

Well, she’s swooping down with some beautiful silver strands flying behind her, so focus your attention skyward. Read more

My boys are off this week for Spring Break, so we’ll be breaking out the craft supplies for sure! This is one of my favorite crafts for springtime. If you have time this week (or need to entertain your little chicks) definitely enlist some tiny hands to help with this project. The adorable blue bird eggs are perfect to display on your table or mantle. (Don’t forget to tarp off around the work area.)

Follow the tutorial for creating blue bird eggs here. Read more

Branch Jewelry Holder

Okay, I admit it. I’m a little infatuated with branches lately. Maybe it is because winter is here and all those bare skeletons of trees have me fascinated. Or maybe it is because my neighbor has been taking down a lot of trees — which really baffles me, but I digress — and the perfect branch was beaconing me from the curb.

As I walked home with the branch held high like a trophy, my neighbors surely figured out what I would make! A branch jewelry holder to hold ALL my jewelry.

Sure I had a jewelry holder already, but it was sagging under the weight and was begging for some relief. One of the fish line strings snapped a few months ago and I started hanging necklaces on the back of the door hook. This makes for some eye opening sounds when the dog pushes his way into the room at 3am. Not good. It was high time I found a solution!

That is when I saw, Shannon Eileen has a really great tutorial for building a wall mounted branch jewelry holder. Isn’t it beautiful in its simplicity?! I love the look.

Unfortunately (or fortunately), I have a lot more jewelry and didn’t want to mount mine to the wall. So, I thought a sculptural twig jewelry holder that sits on my dressing table would be more fitting for my needs.

Finding the perfect branch turned out to be easier than finding the perfect base. I thought about making a cross to support the bottom. Then, I thought about drilling a hole into a plate. But, the solution was cemented once I saw this bamboo bowl at Target on clearance.

And that is the end of the story. My jewelry lived happily ever after on my dressing table. The End!

What?! You want the tutorial? Oh right, I forgot for a minute this was a tutorial blog. I started daydreaming while looking at all that shiny jewelry.

Materials:

  • Freshly cut hardwood branch
  • Freshly cut log (preferably hard wood tree)
  • Gorilla glue
  • Saw
  • Plyers or pruners
  • Drill with several sized bits
  • 2″ wood screw
  • Clothes pin
  • Baby wipes
  • Bowl for base
  • Screw
  • Painter’s Tape
  • Clamp

Instructions:

Cut, a 1.5″ disk from a newly cut log. (I used a miter saw, but you could use a handsaw just as easily.)

The disk will become a support for the branch to give it more stability when it is loaded with jewelry.

Cut the large branch down with a handsaw or limb pruner. (I chose a 22″ tall section with a thick base.)

Select a drill bit that is the same diameter as the base of the branch.

Clamp the log disk onto a scrap piece of wood and drill a hole the width of the branch about 2/3 of the way through the disk. The point of the spade bit will hopefully poke through the bottom, but not the rest of the bit.

Branch Jewelry Holder

Test fit the branch. Make sure it can be seated far enough into the wood disk for stability.

Turn the branch and disk over to view the bottom of the disk. If you used a spade drill bit, hopefully that point came through slightly so you can find the center of your disk. Insert a small drill bit (slightly smaller than the width of the 2″ screw) into the hole. Drill a small hole through the bottom of the log disk and into the branch about 1/2 – 3/4″ (keep the branch inserted into the disk until you finish drilling.)

Use the same small drill bit to drill through the center of the base of the bamboo bowl (turn it upside down on your work surface.) Next choose a drill bit large enough to create a countersink hole for your screw head. I put a piece of tape to mark how deep I needed the countersink hole to go. Not too deep, you don’t want to go through the bowl, just deep enough for the head of the screw to sit inside.

Squeeze a small dollop of Gorilla Glue into the large hole in the disk and then insert the base of the branch. Let the glue harden for an hour.

Once the branch is firmly glued into the disk, turn it over and put some Gorilla Glue around the base of the disk and the center.

Set the disk and the branch into the bottom of the bowl.

Thread the 2 inch wood screw through the bottom of the bowl, through the disk and into the branch via the predrilled hole you made earlier. Gently tighten the screw until it fits snugly inside the countersink hole and the branch is secure.


If Mother Nature has not provided enough smaller branches on your holder (or you have way too much jewelry I do), you’ll want to add more branches to the holder. Cut some small branches off the unused tree limbs. Use a saw, pruners, or wire pliers (use whatcha got!)

Then match up a drill bit with the width of the littler branch. Drill a hole into a sturdy section of your branch. Add a small amount of Gorilla Glue and then press the small branch into the hole. Instant graft! (I have to admit, I felt like I was tampering with God’s creations here. Forgive me if I’ve committed a sin.)

Continue to check on your grafted branch to make sure it stays seated into the hole until the glue hardens.

Support your grafted branch onto other branches or prop it up to help keep it in position as it dries.

Continue to graft branches on as needed. I added about four new branches to mine. Can you see the fake ones?

Once the glue has dried, clean off any wood shavings and dirt.

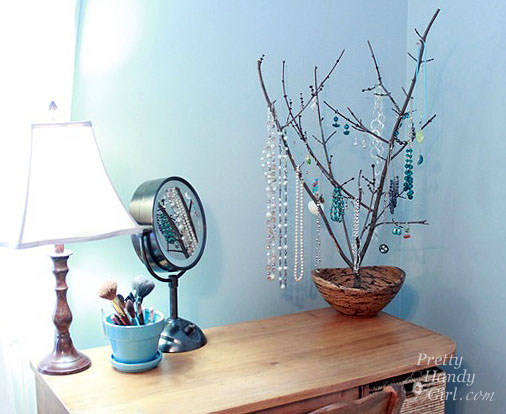
Store your bangles and bracelets in the bowl.

Earrings hang nicely on the small branches like little ornaments.

Then hang your necklaces on display! I’m really enjoying seeing these beauties in the morning.

Much better than the cramped and sagging heating grate:

One more after shot. A beautiful branch jewelry tree. Are your eyes starting to get dreamy too?

Valentines Day Wreath

When I saw this mirror frame Jaime from That’s My Letter made, I was instantly head over heels in love with the branch circles.

Valentines Day Wreath

Valentine’s Day Wreath

So much so, that every branch I passed by I would think, “Hmmm, I wonder what the disks on that branch would look like. It’s a sickness y’all.

So, this past weekend, I hauled in a bunch of branches and began to formulate a design for my Valentine’s Day Wreath that wasn’t overtly cutesy.

Valentines Day Wreath

I even called my neighbor to ask if I could have one of their logs from their woodpile. (Yes, I was coveting thy neighbor’s wood. Sheesh.)

I am thrilled with the final results. Although I had to engage in a few extra spray painting steps to get here, I’ll spare you the details. Let’s just say that no matter what color you paint thin wire, it just doesn’t show up on top of wood disks.

Valentines Day Wreath

Here is the tutorial y’all. Take it or leave it, but just be sure you ask before cutting down your neighbor’s cherry tree.

Valentine’s Day Wreath Materials:

(I’ve included affiliate links for your convenience. I earn a small percentage from a purchase using these links. There is no additional cost to you. You can read more about affiliate links here.)

Start by setting up a stop block by clamping a small piece of wood against the fence of your miter saw. (Or be prepared to be diligent about measuring every slice you cut. My slices are 1.5″ wide.) IMPORTANT: Wear your eye protection and hearing protection!

Valentines Day Wreath

Hold your branch against the fence and cut into the log. The larger logs cut fine, but the smaller branches and sticks tended to kick back all over the place, so be sure you stay on the right side of the saw and the slices are on the left. This way you’ll be out of the path of the flying disks. Cut, until you have a large collection of wood slices in a variety of sizes.

Valentines Day Wreath

It was at this point that I looked down and noticed this little worm squeezing out of the log!

Valentines Day Wreath

Ewwww. I rushed inside to research killing bugs in wood. I read you can either bake your wood in the oven at 175˚F – 200˚F for a few hours. Or microwave the wood for a minute. Being the perfectionist and neurotic termite-fearing person I am, I did both!

Valentines Day Wreath

After roastin’ and nukin’ those little buggers, you can lay out the slices onto the plywood in a heart shape.

Valentines Day Wreath

Trace roughly around the shape.

Valentines Day Wreath

As I said I’m a perfectionist, so feel free to skip this next step.

Fold a piece of scrap paper in half and cut out a half heart shape to give you a symmetrical heart shape. Trace around the template onto the plywood.

Valentines Day Wreath

Use a jigsaw or Dremel TRIO to cut out around the shape.

Sand the edges until they are no longer jagged.

Lay the scrap paper template back on top of the heart shaped plywood. Fold it in half. Drill a hole through the top of one of the sides of the heart (through paper and wood.) Open the template back up and mark where the hole is in the paper. Drill through the other side.

Valentines Day Wreath

Thread a length of ribbon through one hole. Tie a washer onto the end of the ribbon on the back side.

Valentines Day Wreath

Hang the heart up in your desired location. Adjust the length of the ribbon and then tie another washer onto the ribbon.

Valentines Day Wreath

Begin to lay the wood slices back onto the plywood and start gluing each one using Liquid Nails.

Valentines Day Wreath

It may take a little maneuvering and trials to get the slices to fit neatly within the heart shape. But, hey it wouldn’t be fun without a little trial and error.

Valentines Day Wreath

After your shape is filled, lay a folded towel, some scrap wood and heavy weights on top. Do a few bicep curls before setting them down, just because.

Valentines Day Wreath

While your wooden heart is drying, bend the word “Love” into the wire using needle-nosed pliers.

Valentines Day Wreath

Wrap white pipe cleaners around the word.

Valentines Day Wreath

Then wrap red pipe cleaners around leaving space so the white pipe cleaner shows through.

Valentines Day Wreath

Tie a bow at the top of the hanger ribbon. Thread another length of ribbon through the bow and secure it to the “L” and “e” in Love.

Valentines Day Wreath

Find a spot to hang your unique wreath.

Valentines Day Wreath

I wonder if I can put another word on there for St. Patrick’s Day? Maybe “Luck” with some green ribbon.

 Valentines Day Wreath

Valentines Day Wreath

Valentines Day Wreath