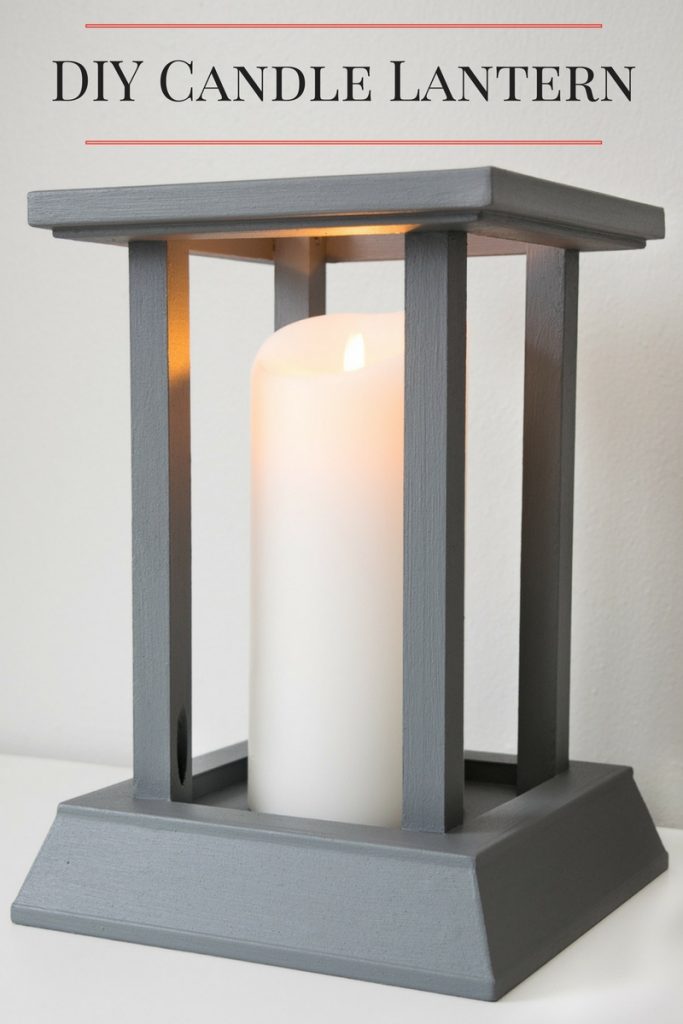
My candle lantern and fireplace mantel are made with the same trim!

This DIY candle lantern was easy to make with leftover trim!

Hi there, Pretty Handy Girl readers! I’m Vineta from The Handyman’s Daughter, and I’m back with another awesome project to share with you. When I cleaned up my disaster of a workshop last month, I unearthed a few scraps of trim left over from my fireplace remodel. I couldn’t bear to get rid of these beautiful pieces. Instead, I decided to turn them into a candle lantern that will coordinate perfectly with our new fireplace!

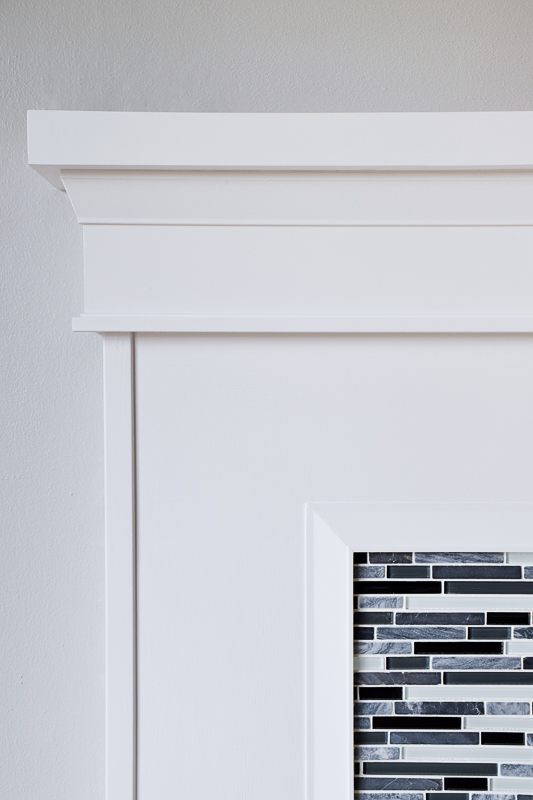
This particular type of trim is called an architrave, and it is typically installed on top of windows and doors for a bold architectural statement. But it worked perfectly under my narrow mantel! You can see all the details of the trim I used in my fireplace remodel here.

This architrave trim fit perfectly under our fireplace mantel, and the scraps will be turned into a DIY candle lantern.

Materials:

(I’ve included affiliate links for your convenience. I earn a small percentage from a purchase using these links. There is no additional cost to you. You can read more about affiliate links here.)

Instructions:

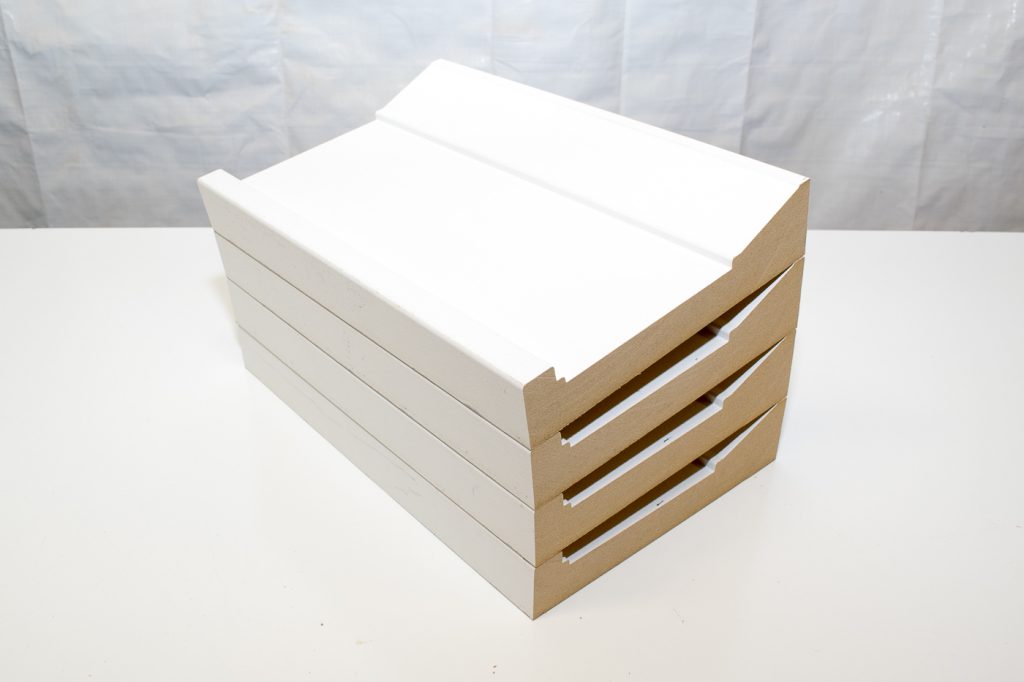
Start by cutting your trim down into manageable pieces. (Mine are about 10 inches long.)

Cut the trim for your candle lantern down to a manageable size.

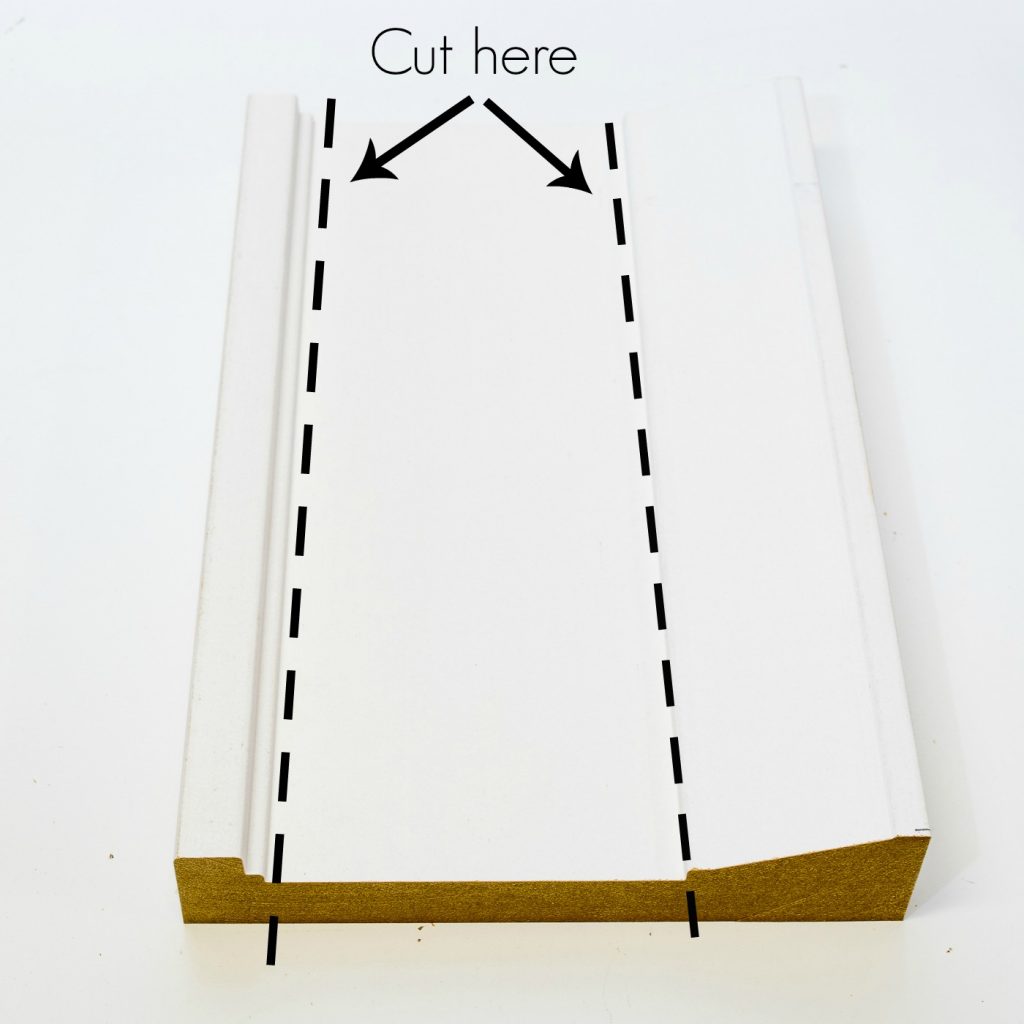
Then cut it into three separate parts as shown below.

Cut the trim for your candle lantern into separate parts.

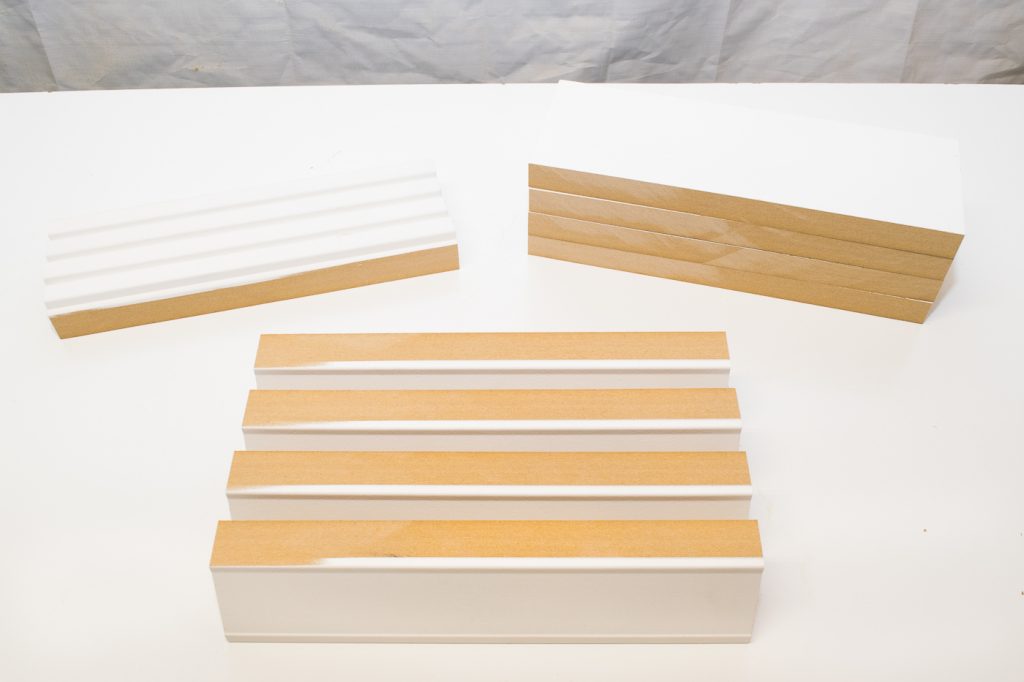
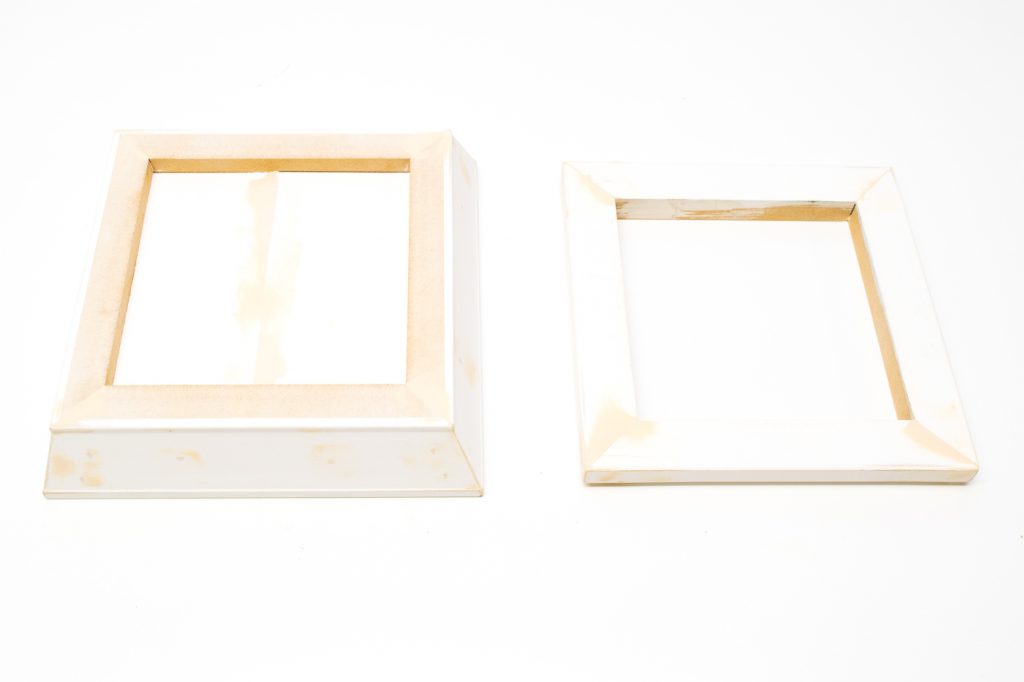
The angled piece will become the base, the square piece will be the top, and the flat middle will fill in the bottom. Alternatively, you could use baseboard or crown moulding for the base, smaller trim for the top, and scrap wood for the bottom. Play around with different combinations in the trim aisle of the home improvement store until you find one you like!

These are the pieces you will need to form the base and top of the candle lantern.

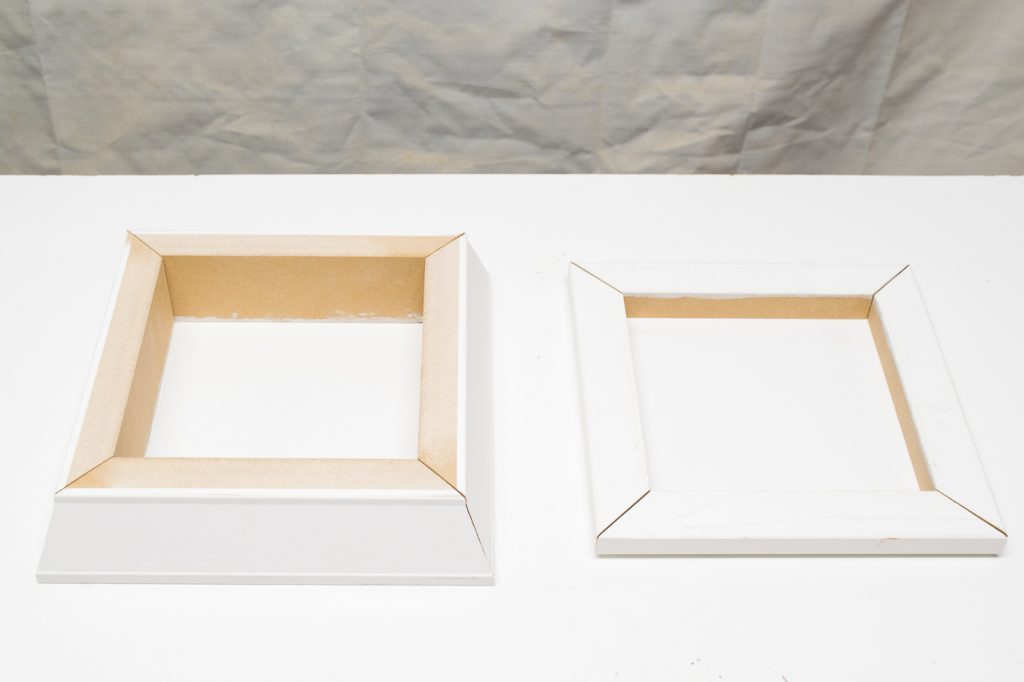
Miter the corners of the base and top pieces to create two frames. The interior dimensions of my lantern are 6″ square.

Miter the corners of your base and top pieces to create two squares.

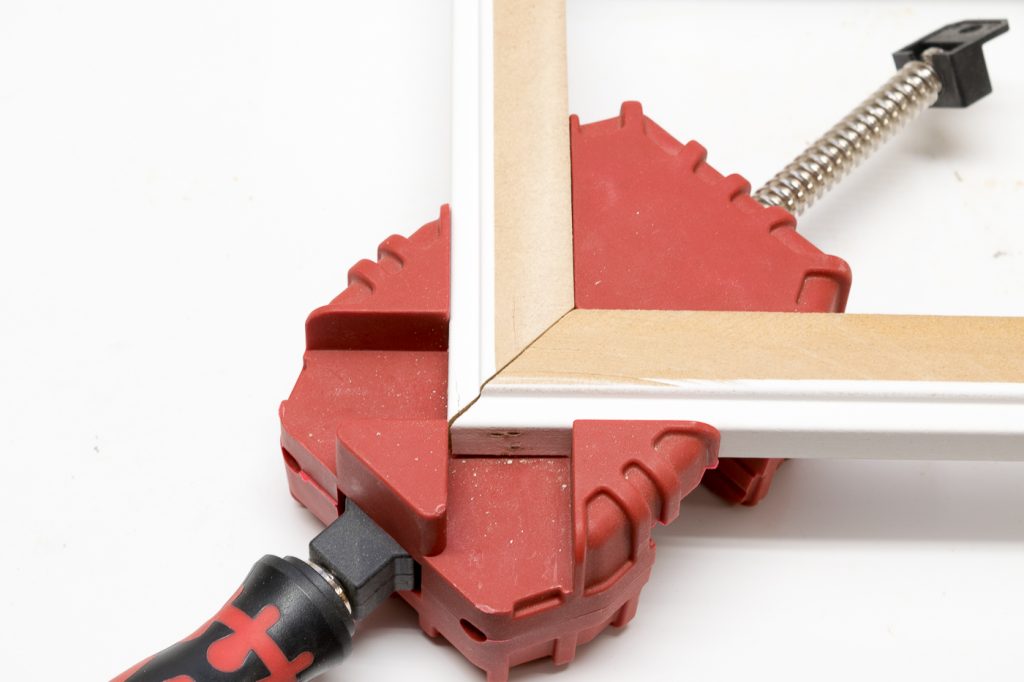
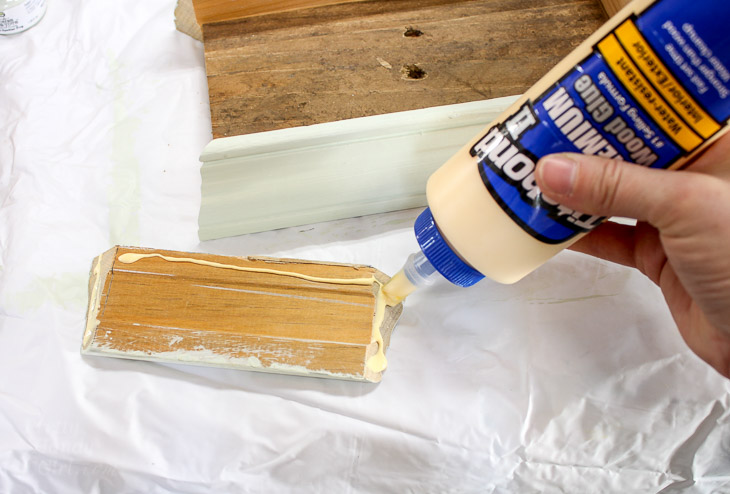
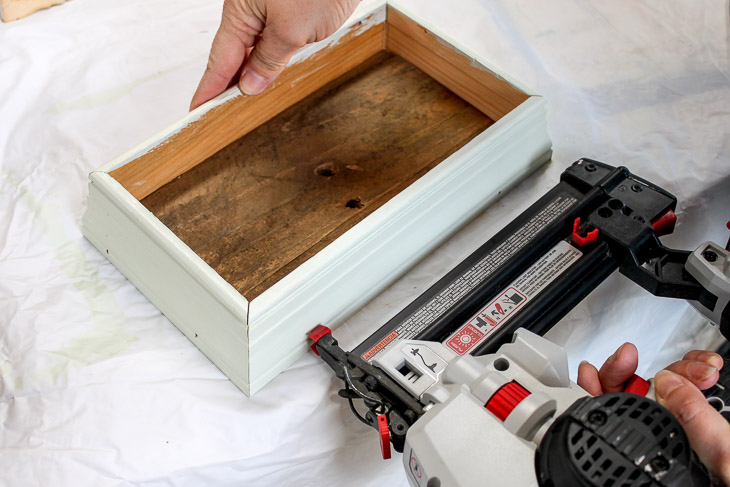
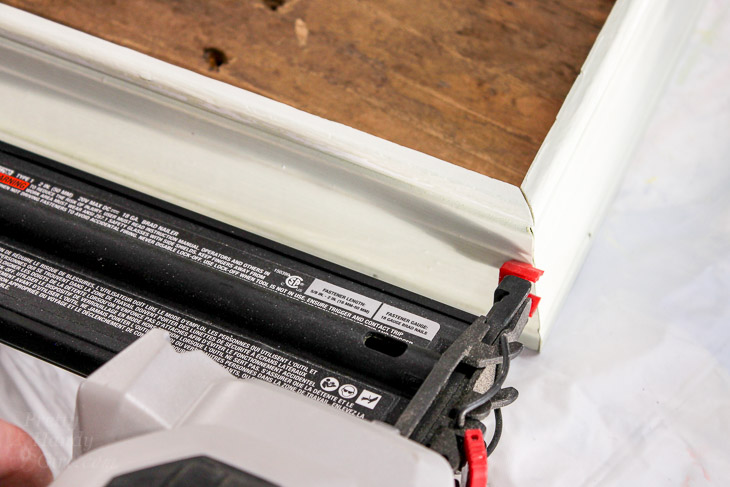
Apply wood glue to the corners, then nail each one together. The thick base was easy to handle, but the thinner top pieces were a little squirrely. I used a corner clamp to hold everything in place while I wielded the nail gun. Don’t worry if there’s a gap in the corners. We’ll patch everything up later.

A corner clamp made it easier to hold the miter in place when using the nail gun.

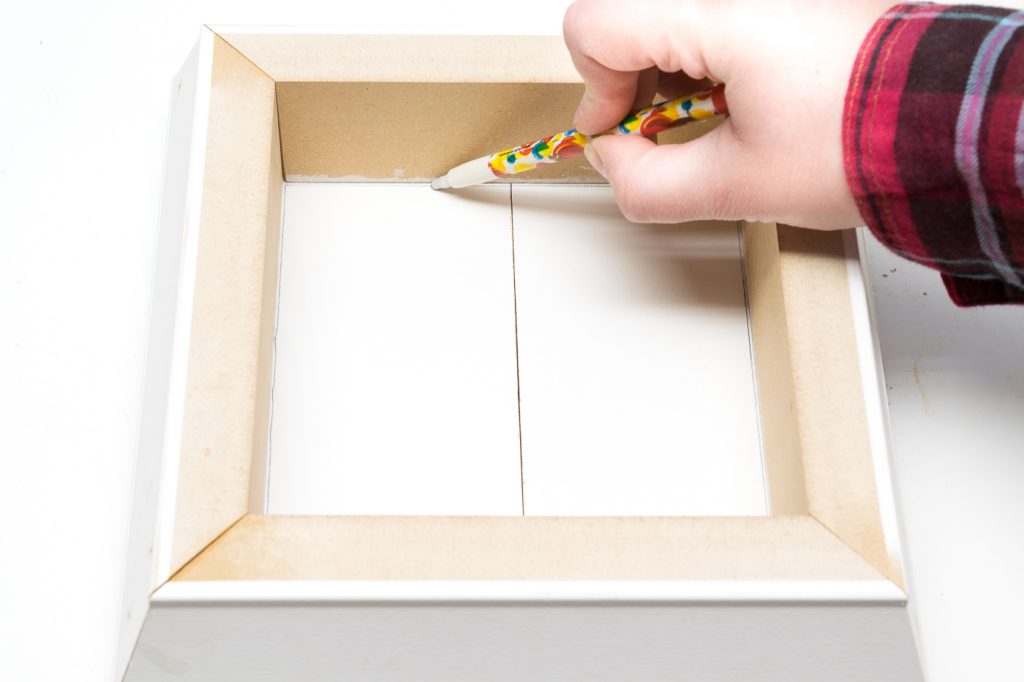
Using your base square as a guide, mark the bottom pieces and cut them to fit inside. I used the flat part of my trim for this, but plywood or scrap wood would work as well. Keep in mind how high you want your candle to sit inside the lantern when working on this step.

Mark the bottom of your candle lantern and cut to fit.

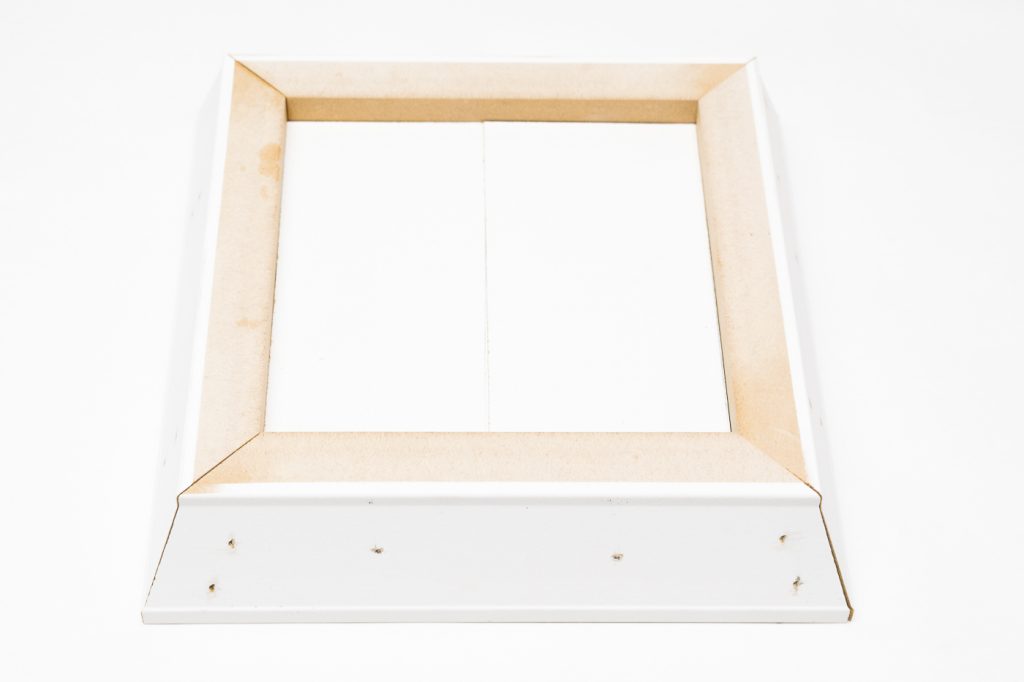
Nail through the sides to hold the base flat pieces in place.

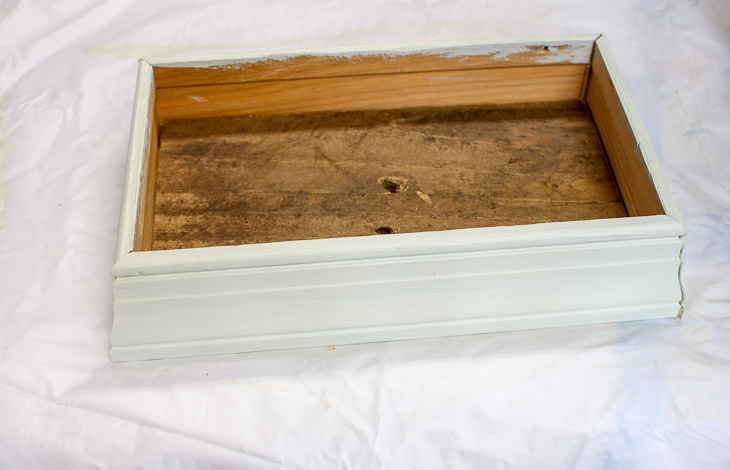
Your candle lantern bottom should look like this.

Fill any holes or gaps with wood filler. Allow it to dry, then sand the surface smooth. When the candle lantern is painted, all those imperfections will disappear.

Adding wood filler to the gaps and holes in the candle lantern will let all the imperfections disappear when it is painted.

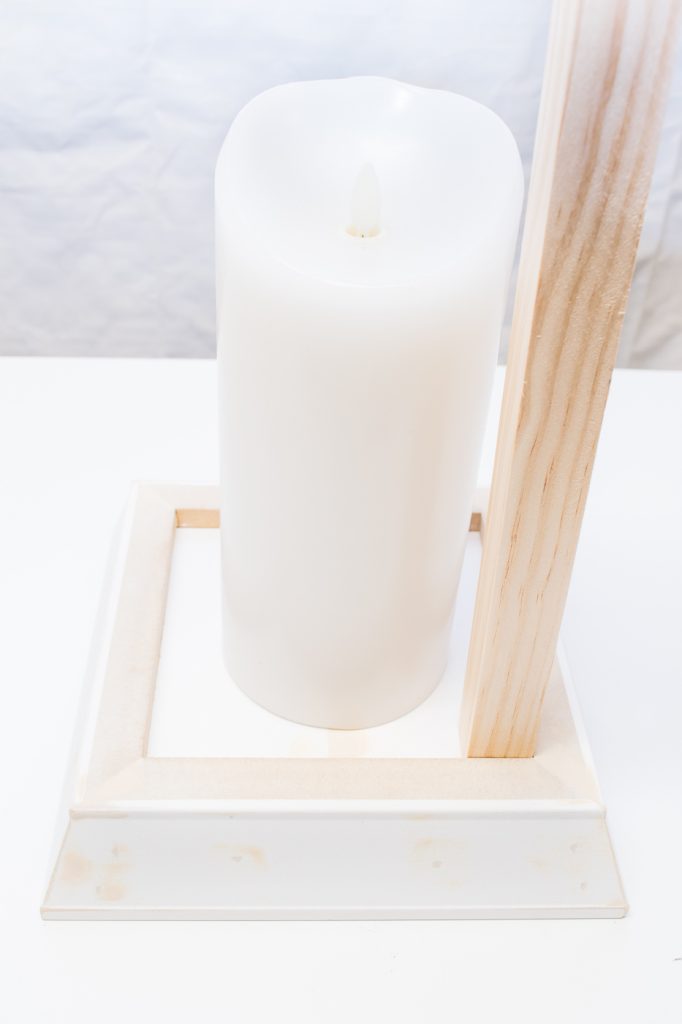
If you have a particular candle you want to use, now is the time to test it out. Place it in the middle of the base, then determine how tall you want the pillars to be. Mine are about 2 inches taller than the top of the candle. Cut 4 square dowels to that measurement.

Use your square dowel to eyeball how tall you want your candle lantern to be.

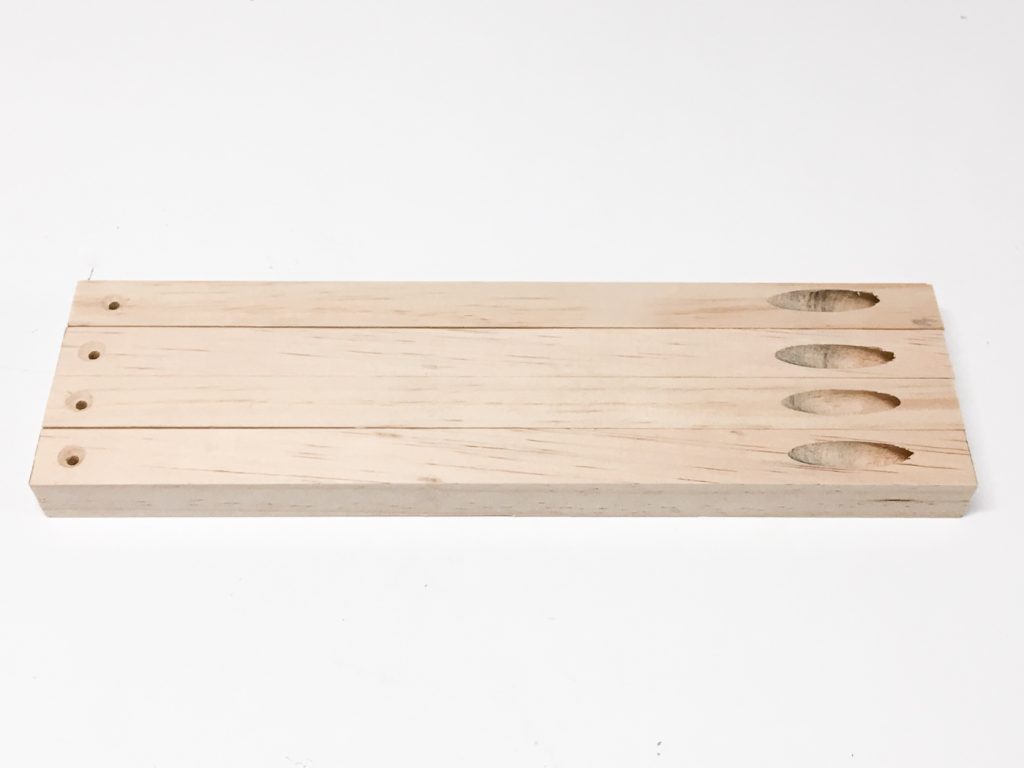
Predrill a hole in one end of each dowel with a countersink bit, and a pocket hole in the other end.

Predrill countersink holes and pocket holes in your dowels for the candle lantern supports.

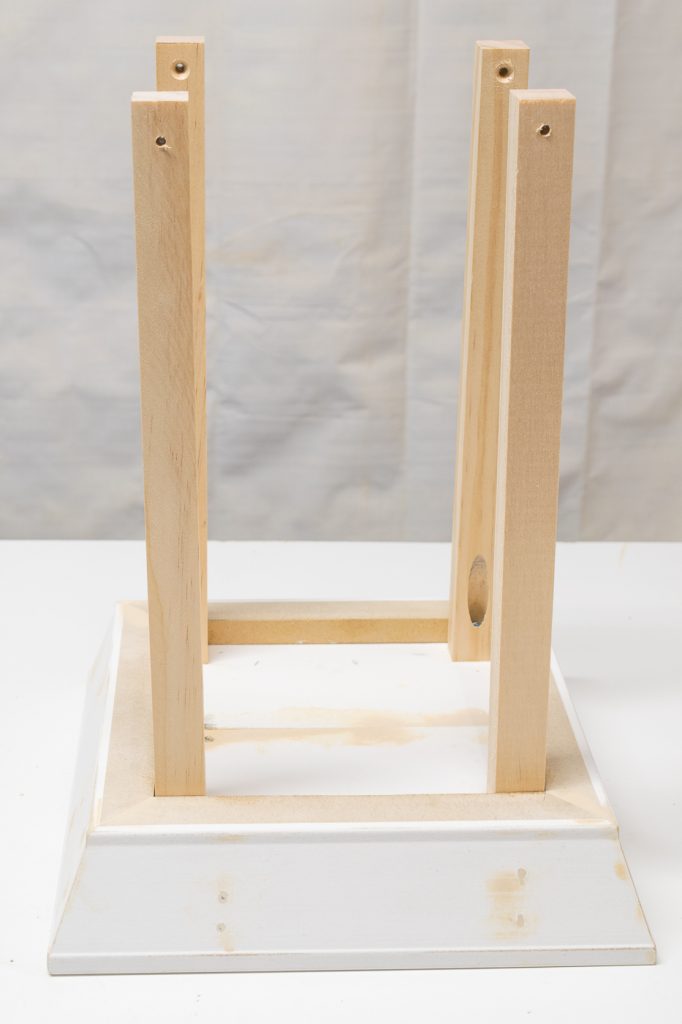
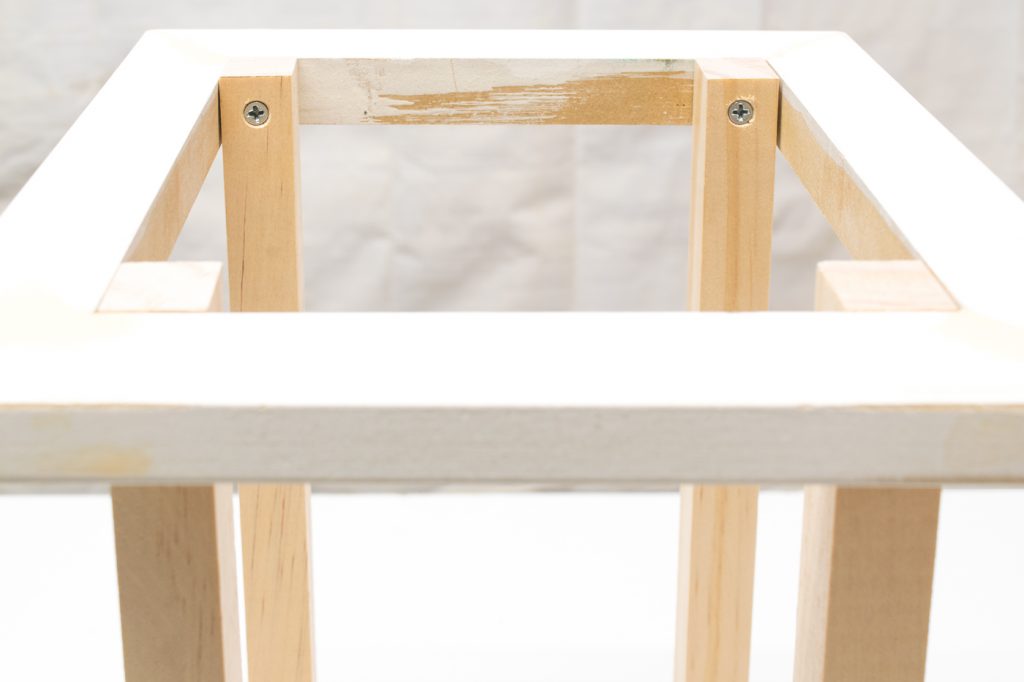
Attach the pillars to the base with 1 1/4″ pocket hole screws. I arranged mine with the pocket holes facing each other, but in retrospect I wish I had them all facing the back so the holes were hidden from view.

Attach the pillars to the base of the candle lantern with 1 1/4" pocket hole screws.

Attach the top frame to the top of the pillars with screws. Make sure the tops of the pillars are flush with the top edge of the frame.

Attach the top frame to the pillars of the candle lantern.

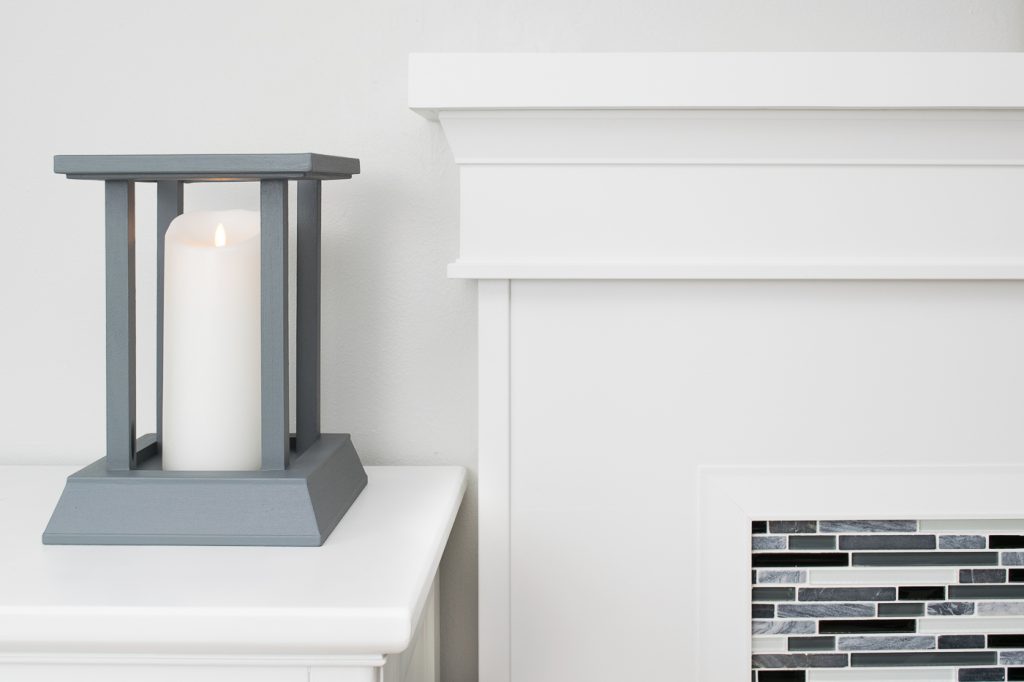
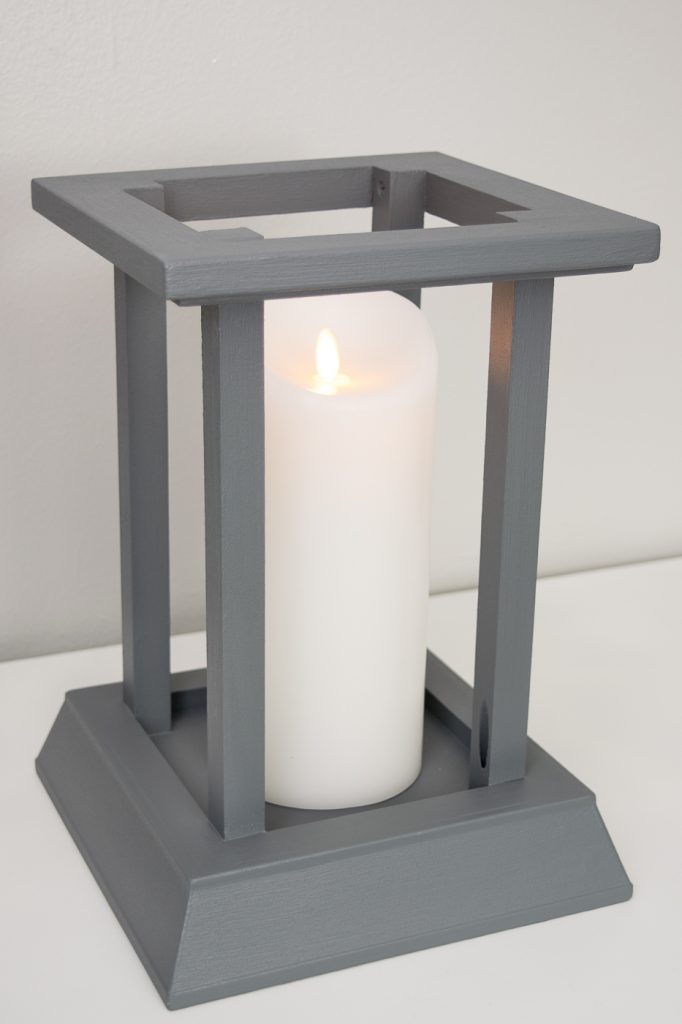
Now your candle sconce is ready for paint! Primer helps cover up the wood filler. I used some leftover chalk mix paint from my bread box makeover, and it goes perfectly with the dark gray tile of my fireplace. Even side by side, it’s hard to tell that I used the same trim for both!

My candle lantern and fireplace mantel are made with the same trim!

This candle lantern is easy to make using leftover trim from my fireplace makeover!

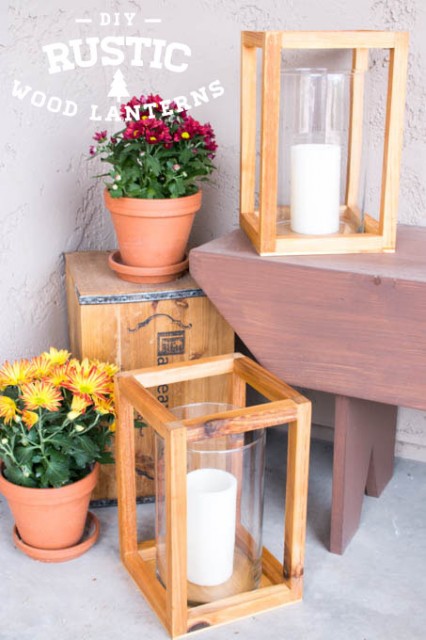
Is your style a little more rustic? Katie has you covered with this stained wood version lantern!

If your style is more rustic, these candle lanterns might be perfect for your decor!

I hope you’ve enjoyed this month’s tutorial! For more great DIY ideas, check out my blog at The Handyman’s Daughter. Until next time!

~ view more of Vineta’s projects ~

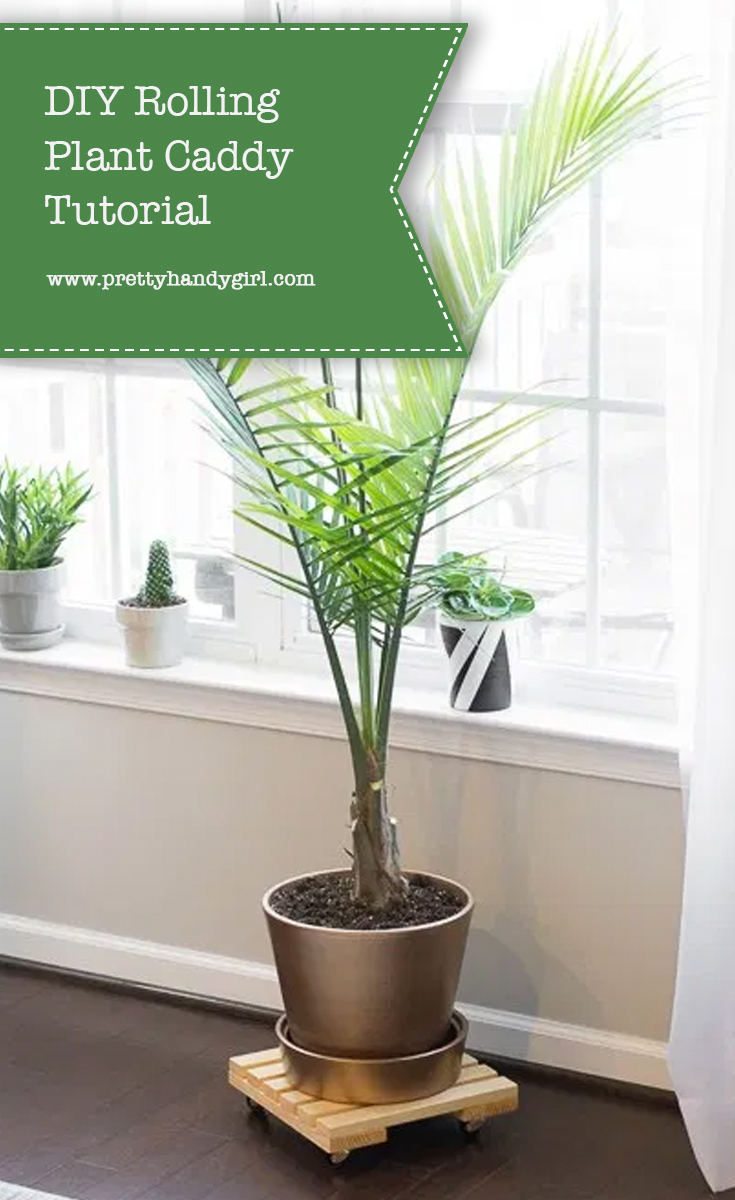
DIY Rolling Plant Caddy by Brittany Goldwyn-1

DIY Rolling Plant Caddy by Brittany Goldwyn-1

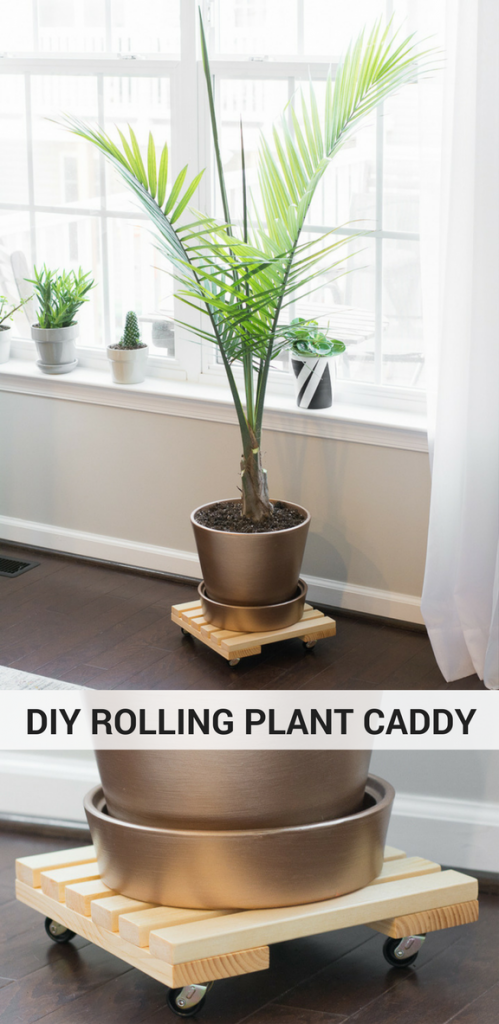
Hello everyone! I’m Brittany from by Brittany Goldwyn, and I’m back to bring you another easy and stylish tutorial! Last month I shared a tutorial on how to frame out a mirror using wood. This month I’m working with wood again to build a plant caddy.

One look at my Instagram feed and you’ll see that we probably have too many plants for our house, but plants make me happy, and I find that they are just the easiest way to decorate without spending a ton of money. We have quite a few big plants and moving them can be a beast. That’s where a rolling plant caddy comes in handy. Luckily, they are pretty easy to make. I made mine out of scrap wood that was left over from previous projects. I hate letting things go to waste, so I love a good scrap wood project!

If you’d like to learn how to make a rolling plant caddy, read on.

Materials

(I’ve included affiliate links for your convenience. I earn a small percentage from a purchase using these links. There is no additional cost to you. You can read more about affiliate links here.)

Lumber:

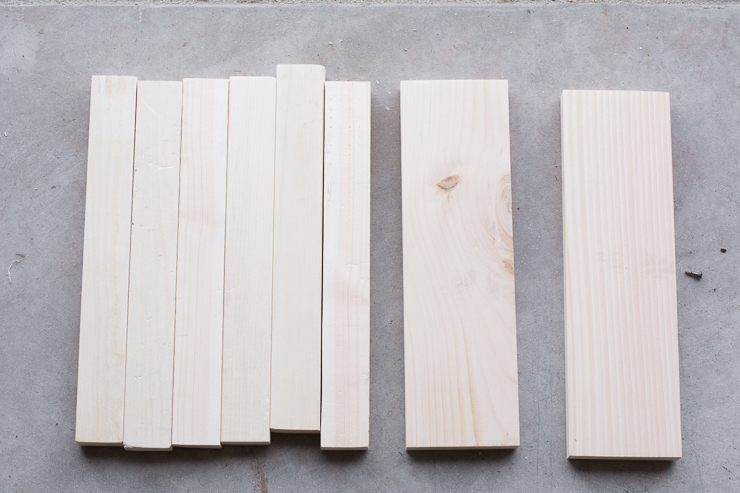
  • (6) 1×2 pieces cut to 12 inches each
  • (2) 1×4 pieces cut to 12 inches each

Tools and hardware:

Other:

Instructions:

Step 1: Cut and polish your pieces.

Use your saw to cut (8) pieces of lumber: (6) pieces of 1″ x 2″ cut to 12 inches each and (2) pieces of 1″ x 4″ cut to 12 inches each. I used pine for my plant caddy, but you can use any type of lumber you like. Cedar would be a good option if you plan to use your plant caddy outdoors.

DIY Rolling Plant Caddy by Brittany Goldwyn-1

Use medium or fine grit sandpaper to smooth out any rough edges on your pieces. Give each piece a good sanding to ensure it is polished.

Step 2: Stain the wood.

I have a lot of unfinished pine furniture and decor in my house, so I chose Minwax “Natural” stain. Feel free to choose the stain color you like. (For great instructions on how to stain and finish wood, check out this detailed post.)

Step 3: Assemble the caddy.

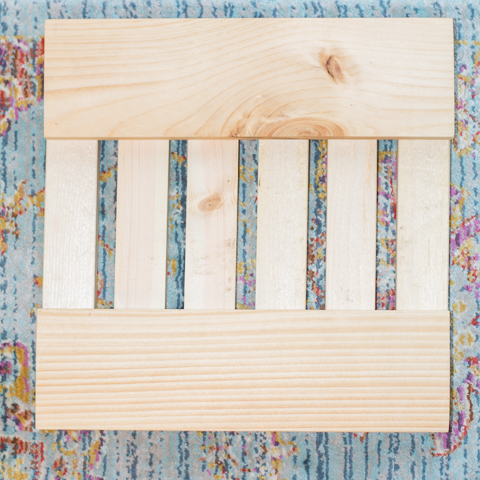
Once the pieces are dry, use wood glue to glue the 1″ x 2″ pieces to the 1″ x 4″ pieces as shown below.

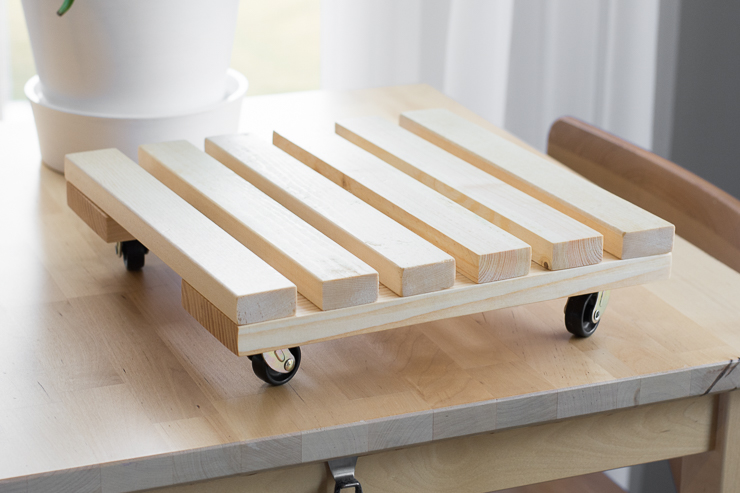
View of the top:

DIY Rolling Plant Caddy by Brittany Goldwyn-1

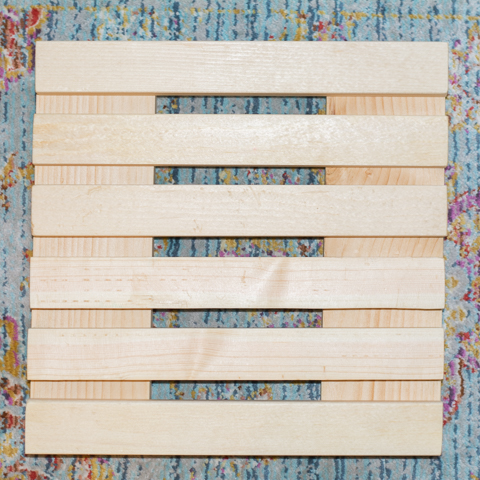
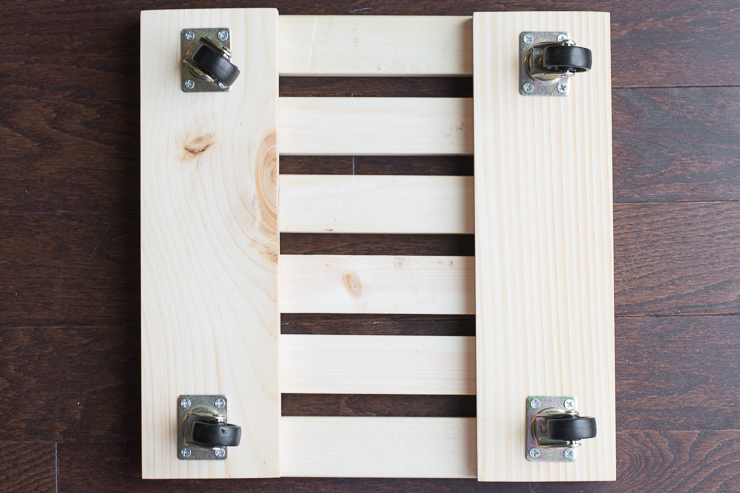
View of the bottom (the side you’ll attach the caster wheels to):

DIY Rolling Plant Caddy by Brittany Goldwyn-1

Add just a bit of glue for the side of each piece. Don’t use too much glue, or it will ooze out the sides when you assemble the caddy. Allow the glue to dry completely.

Step 4: Attach caster wheels. 

Flip the caddy over and screw a caster wheel in each corner. Make sure to buy caster wheels that are graded for the weight you’ll need. (I used (4) casters rated at 20 lbs each.)

DIY Rolling Plant Caddy by Brittany Goldwyn-1

Step 5: Finish with polyurethane spray.

Use Minwax polyurethane spray to finish off the caddy and protect the wood from any water spills. This is actually my first time using an aerosol can of polyurethane, it’s much easier than brushing on the polyurethane and worrying about getting into the nooks and crannies of the caddy.

You can see the bit of added sheen in this photo:

DIY Rolling Plant Caddy by Brittany Goldwyn-1

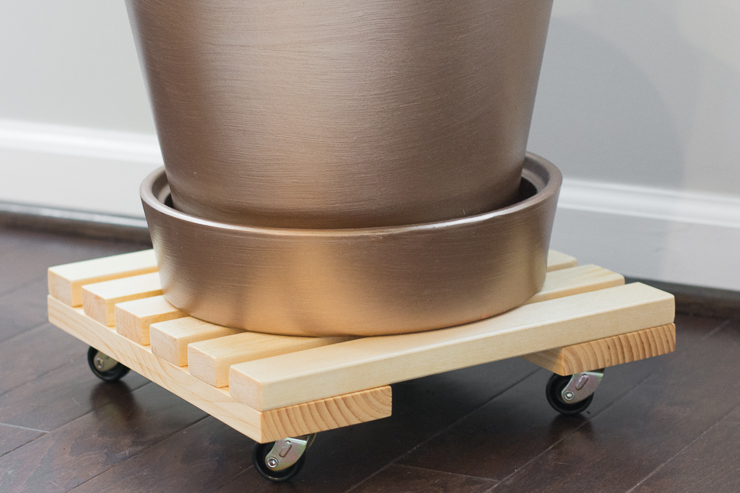
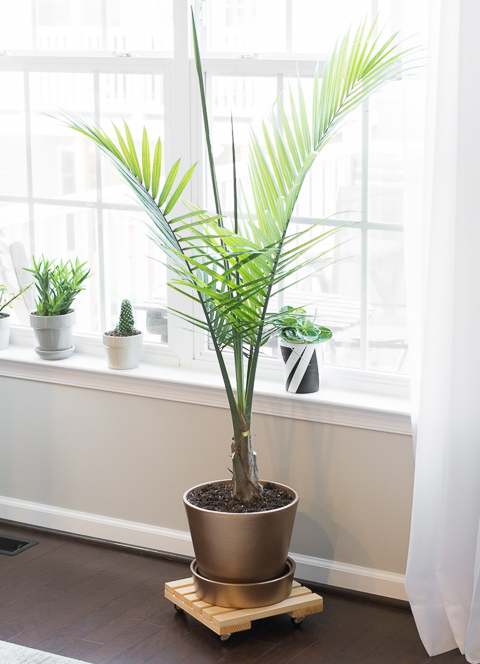
After the polyurethane is completely dry, place your plant on the caddy and enjoy being able to move your plant easily!

DIY Rolling Plant Caddy by Brittany Goldwyn-1

DIY Rolling Plant Caddy by Brittany Goldwyn-1

If you liked this project, you might like my tree stump side table, my indoor succulent care tips, my teacup planters, and my hanging indoor garden! I’ll see you next month but in the meantime, you can always visit  me on my blog to see what I’m up to. Until next time!

Read More of Brittany Goldwyn’s Tutorials ~


Pin for later!

DIY Rolling Plant Caddy Tutorial | Pretty Handy Girl

Plans to Build a School Lost & Found Center | Pretty Handy Girl

Plans to Build a School Lost & Found Center | Pretty Handy Girl

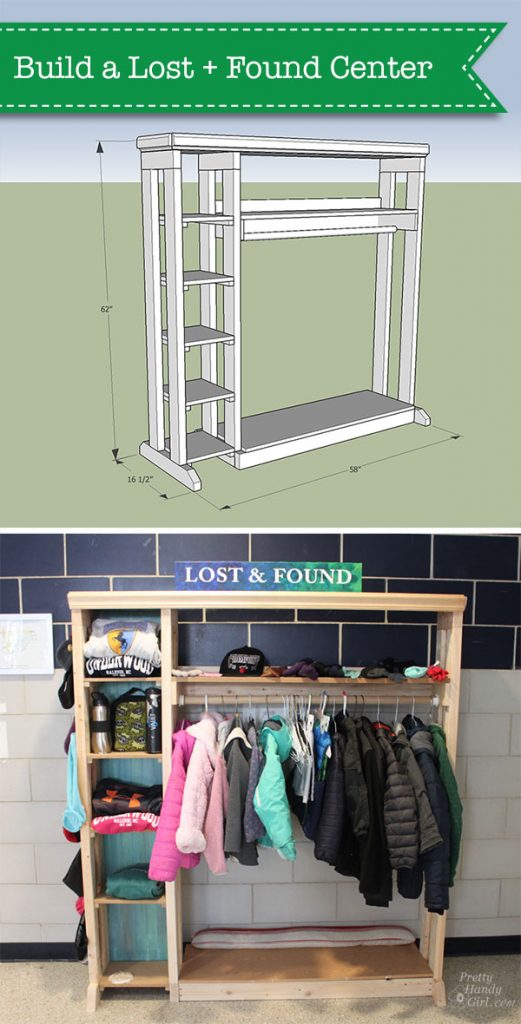
Lost & Found Centers are overlooked spots in schools. The “center” at my sons’ school used to be a folding table that was heaped with mounds of clothing hopelessly separated from their owners. I took on the task of organizing this “center” at my sons’ school once a week. I’d spend a good 20 minutes folding and laying the items out so that they could be seen and hopefully recognized. Unfortunately the children would start picking up items and soon the table would be a jumbled mess again. I knew there had to be a better way to organize the Lost & Found Center and make it easier for the kids to find their items. My dream was a spot that would organize itself.

With this in mind, I created a plan that would accommodate all the jackets, hats, gloves, scarves and other random items that made their way to the lost & found. The best part of my plan was I could use a variety of scrap wood I had laying around in my garage plus some long 1″ x 10″ boards reclaimed from my in-law’s old platform bed. (I’m the frequent recipient of “good wood” from old furniture and shelving.)
Plans to Build a School Lost & Found Center | Pretty Handy Girl

If you have ties to a school (especially an elementary school) and have a little time, consider making a Lost & Found center for them. You will be their hero . . . trust me! 😉

Let’s learn How to Build a Lost & Found Center, shall we?

Materials:

(I’ve included affiliate links for your convenience. I earn a small percentage from a purchase using these links. There is no additional cost to you. You can read more about affiliate links here.)

Optional: 

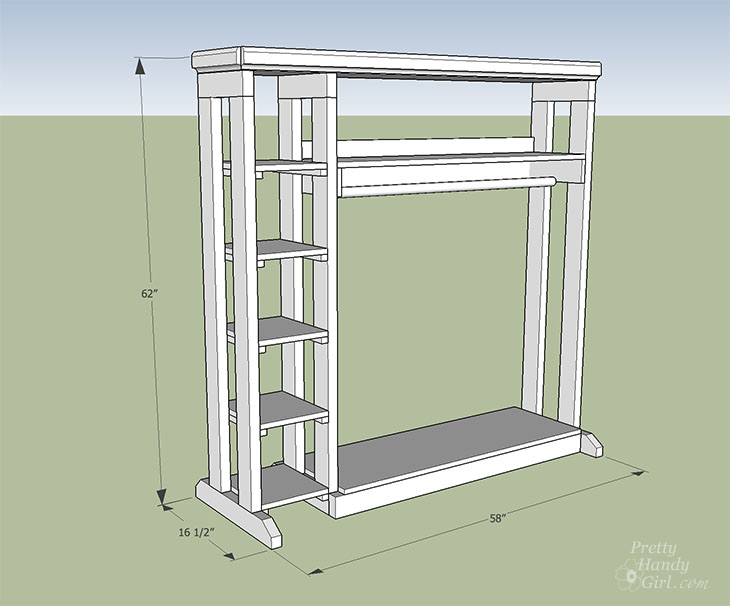
Cut List:

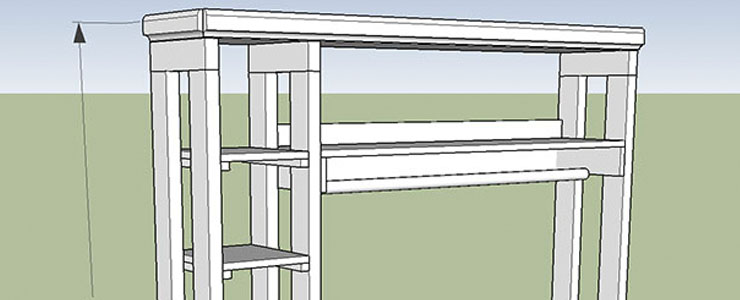
*Please note: I did my best to rebuild the Lost & Found center in Sketch Up. This center was built visually by measuring sides and shelves against each other. Therefore, I ask that you please double check your cuts and my math. I welcome any comments if you find errors. Thanks!

  • 4 – 2″ x 4″ x 10″
  • 2 – 2″ x 4″ x 16 ½” (cut a 45 degree angle off each end to taper the feet)
  • 6 – 2″ x 4″ x 53″
  • 2 – 2″ x 4″ x 45″
  • 10 – 1″ x 1″ x 10″
  • 2 – 1″ x 3″ x 9 ¾”
  • 2 – 1″ x 3″ x 43 ½”
  • 5 – 1″ x 10″ x 12″
  • 1 – 1″ x 10″ x 43 ½”
  • 1 – 1″ x 13″ x 43 ½”
  • 1 – 1″ x 10″ x 58″
  • 1 – 1/4″ x 12″ x 56 ½”

Instructions:

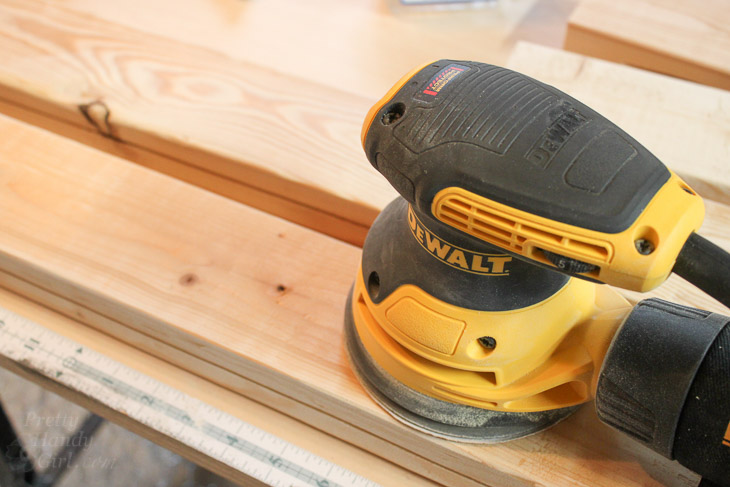
Cut all lumber according to cut list above. Sand all pieces to remove any rough spots or splinters.
Plans to Build a School Lost & Found Center | Pretty Handy Girl

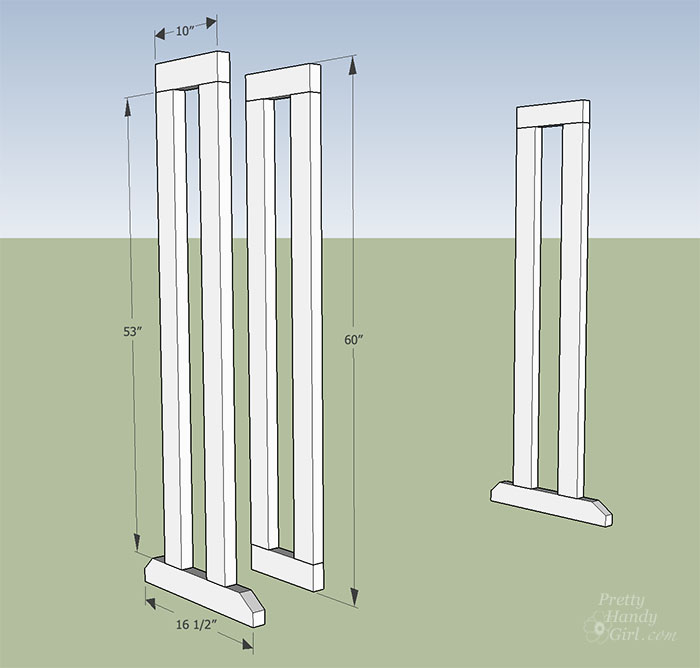
Lay out the 2″ x 4″ pieces to created the vertical supports as shown below.
Plans to Build a School Lost & Found Center | Pretty Handy Girl

Chicken Wire Side Construction:

If you decide not to use chicken wire on your sides, skip to the next section. You don’t “need” the chicken wire, but it is nice for clipping small items to or to stuff mittens in the holes. Alternatively you can add hooks or clips to the sides for those smaller items.

This is optional, but if you want to use chicken wire in the end pieces, use a table saw to rip a 1/2″ deep groove into one side of four of the 2″ x 4″ x 53″ boards and four of the 2″ x 4″ x 10″ boards.

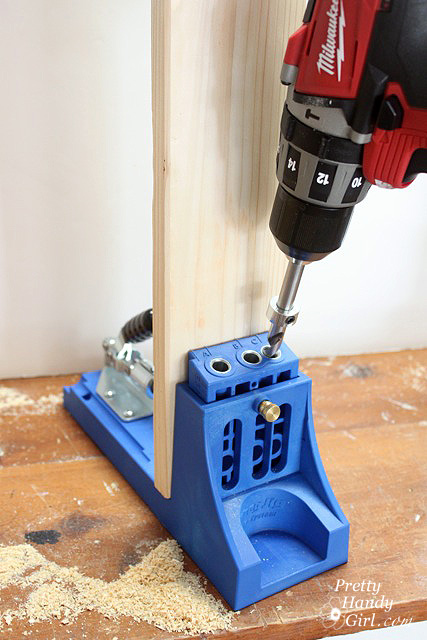
Then drill pocket holes, using a Kreg Jig, into both ends of your 2″ x 4″ x 53″ boards. Never used a Kreg Jig? Here’s a simple tutorial.
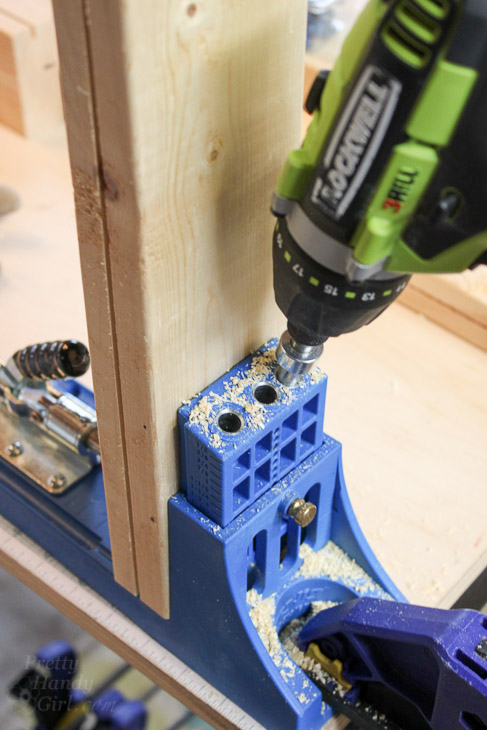
Plans to Build a School Lost & Found Center | Pretty Handy Girl

Attach one 2″ x 4″ x 16½” (bottom foot) to one 2″ x 4″ x 53″ (side) using 2½” pocket hole screws. Clamping the joint before you secure the screws will help keep the boards from shifting.
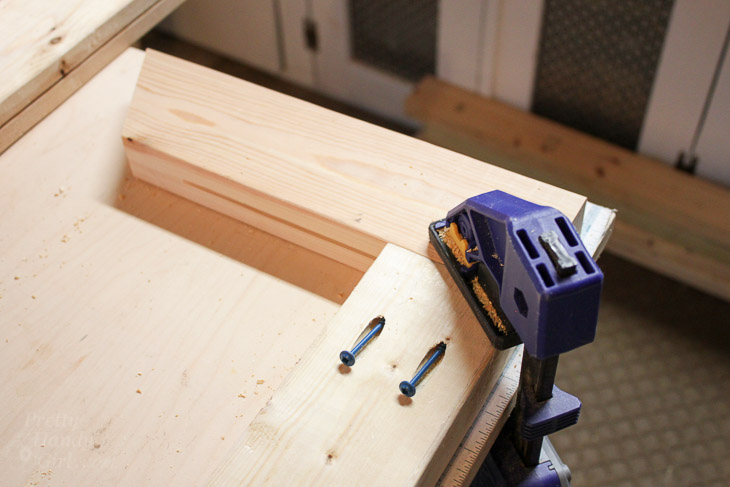
Plans to Build a School Lost & Found Center | Pretty Handy Girl

Cut chicken wire to fit into the vertical support frame (allow an extra 1/2 inch all the way around to recess into the grooves.) Fit chicken wire into the foot and side of the vertical support you assembled.
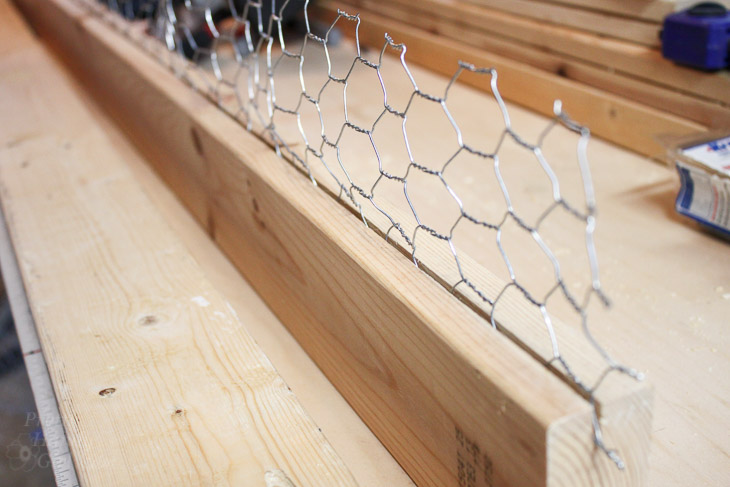
Plans to Build a School Lost & Found Center | Pretty Handy Girl

Attach the 2″ x 4″ x 10″ (top) using two more pocket hole screws.
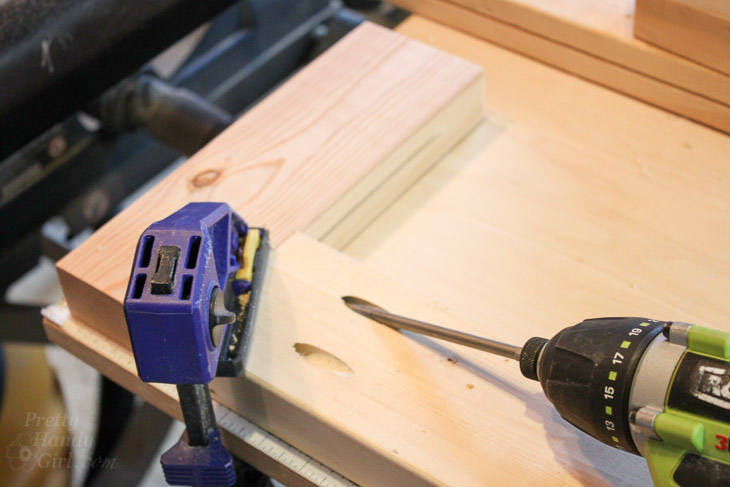
Plans to Build a School Lost & Found Center | Pretty Handy Girl

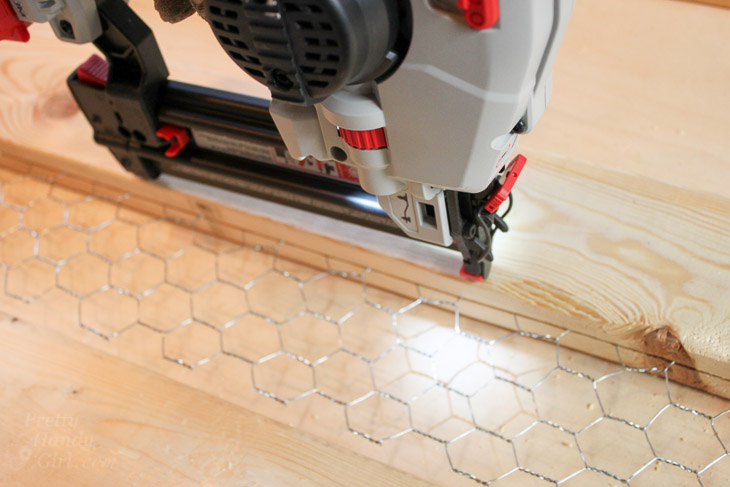
Secure the chicken wire by driving 1 ¼” finish nails into the sides to prevent the chicken wire from sliding out of the groove.
Plans to Build a School Lost & Found Center | Pretty Handy Girl

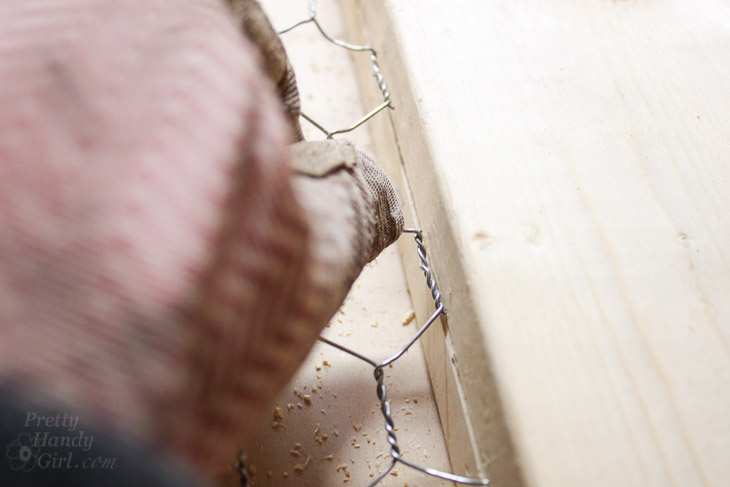
Carefully feed the chicken wire into the grooves on the remaining 2″ x 4″ x 53″ side.
Plans to Build a School Lost & Found Center | Pretty Handy Girl

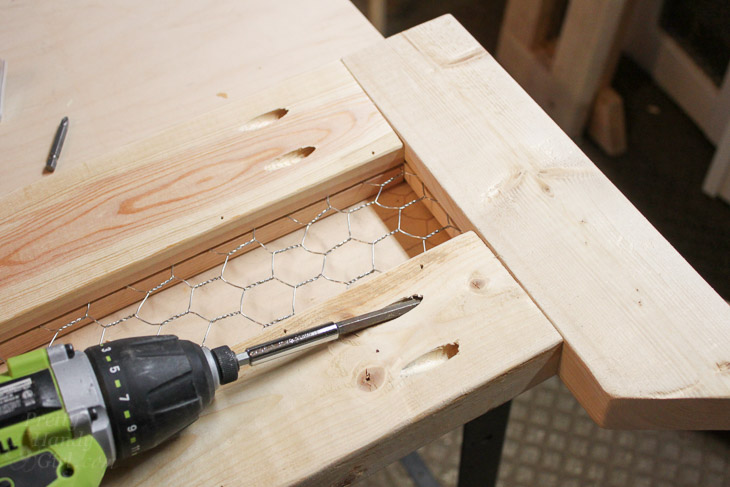
Secure the other side with pocket hole screws.  Finish the vertical support by nailing more 1 ¼” finish nails through the chicken wire on the other side.
Plans to Build a School Lost & Found Center | Pretty Handy Girl

That completes one vertical end support. Repeat for the other side. The next step, you will only be assembling the center vertical support.

Assembling the Vertical Supports:

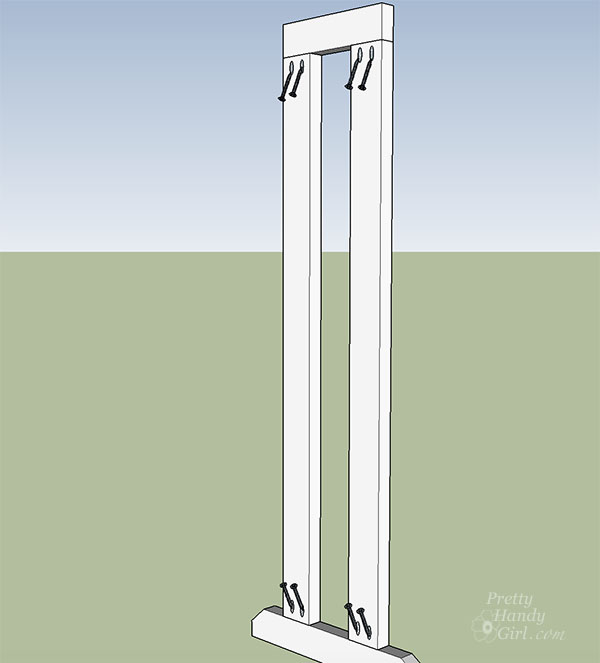
Attach two 2″ x 4″ x 53″ (sides) to one 2″ x 4″ x 16 ½” (foot) and one 2″ x 4″ x 10″ (top) with pocket hole screws as shown below.
Plans to Build a School Lost & Found Center | Pretty Handy Girl

Assemble the other vertical support and assemble the center vertical support (which has two 2″ x 4″ x 10″ pieces for top and bottom and no angled foot piece.)

Shelf Tower Construction:

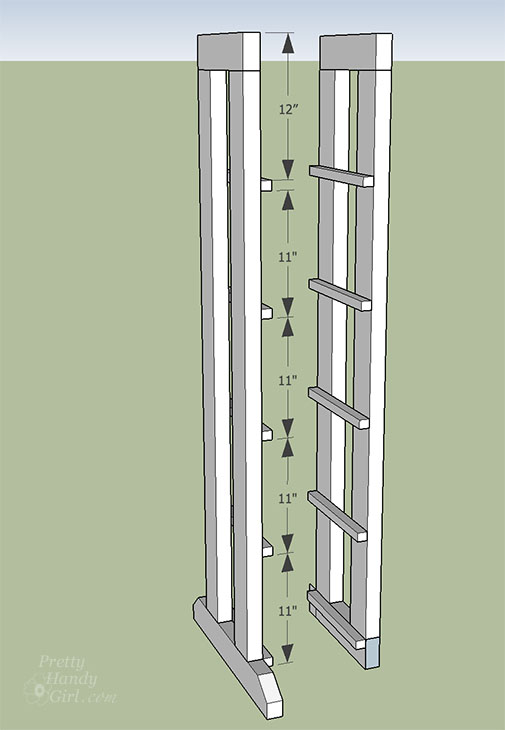
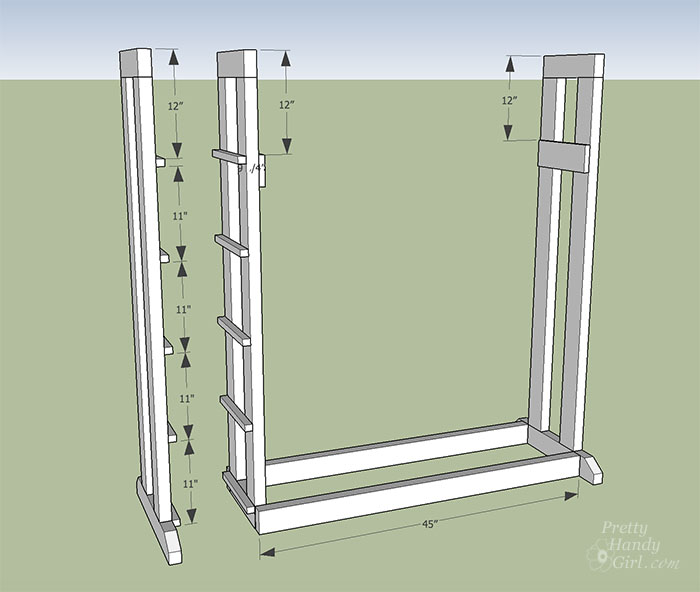
Lay the left vertical side support and the center vertical support side-by-side and mark the shelf locations as shown here:
Plans to Build a School Lost & Found Center | Pretty Handy Girl

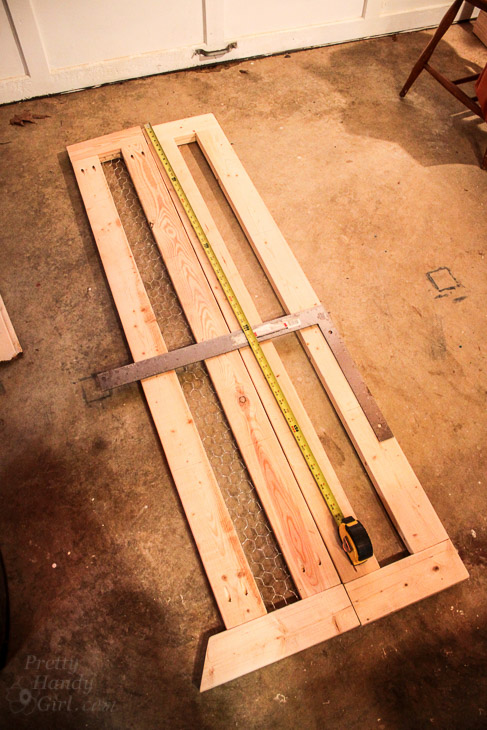
Note that the shelf supports are 11″ apart except for the top support which is located 12″ from the top. Transfer measurements onto both vertical supports as shown below:
Plans to Build a School Lost & Found Center | Pretty Handy Girl

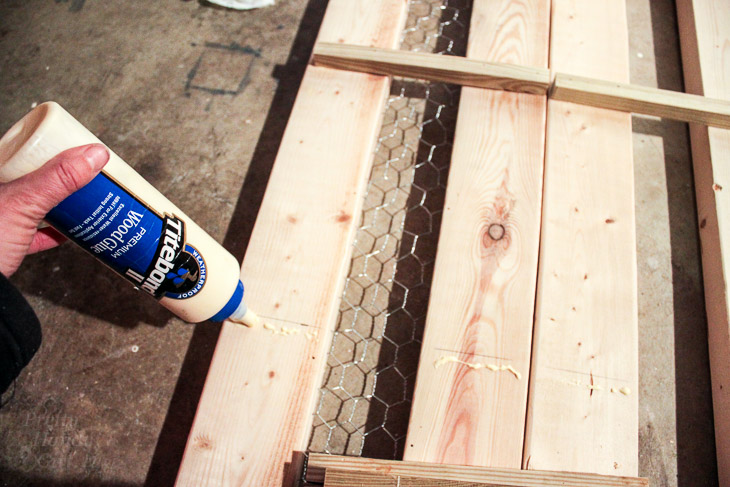
Attach 1″ x 1″ x 10″ supports with wood glue and . . .
Plans to Build a School Lost & Found Center | Pretty Handy Girl

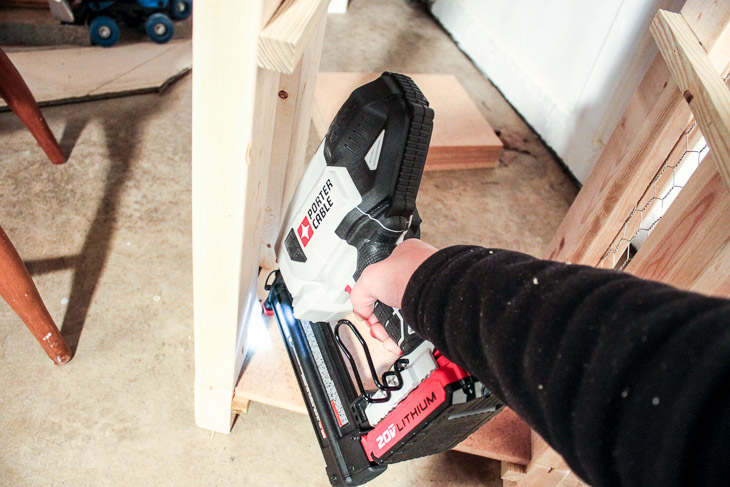
. . . secure with finish nails.

Plans to Build a School Lost & Found Center | Pretty Handy Girl

Starting from the bottom. Set each 1″ x 10″ x 12″ shelf on top of the supports and secure with more finish nails.
Plans to Build a School Lost & Found Center | Pretty Handy Girl

Work your way up the shelf tower adding one shelf at a time.
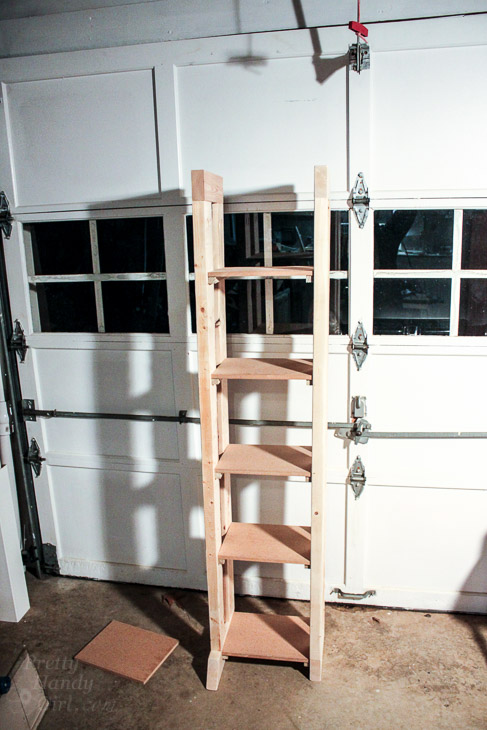
Plans to Build a School Lost & Found Center | Pretty Handy Girl

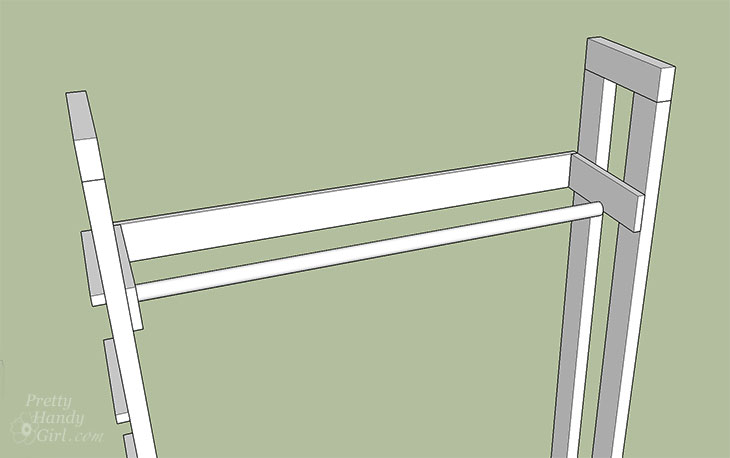
Assemble Closet Rod Supports:

Attach the two 1″ x 3″ x 9 3/4″ blocks to the center support and remaining right side support using 2″ wood screws.
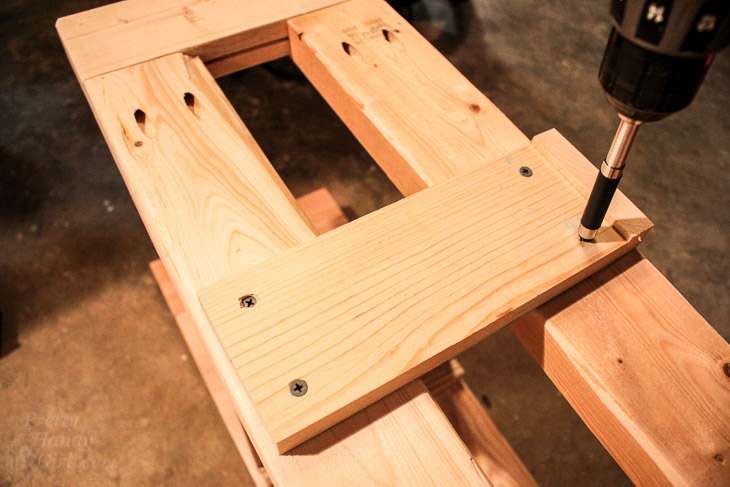
Plans to Build a School Lost & Found Center | Pretty Handy Girl

The blocks should be positioned 12″ from the top and inset 3/4″ from the back:
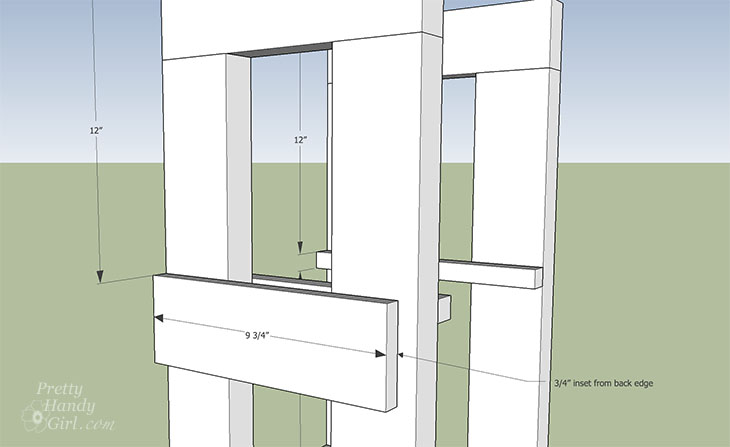
Plans to Build a School Lost & Found Center | Pretty Handy Girl

Attach the closet rod brackets to the lower center of the 1″ x 3″ x 9 3/4″ blocks (line them up toward the bottom edge to allow hangers enough room to be lifted and removed.)
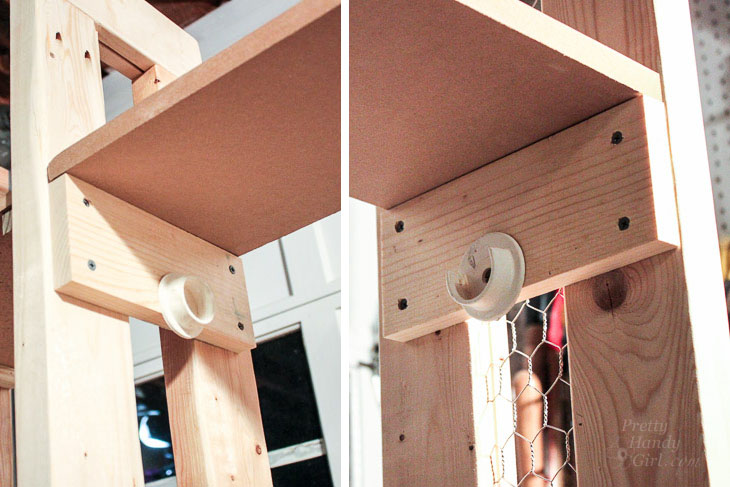
Plans to Build a School Lost & Found Center | Pretty Handy Girl

Attaching the Two Sides Together:

Note: If you have to transport the Lost & Found Center, you may choose to complete these steps on location.

Drill pocket holes into one end of each of the 2″ x 4″ x 45″ boards.

Plans to Build a School Lost & Found Center | Pretty Handy Girl

The pocket hole side will secure to the inside foot of the right vertical side support. The other end can be secured to the outside bottom edges of the center support using 2″ wood screws.
Plans to Build a School Lost & Found Center | Pretty Handy Girl

Attach one 1″ x 3″ x 43 ½” to the back of the two closet rod support boards. (This should fit nicely where it was inset 3/4″.) Use wood glue and finish nails or pre-drill holes and secure with 2″ wood screws.
Plans to Build a School Lost & Found Center | Pretty Handy Girl

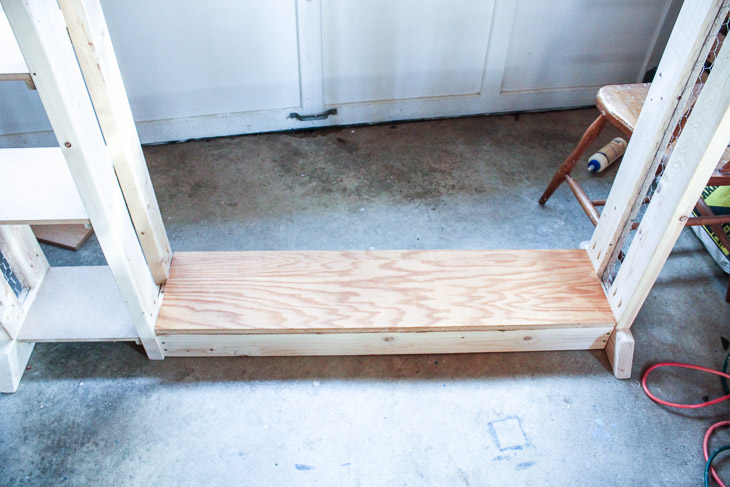
Add the 1″ x 13″ x 43 ½” shelf on top of the bottom supports. Secure with finish nails. (Ignore my bottom shelf construction. I changed it for this tutorial to save wood and simplify.)
Plans to Build a School Lost & Found Center | Pretty Handy Girl

Add the 1″ x 10″ x 43 ½” on top of the closet rod support boards. Secure with finish nails.
Plans to Build a School Lost & Found Center | Pretty Handy Girl

Drill pocket hole screws into the ends of the second 1″ x 3″ x 43 ½” board.
Rest this 1″ x 3″ x 43 ½” board on top of the top shelf. Secure it to the right vertical side support and the center vertical support using pocket screws. This is the view from the back of this shelf:
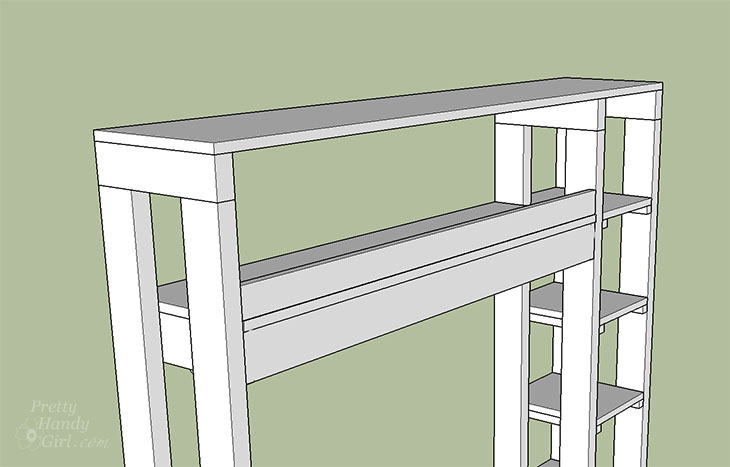
Plans to Build a School Lost & Found Center | Pretty Handy Girl

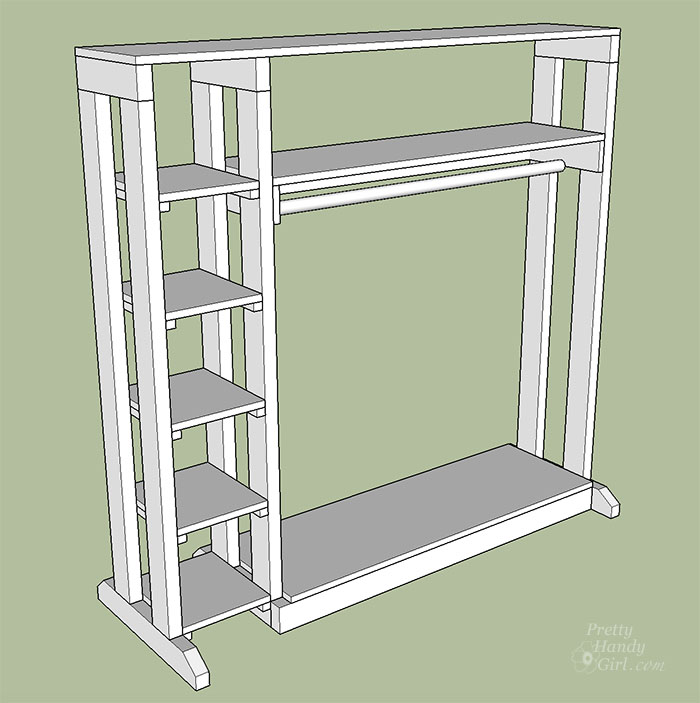
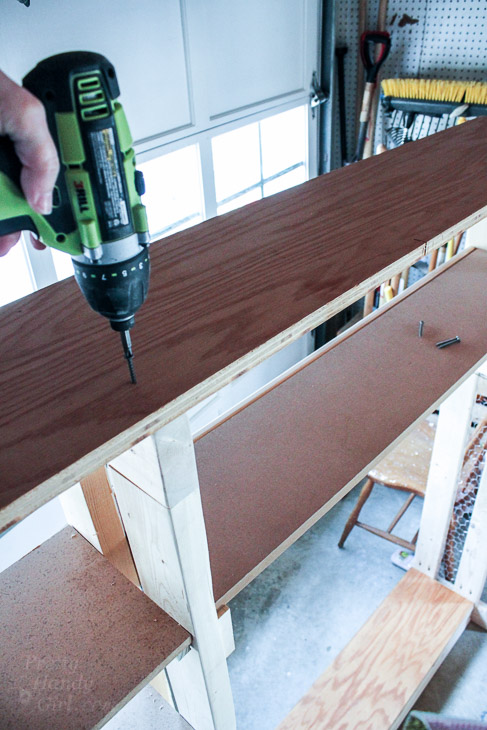
Attach the top 1″ x 10″ x 58″ to the vertical supports by driving several 2″ wood screws through the board and into the supports.
Plans to Build a School Lost & Found Center | Pretty Handy Girl

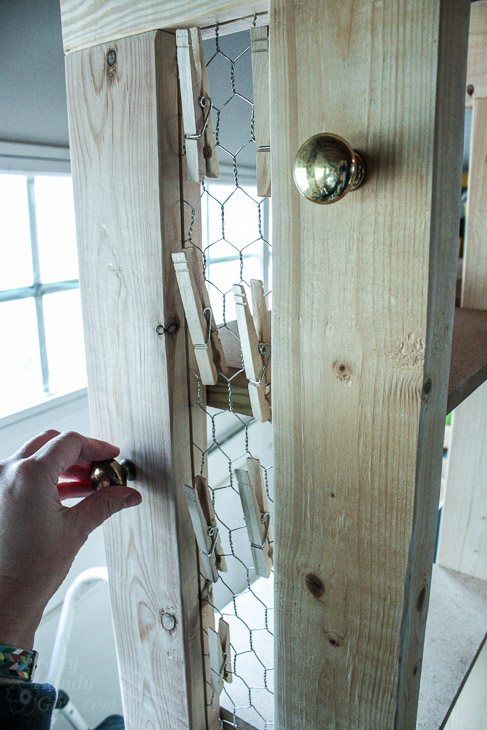
Add drawer knobs to the sides and clip a few clothespins to the chicken wire.
Plans to Build a School Lost & Found Center | Pretty Handy Girl

Secure the masonite to the back of the shelf tower using finish nails.
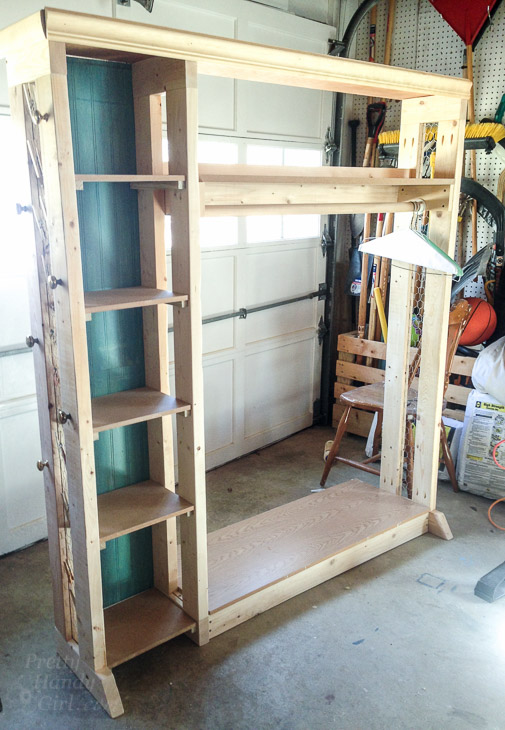
Plans to Build a School Lost & Found Center | Pretty Handy Girl

To finish off the top, you can nail a few pieces of moulding around the top board, but it’s not necessary.
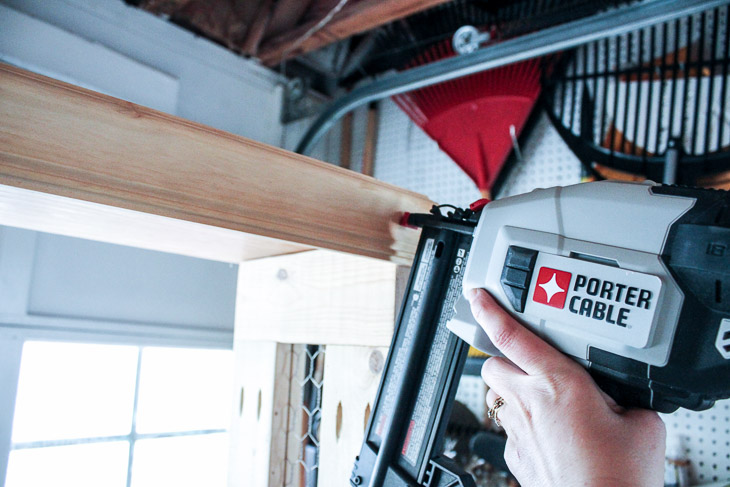
Plans to Build a School Lost & Found Center | Pretty Handy Girl

Deliver the Lost & Found Center and load it up!
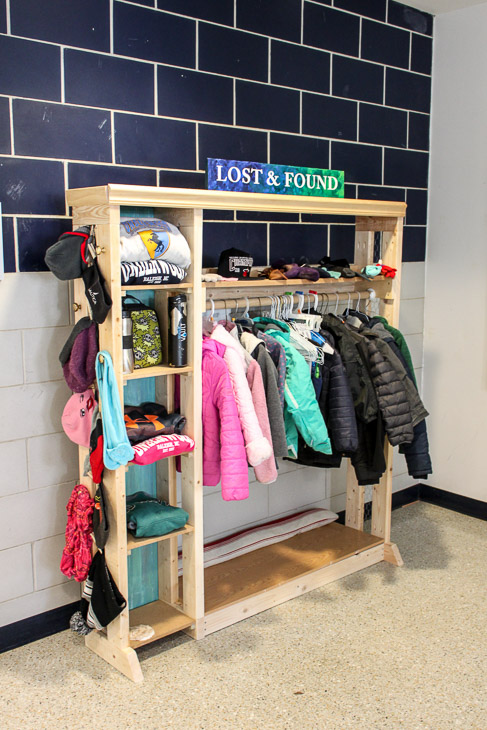
Plans to Build a School Lost & Found Center | Pretty Handy Girl

The kids were so excited to see the center. They exclaimed, “It’s so pretty, it looks like a store!”

Plans to Build a School Lost & Found Center | Pretty Handy Girl
The shelf tower is perfect for sweatshirts, lunch boxes and other items that don’t hang on hangers.
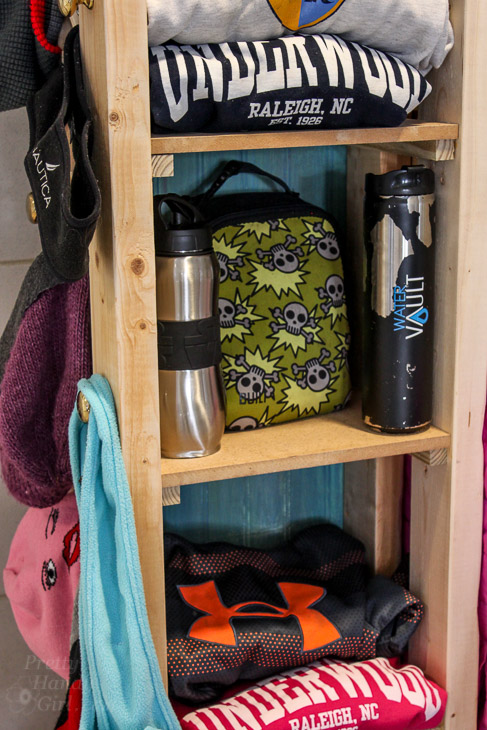
Plans to Build a School Lost & Found Center | Pretty Handy Girl

And the chicken wire sides and knobs work great for hanging hats, gloves and smaller articles of clothing.
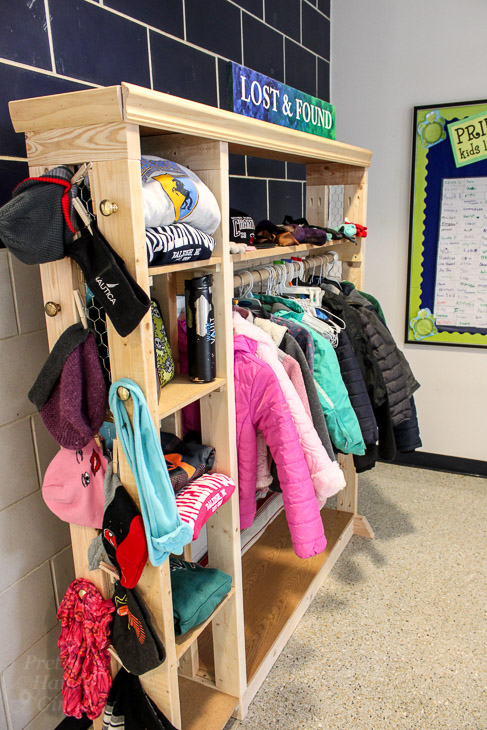
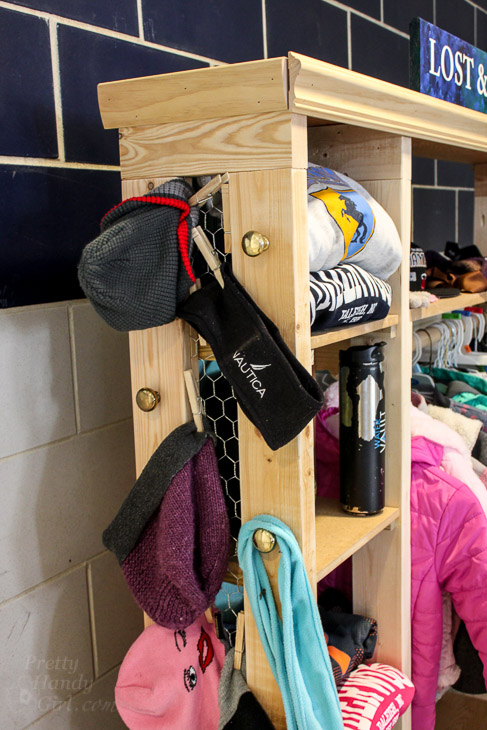
Plans to Build a School Lost & Found Center | Pretty Handy Girl
For safety, I added a sand filled bag to the back of the lower shelf. This keeps the center from accidentally tipping if a child pulls on a shelf or clothing. You could use a few bricks or cinderblocks instead. Or you can anchor the center to the wall.
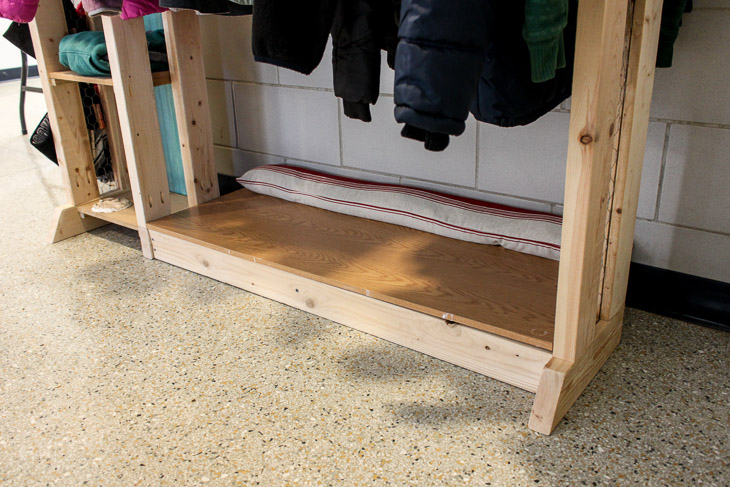
Plans to Build a School Lost & Found Center | Pretty Handy Girl

What do you think? Could a school near you use a new Lost & Found Center?
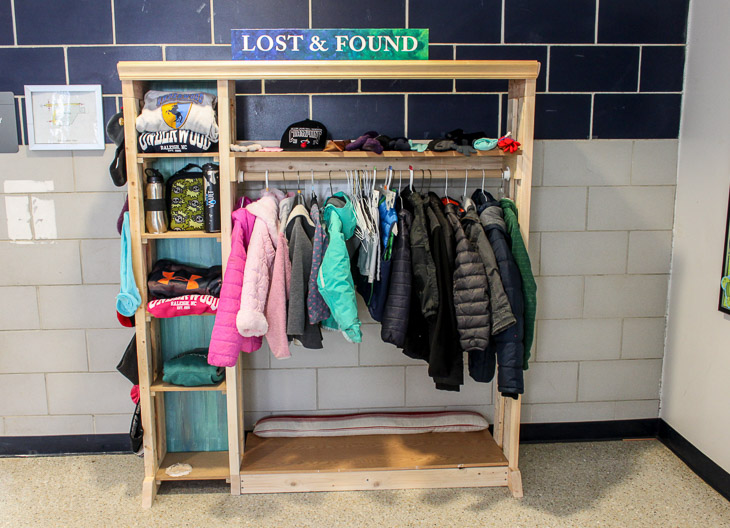
Plans to Build a School Lost & Found Center | Pretty Handy Girl

I’d love to hear if you make one for a school or organization near you.

Want to see the School Library Transformation I completed that turned a corner of the library into the most popular spot in school?

School Library Reveal | Pretty Handy Girl

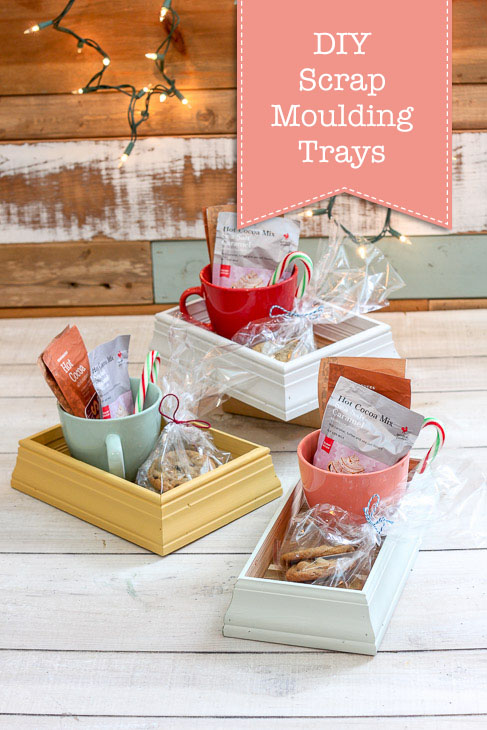
DIY Scrap Moulding Trays | Pretty Handy Girl

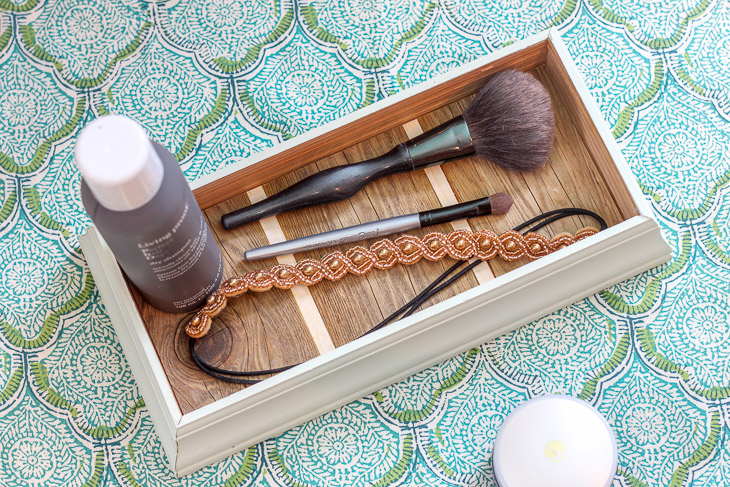
Are you on a purge mission to get rid of excess stuff? Me too! How about your workshop? Do you have scrap wood you need to get rid of? Yes? Perfect. Today I have a simple tutorial to show you how to make DIY Scrap Moulding Trays.

DIY Scrap Moulding Trays | Pretty Handy Girl

DIY Scrap Molding Trays

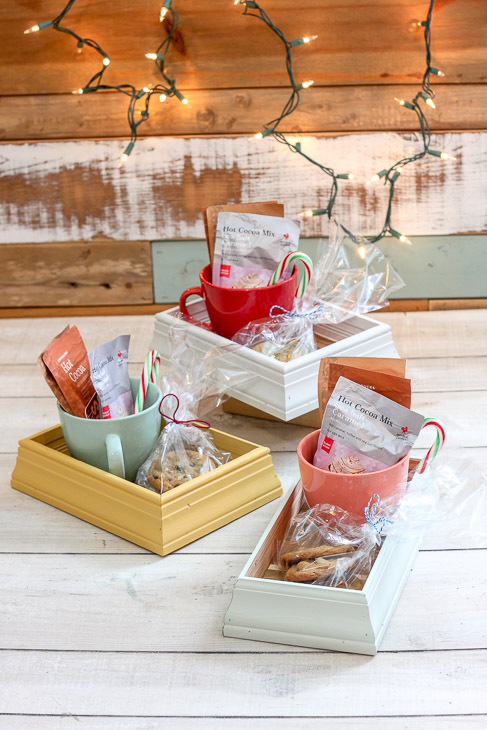
These trays are really cute and can be given as gifts and used to corral things together. Honestly, they are now one of my favorite scrap wood projects!

DIY Scrap Moulding Trays | Pretty Handy Girl

Regardless of how you use these scrap molding trays, they are a great way to reuse materials.

Materials:

Optional: Clamps

Instructions:

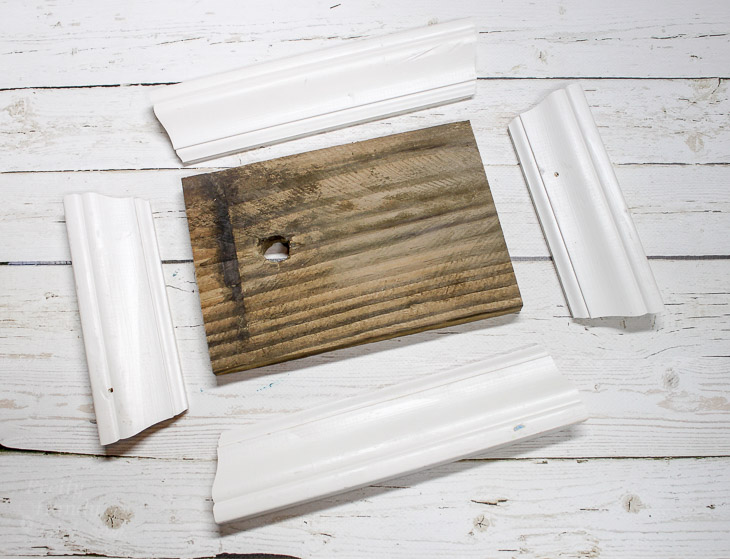
Cut a 45˚ angle into one end of your case molding (the longer side of the cut should be on the outside of the molding.) Never used a miter saw before? Watch this video tutorial to learn how to use a miter saw.

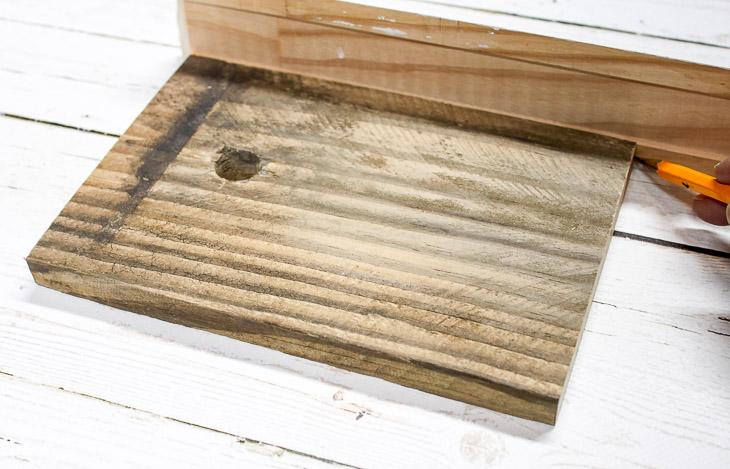
Line up the inner edge of the cut against one corner of your base wood. Mark the location of the other corner onto the molding.

DIY Scrap Moulding Trays | Pretty Handy Girl

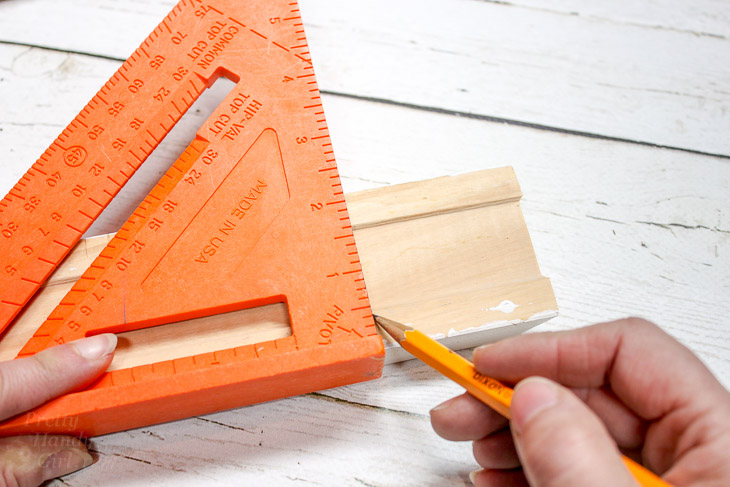
Extend the line along the molding using a speed square.

DIY Scrap Moulding Trays | Pretty Handy Girl

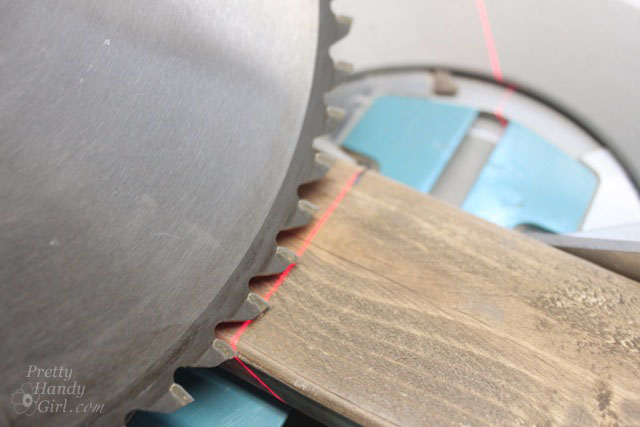
Line up the mark with your saw blade and cut at a 45˚ angle.

Repeat for the remaining sides until you have four sides cut with all ends mitered to 45˚.

DIY Scrap Moulding Trays | Pretty Handy Girl

Test fit all the molding sides against the baseboard and make any adjustments as needed.

DIY Scrap Moulding Trays | Pretty Handy Girl

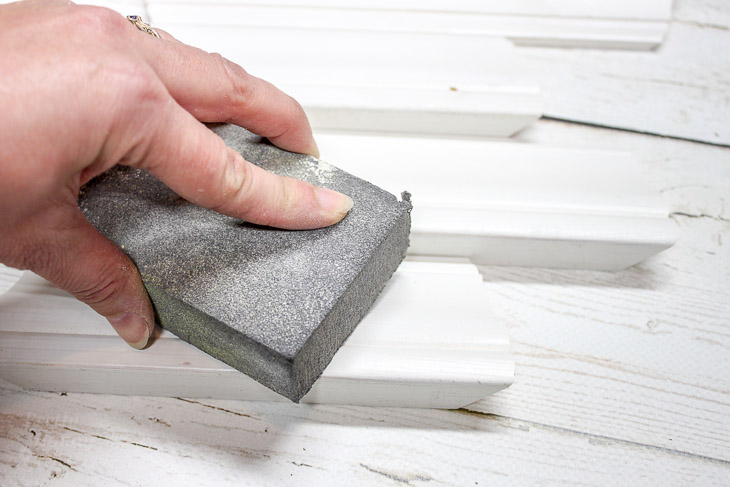
Sand any rough spots off with a sanding sponge.

DIY Scrap Moulding Trays | Pretty Handy Girl

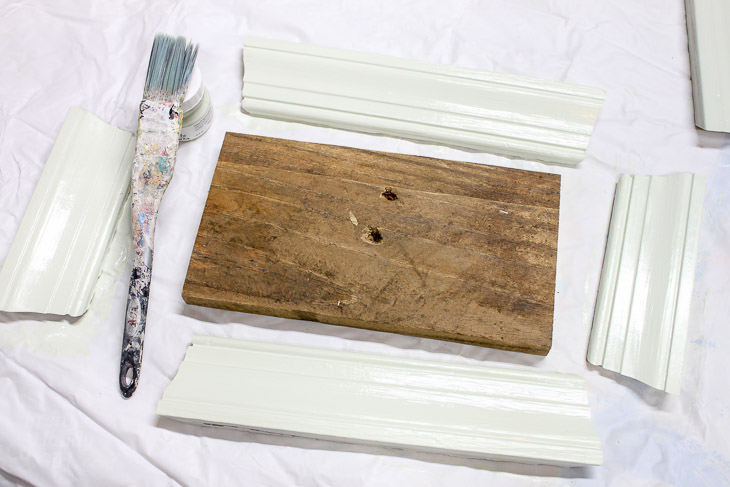
Paint the molding your color of choice. I used a variety of Fusion paints. This is the first time I’ve used Fusion Mineral Paints, but it definitely won’t be the last! They go on smoothly and don’t require a primer. Plus, with a light sanding afterward the paint doesn’t feel chalky.

DIY Scrap Moulding Trays | Pretty Handy Girl

Squeeze wood glue onto the corners and bottom edge of the molding pieces.

DIY Scrap Moulding Trays | Pretty Handy Girl

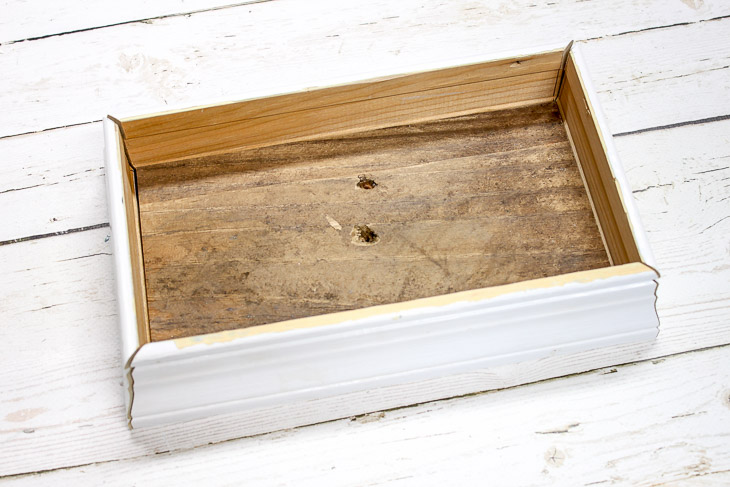
Set them in place around the base.

DIY Scrap Moulding Trays | Pretty Handy Girl

Nail 1 ¼” brad nails through the molding and into the base.

DIY Scrap Moulding Trays | Pretty Handy Girl

Secure the corners with one or two more brad nails.

DIY Scrap Moulding Trays | Pretty Handy Girl

Time to load up your tray with goodies and give them as gifts.

DIY Scrap Moulding Trays | Pretty Handy Girl

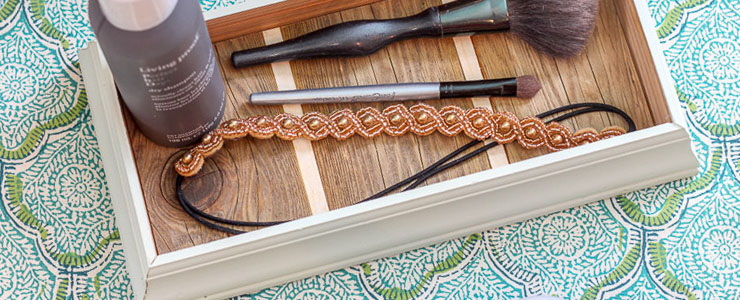
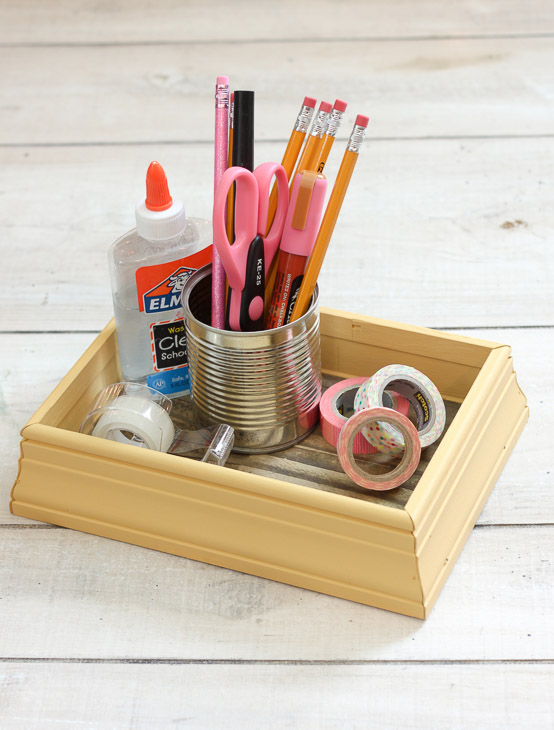
Or use your tray to organize your desk.

DIY Scrap Moulding Trays | Pretty Handy Girl

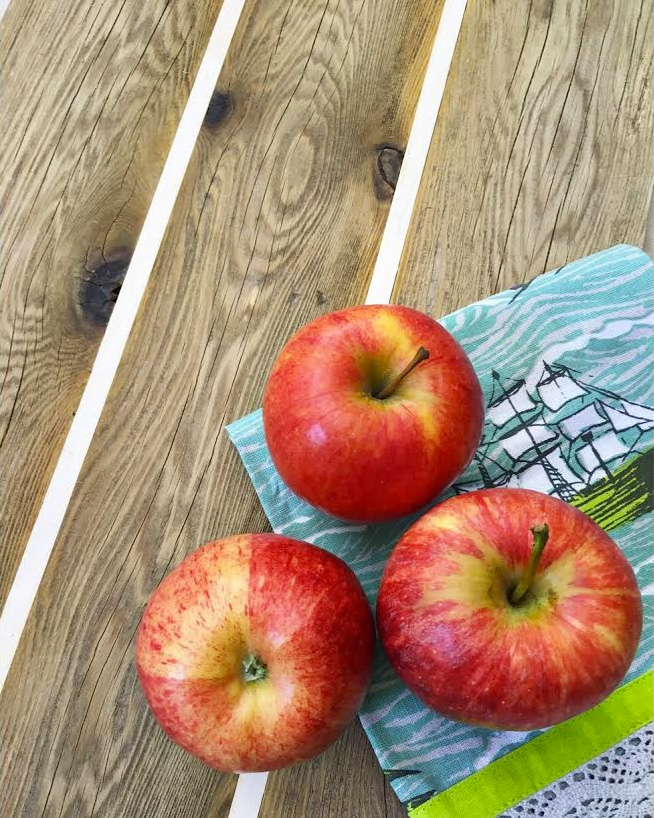
If you fell in love with the tray with the striped bottom, you can learn how to make striped wood block here:

How to Make a Striped Wood Block | Pretty Handy Girl

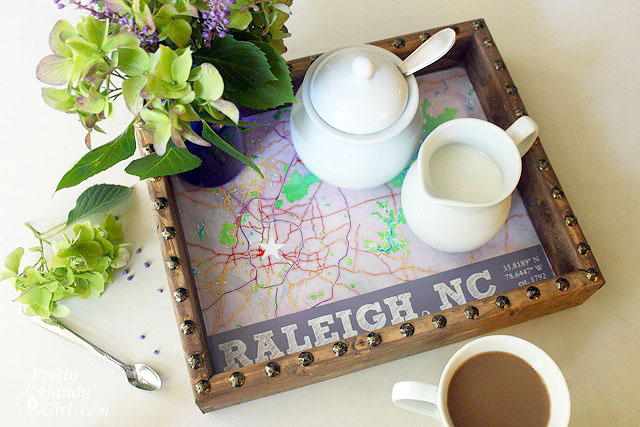
Another tray you can make with scraps is this fun Nailhead State Capital Tray:

What do you think? Want to use up your scraps to make some fun trays?

Children's Closet Library with Secret Pass Through | Pretty Handy Girl

Childrens' Closet Library with Secret Pass Through | Pretty Handy Girl

Turning the bonus room closet into a Children’s Closet Library is one of those projects that took longer than expected. Not because the work was harder, but because I took a break from the project for many months while other things took precedence. I’m thrilled to have this project complete and am ready to move on to something new.

Converting a closet in our bonus room into a children’s library started when my oldest son commented that he wanted me to add onto our house and build a library like the one in A Series of Unfortunate Events.

Obviously I had no desire to add onto our home. But, I began to form a plan about where I could add a library in our home. It became clear when I opened the toy closet in the bonus room and found myself getting angry that it was (once again) a mess. As I began clearing a path on the floor of the closet, it occurred to me that 90% of the toys in the closet were for young children and my boys had outgrown them. Time to clear out the closet and repurpose it for my book worms.

Childrens' Closet Library with Secret Pass Through | Pretty Handy Girl

After removing the faux wood panels, I uncovered a mess of wiring and rewired a new light fixture into the closet. Some idiot had never put the wiring inside the wall, instead the guilty party wrapped the wires around the studs (NOT TO CODE!) Instead of re-routing all the wiring, I furred out a new wall to encase the wiring.

Childrens' Closet Library with Secret Pass Through | Pretty Handy Girl

While the walls were open, I decided to install a new light fixture and a switch (instead of the annoying bare bulb fixture with a pull chain.)

How to Add a Switch to a Light Fixture | Pretty Handy Girl

After adding some much needed insulation, the fun began! I cut a hole into the wall between my son’s bedroom closet and the bonus room closet. I think we felt a little bit like the astronauts the first time they docked to the International Space Station and saw the Russian astronauts though the hatch.

Childrens' Closet Library with Secret Pass Through | Pretty Handy Girl

Before adding drywall, everyone had to test the pass through (humans and canines alike.)

Childrens' Closet Library with Secret Pass Through | Pretty Handy Girl

After I installed the drywall and painted, the boys and I drew some messages on the subfloor. We love leaving little notes and time capsules in our construction projects.

Childrens' Closet Library with Secret Pass Through | Pretty Handy Girl

The flooring was definitely a popular addition to this closet. I wish you could feel it.

Faking Wall-to-Wall Carpet with an Area Rug | Pretty Handy Girl

I purchased a fluffy shag chenille rug at Lowe’s that was used to create wall-to-wall carpeting in the closet.

Faking Wall-to-Wall Carpet with an Area Rug | Pretty Handy Girl

The final steps on the closet library was to add furniture and artwork.

Childrens' Closet Library with Secret Pass Through | Pretty Handy Girl

To create bookshelves, I used several IKEA Room Essentials cube storage units. Each unit is anchored to studs on the wall to prevent tipping.

Children's Closet Library with Secret Pass Through | Pretty Handy Girl

Two – 3 Cube Towers on the bottom, One – 6 Cube Shelves, and One – 3-2-1 Cube Organizer Shelf.

(I’ve included affiliate links for your convenience. I earn a small percentage from a purchase using these links. There is no additional cost to you. You can read more about affiliate links here.)

Childrens' Closet Library with Secret Pass Through | Pretty Handy Girl

After the shelves were filled. I trimmed the secret pass through and added hinges and a door on my son’s bedroom side.

Childrens' Closet Library with Secret Pass Through | Pretty Handy Girl

This allows him to lock the door for privacy. A simple window lock worked perfectly for this purpose. Then the boys quality tested my work on the pass through.

Childrens' Closet Library with Secret Pass Through | Pretty Handy Girl

Bandit found the pass through very intriguing.

Childrens' Closet Library with Secret Pass Through | Pretty Handy Girl

Eventually he gave his stamp of approval.

Childrens' Closet Library with Secret Pass Through | Pretty Handy Girl

Even though the closet has overhead lighting, I added a small side table and lamp for a cozy feel.

Childrens' Closet Library with Secret Pass Through | Pretty Handy Girl

This is the best view of the children’s library closet. (It’s incredibly hard to photograph a closet!)

Childrens' Closet Library with Secret Pass Through | Pretty Handy Girl

The cube storage shelves are the perfect height to accommodate most of their books.

Childrens' Closet Library with Secret Pass Through | Pretty Handy Girl

My 12 year old son filled and styled the shelves (honest!) He even added some teddy bears like the elementary school library has. So cute!

Childrens' Closet Library with Secret Pass Through | Pretty Handy Girl

My boys have spent so much time burrowing in this library closet. I frequently find them in there reading, especially when I’m calling them to do chores.

Children's Closet Library with Secret Pass Through | Pretty Handy Girl

Here’s a final peek into the children’s library closet:

Childrens' Closet Library with Secret Pass Through | Pretty Handy Girl

Childrens' Closet Library with Secret Pass Through | Pretty Handy Girl

Do you have a small closet or nook in your home that can be used as a children’s library? It’s amazing how an ordinary closet can turn into something extraordinary.

If you liked this renovation, you’ll definitely love my son’s closet turned reading nook.

Closet Reading Nook | Pretty Handy Girl