Knock off Partridge Garden Table Tutorial

I often find myself searching online looking at furniture and decor on sites that I consider full of unique items.  I recently came across the Anthropologie Partridge Garden Table and fell in love.  The creative use of old mismatched legs was awesome.  Then I saw the price; a mere $ 148.00.  As cool as it is, spending that much for a plant stand is way more than I could ever justify.  I knew I could make it cheaper and am excited to show you how to make your own!

Materials

  • 3 different banister Spindles or table legs
  • 10″ clock face round
  • Wood Glue
  • Nail Gun
  • Wood Filler
  • Painters Tape
  • Three different colors of Paint
  • Sliding T-Bevel Square
  • Miter Saw
  • Spray Paint (Rust-Oleum Rustic Mist)
  • Spray Paint (High Gloss Sealer)

Round Legs

Instructions

1.  Lay  out the spindles and decide which sections will be used for the legs. Read more

Faux Weathered Gray Wood Grain Tutorial | Pretty Handy Girl

Faux Weathered Gray Wood Grain Tutorial | Pretty Handy Girl

Do you love the Restoration Hardware tables that have that beautiful gray (driftwood-like) weathered wood? Me too. But, I can’t justify spending thousands of dollars on their furniture. Instead, I found a Craig’s List pedestal table that had the right shape and size for our kitchen. It was a cherry veneer finish, but after some paint you’d never know!

Faux Weathered Gray Wood Grain Tutorial | Pretty Handy Girl

And then, I created my own Faux Weathered Gray Wood Grain top. All you need are some Valspar paint samples, some wood grain tools and a dry brush to achieve this look.

Ready to get started?

Faux Finish Weathered Wood Grain Materials:

(I’ve included affiliate links for your convenience. I earn a small percentage from a purchase using these links. There is no additional cost to you. You can read more about affiliate links here.)

Faux Weathered Gray Wood Grain Tutorial | Pretty Handy Girl

Faux Finish Weathered Wood Grain Base Coat and Glazes:

Faux Weathered Gray Wood Grain Tutorial | Pretty Handy Girl

Before you begin creating your wood grain, you should paint your surface with Valspar Woodrow Wilson Putty and allow it to dry.

Faux Weathered Gray Wood Grain Tutorial | Pretty Handy Girl

If you are painting furniture, lightly sand the piece. And be sure to use Valspar Paint + Primer in one. This will allow you to paint directly onto the furniture and skip the primer. Read more

Upcycled Metal Rolling Cart Plant Stand | Pretty Handy Girl

Upcycled Metal Rolling Cart Plant Stand | Pretty Handy Girl

This past summer I spied a metal cart in a dumpster. To be frank, I have never truly actually participated in dumpster diving. The thought of actually climbing inside a dumpster has never been on my acceptable things to do list. But, this metal bar cart was floating on top of the trash pile. It was (to quote a Seinfeld episode) above the rim! And it was begging to be upcycled into a beautiful plant cart.

So, I convinced myself it was okay and wasn’t officially dumpster diving. Feel free to debate this fact in the comment section.

I brought it home and knew I could do a quick makeover with some spray paint. But, first it needed a good cleaning and some prep work. The tops of the shelves were very rusty:

Upcycled Metal Rolling Cart Plant Stand | Pretty Handy Girl

Upcycled Plant Cart Saved from “Above the Rim”

And the undersides were filthy. But, the end product was worth it! Here is how to upcycle your own little metal rusty bar cart into a beautiful plant stand!

Materials:

Upcycled Metal Rolling Cart Plant Stand | Pretty Handy Girl

  • 1 Discarded rusty bar cart (rescued from above the rim)
  • Socket set
  • Hammer for coaxing rusty bolts loose
  • Can of Rustoleum Heirloom White spray paint
  • Can of Krylon Copper Spray paint
  • Sander/sanding block
  • Fine grit sand paper
  • Wire brush
  • Rag and/or damp wipes
  • Painter’s tape
  • Drop cloth
  • Scraps of wood to elevate while painting
  • Optional: Drill

Upcycled Plant Cart Instructions:

Loosen corner bolts with a socket wrench or drill and socket bit. Hammer out any that are too rusty to budge. Read more

how to stain an old basket

I admit it, I’m a basket addict!

Baskets are one of the best ways to organize and accessorize your home but they can be very expensive when purchased new. Thrift stores are a great source of affordable baskets but they are often out-of-fashion colors and can have missing or broken pieces. Today I’m going to show you how to take those old, thrift store baskets and make them a beautiful accent piece for your home.

Materials:

  • super glue
  • hand broom
  • stain
  • paintbrush

Instructions:

The first step in fixing up an old basket is to clean out any dirt or debris using a hand broom. Be thorough on both the interior and exterior.

before old thrifted basket staining

Next inspect your basket for any broken pieces. Use super glue to repair any areas that may need it. Read more

Unique Wine Rack

Unique Wine Rack

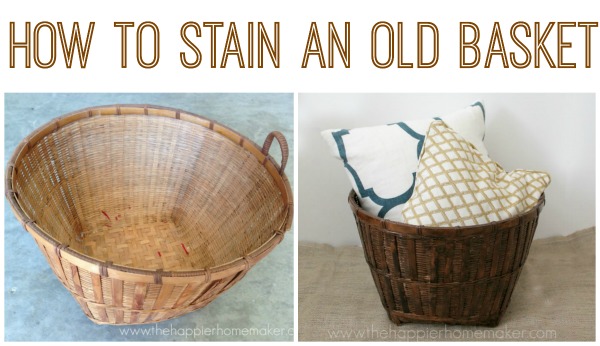
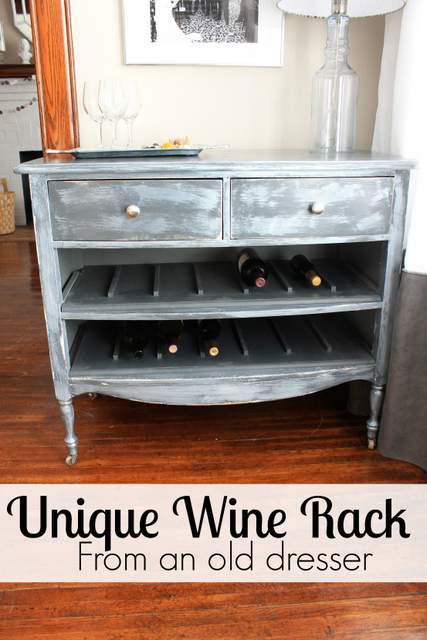
Hi everyone! It’s Jessica from Décor Adventures, back again and ready to show you a furniture makeover project I’m just in love with. This isn’t just any furniture makeover. This is how to turn an old dresser into a rack to hold your favorite reds and whites – wine that is!

One of my favorite things to do is redo furniture. Chairs, mirrors, tables, dressers, you name it. A while back I found this dresser at a thrift shop for only $10 and took it home only to find the drawers didn’t work well at all. I had an idea to ditch the two large drawers and turn this piece into a wine rack. If it doesn’t work for clothes, why not make it work for wine! Here is how to make your own unique wine rack from a dresser.

Materials
Many of these materials are based on how I painted the dresser and how we cut the shelves. We cut them ourselves with a table saw, but if you don’t have one, you can have them cut at the home improvement store or use a circular saw.

  • Dresser with a few drawers removed

Paint:

  • primer, paint, stain, paint brush and roller;
  • Furniture wax or sealant/polycrylic (or whatever you might want to use to finish the dresser)

Racks/Shelves:

  • Two 2’x4’ sheets of ½” MDF
  • Two pieces of quarter round to finish fronts of shelves;
  • Several feet of ½” square wood dowels {they come in 36” pieces}

Tools:

  • Table saw {unless you have the shelves cut to size at the home improvement store};
  • Nail gun
  • nails
  • air compressor
  • Random orbital sander {Optional if you distress the dresser}
  • Miter saw or hand saw

Supplies:

  • Wood glue;
  • 220-300 Sand block or sand paper.

Instructions
These instructions will be in a three sections, so you can easily see how this project comes together. First you will paint or stain your dresser, {or maybe you love it as is and will leave it}, second you will prepare the shelves and put them together to create the wine racks, and last you’ll put the whole dresser together.

Preparing the Dresser
This was a piece I bought at a thrift store and it was already painted but I had to fix it up. The back was not painted and didn’t look very pretty so I ended up painting that too. You can see in this picture how wonky the bottom large drawers were.

Dresser Before Read more