cedar underbed storage

Hi Pretty Handy Readers, Jaime here from That’s My Letter to share a beautiful and simple storage idea using cedar boards.  Let’s build some DIY cedar under bed storage bins and make use of that hidden space!

Cedar boards are readily available in most home improvement stores and typically come in 1×4, 1×6 and 1×8 widths.  I used mostly 1×4 boards, which are actually 3 1/2″ wide, for this project because I only have 6″ of clearance under the bed. That’s still plenty of space to store items so let’s not waste it!

cedar underbed storage 2

You’ll want to measure your space and make the under bed storage fit best for your needs. At 17 ½” w x 29 ½” l, these bins work great for this space.  Cedar is naturally resistant to insects, smells great, and looks pretty too!

cedar underbed storage 3

I added a simple pull handle to one end to make it easier to pull.  A simple finger hole would work fine if you don’t want to use hardware.

cedar underbed storage 1

Below are the step-by-step instructions to build the cedar under bed storage.  (Please follow all safety precautions when operating power tools.)

Materials (for one bin):

  • 2 – 1x4x8 cedar boards
  • 1 – 1x6x8 cedar board
  • 1 ¼” pocket hole screws
  • wood glue
  • saw, drill & drill bits
  • nailer & 1¼” finish nails
  • sander
  • clear polyurethane (if desired)
  • 4 – 1 ½” – 2″ casters
  • 3/4″ wood screws
  • handle pull (if desired)

cedar underbed storage dimensions

Cut List (for one bin):

  • 5 – 1×4 @ 28″ l (3 base, 2 long sides)
  • 1 – 1×6 @ 28″ l (base)
  • 2 – 1×4 @ 17 ½” l (short sides)

Instructions:

Step 1: Make the base by attaching boards using wood glue and 1 ¼” pocket hole screws.  Be sure to pre-drill pocket holes around perimeter for later attaching sides.

cedar underbed storage step 1

Cedar typically has a rough and a smooth side. When making the base keep the rough side to the underside.

cedar underbed storage base

Step 2: Attach the long sides to the base using wood glue and 1 ¼” pocket hole screws.

cedar underbed storage step 2

Step 3: Attach the short sides to the base using wood glue and 1 ¼” pocket hole screws.  Then attach the short sides to the long sides with 1 ¼” finish nails.


cedar underbed storage step 3


Sand smooth and apply clear polyurethane if desired.  Attach casters to four corners and the pull handle to the center of the drawer front.

cedar underbed storage 4

Fill up your new cedar under bed storage bins and push underneath for out of site storage.  So beautiful, so functional, and great for off season storage or every day use.  I hope you enjoy this project and have a spot in your home for cedar under bed storage bins.  Enjoy!

Jaime signature~ Read More of Jaime’s Tutorials ~


Pin for later!

Let's build some DIY cedar under bed storage bins and make use of that hidden space! | Pretty Handy Girl #prettyhandygirl #storage #DIY #organization

These DIY Stacking Cubbies are a great storage solution for stuffed animals, shoes, and more! The plans and tutorial make it easy to build as many as you like!

Hey everyone!  It’s Katie again from Addicted 2 DIY.  Today I’ve got a project to help keep things organized around the house.  These stacking storage cubbies are perfect for stashing away those growing stuffed animal collections, shoes, toys, books, etc.  They were so simple to build and they are easy to customize to fit your needs.  I’ve got the step-by-step tutorial for you below, and you can also stop by my site to download the printable plans.

Materials:
(contains affiliate links)

  • 2 – 1″ x 12″ x 8′ pine boards
  • 1 – 1″ x 6″ x 8′ pine board
  • 2′ x 4′ sheet of 1/4″ plywood (I used some that I already had on hand)
  • Kreg Jig
  • Brad Nailer
  • 1 1/4″ pocket screws
  • 1 1/4″ brad nails
  • 5/8″ brad nails
  • Kreg Rip-Cut
  • wood glue
  • orbital sander
  • 220 grit sandpaper

Cut list (for each storage cubby):

  • 2 – 1″ x 12″ @ 12″ (sides)
  • 1 – 1″ x 12″ @ 15″ (bottom)
  • 1 – 1″ x 12″ @ 16 1/2″ (top)
  • 1 – 1″ x 6″ @ 16 1/2″ (front)
  • 1 – 1/4″ plywood @ 12 3/4″ x 16 1/2″ (back)

Instructions:

Start by cutting all of your pieces for the cubbies.  Drill 3/4″ pocket holes into the bottom 1×12 pieces.

These DIY Stacking Cubbies are a great storage solution for stuffed animals, shoes, and more! The plans and tutorial make it easy to build as many as you like!

Attach the sides to the bottom using wood glue and 1 1/4″ pocket screws. Read more

state-pride-magnetic-key-holder-22

State Pride Magnetic Key Holder

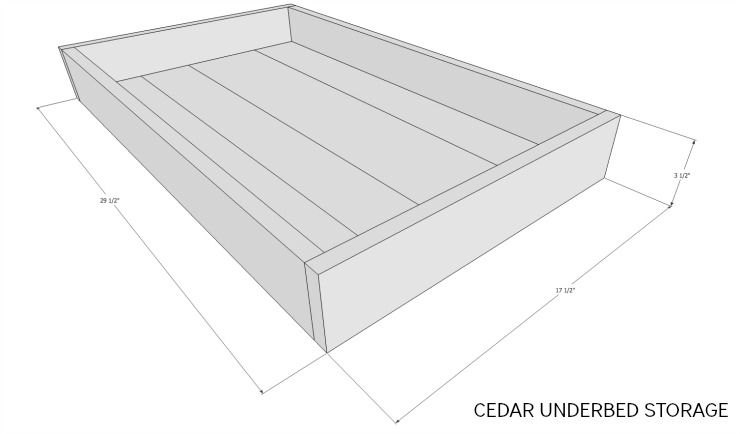
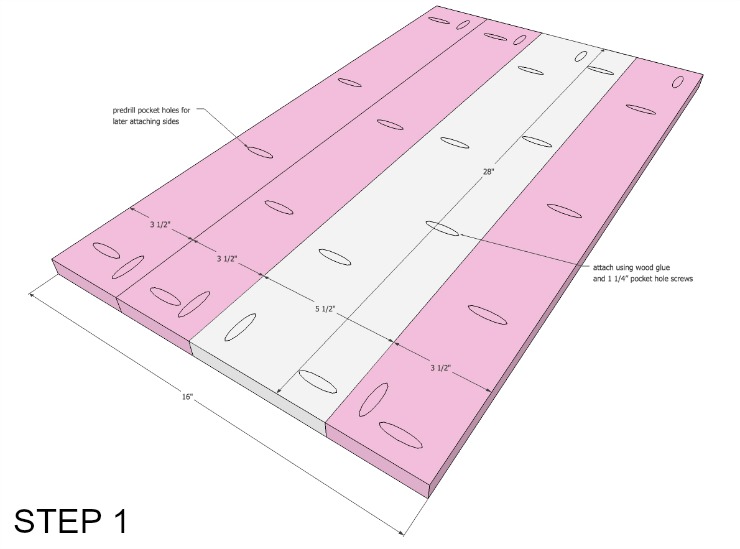
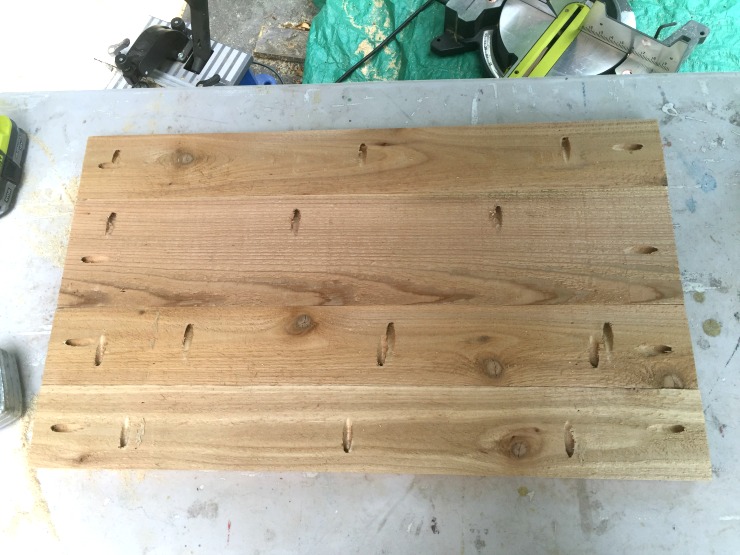
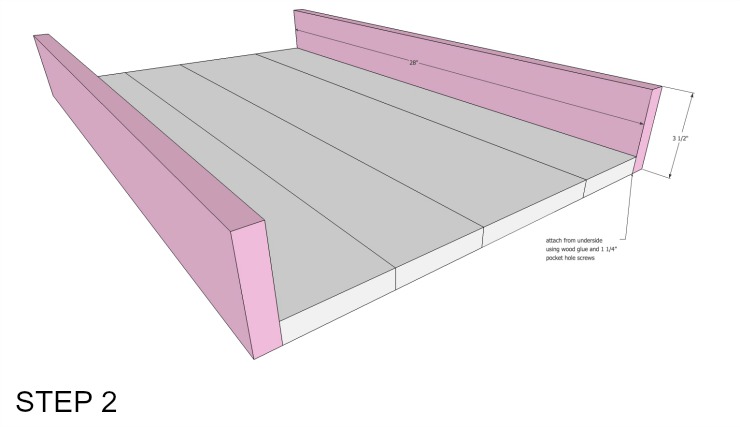
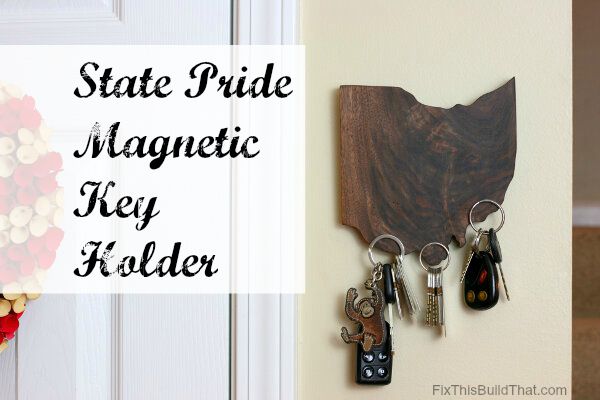
Today on the Rockstar DIY stage is Brad! Brad is our first guy rocker to join the tour. He has an amazing creative brain and woodworking skills that will blow your mind. Brad has created this State Pride Magnetic Key Holder for you to build. And if you look close you’ll notice that it’s magic because there are no hooks in sight!

I told you he’d blow your mind. Brad normally rocks on his home turf at FixThisBuildThat.

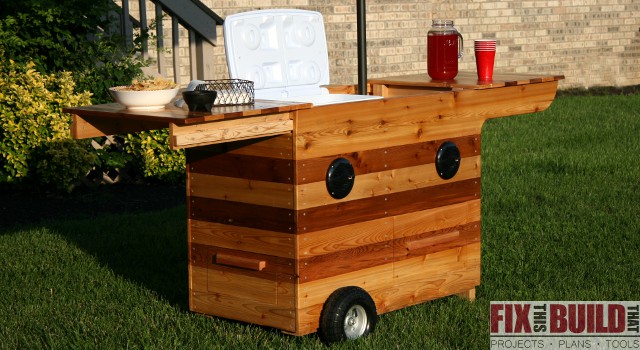
You may have seen his amazing Party Station recently. This cart comes complete with a spot for your beverage cooler, storage drawers and speakers. See, I told you he rocks!

Rockstar DIY Series

I hear the whine of the scroll saw now, so let’s give it up for Brad!

page_break_2

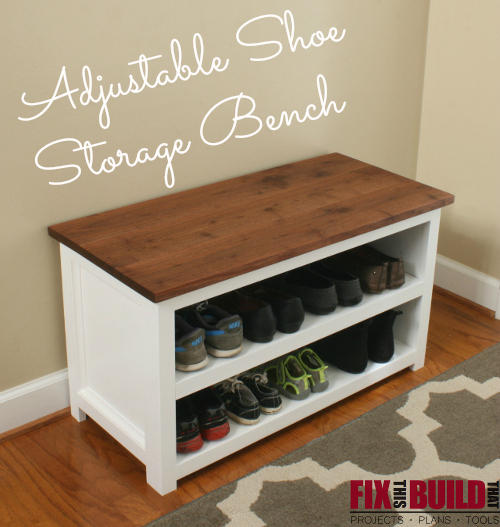
Hey, everyone! Like Brittany said, I’m Brad from FixThisBuildThat.com. My site is all about helping you with Woodworking & DIY Projects, Posts and Plans. And today I’m happy to be here on Pretty Handy Girl to show you how to make this fun State Pride Magnetic Key Holder. If you want to check out some of my other work you can see one of my most popular posts, the Adjustable Shoe Storage Bench.

I’ve always been in love with state signs and cut outs and I’ve made several large state signs. But I wanted do something smaller, and I also wanted to solve the issue of always looking for my keys. In my house finding a set of keys is a little like playing Marco Polo…except the keys don’t usually call back!

I had a really nice piece of figured walnut I wanted to use for something and that’s when it hit me. State sign + really nice wood + key holder = Awesome project. I’d seen some similar things around the interwebs so I knew the perfect project to solve my issue.

Here is what you’ll need for this project.

Materials:

  • Approx 6″x6″ piece of 3/4″ wood (size varies by state)
  • 12 neodynium super magnets – 0.47″ dia x 0.10″ thick
  • Quick set epoxy
  • Picture hanger hardware
  • Spray adhesive
  • Jigsaw or scroll saw
  • Drill
  • 1/2″ forstner drill bit (brad point or twist will work too)
  • Sandpaper
  • Stain/Finish of your choice

Instructions:

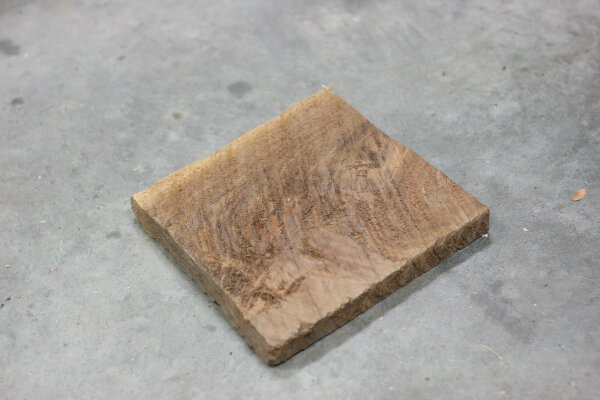
Here is the piece of wood I started with. It is approximately 6″ by 6″ rough cut walnut that was just under 7/8″ thick. I had to do some serious sanding to this thing, but knew there was beautiful grain underneath to uncover.

State Pride Magnetic Key Holder

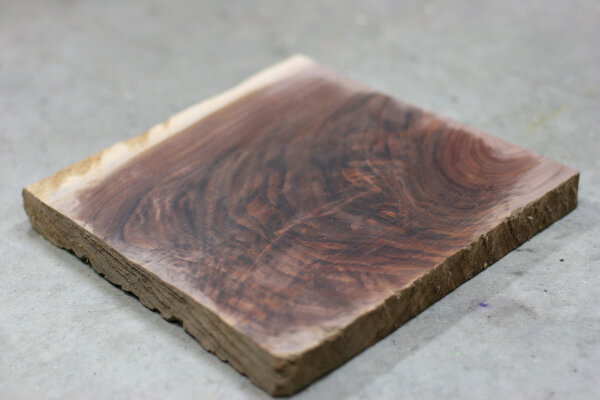
After a ton of sanding I got it down smooth to 3/4″ and here is what was underneath it…gorgeous! (I added a little mineral spirits to show off the grain)

State Pride Magnetic Key Holder

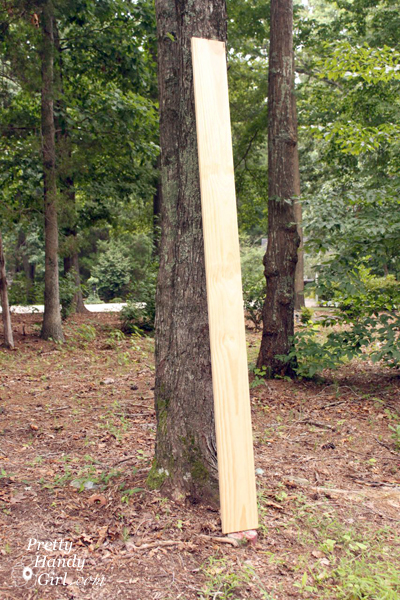
If you have a special small piece of wood this is the perfect project for it. If you don’t have any nice hardwoods laying around this could be your perfect chance to try working with walnut, cherry, maple, mahogany or something else. Go to your local woodworking or lumber store and see if they have any small offcuts. If you want to stay with wood from the home center then a 1×6 or 1×8 will do just fine as well.

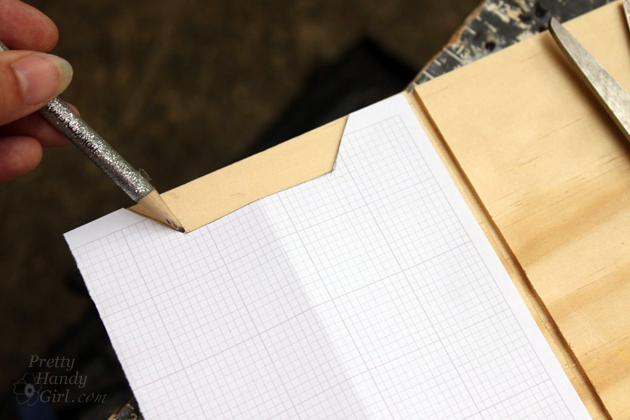
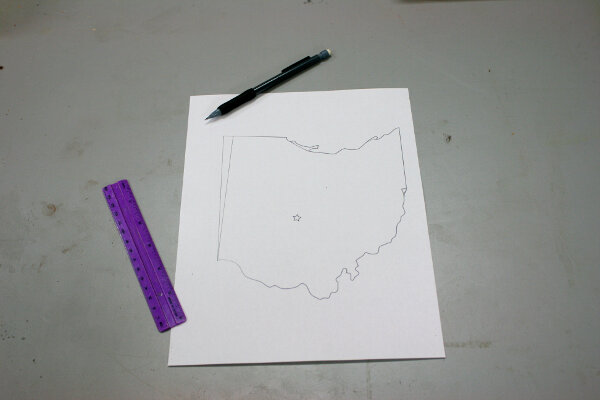
I decided to use Ohio as my state for this project. My wife and I lived there for 13 years, but really it’s just because it fit way better on my board than Tennessee would have 🙂 To get the state shape onto my wood I used a printed outline of Ohio. I found a site called Coloring Castle that has state outlines for kids to color. The outlines are softened a little so it was just what I wanted.

I copied the image of Ohio and pasted it into Powerpoint and sized the image until it fit my board the way I wanted it. You can use a host of different programs or photo editors to do this.

After I printed out the Ohio shape I decided to take a little creative license with the shape of the state. I wanted straight sides and didn’t want to mess with some of the more intricate tight curves like the peninsula up top. So I just drew in new lines where I wanted to cut. Empower yourself and redraw state lines as you see fit!

State Pride Magnetic Key Holder

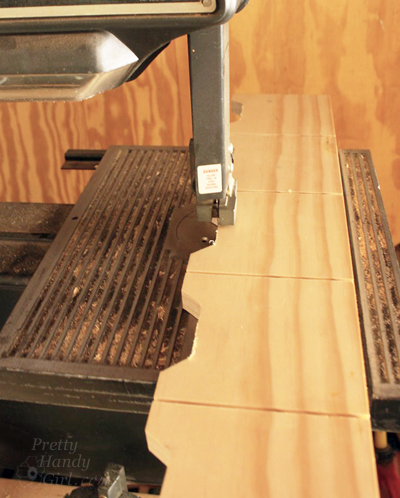
Next you need to temporarily glue the outline to the wood. Cut the shape out leaving about 1/4″ around the edges. Then spray a light coating of spray adhesive onto the backside of the cutout. Don’t go crazy here or you won’t be able to get the paper off without scraping or sanding. Practicing with some scrap wood and paper will give you a feel for how sticky your specific spray adhesive is. Read more

Plenty 'o Storage from One Board | Pretty Handy Girl

Before we get started, did you enter the $1,000 Build.com #LoveItMoment giveaway? Only a few days left, so get crackin’!

What would you say if I told you that I took one board…one 1″ x 8″ x 8′ board and created a faux cubby box with Plenty O’ Storage that will work in any room in your home!

Plenty 'o Storage from One Board | Pretty Handy Girl

This is a project born out of the #OneBoardChallenge. What’s that you ask? In short, it’s a challenge thrown down by Jen from House of Wood. She challenged 17 bloggers to make something amazing out of one 1″ x 8″ x 8′ board.

One-board-challenge-graphic

I’m here to show you how that one board can be cut up and turned into this beautiful fake cubby storage box:

Plenty 'o Storage from One Board | Pretty Handy Girl

And it can store anything you don’t want in plain sight.

Plenty 'o Storage from One Board | Pretty Handy Girl

Today I’ll show you how to build your own Storage Box with Plenty O’ Storage!

Plenty 'o Storage from One Board | Pretty Handy Girl

Materials:

  • 1 – 1″ x 8″ x 8′ board
  • Drill
  • 3/32 drill bit
  • Philips head screwdriver
  • Wire mesh
  • Tin Snips
  • Staple gun
  • 1/4″ staples
  • Pencil
  • 2 – 2″ hinges
  • Magnetic latch
  • 5 – Sash hook lift hardware
  • 4 – {6 x 2 1/4″} wood trim screws
  • Miter saw
  • Table saw
  • Jig saw or Bandsaw

Cut list:

(Note that a 1″ x 8″ board is actually 3/4″ x 7 1/4″. Cut list sizes are actual sizes.)

Plenty 'o Storage from One Board | Pretty Handy Girl

  • 1 – 5 1/4″ x 25″
  • 2 – 7 1/4″ x 25″
  • 2 – 7 1/4″ x 8″
  • 1 – 2″ x 25″ (optional for hanging cleat or back stop)


Instructions:

Cut your 1×8″ board into the pieces listed in the cut list above. Most cuts can be made on a miter saw, but you’ll need a table saw to rip the 2″ board and to cut grooves into the face of the storage box. Alternatively, you could skip the fancy details and create a plain face.

Plenty 'o Storage from One Board | Pretty Handy Girl

Set the table saw depth to 1/8″ above the saw table. Set the fence at 5″. Cross cut the board along the saw blade to cut grooves into the board. Rotate the board and cut across the other ends of the board. Set the fence at 10″ and repeat on both ends.

Plenty 'o Storage from One Board | Pretty Handy Girl

Your board will look like this when you flip it over:

Plenty 'o Storage from One Board | Pretty Handy Girl

Download the template shown below, print and cut out the shape.

Plenty 'o Storage from One Board | Pretty Handy Girl

Using the template to trace the cut out onto the top of the face sections.

Plenty 'o Storage from One Board | Pretty Handy Girl

Use a jigsaw or bandsaw to cut the face profile.

Plenty 'o Storage from One Board | Pretty Handy Girl

Pre-drill holes into the four corners of the two 8″ x 7 1/4″ boards.

pre-drill-screw-holes

Collect the four sides of the box ( 2 – 7 1/4″ x 25″ and 2 – 7 1/4″ x 8″)

Plenty 'o Storage from One Board | Pretty Handy Girl

Drive wood screws into the sides and into the base of the box. Read more

PB Knock Off Monogrammed Bulletin Board

edited-0510

Hey everyone!  If you remember, last month, I shared with you how I updated my boys’ desk in our den with a wood plank desktop.  The den is just about ready for the big reveal and now I’m just working on adding little details.  This includes these fun personalized bulletin boards I made for each of my boys.  I was searching for desk organization ideas one day and saw these personalized pinboards on Pottery Barn Kids.  I knew they would be perfect for my boys and that I could knock them off pretty easily.  I made two of these pinboards, but my supply list will be for one pinboard.

Materials:

  • 12″ x 12″ wrapped canvas (mine was 3/4″ thick)
  • 12″ adhesive backed cork sheet
  • Adhesive vinyl
  • Transfer paper
  • Die-cutting machine
  • Acrylic aint
  • 2 – 1″ foam paintbrushes
  • 1″ x 2″ x 6′ pine board
  • Wood stain
  • Sander w/ 220 grit sandpaper
  • Miter saw
  • Brad nailer
  • 1″ Brad nails
  • 24″ Bar clamps
  • Hot glue gun

Instructions:

Start by designing your stencil.  To make it look just like the PB Kids version, use the Varsity font.  (FYI, the letters are all capitalized, but when you use the shift key or CAPS lock, it will add the outline.)

Knockoff Personalized Pinboard

Cut your design out on the 12 x 12″ sheet of vinyl and weed the negative pieces out.  Remember that this is a stencil, so make sure to weed out the correct parts of your design.  Place your transfer paper over the design and use a scraping tool or a credit card to get out any air bubbles.

edited-7687

Peel the backing off of your vinyl and very carefully center it onto your cork sheet.  Use the scraping tool or credit card again to firmly adhere the vinyl to the cork sheet.  Carefully peel the transfer paper off. Stencil your design using the acrylic paint and foam brush. Read more