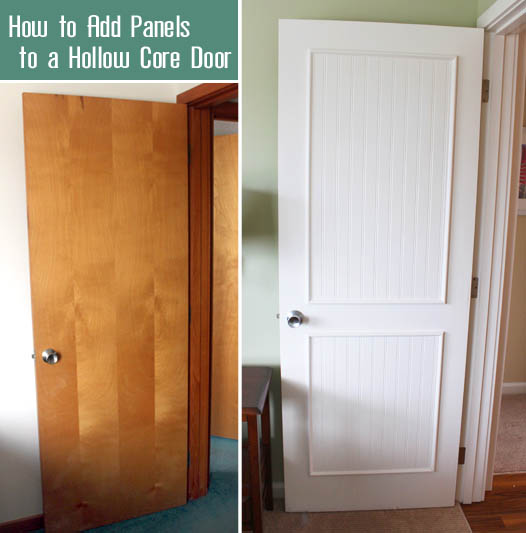
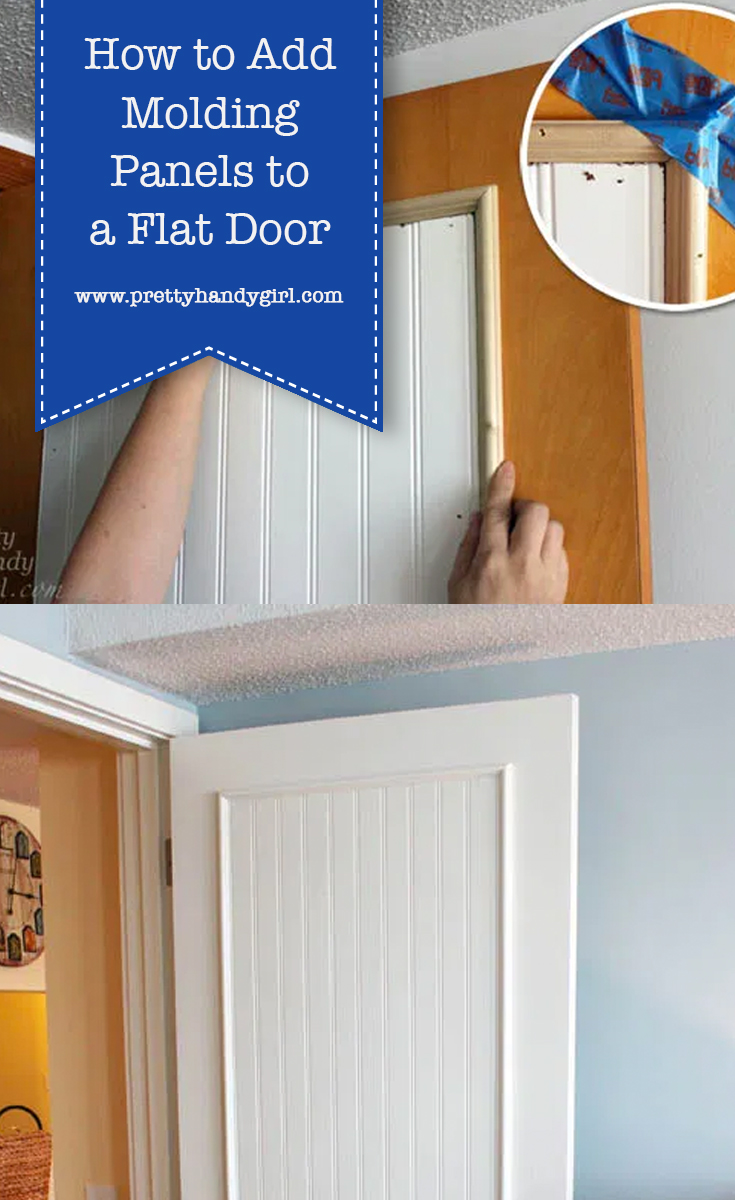
How to Add Molding Panels to a Flat Door
When my sister brought me on to the Topsail Beach condo renovation, she had a laundry list of DIY projects she wanted me to complete. One of them was dressing up the hollow flat doors with moulding panels. She showed me a pin that led to One Life to Love’s DIY beadboard panel doors. After seeing the photo, I knew it would be a great DIY upgrade to make. But, we decided to use real beadboard (instead of beadboard wallpaper) because it had to hold up to the stress of being a rental.
To Begin:
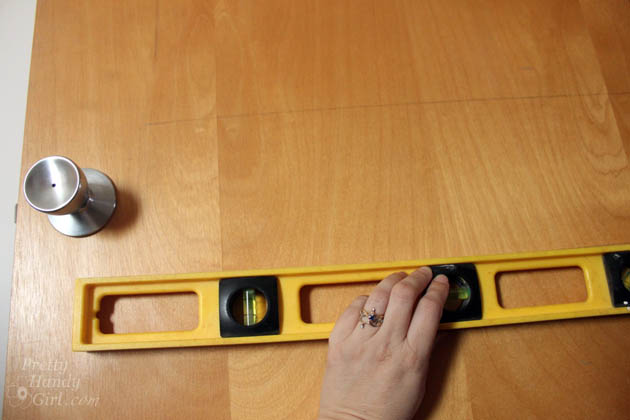
Start by measuring and marking the doors to determine the size of your panels.
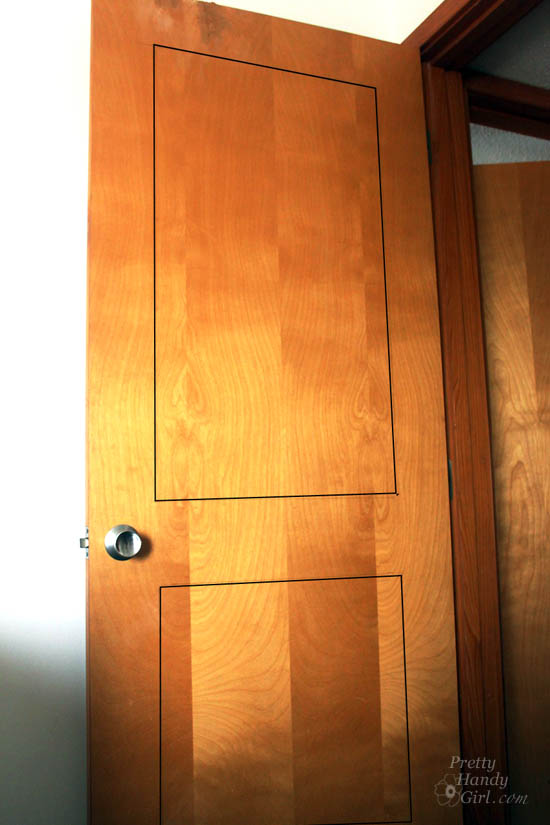
Draw lines 5″ in from the top and two sides of your door. Draw the bottom line 6″ up from the bottom. Finally, leave 5″ between the top and bottom panels.
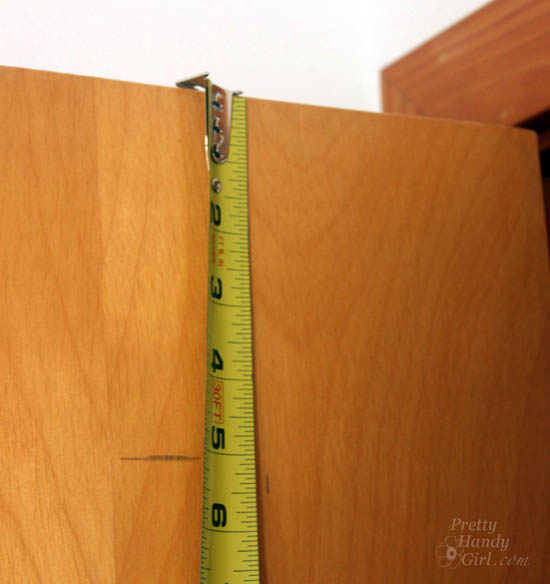
When marking your doors, use a pencil and level to draw your lines.
After we had our panel measurements, Caitlin and I headed to Lowe’s. But, she refused to push me in the cart (party pooper!)

We pulled some 4′ x 8′ beadboard panels and took them to the lumber cutting area. We gave the Lowe’s employer our measurements and asked him to cut the boards for us. While he cut our beadboard, Caitlin and I gathered the rest of our supplies.
Materials:
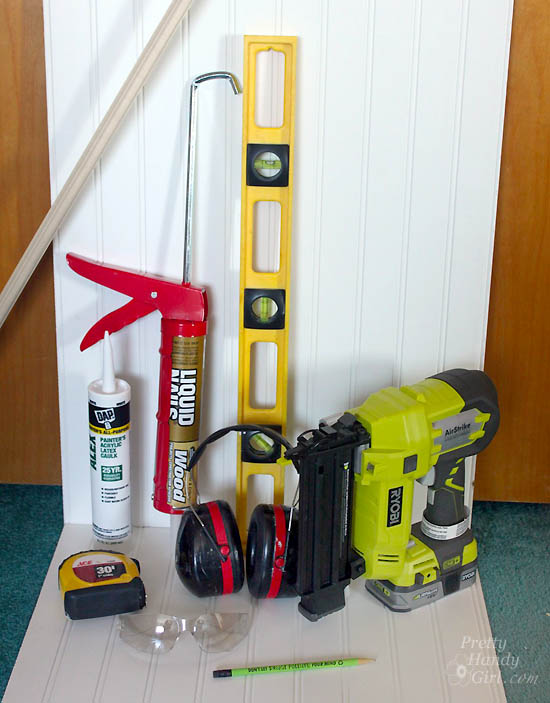
- Beadboard panels
- Moulding to frame panels
- Tape measure
- Pencil
- Level
- Construction glue
- Latex paintable caulk
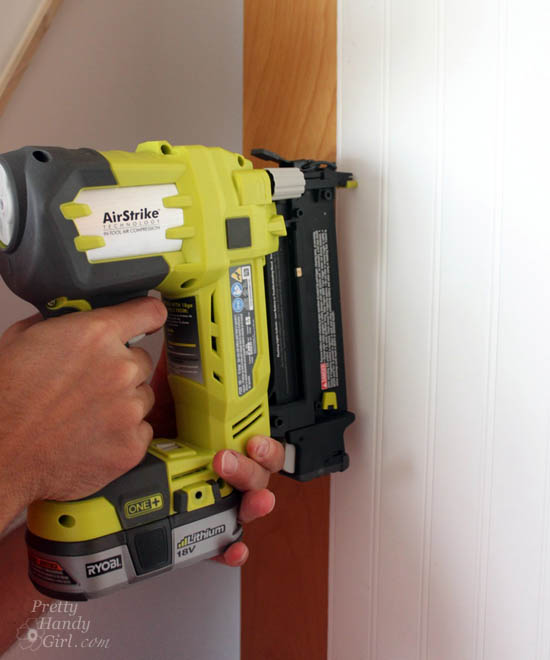
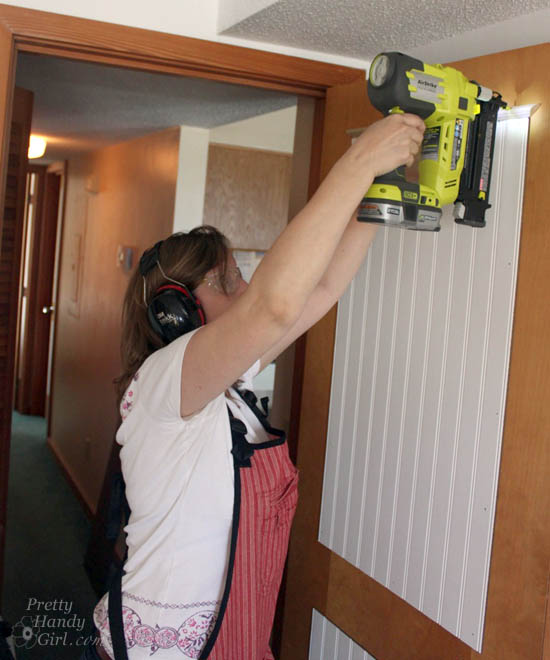
- Finish nailer
- 1 1/4″ finish nails
- Painter’s tape
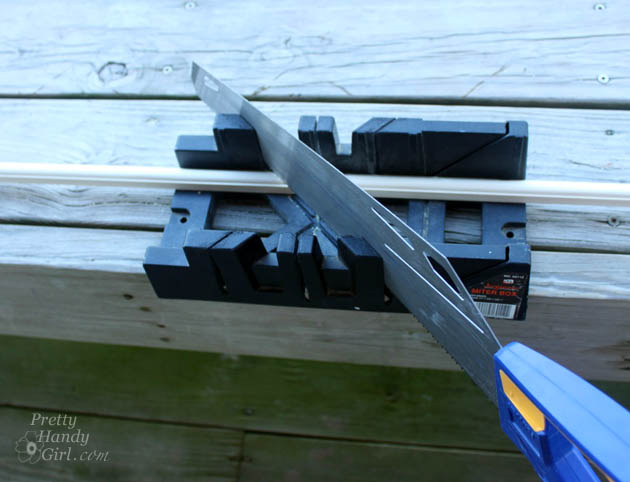
- Hand saw
- Miter box
- Eye protection
- Hearing protection
- Plastic wood putty
- Putty knife
- Sanding block
Instructions:
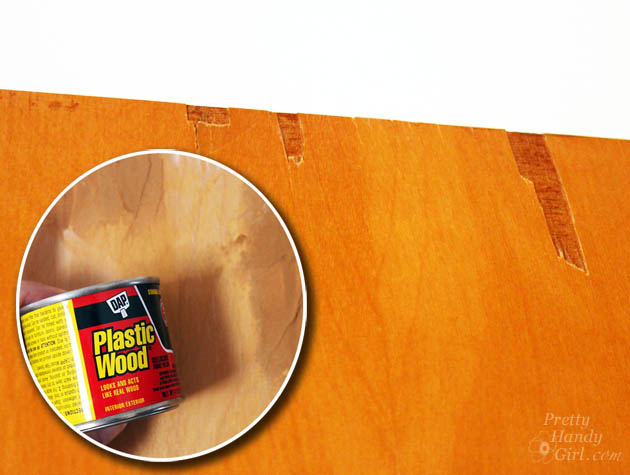
Assess the condition of your door. If there are chips or dings, you need to fix them before proceeding.
Apply wood putty and allow it to dry.
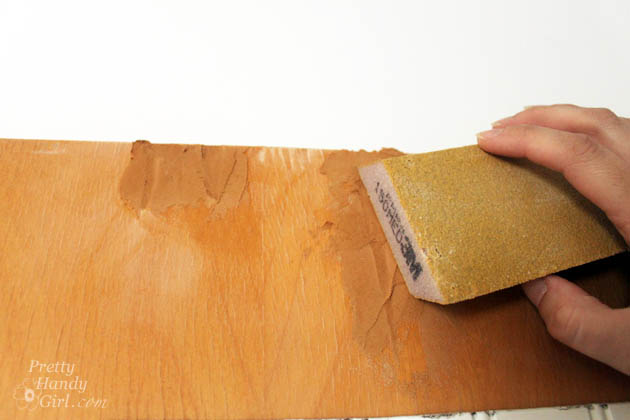
After dry, sand the putty smooth.
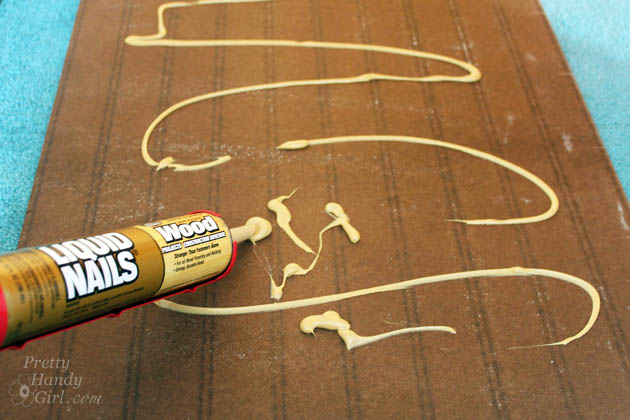
Time to apply the beadboard panels. Squeeze construction glue onto the back of the beadboard panels.
Set the panels on the door and double check the level and plumb of the panel.

Press the panel firmly to spread the glue. Use the finish nailer to secure the panel around the perimeter.

Attach the lower panel next.
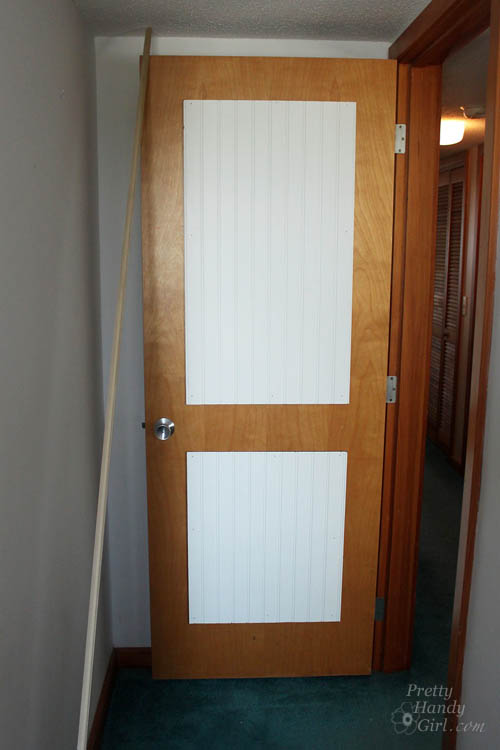
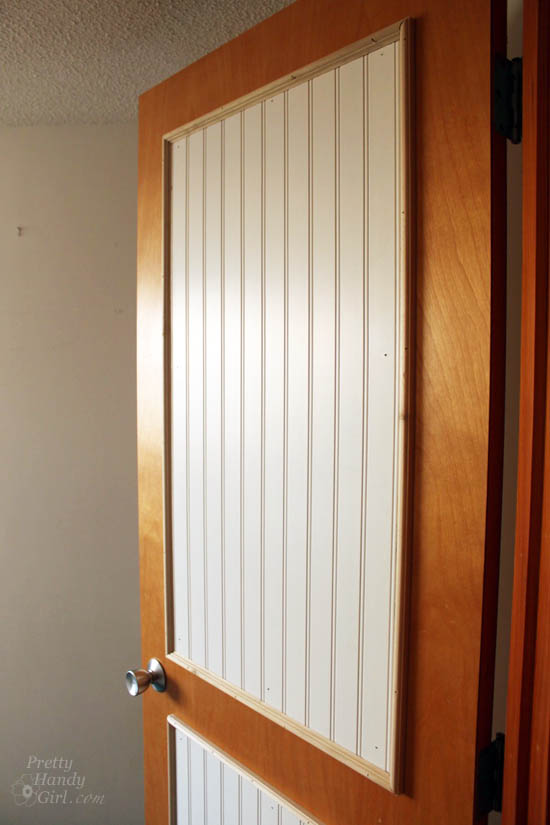
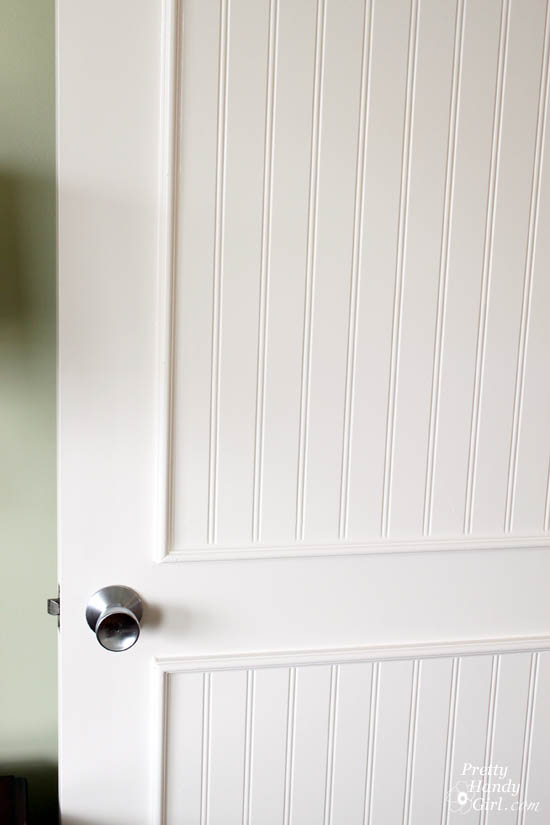
To trim the panel, measure and cut your trim molding to fit around the panel.
Set your top piece in place and secure it with the finish nailer.
Set the side pieces in place. Use painter’s tape to hold the corners tightly. Use more tape to secure the side piece if necessary.
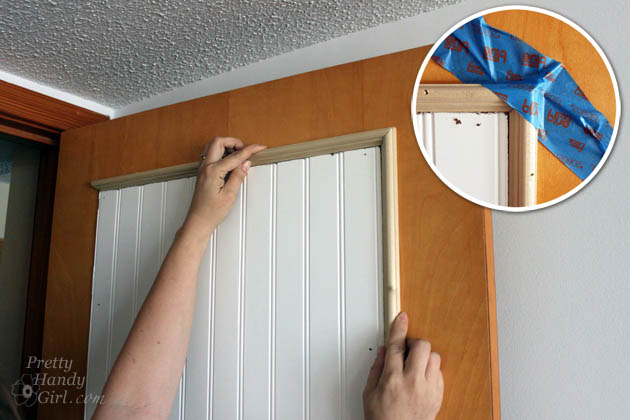
Attach the side molding with finish nails.
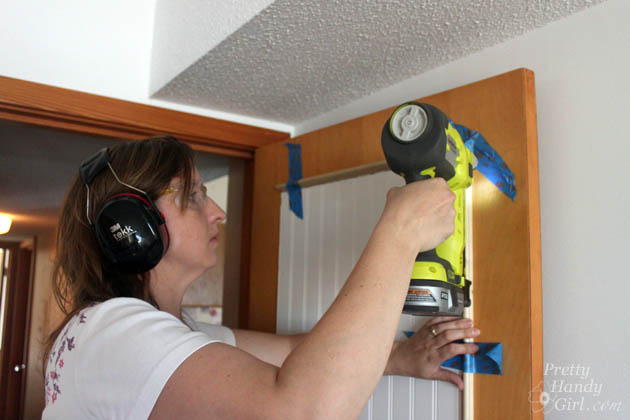
Attach the opposite side and the bottom molding pieces. Putty the nail holes and caulk the seams. Then prime and paint the doors.
Ooolala. How about that transformation?!
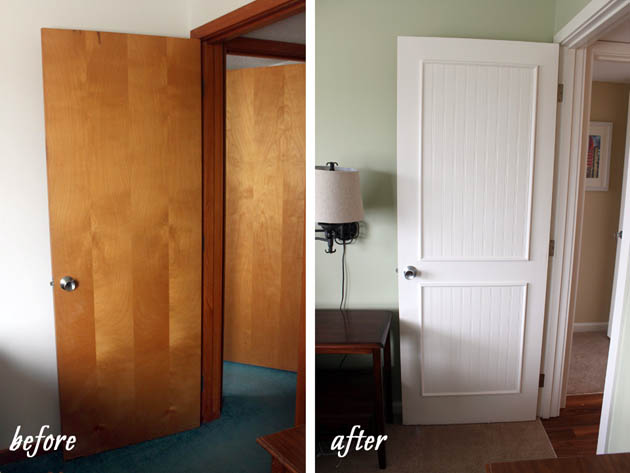
The newly paneled doors make a huge difference in the look of the condo.
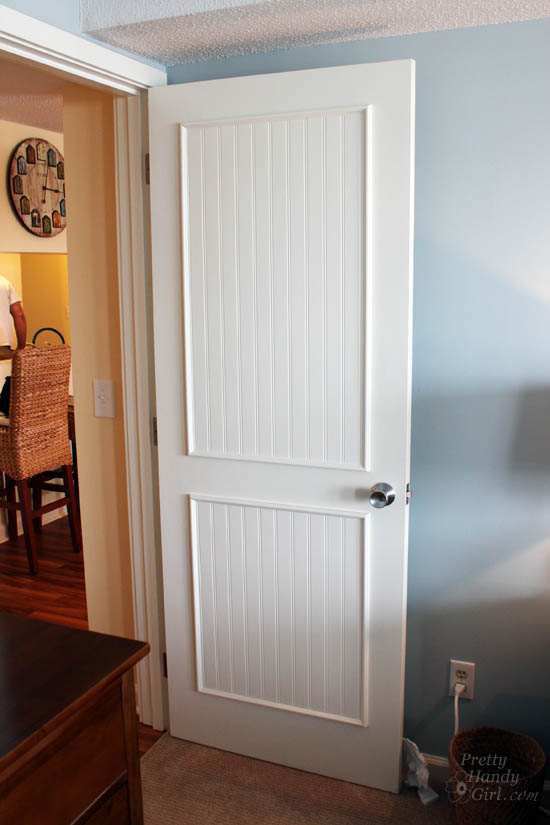
It’s all in the details.
Like what you see? Take the tour of the entire Topsail Beach Condo Renovation for more upgrade ideas.
![]()
Pin for later!

Did you do the panel and trim to both sides of the door? Or just the hallway side?
Thank you!
We didn’t do it on the bedroom sides, but easily could have.
How do you know how far to take the top portion down towards the door knob?
I used painters tape to “draw” out the design and see what looks good to me.
Love this! I don’t want to paint my doors, I want to stain to match the existing. Any suggestions instead of using the white beadboard?
Thanks!
You can buy wood beadboard unprimed.
Did you have to prime before painting?
yes, you should always prime raw wood before painting. But, if the material is pre-primed or painted with latex paint previously, you can skip priming.
Awesome job ! I’m a fellow DIY fan and fixer! Just curious what your overall cost was for this project or how much you saved versus purchasing brand new door with all the fixings. 😬👍🏼 thanks so much and keep rocking !
Did you paint the door frame too? You didn’t find that between the paint on the door and the paint on the frame it was too tight when closing the door?
Yes, in our case the doors were not too tight to begin with.
This looks like a great project – well done!
All your work is amazing, I will copy your idea for the beadboard doors… thanks so much
This is an amazing idea! What a great way to turn boring, nondescript doors into something special with a high-end look. I love this project!
Looks Amazing! Did you do the back side of the doors too?
We didn’t, but can at a later date.
Very cool. Will be trying this weekend! Would it not be easier to take the door off the hinges and lay it down?
I used a small foam roller.
Did you do the flooring as well?
No, I didn’t.
My husband also, he would have a house full of wood if I let him. Wood EVERYTHING!! YUCK!!
Exactly what type of trim did you use? Haven’t seemed to find any in the big box stores.
I’m not sure of the names, and I know trim moulding varies based on area. I’d recommend pulling a bunch of small trim to see if any work for your doors.
Looks fantastic Brittany! An easy step-by-step guide! Keep up the good work!
Hi, do you do this on both sides or just the side that people see from outside the space? Thank you
We only did it on the side that faces the living areas. But, you can do both if you like.
What kind of paint did you use?
Hi, awesome tutorial. Are the measurement the same for bathroom doors and closet doors? Thank you
I think you need to visually judge that for yourself. It depends on the width of your closet doors, but bathroom doors should be fine at the same.
Thanks for the inspiration on this! I tried the same thing on my doors, minus the beadboard (just because I didn’t think it matched the era of my house). The results are fantastic — so much better than I expected! I’m just finishing up the last of five doors and it makes such an amazing difference in my hallway. It has been a lot of work, but so worth it!
What did you do in place of bead board?
this looks amazing! can i ask what paint you used for the door?
Great job on the door-looks great! We’re looking to upgrade our plain, rough looking 1950’s hollow core doors as well. We painted a few, but they seemed to swell and scratch off the paint on the edge that closes. Any tips to avoid this?
Can this idea be also done to bathroom and kitchen cabinets and what material to replace bottom layer of cabinets. Would it be the same ? i want to get rid of this brown to it is all over this house big project on doors and cabinets , where can i get some good ideas
OMG i am definetly going to try this
Awesome transformation. I like it. And have a doubt for quite a long time. How do things are nailed into the wooden doors so perfectly? It looks like another layer…
Not sure what you mean. The caulk helps hide the seams.
Got it!!! Thank you
Love love love this idea, I’m currently repainting my dark ugly brown doors (all 10 of them!), they already look loads better!
My house was built in the 20’s and nothing is standard size, all my doors are custom size (even the door handles are lower than standard doors!) and the door jams are also custom this saves me thousands of dollars vs replacing them. I’ve seen this done on a few other blogs however I appreciate your instructions as they are much more detailed and answered some questions I had.
Appreciate your post and can’t wait to see how much better my house looks afterwards.
Hi. I want to do 4 panels rather than 2. Does the 5″ measurement from top, sides and in between panels still apply? Thanks
I’d suggest you layout your panels with painter’s tape and see what spacing you want to use.
I have been staring at a door in my kitchen for the last 2 months and thinking, “what am I going to do to this door?” Then, WahLah! I saw you had crafted the perfect solution and gave instructions on your website. I used beadboard above painted cabinets to fill the space exposed when I removed a drop ceiling, so this is the answer. Thank you!
I am renovating the house I am living in – northern NJ, 960 sq and built in 1900. Your Etta project is truly inspirational. So glad I found your site, Brittany.
Hooray Theresa! Glad you found this tutorial. Good luck on your renovations.
Thanks for sharing this DIY Brittany! I know it’s been a while now, but have the doors stood the test of time in the rental?
Quick question: Did you use the nails as well because construction glue alone wouldn’t be strong enough? Or is that just a personal preference?
Also, did you use primer on everything before painting? The door looks shiney, like it had a gloss painted on it before.
I think they came out looking great, and I’ve always thought that real beading looks better, so good choice! 🙂
Did this improve the soundproofing at all?
Pamela, I don’t think so.
Awesome idea! I have hollow doors in my home too and had considered buying and installing new 6 panel doors, one of which would be very expensive since it was not a standard width. The total cost of that upgrade for a total of six doors was quite prohibitive. I plan on trying this but will use stain instead of paint. Thanks again.
I love these! I was trying to get out of fixing he plea in my hollow wood doors, however. How important Ian it to repair Holes before you begin the project?
No need to repair any holes that are under the beadboard.
The inside doors in my house have holes in them from a guy putting his fist through them. Can I cover the holes with patches, like the ones used on walls, then cover with bead board?
If the holes will be behind the beadboard panels, there is no need to patch first.
I’m gonna do this. New house. Someone had anger issues and punched them. I got bread board at Lowe’s. The sheets were damaged. I knew i could figure something to do with them. Put half sheets on bath wall. Now gonna do some doors!
Loved this so much, I am doing something very similar to this on my front door now! Only question I have is did you caulk the inside seams on the panels or just the outside seams? Thanks!
I caulked both then painted. If you don’t caulk all the seams you’ll have a dark line where there are gaps.
Instead of using bead board I’m thinking of using bead board paintable wallpaper. Should I do the trim first or install the wallpaper??
Did you cut the panel to fit within your measurements and the add the trim on the outside of the panel?
I may have missed this, but what is the length of the top board?
Catherine, you need to measure your own door. Here’s what I recommend: “Draw lines 5″ in from the top and two sides of your door. Draw the bottom line 6″ up from the bottom. Finally, leave 5″ between the top and bottom panels.” Then measure the rectangles you drew to get your sizes.
Thank you. My husband explained that he would measure 2.5 inches above and 2.5 inches below center of doorknob to determine where the boards should end/begin. We are looking forward to doing this on our doors. Thanks again!
How did you cut the trim for around the beadboard? I want to do this but I’m not sure if i will know how to cut the trim wwith the angle.
Melissa, I used a miter saw, but you can use a hand saw and a miter box to help cut perfect 45 degree angles.
Just a quick Thank You for posting this project what a great idea! I am just finishing up a door that had seen better days located in my Mom’s Real Estate Office….I made a few additions like I used chair rail trim for the frames, added the wood embellishment and her initials…she almost started crying (for joy) when I revealed it! Keep up the great work and have an awesome summer!
I bet it looks amazing Michael! Thanks for sharing and I like your use of chair rail.
I want to do this!! My doors have like a faux raised wood grain texture to them…do you have any suggestions of how I could fill them in first?
oops… just saw that you already answered this
I know I’m quite late on a response, but I came across this site when trying to update my flat doors. Although I used glue and hand pounded nails instead of a gun, I used many of the same techniques you described above. Thank you so much for making this site. I did two doors in my kitchen just
Ike this and they look awesome!!!
This is an awesome idea. I am getting ready to redo my bathroom and this is perfect for my doors. My only problem is my doors are not flat doors. They have the raised “grain” in them. Any suggestions on how to deal with that along the sides? I hate them but would like to save some money.
Thank you for your posting. I just found you through another post from Pinterest. i will be checking out the rest of your projects.
Sandy, although it will take some time, you can wood putty all your wood-grain and then sand smooth when it’s dry. Then prime and paint after adding the moulding.
others have really said it all. just wanted to add my WOW to the conversation. lots of terrific ideas but the doors have to be the most bang for the buck. I am wondering how it would look with a wood stain look rather than paint. my hsb is usually in horror if I mention painting anything that starts out life looking like wood.
Hi! I’m trying to add moulding to a flat door but I’m having trouble finding moulding that is small enough. What type did you use? I was just at Lowe’s and I didn’t have any luck. Thanks! The doors look great!!!
Sally, I’m sorry you are having a hard time finding the moulding we used. I don’t know the name of it, but you can use any moulding you like for your project. Just take pieces off the shelf and lay them out with beadboard to see how they’ll look.
Beautiful door!
Any suggestion on how to re-create the look with a curved top panel? One that looks exactly like yours- except the piece at the very top is curved?
Thanks
Courtney, look for the flexible moulding. Perhaps use MDF? Or you can soak wood and gently bend it around your shape. You can see how here: https://prettyhandygirl.com/sports-gear-storage-shelves-small-space/
Hi Brittany!
This is an amazing idea and I’m thinking of trying it this weekend to dress up my apartment front door as I can’t afford to replace it at the moment.
I just had a couple of questions – when you were working out the measurements, was it 4″ from the top to the edge of the bead board or to the outer edge of the moulding? Also, do you remember how wide your moulding was?
Going to go and explore all your other ideas now! 🙂
Nicola, it was 5″ in from the sides and top to measure for our panels. After you have the panels cut and installed, then measure for your trim. I think the trim was about 3/4″. But, I’m not 100% sure.
Hi
Was it around $25 per side or for both sides.
Thanks
I can’t remember, but I’d guess per side because we only did this on one side of the doors.
Loved your post, we are buying a place at the lake. It is old and needs updated. I was wondering, if it would be easier to take the doors down. Just thought it would be easier to glue and paint them and the door jams.
Jan, if you have the room to take them down, go for it. We were cramped in the condo, so left them in place.
Brittany,
First let me say…AMAZING idea!! I feel the same way regarding replacing all our flat “natural” wood 1980’s doors. I cringe thinking they would go to the dump especially the heavier door leading to the garage. However they are hideous dated and clash with my brand new kitchen!! I would like your opinion if you were living in the property would you panel the interior side as well? I’m curious if you kept the popcorn ceilings Ha? Your opinion is appreciated!!
If I was living there, yes, I’d spend the time to do the interiors too. And yes, I would scrape the ceilings. We didn’t because this is a rental and we were already over budget. Hope that helps. Be sure you test your ceilings for asbestos if you decide to scrape. And if you do, here’s how: https://prettyhandygirl.com/scraping-your-own-popcorn-ceilings-its-a-messy-job-but-someones-gotta-do-it/
Hey – amazing transformation. I had 2 Questions; read through the comments and the one I had about ‘nails’ into a hollow door was answered….but here is my next concern BEFORE I go ahead with this….
WHAT paint/primer, etc do I use? How have your doors stood up? Paint chipping on the frame? I am most worried about going to all the work and then with the opening and closing….they look horrible (or the door frames do) in a month or so. ADVICE PLEASE and Thankyou!!
Tasha, our contractor ended up priming and painting all the doors for us. It hasn’t been a full year yet, but when I checked on them in August, they still looked great. Number one is to use a paintable caulk to seal all the seams. Caulk is flexible and will stand up to any swelling and contracting of the door. Regarding paint and primer. From experience I can tell you that you get what you pay for with paint and primer. Use a good primer like BIN or KILZ. Be sure to lightly sand the door after each coat and wipe off any dust. Paints that hold up REALLY well on doors, trim and cabinets are Benjamin Moore Advance and Sherwin Williams ProClassic. They are expensive, but again, you get what you pay for. Here’s a great post on painting doors for more information. https://prettyhandygirl.com/how-to-paint-doors-the-professional-way/
I know I’m late to this post but I just can’t help but comment. We are looking at purchasing a foreclosure and only planning on living in it for about 3 years. It is a true fixer upper and this is my answer to the old hollow core doors! If this were your home would you recommend doing both sides and for resale purposes? I also want to update the molding in the house and hoping to go with more of a craftsman style. Would like kind of molding look ok with the beadboard door?
Thank you so very much for the idea and instructions! I can’t wait to get started.
Awesome! My husband found your blog when searching “how to dress up a hollow core door”. I am so glad he came across this! thank you for sharing! This will save us a ton.
My wife and I have been checking your site out and it is awesome! I love this project as it takes a very traditional cheap door and makes it looks far nicer.
Such a great idea! I am filing this one away for our upcoming move.
Thanks Jill. It was an easy way to add character to plain doors.
I am SO excited about this post. I have hollow core, flat doors everywhere in my house and I knew that I wanted to paint them (they’re currently a dark stained wood), but I didn’t know how to dress them up without making them look cheap. Thank you for blessing me with this post 🙂
Also, we lived in Hampstead, NC for a while and loved visiting Topsail Beach. The last time we were able to go back for a visit was six years ago and we stayed in a condo on the beach. I miss that area and it brought a smile to my face to see it mentioned.
Kacy, you’re welcome. And Topsail is beautiful isn’t it! I hope you get back one day.
It was just last night that I was thinking to myself, “When I am rich and famous, we can finally replace all the hollow doors out for cute, paneled ones.” Looks like you saved me from buying all new doors! Clever, awesome, fabulous…just like you!
That is a pretty awesome project and the result is amazing! I’m in a new home and don’t need to do any update projects like that, but it’s so fun seeing a transformation like this. The finished door looks like it was made that way.
Nancy
Beautiful transformation on the doors Brittany! I love the beadboard. I would have to buy a finish nailer to do this to my doors and I notice there are different gauges, like 16, 18, 23 gauge. I assume that refers to the size of the nails. Can you give us some advice on how to choose a decently useful but not too expensive finish nailer? Like what gauge is most useful and any other features to look for. Thanks very much. I too have those ugly brown doors and I don’t want to just paint them. I’ve seen pictures of doors with trim added, but the beadboard makes them look so much more special. Thanks for the great idea!
Sharon, yes, gauge is the size of the nails. The higher the number the smaller the nails. I actually did a comparison post on finish nailers. I will be publishing it next week so stay tuned!
🙂
What did you do to the inside of the doors? Just paint them white?
Kelly, yes, we didn’t trim the inside of the doors because we were on a tight budget and were mainly trying to improve the view from the boring hallway of doors. So, yes, we just painted them white.
Amazing. Beautiful. You must look for reasons to walk through those doors, just so you can admire them. Great job!
Do you know what the approximate cost was? And did you do both sides? I have been considering this but a new door is approximately $75 and I started adding up the cost of the trim and other materials and factoring in time and I came up with a figure close enough to the cost of just replacing the door that I thought I must have added everything up incorrectly! I have 9 doors in my house and would want to do both sides for at least 6 of them, so 12 sides and trim….
Thanks!
Chelsea,
We only did the outside of the door that faced the hallway. The insides are just painted white. I’m checking with my sister who purchased the supplies, but I think the cost was definitely cheaper than buying new doors. I will reply when I get the actual cost. And, this is a lot easier than hanging a new door in existing door jamb. And even easier than removing and hanging a new pre-hung door. Plus, I hate to throw things in the landfill, so this is a perfect project that has little environmental impact.
Chelsea, I did a rough estimation on cost, and it cost approximately $25 per door (not including paint.) One 4×8 sheet was cut into 6 panels for three doors. And the molding we used wasn’t very expensive. The other supplies: glue and nails, etc. were minimal cost. And because we already had the tools, I didn’t count that into the estimate.
What size panel I need for door 30/80
Arthur, Draw lines 5″ in from the top and two sides of your door. Draw the bottom line 6″ up from the bottom. Finally, leave 5″ between the top and bottom panels. Then measure your lines to give you the dimensions for the panels you need.
Beautifully done! Thanks for the details on this project!
Awesome idea that I could use in a rental I have. I’ve always hated the hollow core doors & this is a great solution to replacing them. Awesome post!
I wish I had seen this about a year ago!! It would have saved me a lot of money in new doors!! Love this idea and if I ever move into a house with plain doors, this will be done to them!!!!
Great transformation – love the bead board!
I have a silly question, one I’ve wondered about many times – How does anything nailed into a hollow core door hold?
Tati, the small nails will only hold if you angle them when shooting them in. If you angle them at different angles around the beadboard, they will hold fairly well. But, you’ll also notice that I used construction adhesive for added hold on the beadboard.
Oh my goodness! I love this! Thank you for sharing this. I’m doing a redesign on my closet this weekend, I’m going to do this! Thanks so much.
This could not be better timing! I just added this project to my list last week. I love the addition of the beadboard. Thanks!
I love this. I need a make a list of projects and then I need to make it happen. I love this and I think this is awesome. Hi, I am 21 and I work full time, how do you find time to get all your projects done. I am a beginning DIYer any advice?
Brittany, well, considering this blog is my full-time job I make time to finish projects. But, I also make sure to make time for my kids. I don’t watch much TV and I rarely sit still (except when writing posts.) Also, like the HGTV shows, what takes you 5 minutes to read in real life takes several days. But, this is my passion, I love transforming the ugly to beautiful.
Ha ha… I love the door makeover, but even more I LOVE the pic of you in the shopping cart!! I’ll totally push you through the Lowes in a cart any day! Ha ha!!
I kind of thought you’d be the type to do this for me ;-). Next time my friend, next time!
What a great looking project! We’re breadboard fans too. To think I just replaced all our flat doors with six panel doors, when I could have done this instead.