Welcome back to another Tool Tutorial Friday! I hope you enjoyed some time off last week. Today I want to share with you a power tool that can cut long straight lines and it can cut curved lines with ease. This tool is also my “go to” tool when I need to cut plexiglass. I’m introducing you to a band saw.
Although the band saw is big and may seem intimidating, it actually isn’t very scary. The blade is usually a mere 1/4″ wide and the cutting action is not super loud and it doesn’t usually throw wood back at you. So, cutting with this power saw really gives you a lot of control and can help eliminate the intimidation factor.
The band saw I have it old, but it still gets the job done. If you were to buy a new band saw, the mechanics are basically the same and not much has changed over the years. The size of the band saw (usually 9″, 10″, 12″ or 14″) refers to the distance between the blade and the neck or side column of the saw. Prices for a new band saw vary from about $125 – $600. I would definitely recommend buying a band saw used unless you are running a business that puts out tons of wood projects. Also, make sure that your band saw comes with a detachable rip fence or you will need to purchase one to fit your saw. This is important for making straight cuts.
A band saw has a circular one piece band shaped blade. The blade rotates around the two wheels at a high speed and allows for precise cuts.
There are several blades available for a bandsaw. In addition you could buy a sanding band for sanding intricate cuts. Band saw blades have a TPI (teeth per inch) number. In general, the more teeth per inch the tighter the cuts and more intricate details it can handle. However, that blade will flex more and cannot cut harder stock wood as efficiently. For straight cuts and thicker stock, a lower TPI number is desired. For a more detailed explanation of band saw parts and blades, check out WoodworkingHistory.com’s bandsaw syllabus.
The ONLY saw that I know of that will make more precise cuts than a band saw is a scroll saw. And when I talk precise, I mean making doll furniture type precise. A band saw is used for ripping, cross cutting, curved cuts, circles, you name it! So, why would you need anything else if this saw does it all? Well, sometimes speed is a factor, the band saw is not super fast when ripping a piece of plywood. Plus, you are limited by the width of your bandsaw. You have to work with a board that will fit in between the blade and the neck of the saw (this is specific inch size of your saw.)
Personally, I prefer using the band saw for smaller projects and cutting plexiglass, thin metal, or intricate shapes. It is a staple for anyone who wants to cut letters out of wood! When making intricate cuts, you will need to plan your cutting paths. In other words, you can’t put your wood in and cut around like you would scissors in a piece of paper. Here is an example of what I’m talking about:
To cut the letter “T” out of a piece of wood, you’ll likely have to make several cuts into the wood, making your cuts meet at tight angles or corners.
Before making any cut using a band saw, you need to make sure that your guide is set for the proper depth. You want the guide to ride just above your board. There should be approximately a 1/16″ space between the wood and the guide so the board doesn’t get pinched between the guide and the work table. On my band saw the adjustment is made by loosening a screw at the back of the machine, raising the guide, and re-tightening the screw.
My band saw also has a work table tilt lever for making bevel cuts. Honestly I’ve only used this feature once, but it is nice to have. Simply turn the lever to loosen the bolt holding the table in place. Then tilt the table to the desired angle and re-tighten the bolt.
That’s basically it for setting up the band saw. Before cutting be sure to wear safety glasses. Ear protection is a good idea, but I’ve been known to skip it since this saw doesn’t bust my ear drums as much as some of my other power tools.
As I’ve said before, keep in mind your safety is in your own hands:
DISCLAIMER
The viewer assumes all responsibility and liability associated with the hazards of woodworking. Pretty Handy Girl is not responsible for any errors or omissions that may be present in this tutorial. She also assumes no liability for any action or inaction of a viewer.
Please use extreme caution when using power tools. Read your tool manual thoroughly and wear protective safety gear. Take your time familiarizing yourself with a tool before using it. (If you are missing the manual, you can easily find it online by going to the manufacturer’s website or google your saw’s make and model + manual.)
Please recognize that I have tried to put together a basic band saw usage tutorial to get you started. I have tried my best to show the safest way to use a band saw. That being said, I am not a professional (I only play one on this blog .)
And here is the video tutorial:
Okay, time once again to let me know what you think about this tutorial; ask any questions; or simply beg to win. When you do so, you will be entered to win this cutie!
Don’t let her pink attire fool you. This lovely lady packs a punch that will knock out any “boy’s” hammer! So limber up those fingers and leave me a note. Your comment will automatically enter you into the 13 oz. Tomboy Tools magnetic hammer giveaway. Good luck!
https://prettyhandygirl.com/wp-content/uploads/2011/12/band_saw_promo_image.jpg564411Brittany Baileyhttps://prettyhandygirl.com/wp-content/uploads/2021/07/PHG-logo-tagline-2020-1030x211-R.jpgBrittany Bailey2011-12-02 11:36:582021-08-06 16:11:59Tool Tutorial Friday – How to Use a Band Saw
Welcome back to another Tool Tutorial Friday. I have a secret to tell you, this is one of the two power tools I own that I fear the most (the other is my router.) However, everytime I use my table saw I get a little more comfortable. Regardless, I will always keep that “healthy fear” so I won’t forget to use caution when using this power tool.
If you are just getting used to power tools, I would use a jigsaw or miter saw before tackling this big bad boy! That being said, I believe in all of you and know you can use a table saw, so let’s get to it!
A table saw is a great tool for ripping long pieces of wood. Unlike the miter saw which is limited to a certain width stock, the table saw can handle long sheets of 4′ x 8′ plywood.
Explanation of a cross cut vs. a rip cut:
Rip – ripping a board is cutting with the grain along the length of a board. This is usually done with a table saw, but can be done with a circular saw and a straight edge.
Cross cut – a type of cut that is perpendicular to the grain or along the width of your board. Cross cuts are usually made with a miter saw or circular saw, but can also be made with a hand saw. (I’ve been known to make this cut using my band saw before I had either a miter or table saw.)
We bought our table saw when we laid the wood floors in our living room. I knew that we’d probably have to rip a board or two once we reached the end. Well, wouldn’t you know that our living room ended up being the perfect size for all full width boards. I kept the table saw anyway knowing that I’d use it (and I have used it a fair amount.)
Table saws come in either a stationary or a portable style. I prefer the portability of my table saw. I can roll it out into the driveway (to keep the sawdust outside.) And, because the stand is built-in, I can fold it up on its side, roll it back into the garage and store it away when not in use.
I highly recommend wearing ear protection, safety googles and a dust mask when using a table saw. Hooking your table saw up to shop vac will greatly reduce the amount of saw dust that is discharged (and it spits out a lot of sawdust!)
Two common dangers of using a table saw are kickback (the board being thrown back toward the user) and hand injuries from forcing material through or feeding the wood with the hand too close to the saw. Kickback will happen if the wood is pinched too tight between the rip fence and the blade. When making a cross cut with a table saw, DO NOT use the rip fence! This can cause kickback to occur.
Table Saw Features:
Safety features are super important on a table saw. A blade cover is essential to keep hands away from the blade. And for that reason a table saw should never be used without the guard in place. For even more protection from hand injuries, there is a table saw that is manufactured under the name Stop Saw, that retracts in a split second if it detects flesh against the blade.
Behind the blade on my table saw are anti-kickback pawls. This is a close up view of this safety mechanism. They are basically teeth that will dig into the wood should the blade start to “kick back” the material toward the user.
The rip fence is used to setting the width of a cut and keeping the board straight when making a rip cut. Never use the rip fence when making a cross cut. My saw has a miter fence for making angled miter cuts. I honestly haven’t used that feature yet.
The blade depth adjustment and bevel adjustment knob are one and the same on the Ryobi. To adjust the bevel, push the knob in and then turn it.
The material support and the sawdust chute are located on the back of my table saw.
When using a table saw, be sure to have a clear work area. Set up supports or have someone help you to support large pieces of wood after they exit the saw. Use a push stick to assist when making a narrow cut. Do not wear any loose clothing or jewelry that could catch on the machine. Always use a table saw when you are well fed, alert, and are not in a hurry. This is a serious power tool and requires all your focus to use it.
DISCLAIMER
The viewer assumes all responsibility and liability associated with the hazards of woodworking. Pretty Handy Girl is not responsible for any errors or omissions that may be present in this tutorial. She also assumes no liability for any action or inaction of a viewer.
Please use extreme caution when using power tools. Read your tool manual thoroughly and wear protective safety gear. Take your time familiarizing yourself with a tool before using it. (If you are missing the manual, you can easily find it online by going to the manufacturer’s website or google your saw’s make and model + manual.)
Please recognize that I have tried to put together a basic table saw usage tutorial to get you started. I have tried my best to show the safest way to use a table saw. That being said, I am not a professional (I only play one on this blog .)
If I haven’t scared the sawdust out of you, here is the video tutorial for using a table saw:
I hope I have empowered you to use a table saw at some point. It is a good saw to have in your shop. Especially if you need to lay wood flooring, install beadboard wainscoting and many other projects that require you to rip a board.
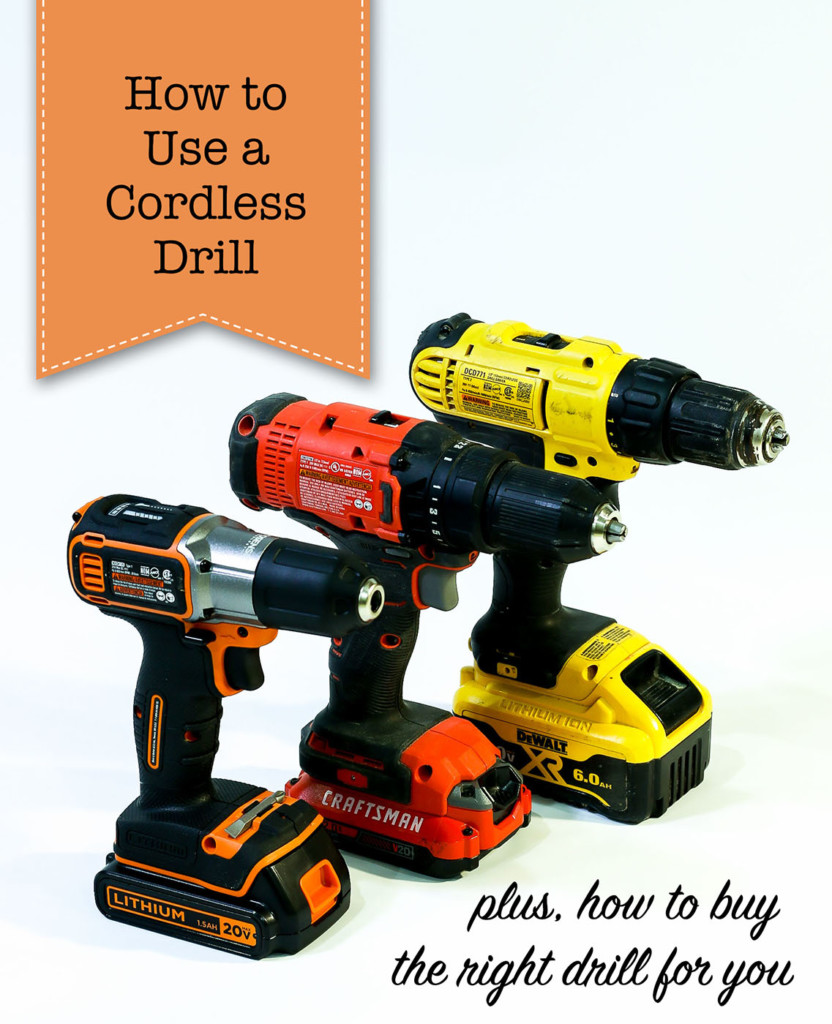
A cordless drill is an essential tool for any DIYer. If you don’t have one, stop reading this and go buy one! Seriously, a cordless drill is one of the most important tools for your toolbox.
How to Use a Cordless Drill
If you’ve been reading my blog for a while you know I use a cordless drill for almost every project. You could say, my drill is my right-hand man. Over the years, I’ve used many different brands with a variety of features. Today we’ll discuss how to use a cordless drill and a list of features you should look for when buying a new drill. Consider this your comprehensive guide to cordless drills.
(I’ve included affiliate links for your convenience. I earn a small percentage from a purchase using these links. There is no additional cost to you. You can read more about affiliate links here.)
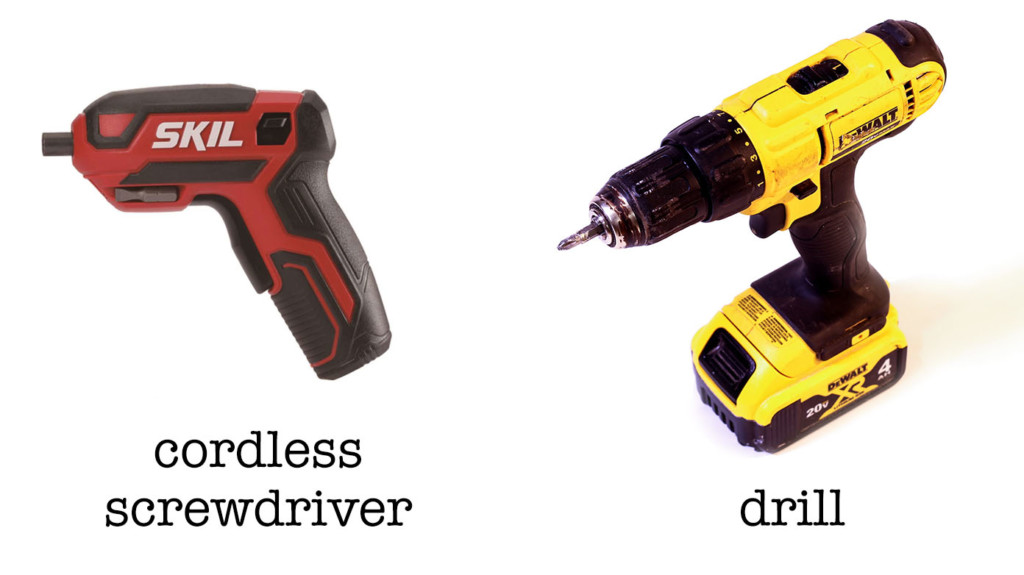
These Tools are Not a Drill:
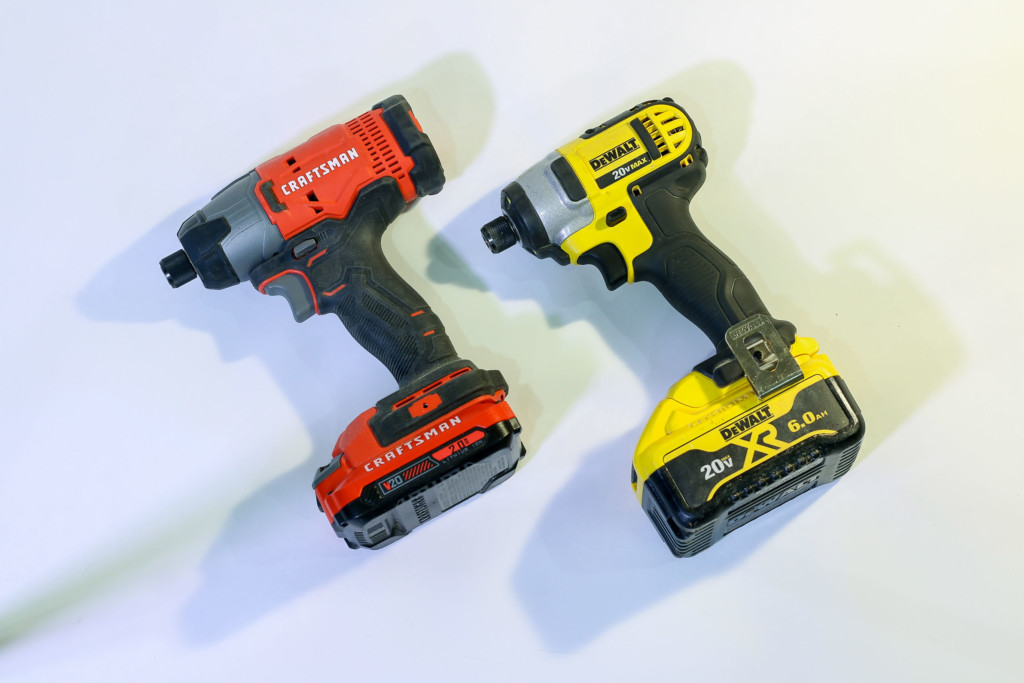
Before we talk about how to use a cordless drill, I want to explain to you the difference between a cordless drill, a cordless screwdriver, and an impact driver. Although they may look alike, impact drivers and cordless screwdrivers are not drills.
Cordless Screwdriver:
Some may look like a drill, but a cordless screwdriver does not have the power or speed to drill holes, or drive screws into hard materials. It also has no torque or speed adjustments. In fact, a cordless screwdriver is strictly for loosening and tightening screws.
Impact Drivers:
Although they also look like drills, impact drivers are solely meant to drive screws or bolts into tough material. But, can also be used with a quick change drill bit for small holes. An impact driver has rotational force onto the sides of the bit giving more force when driving screws or bolts. Unlike a drill, the impact driver does not have torque adjustments or a twisting chuck to change bits.
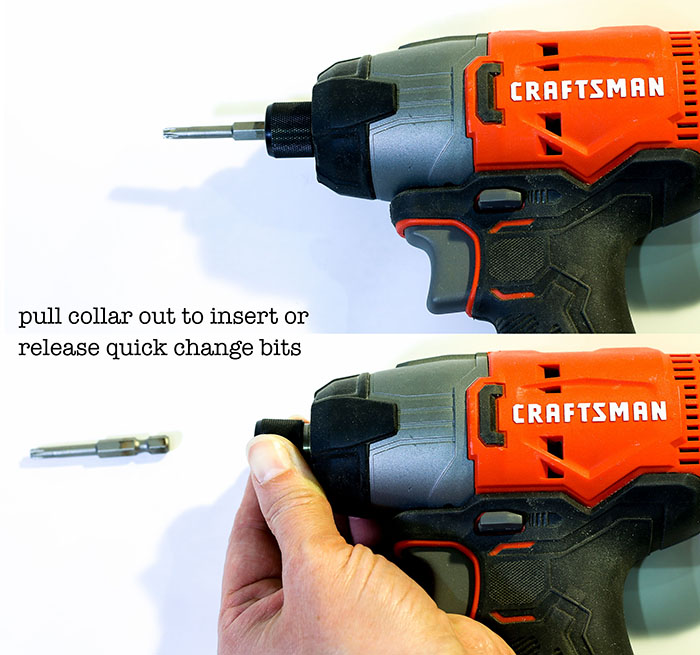
Impact drivers don’t have a chuck to hold the bit. They use a collet to hold bits. Impact drivers accept 1/4″ hex and quick change bits. The collet releases the bit when pulled away from the tool.
Now that you know the difference between a drill and a cordless screwdriver or impact driver, let’s talk about the features on a cordless drill.
About Cordless Drills:
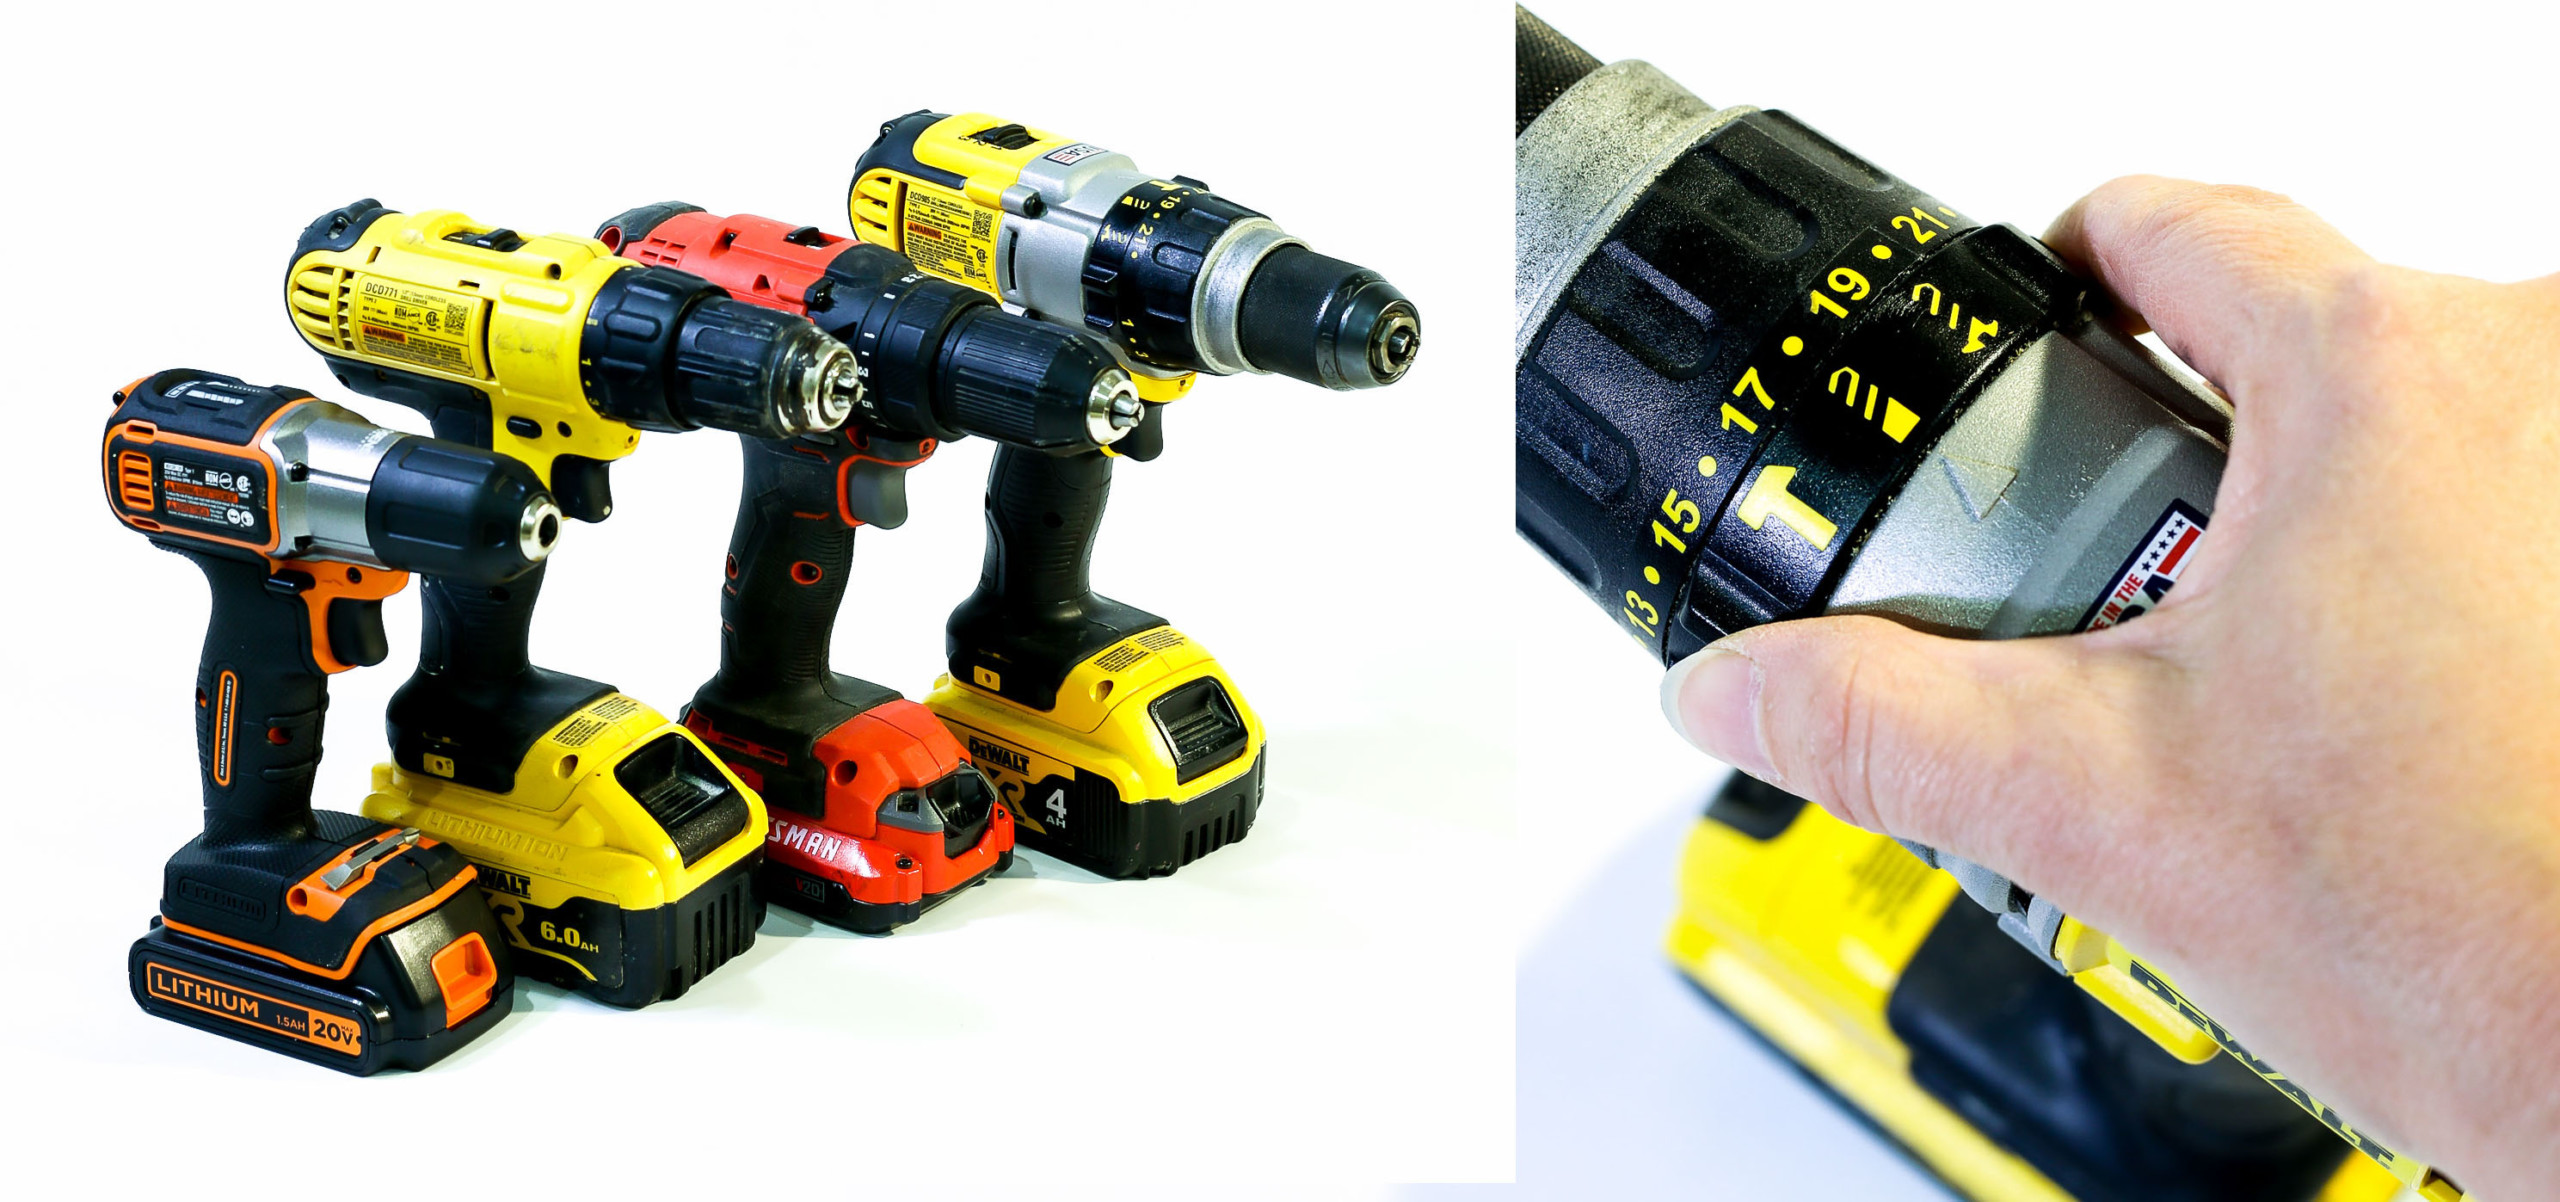
When you first pick up a cordless drill, all the buttons and symbols on the drill may seem confusing. Have no fear, I’ll break it down and give you a little more information about torque, speed, and those symbols to simplify things.
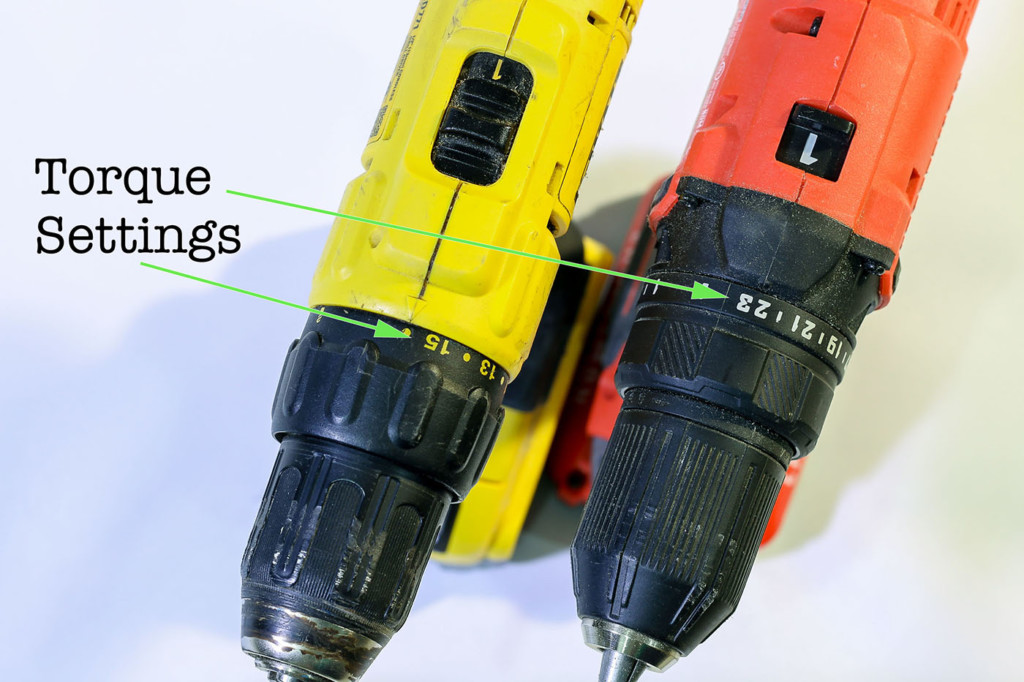
What is Torque:
Torque is the amount of force your drill uses to turn an object (like a screw or drill bit.) All cordless drills have a clutch to change the torque setting. The clutch on your drill is the dial on the front of your drill just behind the chuck.
If you need more torque, use a higher number. But, if you are driving screws into softwoods, use a lower setting for more control and less likelihood of driving the screw too far into the wood.
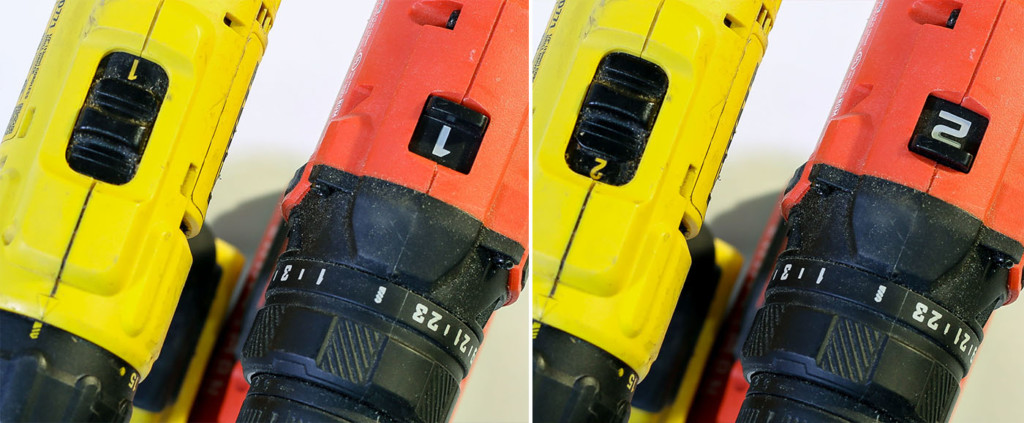
Speeds on a Cordless Drill:
Some drills have an adjustable speed setting (or gear) switch on the top of the drill. Switching between one or two will give you access to more speed or less speed. Selecting the number two will produce higher speed and more power for drilling and driving bigger screws. This is a nice feature and helps when you need to switch from driving smaller screws into softwood vs. driving larger screws into hardwood or drilling.
Direction Selection:
There is a button on each side of the drill just above the trigger that is used to change the drill rotation direction. Clockwise to drill and drive screws. Counter-clockwise to remove screws and bolts.
Optional Features on a Cordless Drill:
Drills come with a variety of features. Depending on your needs, you may be fine with a standard drill that drives screws and drills holes. But, if you are working on more difficult tasks, you may want a drill with a hammer drill setting.
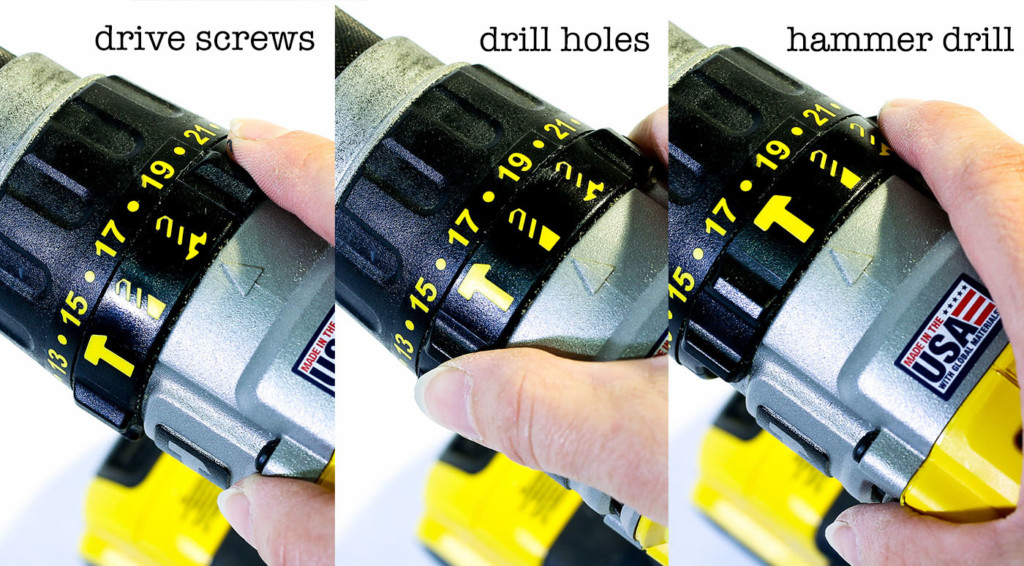
Task Selection:
Drive Screws: The first function is self-explanatory. Use the drive screws function to screw in fasteners or remove them.
Drill Holes: The hole drilling function runs at the fastest speed and is used for drilling holes with a drilling bit.
Hammer Drill: A hammer drill is useful for drilling holes or driving bolts into tough material. A hammer drill has a hammer action from the rear that pulses force directly onto the bit (like a small jackhammer.) In contrast, an impact driver has a rotational pulse on the sides of the bit. (See above for more information about impact drivers)
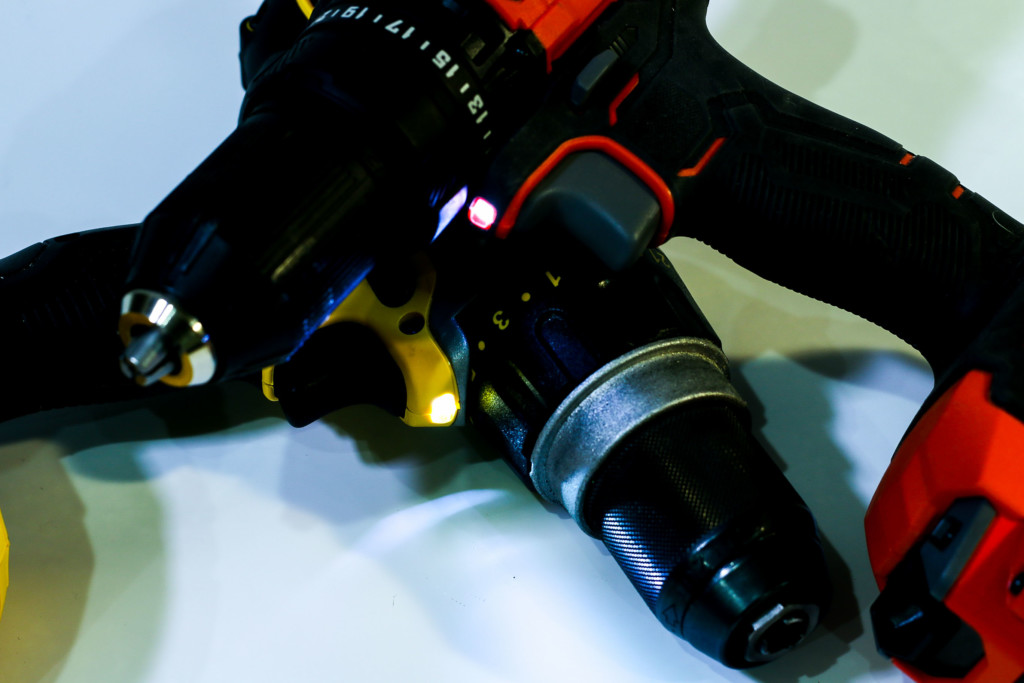
Light Up Your Task:
Another nice feature to have on a drill is a light. Most mid-range to upper range drills have a light that is activated when pulling the trigger on the drill. Although not 100% necessary, anyone who has tried to see inside a cabinet while using a drill appreciates the light feature.
Belt Clip:
Having a belt clip on a drill is one of those features that a tradesperson finds exceptionally helpful when juggling tools on a ladder. Instead of setting the drill precariously on top of the ladder, it can clip onto your belt.
Magnetic Holder:
One of my favorite features on a drill is a magnetic bit holder. This is not standard on drills and frankly I have only seen a few drills with this feature, but I wish more were manufactured with it.
How to Replace Bits on a Drill
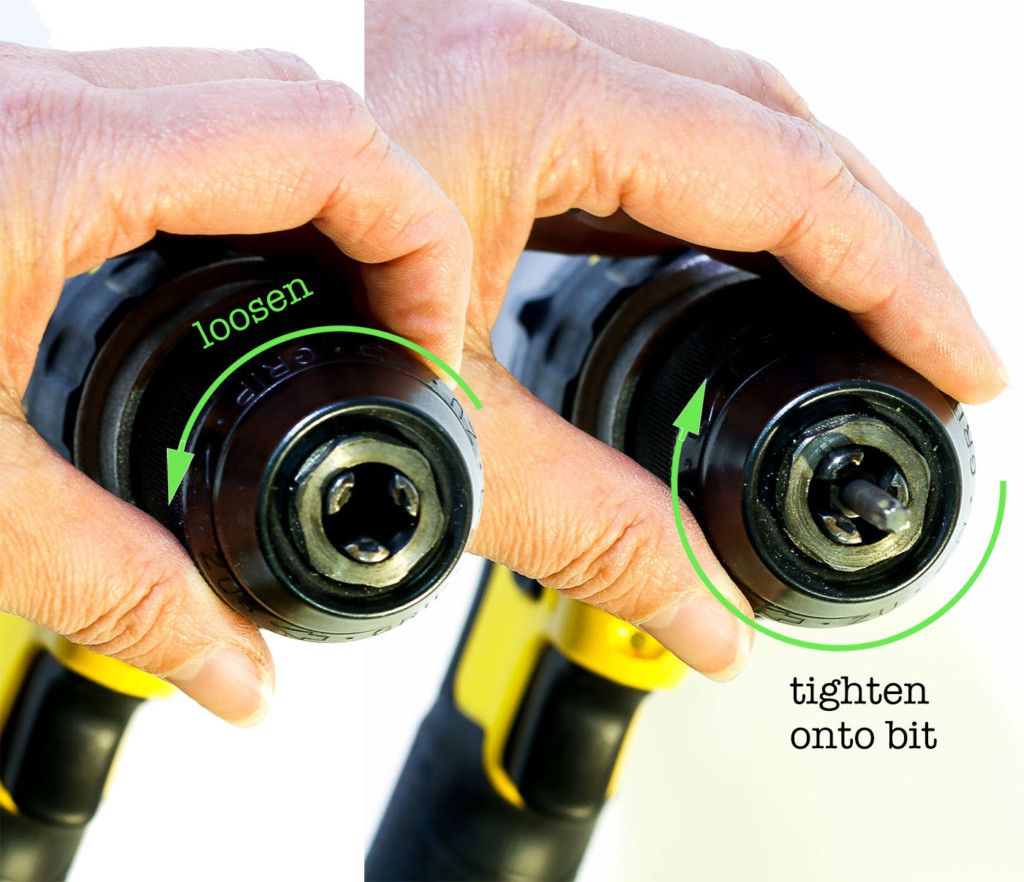
Cordless drills have a keyless chuck. To change the bits, simply turn the chuck counter-clockwise to loosen. Insert the new bit and turn clockwise to tighten onto the new bit (making sure the bit is centered in the claws of the chuck.)
A keyed chuck is found on most corded drills. The key (black tool shown below) fits inside the hole on the side of the chuck and turns the gears on the chuck to loosen or tighten it.
Costs for a Cordless Drill:
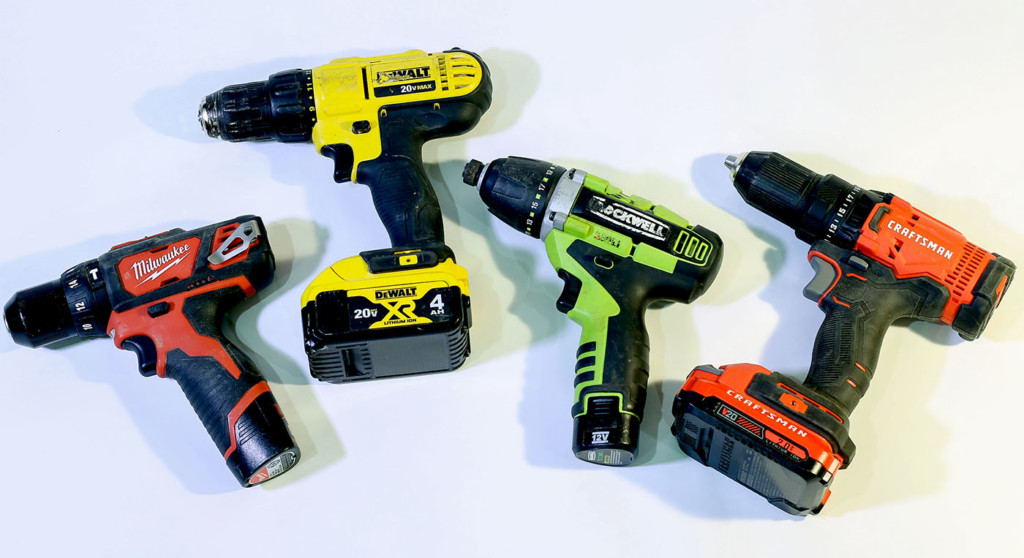
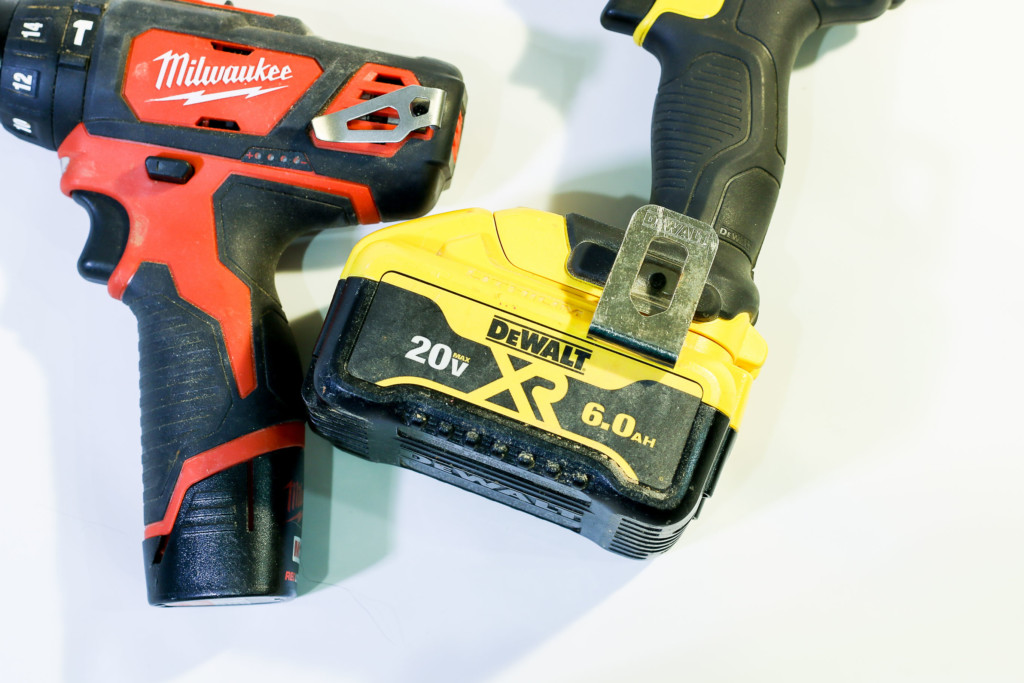
Brand and features factor into the price of a cordless drill, but typically a DIYer can expect to spend $50 – $150 on a drill. My first drill was a Ryobi 12 volt Lithium Ion cordless drill, but I quickly upgraded to a more powerful Milwaukee Drill/Driver. Now I’ve switched over to a cordless DeWalt drill/driver set because most of my cordless tools are DeWalt cordless tools. Keeping all your cordless tools in one family will save you money, space, and the hassle of having too many different batteries in your toolbox. (Side note: DeWalt batteries are cross-compatible with most of their 20v tools? The exception is the 12v tools that will only run on the 12-volt batteries. And the 60V and 120V tools will need the stronger FlexVolt batteries.)
How Many Volts Do I Need?
You may be curious about what the volts mean on the drill you’re considering. In short, the volts equal the power of the drill. The higher the voltage, the stronger the drill. In all honesty, I would recommend purchasing an 18-volt drill if you plan to use it for multiple DIY projects. In the beginning, you might try a 12-volt drill, but as your projects grow you’ll find the 12 volts don’t have the power needed to muscle through hardwoods and other tough materials. The DeWalt drill I use now is a 20 volt, but I needed the power to muscle through old-growth lumber in the renovation I was working on.
Batteries: Ni-Cad vs. Lithium-Ion
When I first wrote this article, lithium-ion battery drills were just coming onto the market. Lithium-ion is the latest battery technology. Lithium-ion batteries will last through many more recharges than a Ni-Cad battery. And, they don’t lose charging capacity over time. The lithium-ion batteries also maintain power as the battery runs low. As the battery loses charge, it will stop when the battery runs out.
Luckily over the years, lithium has become more the norm in the cordless department. If you are in the market for a new drill, be sure to make sure you are purchasing a lithium-ion battery-powered drill. Beware of used or inexpensive Ni-Cad battery drills. You will save money on one now but will need to replace the battery (or worse not be able to purchase new batteries) for it before long.
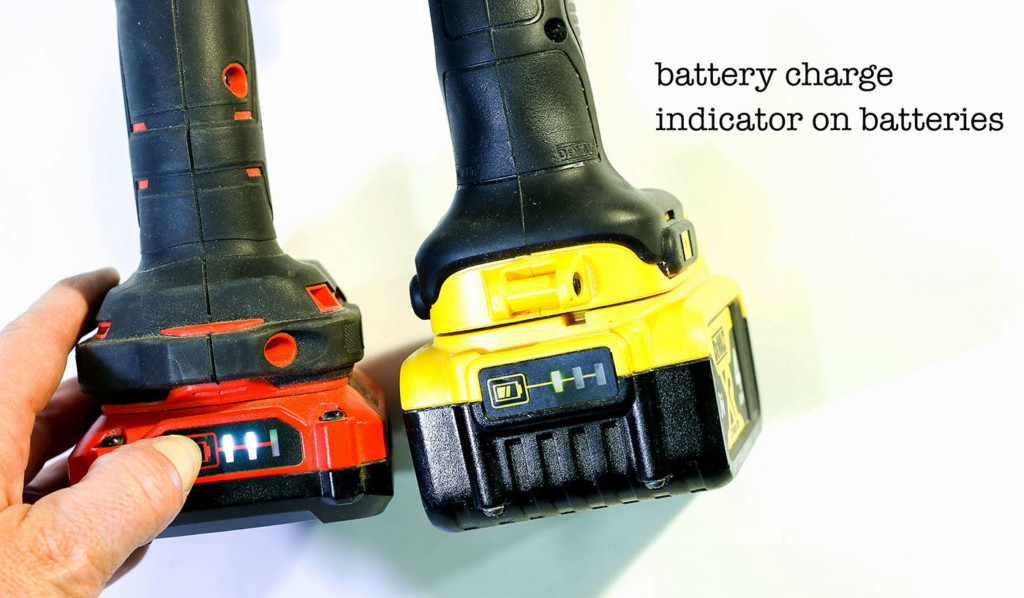
Speaking of battery life, I recommend choosing a cordless battery that has a charge indicator on it. There’s nothing worse than grabbing a battery you thought was fully charged only to realize it’s not.
Feel the Weight of the Drill:
Now that you are honing on in the features you want in a drill, let’s talk about weight and balance. I highly recommend trying a drill before you buy it. Go to the hardware store and ask to hold the drill with its battery inserted. Some drills (especially the higher voltage drills) will be significantly heavier than a smaller 12-volt battery drill and may cause wrist fatigue if you aren’t used to the heft. You also want to feel the balance of the drill in your hand. A nicely balanced drill can easily be held with one finger wrapped around the trigger and the tool resting balanced on your hand. A front or back heavy drill can put extra strain on your wrist.
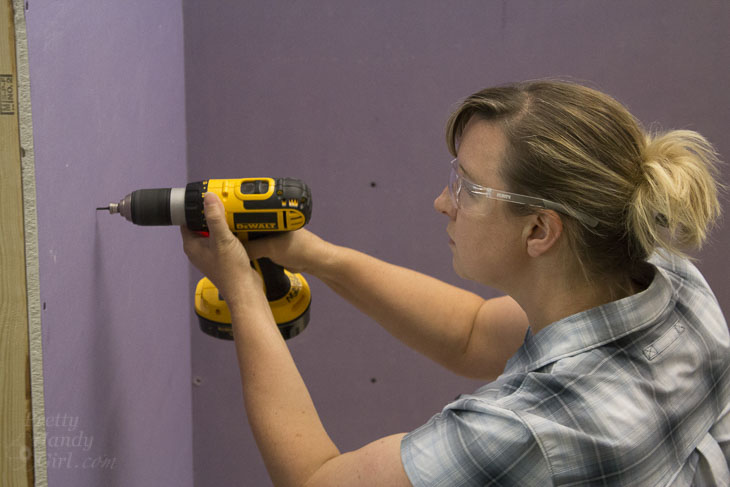
How to Use a Cordless Drill:
Time to start using a cordless drill! This is a very user-friendly tool as long as you know a few simple safety tips.
Safety Tips:
Never wear loose clothing or gloves when using a drill. Keep long hair tied back. You don’t want anything to catch and wind up into the drill. Always keep hands away from the drill bit, screws, or fasteners. Never put your hand behind the piece you are drilling into. Always wear safety glasses when using a drill. (Ear protection is a good idea when using the hammer drill function.)
To Drive Screws:
Set the drill on a low torque setting. Hold the screw perpendicular into the wood (hold it up at the top against the smooth portion of the screw if there is one.) Slowly squeeze the trigger to rotate the screw clockwise far enough into the material for the screw to start to grab. Remove your hand, keep pressure against the drill as you depress the trigger again and drive the screw into the wood. Stop when the screw is flush with the material (or slightly below the material).
Troubleshooting Screw Driving Issues:
If the bit is spinning and not gripping the screw, try one of these solutions:
Apply more pressure against the back of the drill
See if your bit or the screw is stripped
Try lowering the torque
Check the bit size, if it’s too small or large it won’t grip the head properly.
DO NOT continue to let the drill bit spin on top of the screw. This will strip the head.
If your drill makes a loud sound and stops turning the screw, try changing to a higher torque or speed setting. This usually means, you need more torque for the task.
To Drill Holes:
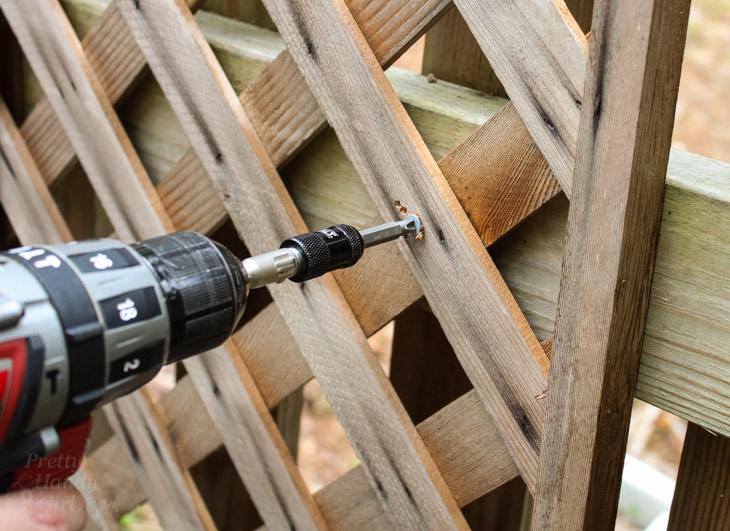
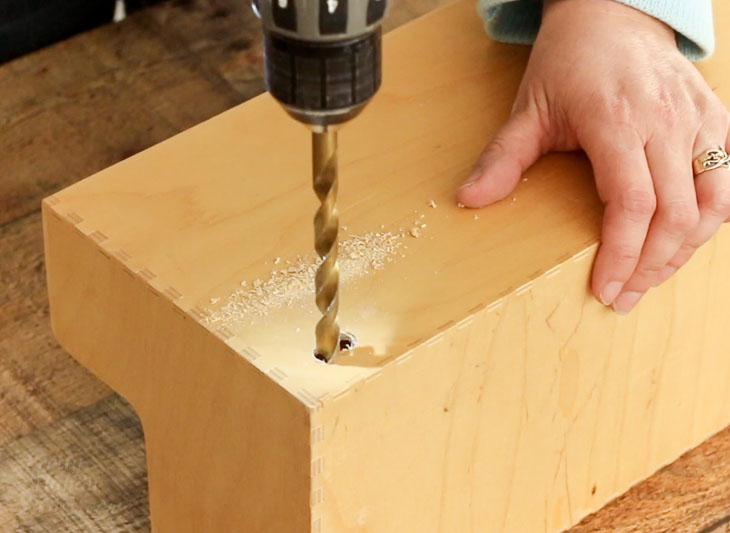
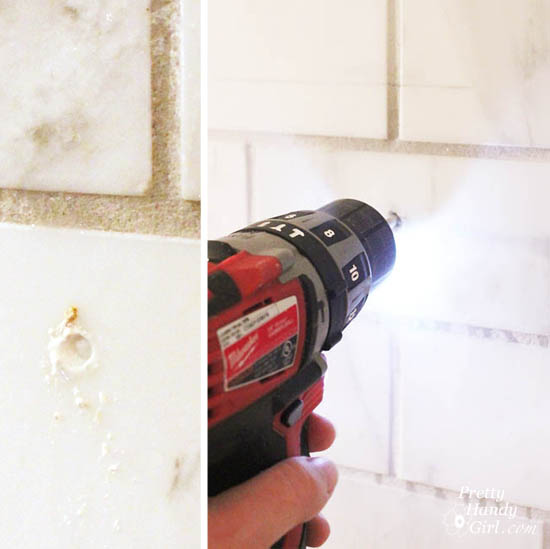
Measure and select the appropriate drill bit for the hole size you need to drill (and for the material you are drilling into.) Insert the drill bit into the chuck and tighten, making sure the bit is centered in the chuck. Set the drill onto the drilling setting. When drilling into wood, gently depress the bit into the wood to create an indentation to keep the bit from sliding. If you are drilling a hole into metal or other slick surfaces, try using a piece of painter’s tape on top of the material to keep the bit from sliding.
When drilling holes into masonry, ceramic, porcelain, and other hard surfaces, be sure to cool the bit occasionally with water.
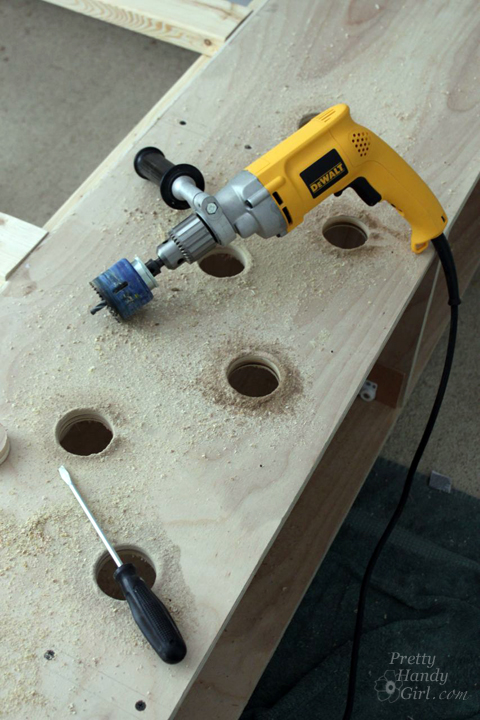
To drill large holes, use a hole saw or a Forstner bit. It helps to use a corded drill with more power for drilling large holes.
Trick for Drilling Holes to a Certain Depth:
Use a piece of painter’s tape wrapped around the drill bit to the depth you want to drill to. Stop when the painter’s tape is even with your surface.
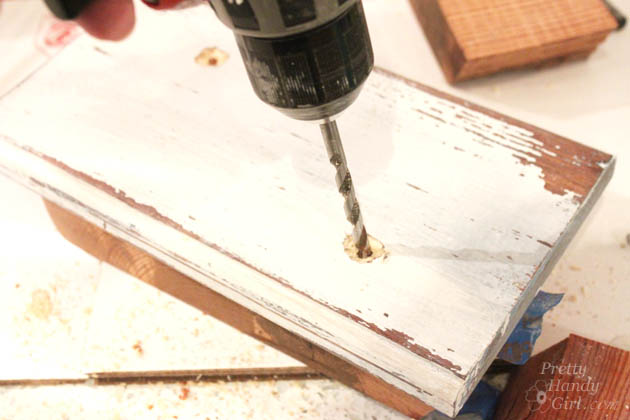
Trick for Drilling into Lumber at an Angle:
When drilling into wood at an angle, start by drilling into the wood perpendicular to the surface about one-eighth to 0ne-quarter of an inch. Then change to the angled direction. This will keep your bit from sliding on the surface of the lumber.
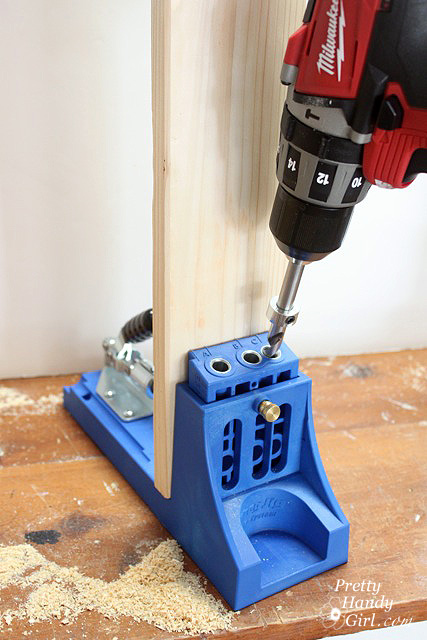
Alternatively, you can use a jig for drilling at an angle (especially helpful for drilling pocket holes.)
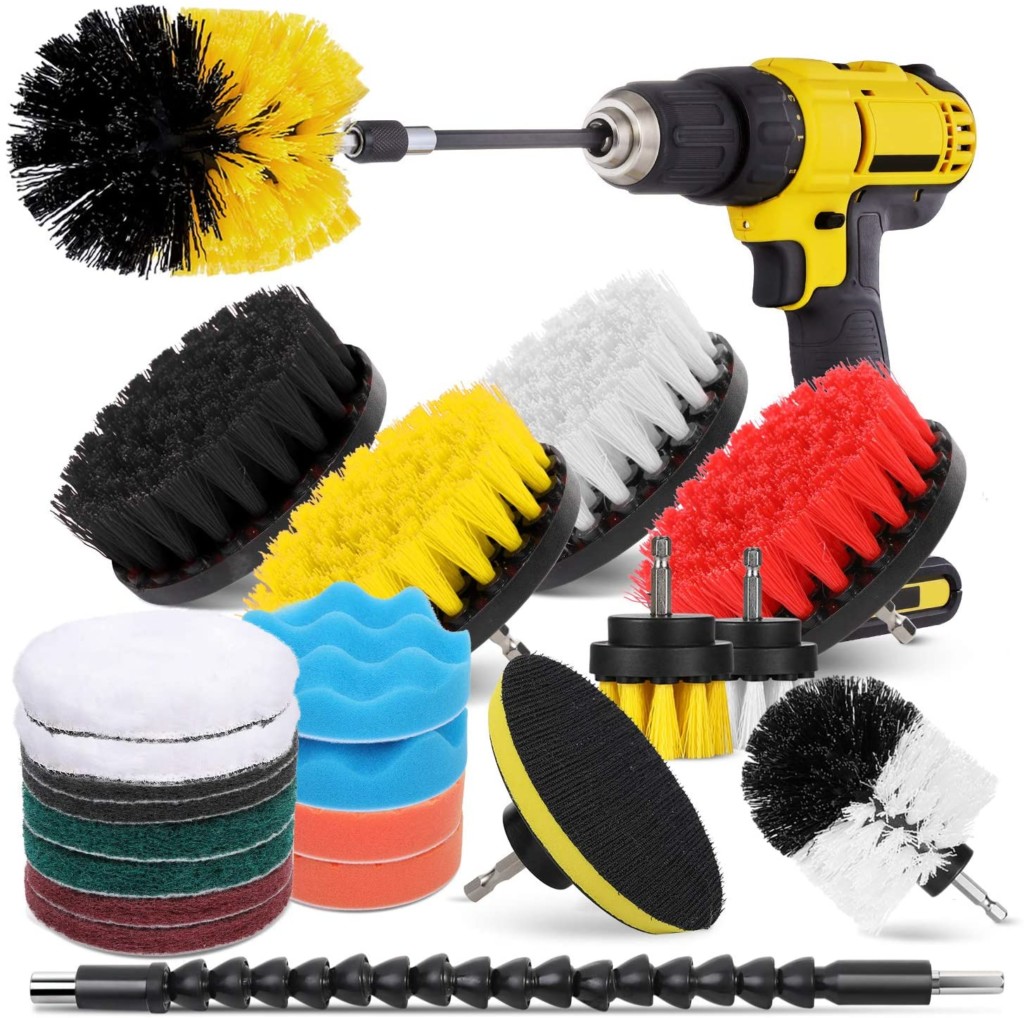
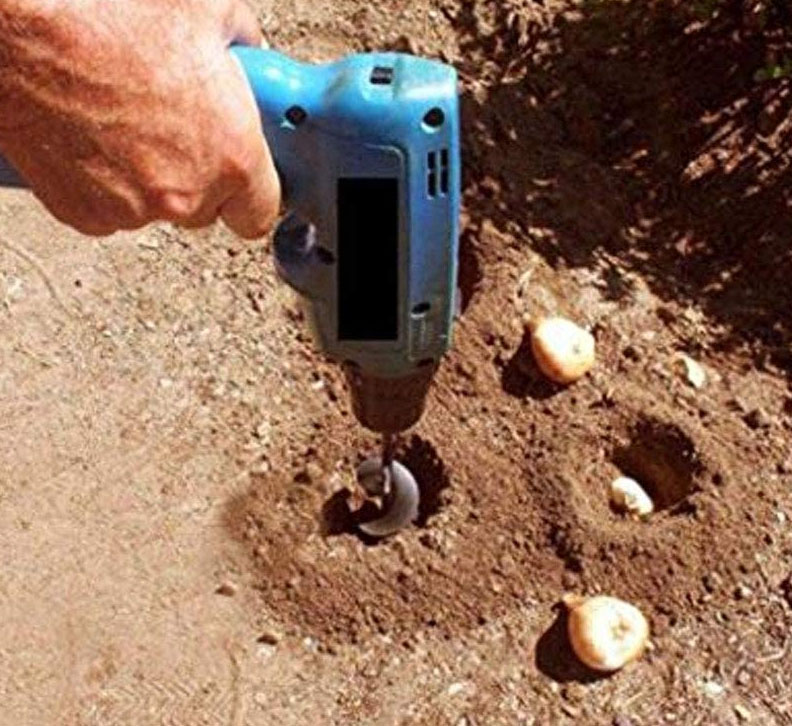
Various Attachments for Drills:
Did you know you can also clean with your drill? Yup! Check out this attachment set for cleaning a variety of things around your house and your automobile!
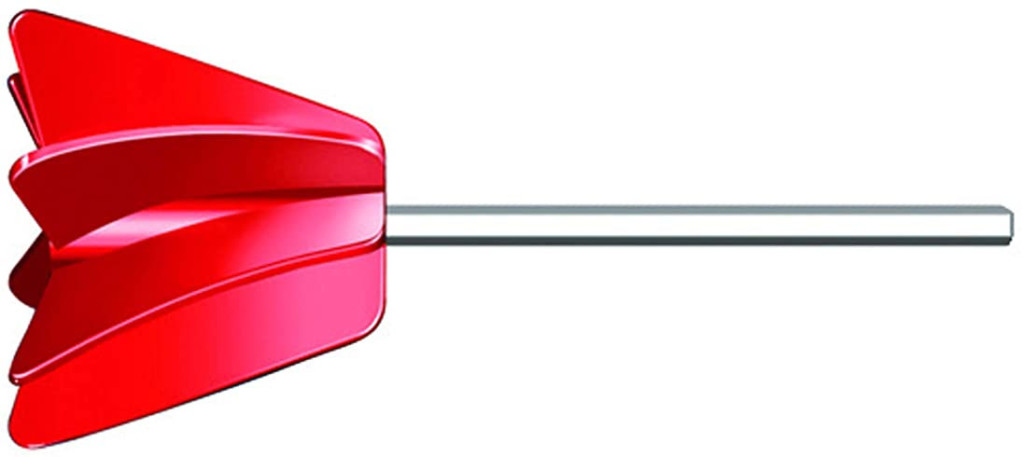
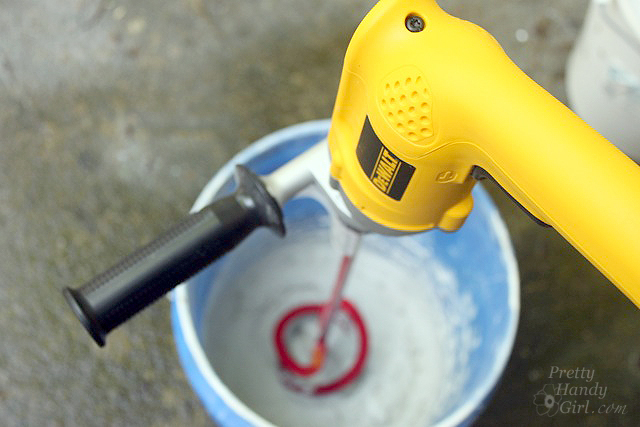
Besides the cleaning and buffing, you can also use a drill to mix paint! A paint mixer attachment can be used to mix up an old can of paint or mix new colors.
Can you Mix Mortar or Concrete with a Cordless Drill?
You may be able to mix mortar or concrete with a powerful cordless mixing drill, but chances are your standard cordless drill won’t stand up to the challenge. It either won’t have the power to mix, or you’ll burn out the motor. It’s best to use a corded drill to mix heavy mixes.
Video Tutorial on How to Use a Cordless Drill:
I hope the video tutorial helped you learn how to use a cordless drill. It’s definitely one of the most used tools in my toolbox.
https://prettyhandygirl.com/wp-content/uploads/2011/11/how-to-use-cordless-drills-feature-scaled.jpg12022560Brittany Baileyhttps://prettyhandygirl.com/wp-content/uploads/2021/07/PHG-logo-tagline-2020-1030x211-R.jpgBrittany Bailey2011-11-11 07:00:282020-05-20 21:58:57Tool Tutorial Friday – How to Use a Cordless Drill
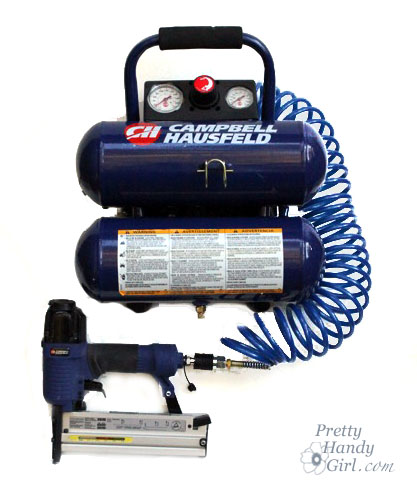
Welcome back for another Tool Tutorial Friday! Today I’m going to introduce you to a 2 gallon compressor and pneumatic finish nailer. I use the Campbell Hausfeld 2 gallon compressor with Pneumatic Finish Nailer. I bought these as a kit when they were on sale at Lowe’s for $69! A good price on this set is $89. There are loads of other brands out there and I’m sure they have other features and capabilities, but frankly I’ve been happy with my set that I’ve had for 2 years. Other kits can cost up to $300. The only drawback with this set is that they can not be used for framing (building walls of a house structure.) But, so far I haven’t needed to do that.
The finish nailer works very well on moulding, trim, board and batten, wainscoting, and other small wood projects.
How to Use a Pneumatic Finish Nailer and Air Compressor
The compressor is a fairly simple tool. When turned on, air builds up in the chambers until it reaches the maximum 110 psi.
The pressure going into the air hose can be controlled by the regulator button. I typically use my compressor and nailer at about 90 psi. But, if the nails are going too far into the wood, I might turn it down to 80 psi. Or if the nails aren’t going in far enough I will turn it up to 100 psi. With continual use, the pressure will drop down. When the pressure is low enough, the compressor will start itself back up to raise the pressure again.
The on/off switch on my compressor is in the back.
The finish nailer holds small brad nails up to 2″ in length and “U” shaped staples. They are held in the magazine. The safety tip on the nailer must be pressed into the wood before a nail will fire. Otherwise, the gun will not discharge.
While using the nailer and compressor it is very important to use safety goggles and ear protection.
When you are finished using the compressor, it is important to release all the air from the compressor. If you don’t release the air, moisture can build up and rust the tank. Start by reducing the pressure by turning the regulator down. Then pull the safety valve ring. It will close automatically, so you will need pull it a few times or hold it open. I also unscrew the valve at the bottom of the tank to insure it is completely empty before storing. Then I screw the valve back in.
After the tank is empty, release the hose from the nailer. Add a drop or two of penetrating oil onto and in the air inlet on the nailer to keep it well lubricated. Cover the air inlet and then you can store your nailer and compressor.
DISCLAIMER
The viewer assumes all responsibility and liability associated with the hazards of woodworking. Pretty Handy Girl is not responsible for any errors or omissions that may be present in this tutorial. She also assumes no liability for any action or inaction of a viewer.
Please use extreme caution when using power tools. Read your tool manual thoroughly and wear protective safety gear. Take your time familiarizing yourself with a tool before using it. (If you are missing the manual, you can easily find it online by going to the manufacturer’s website or google your saw’s make and model + manual.)
Please recognize that I have tried to put together a basic finish nailer and compressor tutorial to get you started. I have tried my best to show the safest way to use them. That being said, I am not a professional (I only play one on this blog .)
https://prettyhandygirl.com/wp-content/uploads/2011/11/Compressor_finish_nailer_combo_kit.jpg492417Brittany Baileyhttps://prettyhandygirl.com/wp-content/uploads/2021/07/PHG-logo-tagline-2020-1030x211-R.jpgBrittany Bailey2011-11-04 07:30:462021-08-06 16:16:06How to Use a Pneumatic Finish Nailer and Air Compressor (with video)
Today I’ll teach you how to use a miter saw safely. We’ll learn the difference between a miter and a bevel cut. Plus, I’ll also show you the different features and functions of miter saws.
How to Use a Miter Saw
Hello and welcome to the very first Tool Tutorial Friday (a series of tool tutorials)! Come right in and have a seat. If you give me less than 10 minutes of your time, I will empower you with a new power tool skill! Today, I’m going to show you how to use one of my favorite power tools. Before I owned a miter saw, I used a hand saw and a cheap plastic miter box. But, they were really putting a cramp in my DIY style (if you know what I mean.)
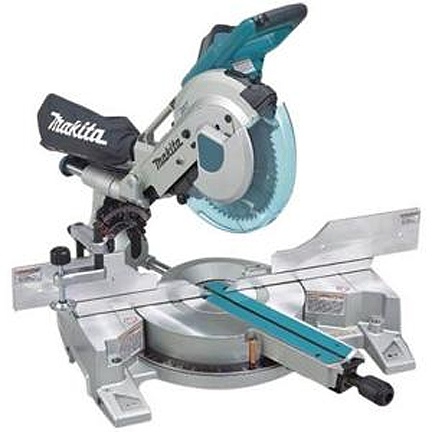
About two decades ago, my husband gifted me my Makita 10″ Sliding Compound Miter Saw. That’s right, I don’t ask for jewelry for big occasions, Pretty Handsome Guy knows to ask one thing before an upcoming holiday, “So Honey, what power tool do you want now?” It’s true, I’m a power tool junky.
Ready to learn how to use a miter saw? Okay, let’s get started…
Working with power tools can be dangerous, but your risks drastically eliminated if you give the tool some respect. Today I’ll show you how to use a miter saw safely.
About Miter Saws:
Miter saws come in many shapes, sizes, and colors. The size (usually from 7.25″ up to 12″) refers to the diameter of the blade on the saw. The larger the blade, the wider the material it can cut. However, if you purchase a “sliding” miter saw, you can cut several inches wider than your blade diameter (the specifications on the saw should tell you this cutting distance). Miter saws run anywhere from $80 up to $800 depending on the features and brand you choose.
Sliding Miter Saw:
I highly recommend a sliding miter saw if you can afford it. Being able to cut lumber a few inches wider means the difference between using your miter saw or having to break out the circular saw or table saw.
On a non-sliding miter saw, the saw head will not slide forward and back. Most of the entry-level models will cut a miter and a bevel. You may have heard miter saws without the ability to slide referred to as chop saws. They will work great for “chopping lumber” but without sliding, dual miters, and dual bevels, you will spend some time flipping the lumber to make your compound cuts.
Speaking of miters and bevels, let’s talk a little more about what is a miter and a bevel cut.
Type of Cuts:
Miter saws are perfect for cross cuts, miter, and bevel cuts. Miter saws cannot make rip cuts. Rip cuts are easier cut on a table saw or track saw (or using a variety of other handheld saws.)
Rip – ripping a board is cutting with the grain along the length of a board. This is usually done with a table saw but can be done with a variety of handheld power saws and a straight edge.
Crosscut – a type of cut that is perpendicular to the grain or along the width of your board. Crosscuts are usually made with a miter saw or circular saw, but can also be made with a track saw, jigsaw, band saw, or hand saw. You can make crosscuts with a table saw, but you will need a crosscut sled to perform a crosscut cut safely.
Miter Cut:
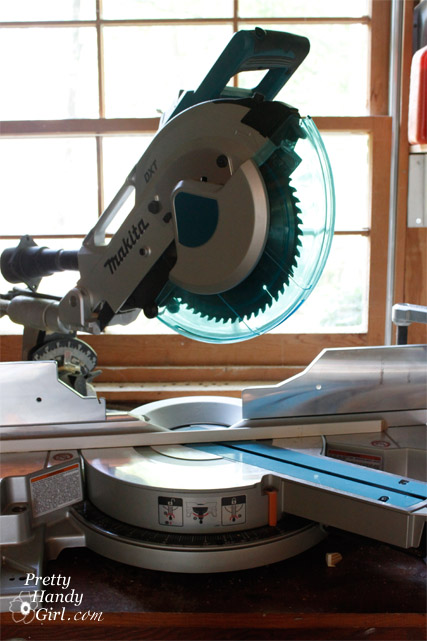
A miter cut is made when you change the direction of your blade from straight ahead (90˚) by moving it from side to side. Think of pizza wedges. For example, in the image below, the saw is set up to cut a 45˚ miter, and no bevel because the blade is still straight up and down.
Bevel Cut:
A bevel cut is made when you angle your blade tipping it to the left or right. As an example, in the picture below, I’m making a 45˚ bevel cut into the wood.
Compound Cut:
A compound cut happens when you make a miter and a bevel cut at the same time. Essentially you are cutting two angles simultaneously. This is particularly useful when you are cutting crown molding for a room.
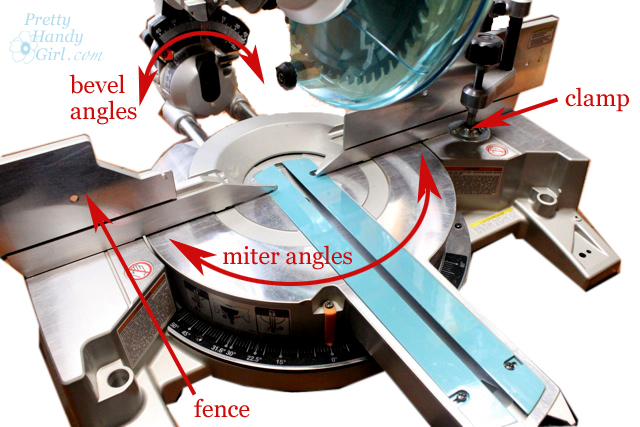
You can see in the diagram below how to set up your saw for bevel angles, miter angles, or both.
Safety Features and Operating a Miter Saw:
All modern miter saws have a trigger built into the handle. Most miter saws also have a safety button that you must push with your finger or thumb before you can squeeze the trigger. To start a straight downward cut, press the safety button, squeeze the trigger and wait for the saw to reach maximum rotation. Then slowly lower your saw into the board you are cutting. Never force the saw through the wood. Let the saw cut and then guide it downward. Once you have completed the cut release the trigger while the blade is in the wood. Let the saw come to a stop before lifting it out of the wood.
Most miter saws have a fence. The fence lets you rest the position your lumber against a straight edge. It keeps the wood steady and helps your miter saw cut true to the degree setting you have chosen.
Some miter saws have a detachable clamp. This is a nice option and helps keep your hands away from the blade during cuts. Let the clamp be your right-hand man (or left-hand man). If you don’t have a clamp on your saw, be sure to always position your hand as far away from the blade as possible. Do not attempt to make cuts where your hand is close to the blade. AND NEVER reach under the saw while it is rotating! Even when you have finished your cut, your hand is not safe until the blade has completely stopped.
Three Safety Tips for Using a Miter Saw:
Blade down until it stops! You should always end your cut and release the trigger while the blade is down and in the lumber. Let the blade come to a stop before raising the blade.
Always make sure the lumber is supported on both sides. And never clamp both sides of your lumber. One side should be free so as not to pinch the blade during the cut.
Never cut small pieces of wood where your fingers are too close to the blade. If you absolutely must cut a tiny piece, clamp or attach it to a larger piece of lumber.
Making a Safe Sliding Cut:
When using a sliding miter saw, there is a proper way to make a sliding cut (used to cut wider boards):
Make sure your saw is positioned fully on your workbench. Test the blade in its full reach toward you to make sure it won’t tip as you lower the blade.
Put your lumber up against the fence and clamp it on one side (if you can).
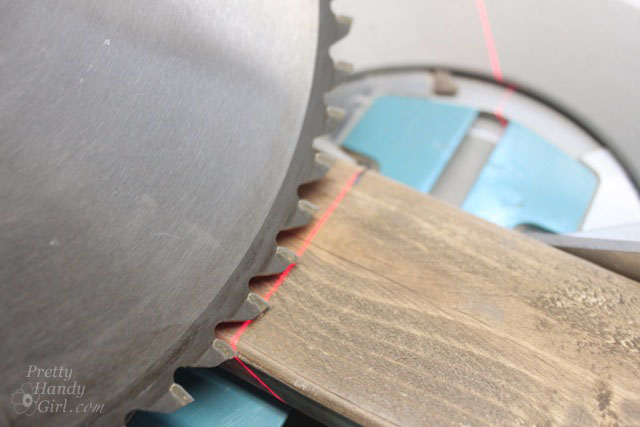
Before you start the blade, pull the saw toward you until the blade is directly over the board’s edge closest to you.
Squeeze the trigger to start the saw and wait for it to reach peak rotation speed. Then lower the blade down into the wood.
While the blade is still rotating, slide the saw back and away from you as your blade cuts through the rest of the wood (see photo below.)
Once the blade has finished cutting through the wood, release the trigger and let the blade stop before raising the blade.
I created a video, so you can see how to safely use a miter saw. Before you watch the video — a few necessary words of caution:
DISCLAIMER
The viewer assumes all responsibility and liability associated with the hazards of woodworking. Pretty Handy Girl is not responsible for any errors or omissions that may be present in this tutorial. She also assumes no liability for any action or inaction of a viewer.
Please use extreme caution when using power tools. Read your tool manual thoroughly and wear protective safety gear. Take your time familiarizing yourself with a tool before using it. (If you are missing the manual, you can easily find it online by going to the manufacturer’s website or google your saw’s make and model + manual.)
Update: Please recognize that I have tried to put together a basic miter saw usage tutorial to get you started. I have tried my best to show the safest way to use a miter saw. Two safety revisions I want you to be aware of:
You should wear appropriate Personal Protective Equipment when using a miter saw. (Ear protection, eye protection, and a dust mask.) I should have been wearing a mask.
When I first learned to use a miter saw, no one told me to keep the blade down until it came to a stop. This is now standard practice when I work.
And now, let’s get you more familiar with using a miter saw!
https://prettyhandygirl.com/wp-content/uploads/2011/10/my_miter_saw.jpg432432Brittany Baileyhttps://prettyhandygirl.com/wp-content/uploads/2021/07/PHG-logo-tagline-2020-1030x211-R.jpgBrittany Bailey2011-10-21 07:00:022020-05-15 18:23:22How to Use a Miter Saw