Tool Tutorial Friday – How to Use a Band Saw
Welcome back to another Tool Tutorial Friday! I hope you enjoyed some time off last week. Today I want to share with you a power tool that can cut long straight lines and it can cut curved lines with ease. This tool is also my “go to” tool when I need to cut plexiglass. I’m introducing you to a band saw.
Although the band saw is big and may seem intimidating, it actually isn’t very scary. The blade is usually a mere 1/4″ wide and the cutting action is not super loud and it doesn’t usually throw wood back at you. So, cutting with this power saw really gives you a lot of control and can help eliminate the intimidation factor.
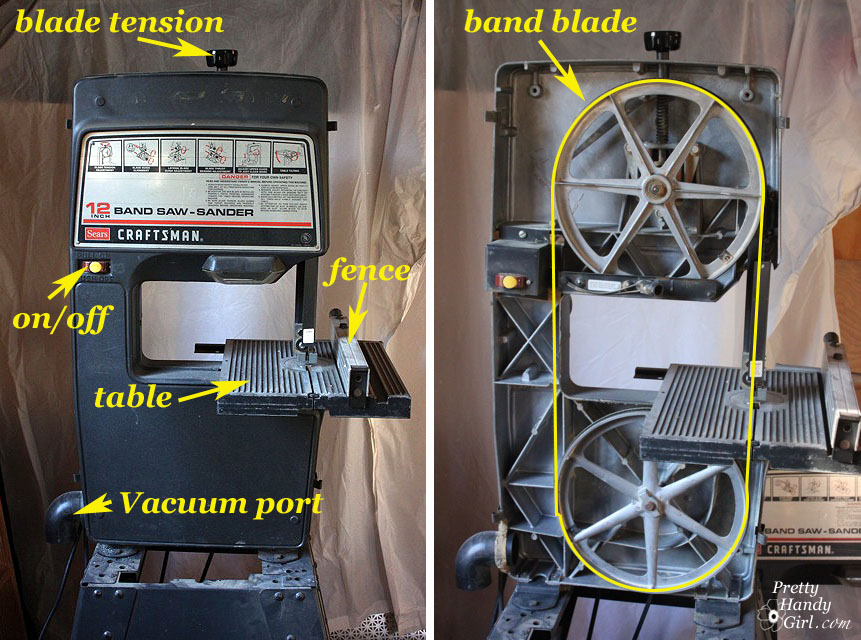
The band saw I have it old, but it still gets the job done. If you were to buy a new band saw, the mechanics are basically the same and not much has changed over the years. The size of the band saw (usually 9″, 10″, 12″ or 14″) refers to the distance between the blade and the neck or side column of the saw. Prices for a new band saw vary from about $125 – $600. I would definitely recommend buying a band saw used unless you are running a business that puts out tons of wood projects. Also, make sure that your band saw comes with a detachable rip fence or you will need to purchase one to fit your saw. This is important for making straight cuts.
A band saw has a circular one piece band shaped blade. The blade rotates around the two wheels at a high speed and allows for precise cuts.
There are several blades available for a bandsaw. In addition you could buy a sanding band for sanding intricate cuts. Band saw blades have a TPI (teeth per inch) number. In general, the more teeth per inch the tighter the cuts and more intricate details it can handle. However, that blade will flex more and cannot cut harder stock wood as efficiently. For straight cuts and thicker stock, a lower TPI number is desired. For a more detailed explanation of band saw parts and blades, check out WoodworkingHistory.com’s bandsaw syllabus.
The ONLY saw that I know of that will make more precise cuts than a band saw is a scroll saw. And when I talk precise, I mean making doll furniture type precise. A band saw is used for ripping, cross cutting, curved cuts, circles, you name it! So, why would you need anything else if this saw does it all? Well, sometimes speed is a factor, the band saw is not super fast when ripping a piece of plywood. Plus, you are limited by the width of your bandsaw. You have to work with a board that will fit in between the blade and the neck of the saw (this is specific inch size of your saw.)
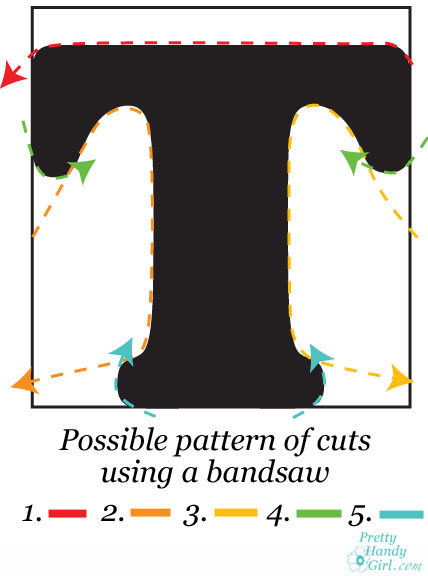
Personally, I prefer using the band saw for smaller projects and cutting plexiglass, thin metal, or intricate shapes. It is a staple for anyone who wants to cut letters out of wood! When making intricate cuts, you will need to plan your cutting paths. In other words, you can’t put your wood in and cut around like you would scissors in a piece of paper. Here is an example of what I’m talking about:
To cut the letter “T” out of a piece of wood, you’ll likely have to make several cuts into the wood, making your cuts meet at tight angles or corners.
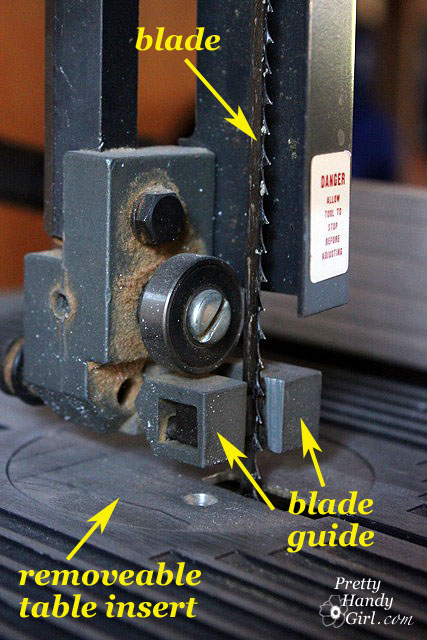
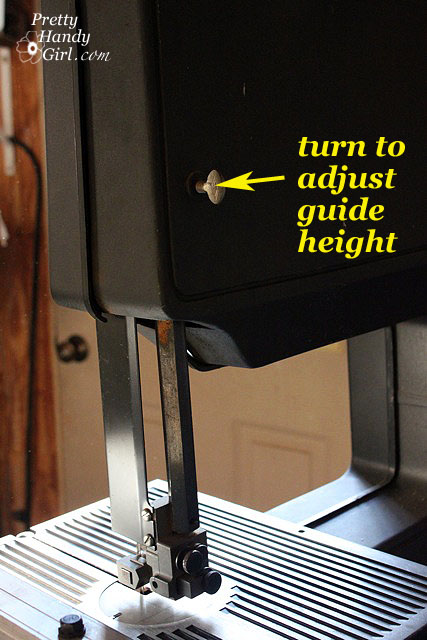
Before making any cut using a band saw, you need to make sure that your guide is set for the proper depth. You want the guide to ride just above your board. There should be approximately a 1/16″ space between the wood and the guide so the board doesn’t get pinched between the guide and the work table. On my band saw the adjustment is made by loosening a screw at the back of the machine, raising the guide, and re-tightening the screw.
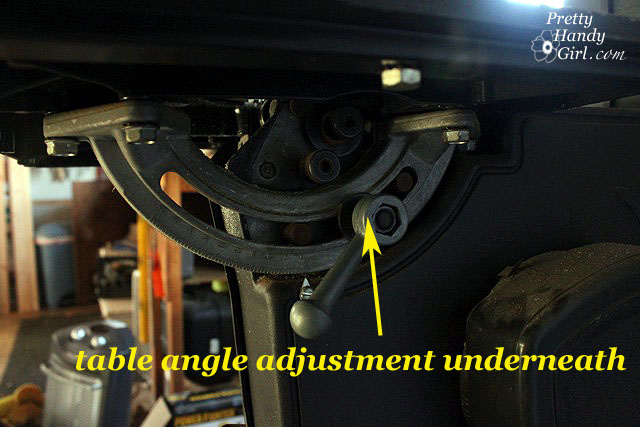
My band saw also has a work table tilt lever for making bevel cuts. Honestly I’ve only used this feature once, but it is nice to have. Simply turn the lever to loosen the bolt holding the table in place. Then tilt the table to the desired angle and re-tighten the bolt.
That’s basically it for setting up the band saw. Before cutting be sure to wear safety glasses. Ear protection is a good idea, but I’ve been known to skip it since this saw doesn’t bust my ear drums as much as some of my other power tools.
As I’ve said before, keep in mind your safety is in your own hands:
DISCLAIMER
The viewer assumes all responsibility and liability associated with the hazards of woodworking. Pretty Handy Girl is not responsible for any errors or omissions that may be present in this tutorial. She also assumes no liability for any action or inaction of a viewer.
Please use extreme caution when using power tools. Read your tool manual thoroughly and wear protective safety gear. Take your time familiarizing yourself with a tool before using it. (If you are missing the manual, you can easily find it online by going to the manufacturer’s website or google your saw’s make and model + manual.)
Please recognize that I have tried to put together a basic band saw usage tutorial to get you started. I have tried my best to show the safest way to use a band saw. That being said, I am not a professional (I only play one on this blog ![]() .)
.)
And here is the video tutorial:
Okay, time once again to let me know what you think about this tutorial; ask any questions; or simply beg to win. When you do so, you will be entered to win this cutie!
Don’t let her pink attire fool you. This lovely lady packs a punch that will knock out any “boy’s” hammer! So limber up those fingers and leave me a note. Your comment will automatically enter you into the 13 oz. Tomboy Tools magnetic hammer giveaway. Good luck!
Sharing with these link parties:




Thank you Darryl for answering my question.
Vic, I have the same bandsaw. When you are adjusting your blade guides you want to be able to slide a piece of paper between the blade and your guides. The back wheel needs to be 1/16″ from back of the blade.When making the adjustments just spin wheel by hand to make sure the settings are right before you turn your saw on. You can find a lot of this information on youtube.
Thank you Darryl for answering Vic’s question.
I got my band saw used recently, and then had to de-rust the saw. And mine is just like yours, 12″ old Craftsman. The close up photo you have of the blade guide was nice, but what I’m after is how much space should those two adjustable things on each side of the blade have between each one and the blade. And the spinning item behind the blade, how close should it be to the back of the blade?
Vic, I’m sorry I don’t know the answer, I’ve actually never adjusted mine.
Looks like one more trip to the woodworking store. Those guys have been a ton of help. BTW, it is a Woodcraft store.
That’s a nice intro to the bandsaw. I would like to see a tutorial on how the blade is adjusted, what blade to use for certain cuts. BTW, I have the same saw. I asked a dealer (Sears for what it’s worth.) what is the size rating about; he said “it’s the size of the wheel(s).” Go figure. So off I go and measure my wheel and wouldn’t you know it, the size has gotta be nominal if it corresponds to the wheel size.
I’m a woman and I have to say, the fact that you are, too, make me feel a little better about learning how to use my new band saw. It was even better that you have the same one that I have. So, thanks for demonstrating that chicks can do anything they put their minds to. I’m trying not to let all the safety issues intimidate me as I begin to use the saw. Your tutorial was clear and easy to understand. Thanks.
Thank you Pat. Glad I could help.