Have you ever wanted to maximize the space in one of your drawers? Do you have a drawer that acts like a black hole? Learn how to build a DIY Drawer in a Drawer and watch your organizational dreams come true.
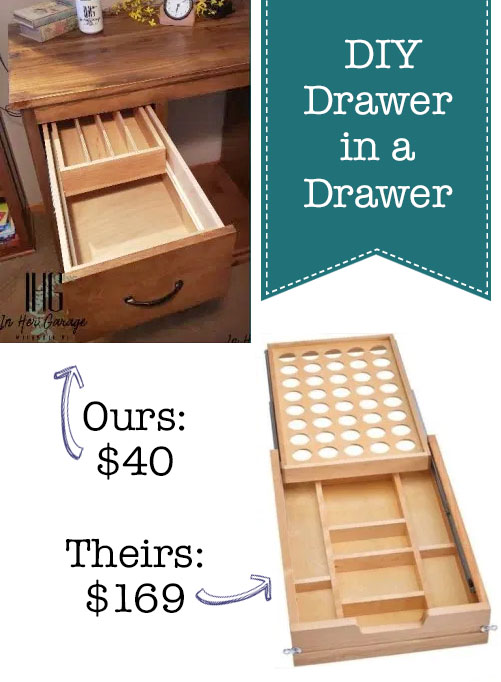
DIY Drawer in a Drawer

Hi! This is Kristen from In Her Garage, and I’m here with a tutorial just for you. We all love organization, but in almost every room of the house we have a drawer that houses those tiny little necessities. And inevitably they end up scattered and lost within the drawer depths. Today I’ll teach you how to build a DIY drawer in a drawer to keep those little things easily at hand while still allowing use of the drawer beneath. You could just build a small separate top drawer, which would be fine if that is the outward aesthetic you want, but if you desire your uniform size drawer front, then this is a perfect solution. And, great news…this can also work as a modification to an existing drawer.

There are similar drawers available online but chances are they won’t fit the size drawer you’re building or already have. Not to mention the cost! Why not just do it yourself?!

I have built this drawer several times and each time I made it for a coffee bar/beverage center I was building. This drawer makes the perfect K-cup organization drawer. My clients had complained, “I’m sick of these K-cups laying all over the drawer!” or “I do not like the look of the K-cups on the tabletop. It looks like clutter!” I was thrilled to be able to help with this issue by building a DIY drawer within a drawer. Once you know how to make this insert drawer, you can use it to hold more little things such as:

  • Office, craft room, kid’s craft room- holding paper clips, push tacks, post-its, those sticky page marker tab things, pens/pencils, markers, scissors, legal pads
  • Bathroom- makeup, hair ties, bobby pins, Qtips, all the little creams, first aid supplies
  • Junk drawer!!- batteries, keys, phone chargers, pens/pencils, tape, rubber bands

I’m sure the list could go on but let’s get down to it and start making this drawer happen!

(I’ve included affiliate links for your convenience. I earn a small percentage from a purchase using these links. There is no additional cost to you. You can read more about affiliate links here.)

Tools:

Materials:

Please read through the instructions first to gain a basic understanding of what you will be building.

Instructions:

Figure out the size of your drawer you want to build. Then select a height for the inner drawer based on what will be stored in it.

  • If you plan to use it as a K-cup organization drawer allow at least 2” inches in height. (Standard K-cup dimensions are 1 ¾” tall x 2″ top diameter and 1 ¼” bottom diameter.)

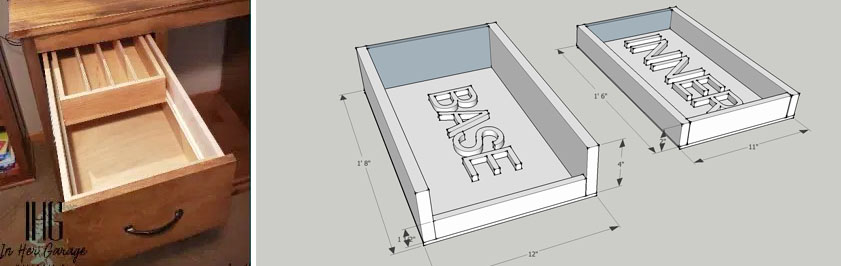
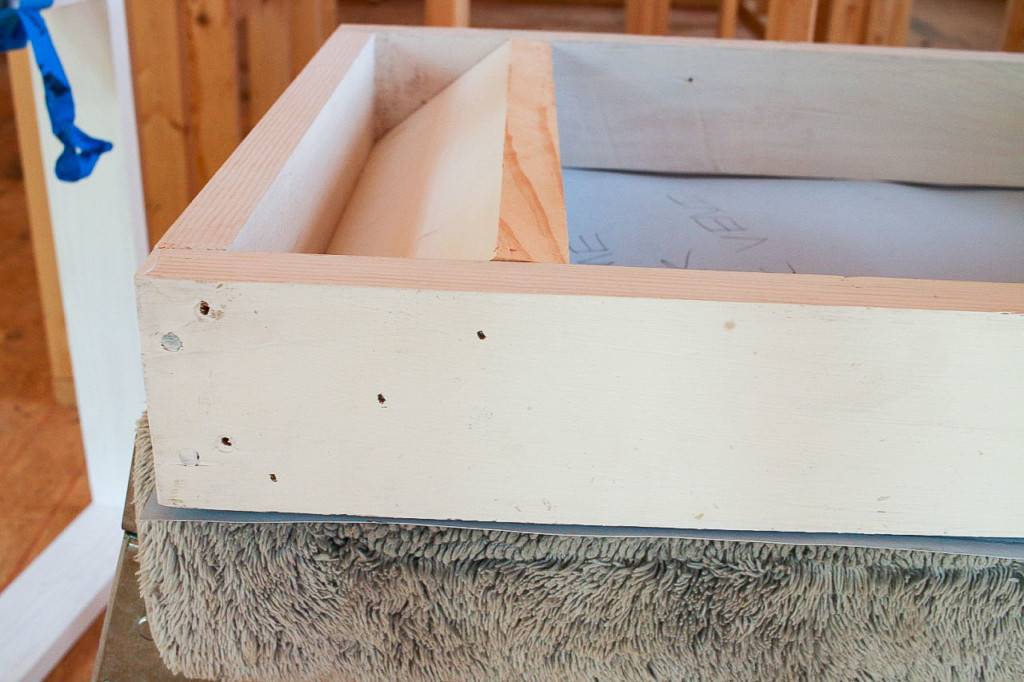
Next, you will need to figure out the dimensions of the inner drawer.  Follow the instructions for the drawer slides you chose for the base drawer for sizing. (My slides dictated 1/2″ for each.) The front and sides of the base drawer should be cut to the same height BUT the back of the drawer should be shorter to allow the inner drawer to roll away. See the photos below.
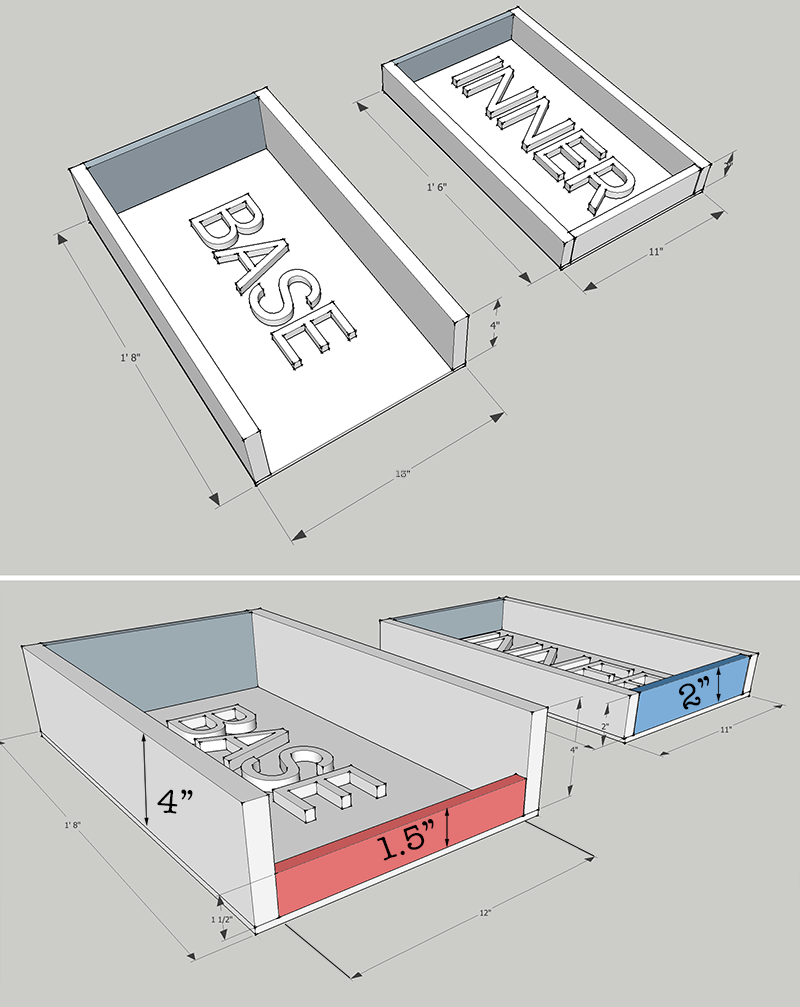
The equation to figure out the back of the base drawer: 

The inner height of the base drawer  – (the height of the inner drawer + 1/2”) = Back of the base drawer

Using the example as shown above:

4” inner base drawer height – (2 ” inner drawer + 1/2”) = 1.5” back of the base drawer

If you are modifying an existing drawer, cut the back panel to this same height using a jigsaw.

Feeling good about that? Great!

Building Your Inner Drawer:

Now it’s time to assemble the inner drawer components. (Double-check your measurements below):

  • Height- you’ve already chosen this dimension
  • The width will be 1 inch narrower than the inner width of the base drawer to allow room for the drawer slides
  • The length will be slightly longer than the length of the drawer slide so the drawer meets the back of the base drawer.
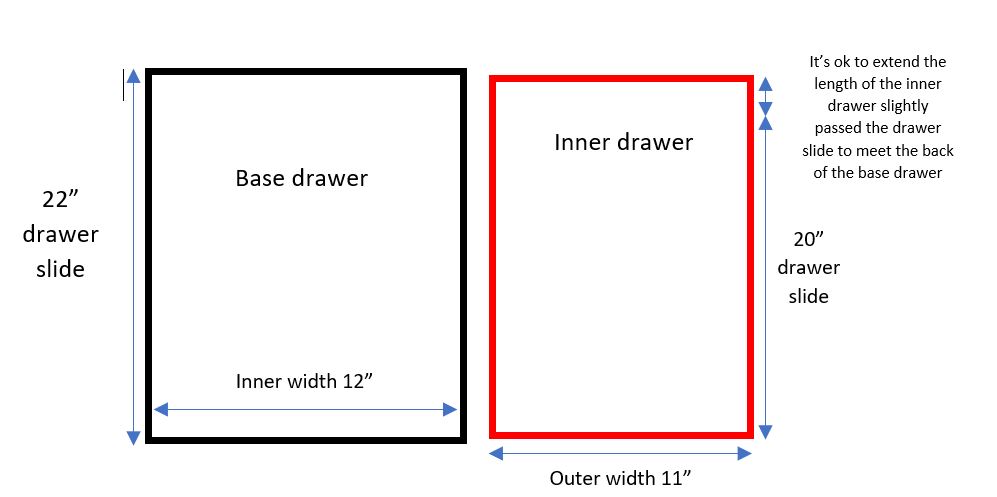
Assemble the inner drawer using wood glue and brad nails.

Installing the Drawer Slides for the Inner Drawer:

Set out the base drawer components you pre-cut.

Note: Installing the drawer slide is the opposite of what you would normally think. You always pull a drawer open toward you but this drawer will operate by being pushed away from you to reveal the base drawer beneath it. Meaning the front of the inner drawer slide is now the back. You’ll see what I mean in a minute.

First, take the two sides from the base drawer and mark the front and top of both sides. Now, using your combination square, mark the height of the inner drawer on the sides of the base drawer measuring from the top down. Add about a 1/8” to let the drawer sit slightly lower than the top of the base drawer.

Now figure out where the “front” (actually the back) of the inner drawer slide will be attached.  (Allow 1/8” from the front of the base drawer.) Remember to take into account whether or not the base drawer front attaches inside the sides (as shown in the picture below) or in front of the sides.  If the front does attach between the sides, be sure to allow for the thickness of the drawer front when attaching the slides to the sides.
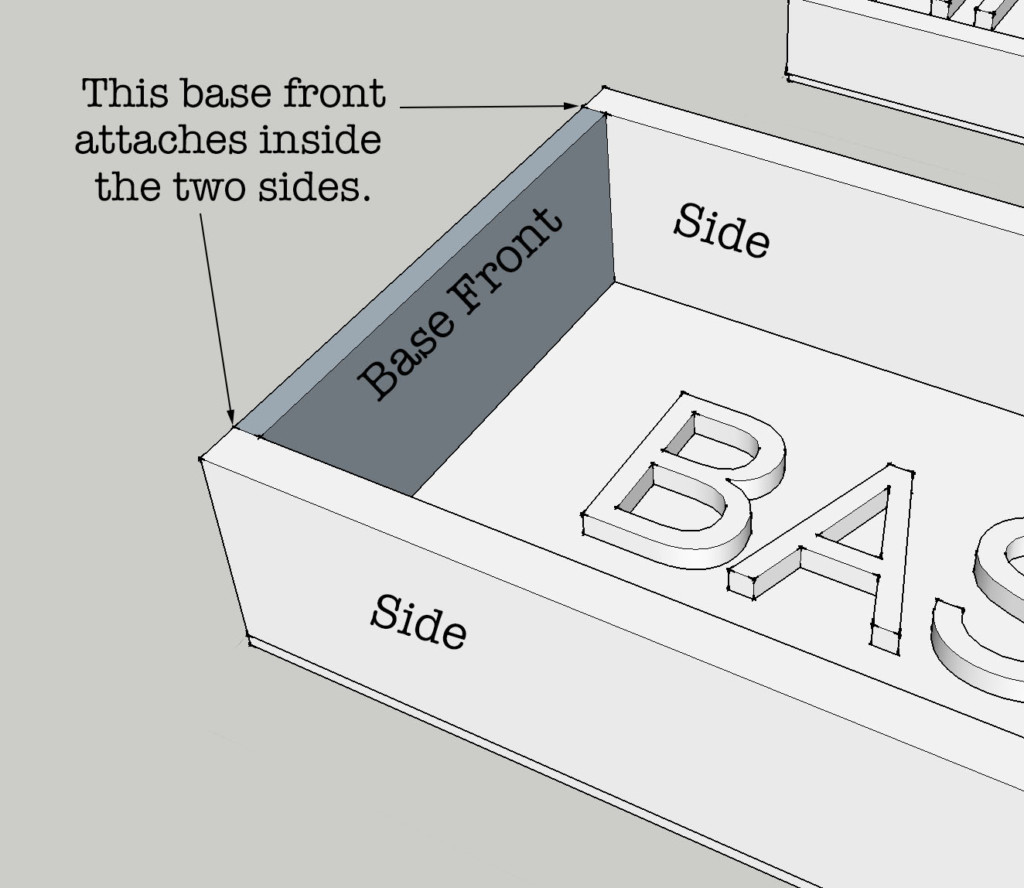
Mark a pencil line where you will be attaching the drawer slides. Attach the inner drawer slides to the inside sides of the base drawer. Lining up the “front” and bottom of the slides with the two lines you’ve drawn. This video might help.

Attach the other piece of the drawer slide to the inner drawer bottom (double-check you are lining the back of the slide up to the “front” of the drawer. Normally you would align the front of the drawer slide to the front of the drawer but what was the front of the drawer is now considered the back.)

Now that the drawer slides are installed, Assemble the base drawer (pretend there are drawer slides in the photo below.)
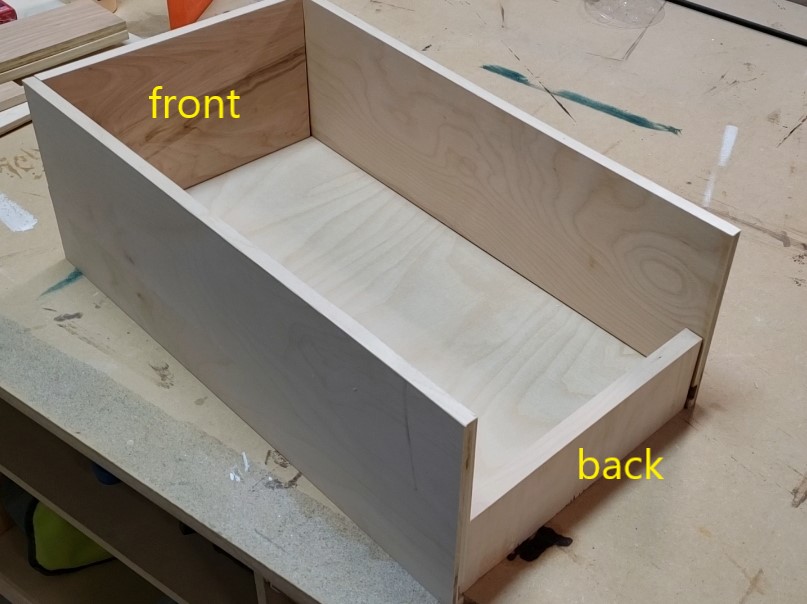
Finishing Your Drawers with Edge Banding:

For a finished look, cover the exposed edges of the plywood with edge banding. I prefer iron-on edge banding because it is easy, inexpensive, and finishes nicely. Brittany has a great tutorial for how to finish plywood edges which includes iron-on edge banding, click here to check it out.

Nesting the Inner Drawer:

Slide the inner drawer into place inside the base drawer. Now you are ready to set your base drawer back into the cabinet it goes in.  That’s it. Good work!
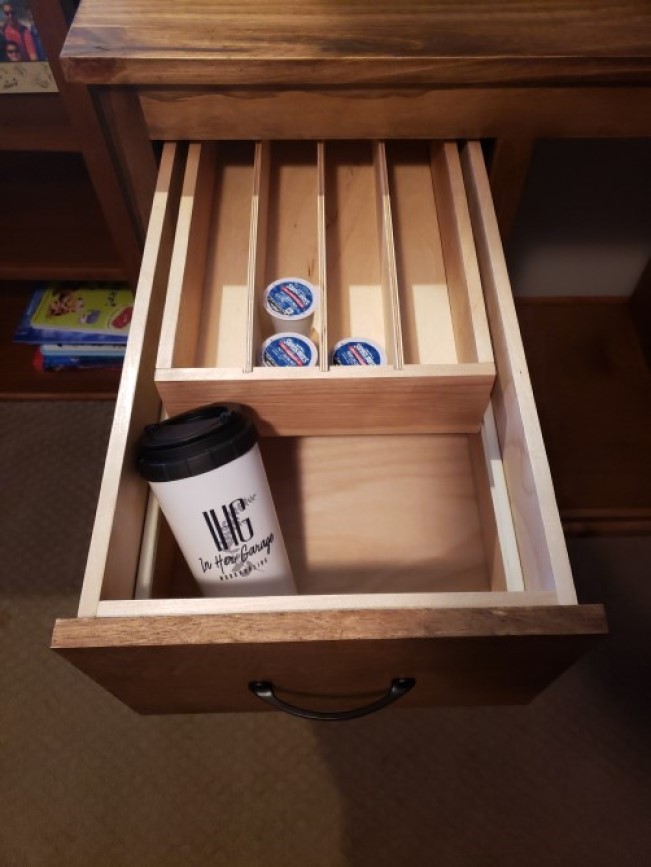
Optional last step: you can add little felt pads to the front and back of the inner drawer. This will make closing the drawer whisper quiet.  Most people will pull the inner drawer closed before closing the base drawer after use but it isn’t necessary if there is a back to the entire cabinet piece. The inner drawer will simply hit the back of the cabinet and be pushed back into place when closing the base drawer so having little felt pads on the back of the drawer will make this quieter and having pads on the front of the drawer will help with this too.

Good luck keeping all the little things organized and I hope this DIY drawer in a drawer will come in handy for any room in your home! Happy Building!

Find more projects and inspiration In Her Garage and follow my DIY journey on Instagram and Facebook.

Hi! I’m Kristen, from In Her Garage, and I am a self-taught woodworker and DIY fanatic from Minnesota where I live with my husband and our two daughters. Between being a wife, mom and, registered nurse, I try to make as much time for DIY as possible. My love for building came after our family built our current home in 2015. After we moved in, we needed furniture and instead of spending massive amounts of money to order the pieces we wanted I decided that I would build them myself. I started with a buffet table plan from the fabulous Ana-white and quickly set out to remodel my entire home office.

Since then I have started a side business building furniture for the people in my community. I love hearing my clients talk about the pieces they wish they had whether it be a rustic buffet table, a one drawer side table, or a toy box and then making it a reality for them. While starting my small business it made perfect sense that I would document my building journey so I simultaneously launched the In Her Garage blog and I love sharing my plans, tips and tricks.

Making something beautiful with your own two hands through a little preparation and determination is an amazing feeling and I hope to bring inspiration and know-how to those looking to tackle a big or small project.
I am so glad that you found me here and please feel free to connect with me on PinterestInstagram, and Facebook to see what I am working on right now.

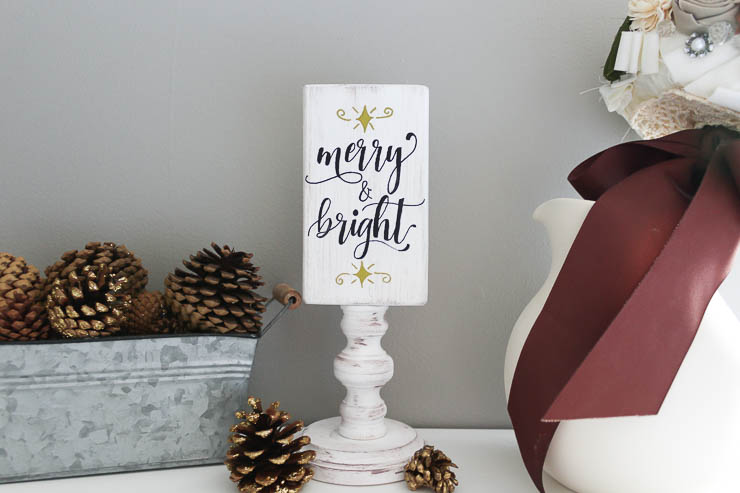
Merry and bright finished side

Pinterest Collage image reversible sign

DIY Reversible Wooden Sign on a Pedestal Base

This is an easy project to create for any season! Make your very own Fall/Christmas reversible wooden sign on a pedestal base with this easy tutorial. The top is made with a scrap 2×4, while the pedestal base is assembled from a few pieces of craft wood. Can it get any more simple? There’s no need for a stencil or Cricut to make your sign! Instead use this simple method to transfer the design from paper to wood.

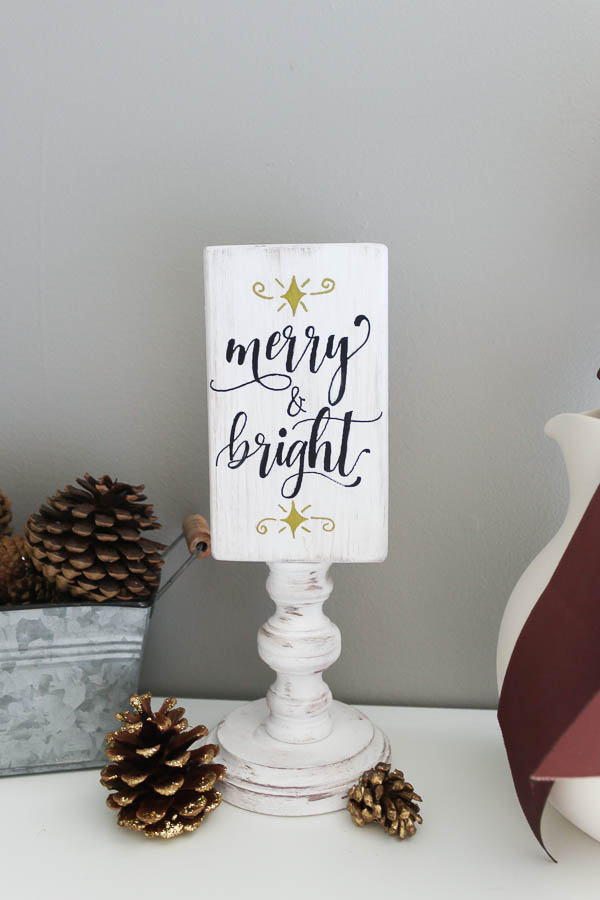
Finished Merry and Bright side on reversible wooden sign

Materials:

(I’ve included affiliate links for your convenience. I earn a small percentage from a purchase using these links. There is no additional cost to you. You can read more about affiliate links here.)

Instructions

1. Sand the wood

Using the palm sander, start with 100 grit sand paper and sand all sides of the freshly cut 2×4 board. Make sure to smooth out any imperfections as much as possible. Continue sanding with 150 grit and 220 grit consecutively to get a smooth finish. If needed, use the 220 grit sand paper on the wooden candlesticks and circle base. You might find it easier to sand these items by hand.

2. Paint the wooden pieces

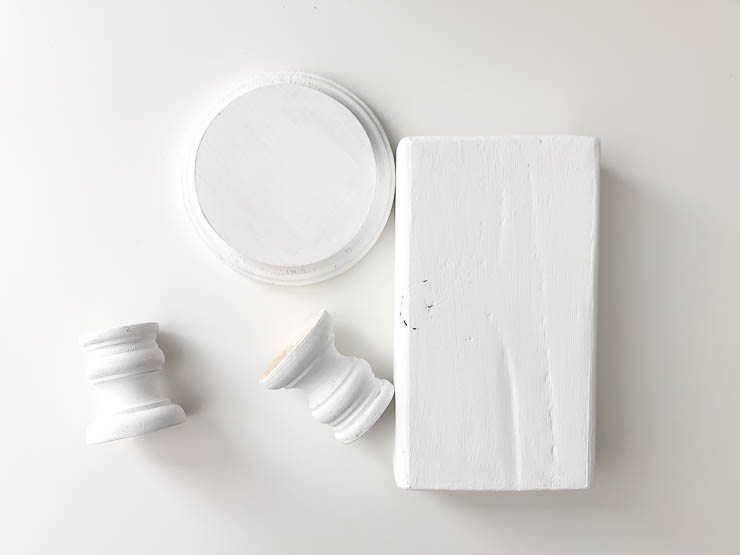
Give each piece two coats of white chalky paint. Chalky paint is great for going over bare wood because there is no priming involved and it dries very quickly.

Painted wood pieces

Once both coats of paint have dried completely, sand each piece of wood again with 220 grit sandpaper to smooth out any brush lines.

3. Glue the pedestal together

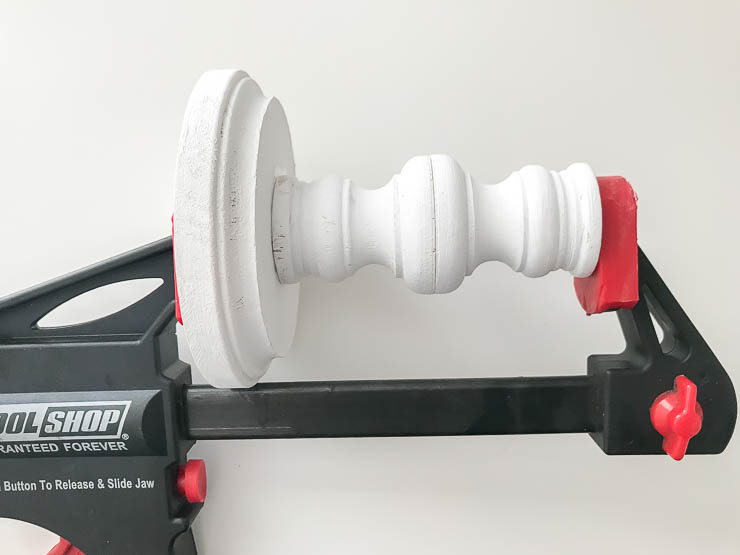
Use a small amount of wood glue to assemble the pedestal base of the sign:

  • Glue both candlesticks together first
  • Glue candlesticks to the beveled edge circle
  • Use a clamp to keep everything together while the glue dries and sets.

Pedestal Base assembly

4. Dry brush to add an aged look

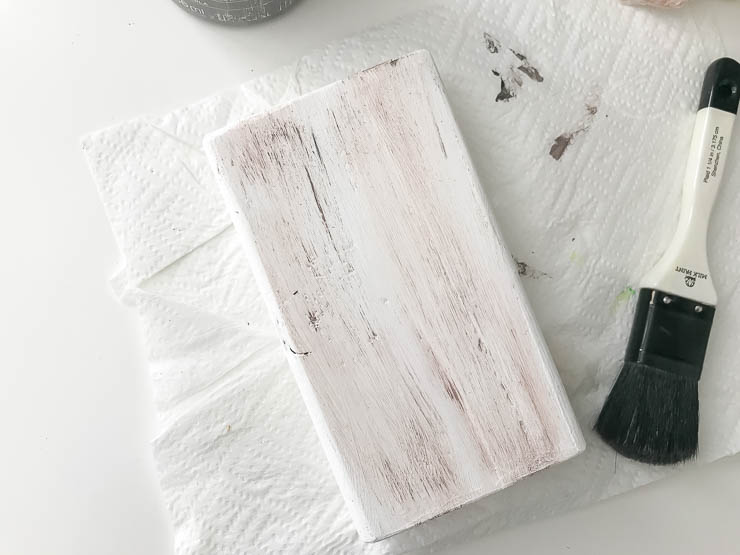
Using a chip brush or a wax brush to dry brush each piece of wood using the gray or brown chalk paint.

Tips for Dry Brushing: Lightly dip the very end of the chip brush into paint. Wipe off the majority of the paint and then lightly brush onto the wood surface. There is no exact science to this method which means there is no wrong way to do it. Just make sure you have wiped off most of the paint before applying.

Dry Brush after

5. Add the Fall and Christmas designs

To add the designs to each side of the reversible pedestal sign, use the same method as these His and Hers Towel Hooks. You could make a stencil with a Cricut or Silhouette Machine, but if you don’t have one of those, this font transfer method is very easy to do!

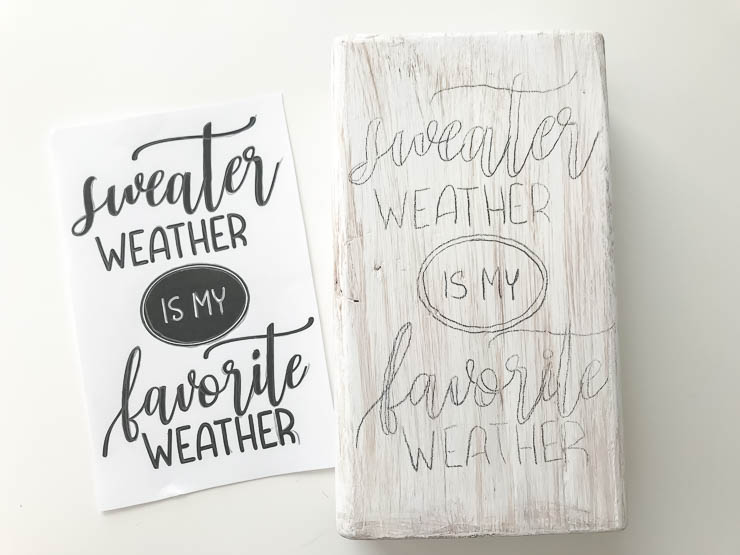
Print each design out onto paper to the size of the 2×4 sign. If using the designs provided above, they are already sized correctly.

Design prep

Place a sheet of graphite paper on top of the 2×4, and the design on top of that. Use a pencil to lightly trace over the design, but be careful not to press in too hard.

Design prep

Once you’ve traced over the whole design, pull the paper away and you’ll be left with an outline of the design.

How to transfer fonts

Simply fill in the design using your acrylic paint marker. Repeat the steps above for the other side to make it reversible!

6. Glue the sign to the pedestal

The last step is to secure the 2×4 sign to the pedestal base. Use wood glue and a clamp to secure the base to the sign like in step 3. Let it dry and cure completely before moving.

Finished pedestal Base

Pretty easy right? Now you can create your own for every season or occasion!

Finished Merry and Bright side on reversible wooden sign

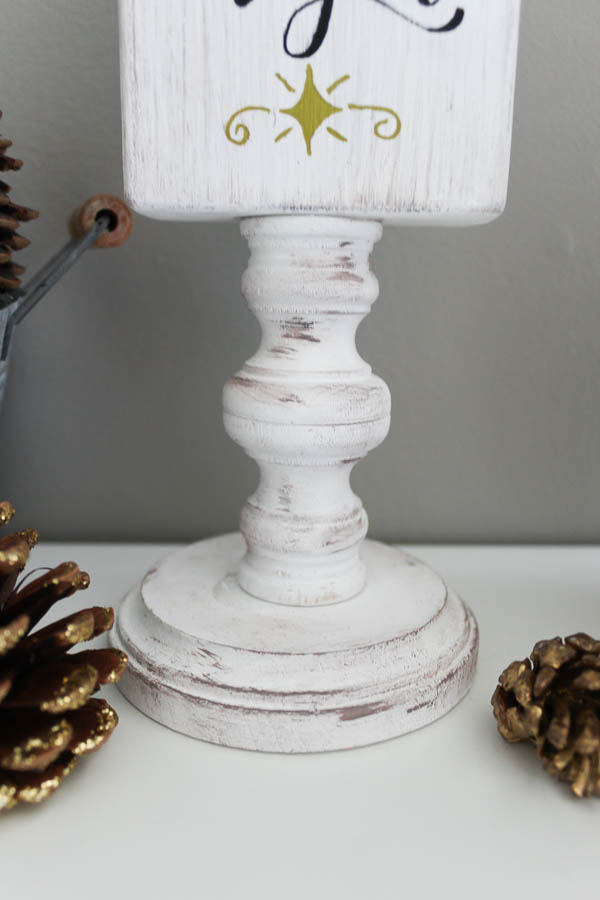
Merry and bright side on reversible wooden sign up close

Another fun way to use this reversible wooden pedestal sign is to have the front side display “be our guest” and the other side with the WiFi access information. It doesn’t just have to be for the holidays!

What will you put on your reversible wooden pedestal sign?

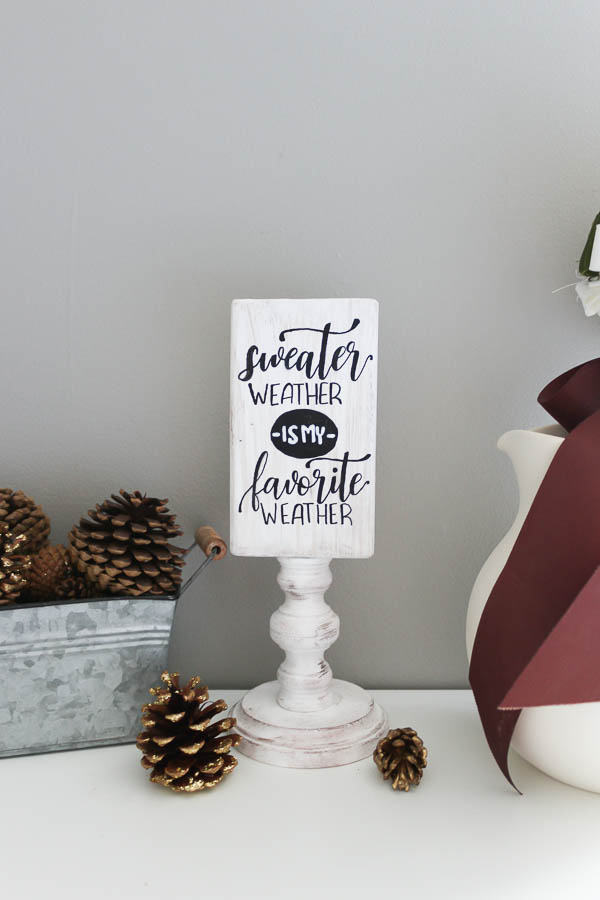
Finished Sweater Weather side on reversible wooden sign

I’m Amanda, and I am the creator and voice behind the food and DIY blog, Domestically Creative. What started as a place to share updates with friends and family after we moved from Illinois to Tennessee and then to Texas, turned into a passion for finding creative and frugal ways to feed us and decorate our homes.

I have always had the “make it myself” attitude and I’m not afraid to bust out the power tools or get creative when it comes to decorating our home on a budget. You can usually find me scouring the local thrift stores, garage sales and estate sales looking for my next makeover (like this litter box cabinet), or dreaming up ways to make our new house feel more like home. My most recent project was giving my home office a much needed facelift. Some of the plans included creating a fun inspirational accent wall and adding pegboard to store my craft hoards.

I currently call Missouri home, where I live with my husband, dog, and 2 cats in a pretty dull, late 90’s split level. My husband and I both love to travel the U.S and recently purchased a small travel trailer to tag along in our journeys. In our free time together we can usually be found working together on a home project, exploring a new place, or just lounging with our pup, Delilah.

I’d love for you to connect with me on social media via Facebook, Instagram, Pinterest and Twitter!

See all of Amanda’s tutorials HERE.

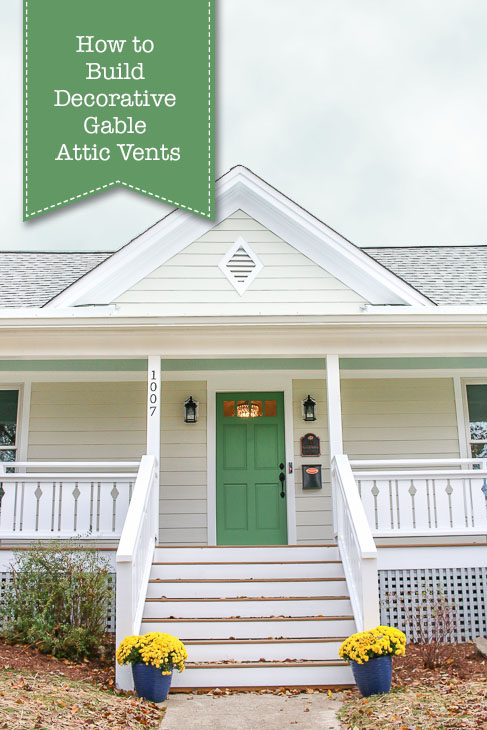
How to Build Decorative Gable Attic Vents

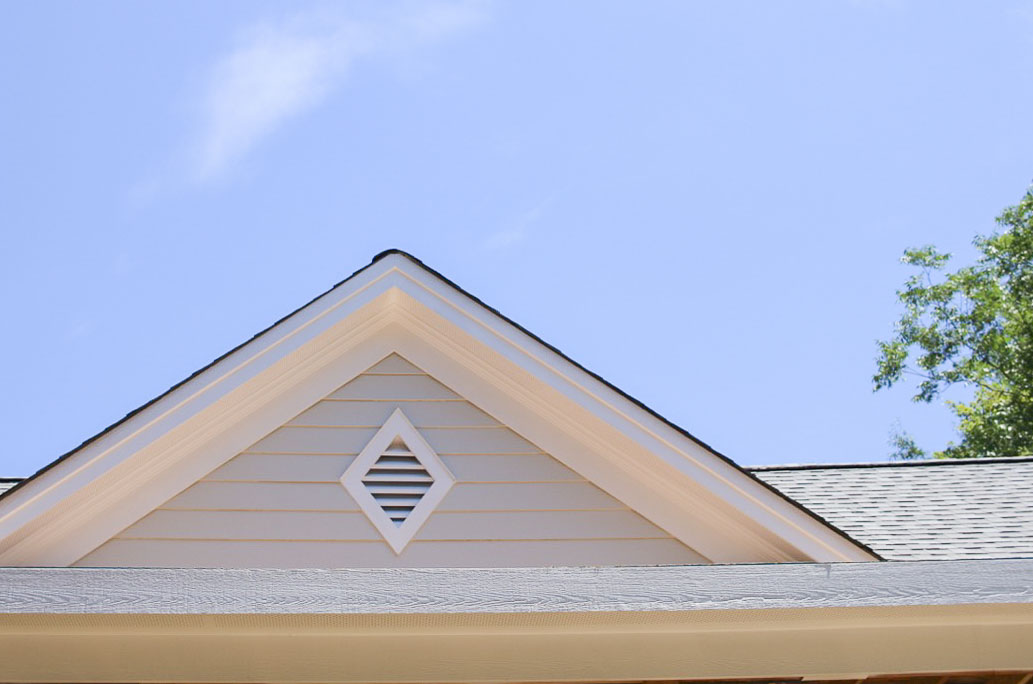
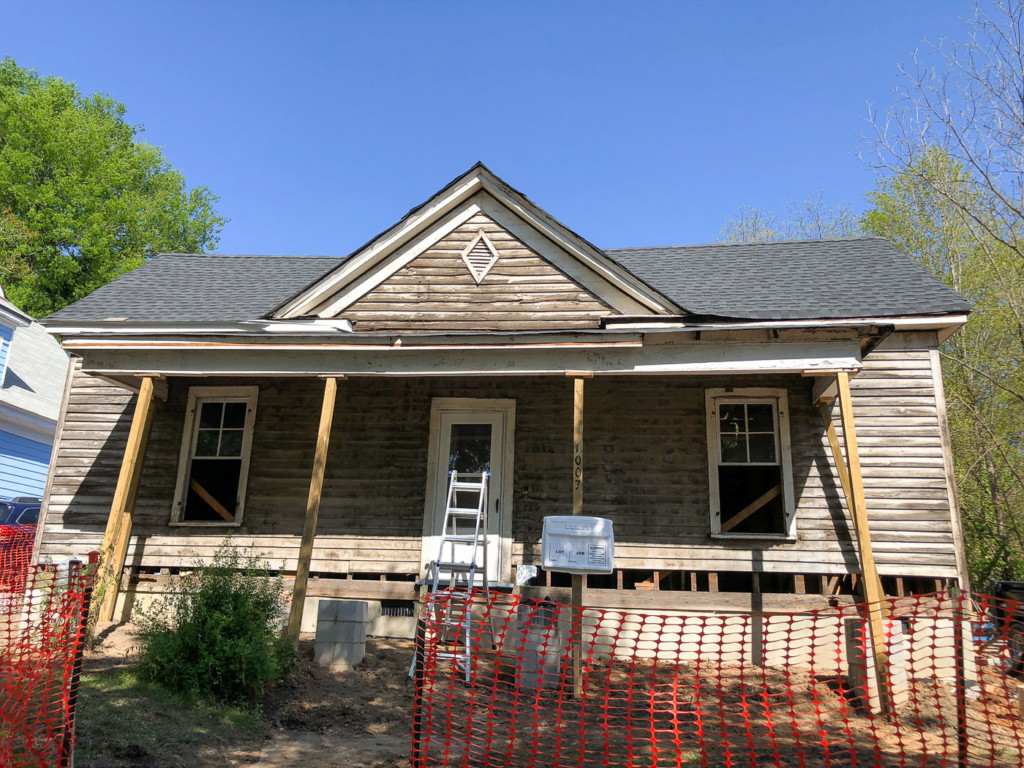
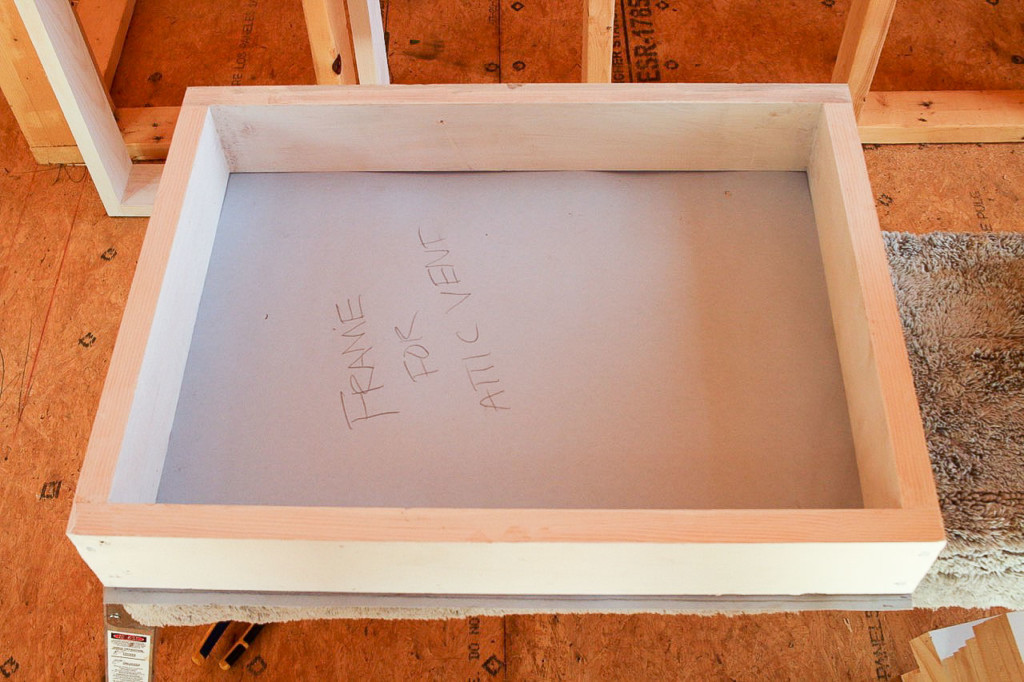
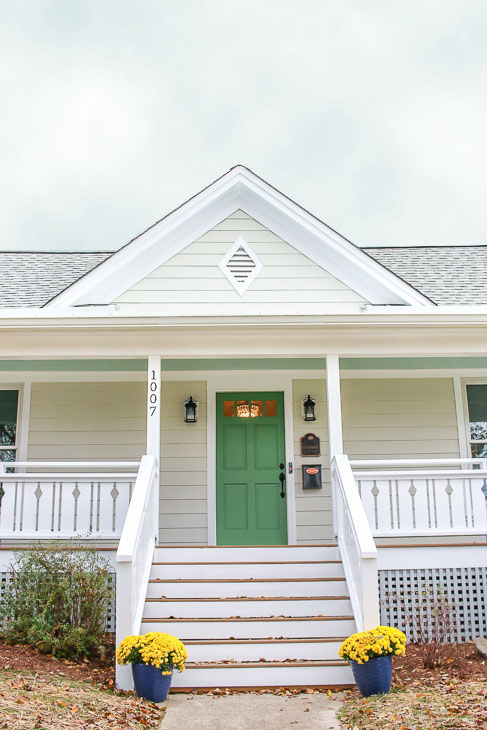
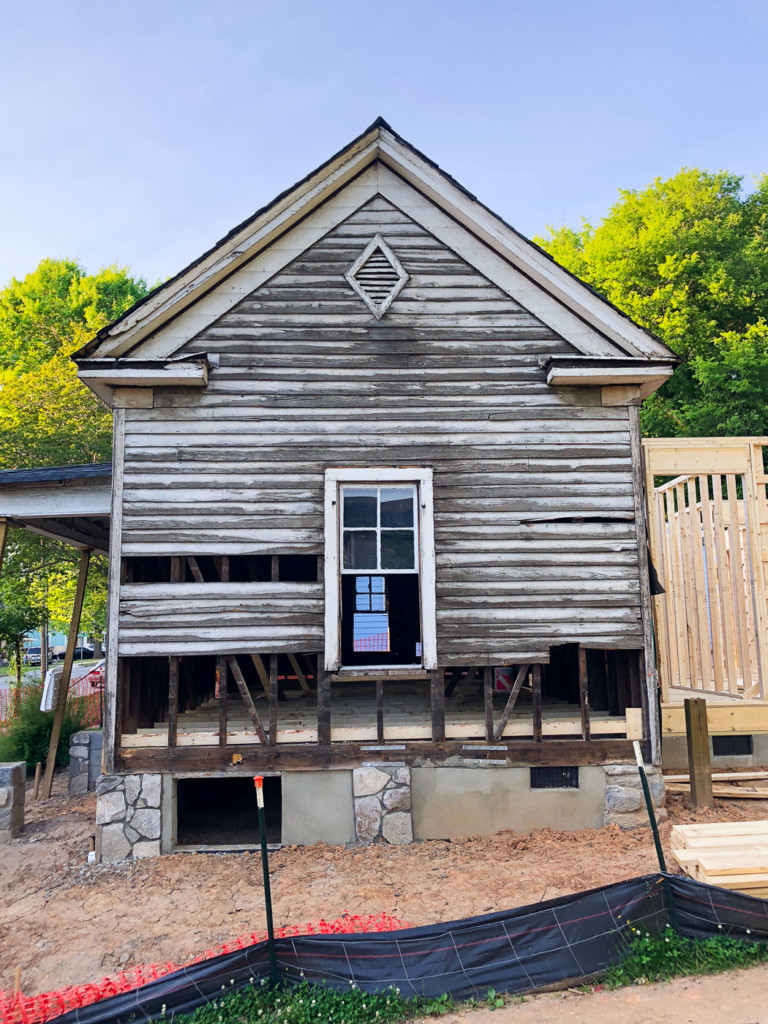
When I purchased the Saving Etta house (a Triple-A construction house built in 1900), I fell in love with the decorative gable attic vent shape at first sight. The little diamonds decorating each gable had my heart skipping a beat, even if she really needed a full gut job and renovation. When we stripped off the old faded aluminum siding and started to assess the condition of the gable vents, it became clear they were in really rough shape. And these cute custom shaped decorative gable attic vents weren’t available anywhere. Of course, you know that won’t stop me from getting what I want, so I taught myself How to Build Decorative Gable Attic Vents.

1900 triple A frame house

If you are a professional gable attic vent builder, this may not be the way you build gable vents, but I had to figure it out by myself because I couldn’t find any tutorials for building custom shape gable attic louver vents.

Decorative Gable Attic Vents Inspiration

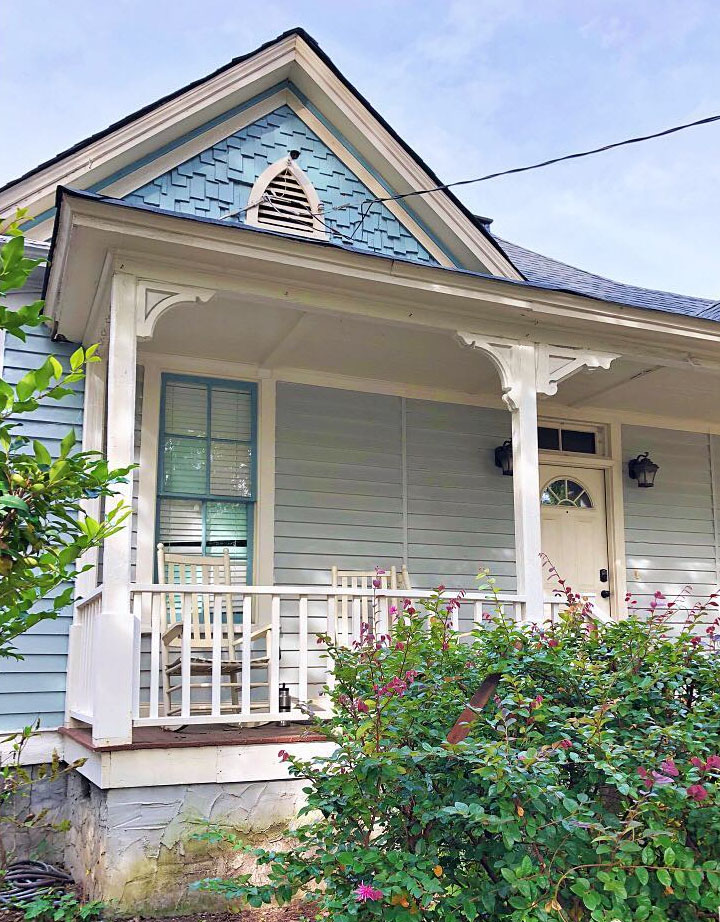
Before we get to the tutorial on how to build custom shaped attic vents, I want to show you some other decorative gable vents to give you some inspiration. It seems I’m drawn to decorative gable attic vents, because I have several photos from my travels of old houses with cute custom shaped gable vents. Take a look at these beauties!

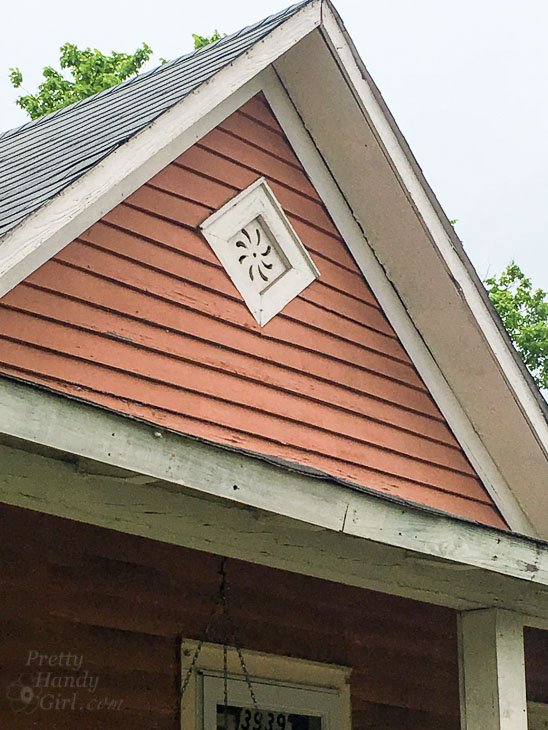
This attic vent doesn’t have louvers, but has a decorative cut out instead. I’m not sure it provides much ventilation, but the vent sure is cute to look at.

Triple A Construction House from pre-1900. Alamance Village, NC

I saved the best for last. Feast your eyes on this beautiful early 1900 quatrefoil louvered vent. This was a Sears & Roebuck house that was unfortunately torn down a few years ago to make way for apartment buildings. Don’t get me started on all the history being torn down around Raleigh, NC. At least I have a photo to remind me of the beautiful architectural features.

Still want more custom shaped gable vent ideas? You can see more Decorative Attic Gable Vents in my Pinterest Board.

Now it’s time to learn How to Build Decorative Gable Attic Vents!  So, let’s get crackin’.

Materials:

(I’ve included affiliate links for your convenience. I earn a small percentage from a purchase using these links. There is no additional cost to you. You can read more about affiliate links here.)


Tools:

Directions:

If you have to make multiple gable louvered vents, you may want to start by making a template of your shape. And, you’ll want to measure the rough opening for your gable vent if you are trying to install into existing attic framing.

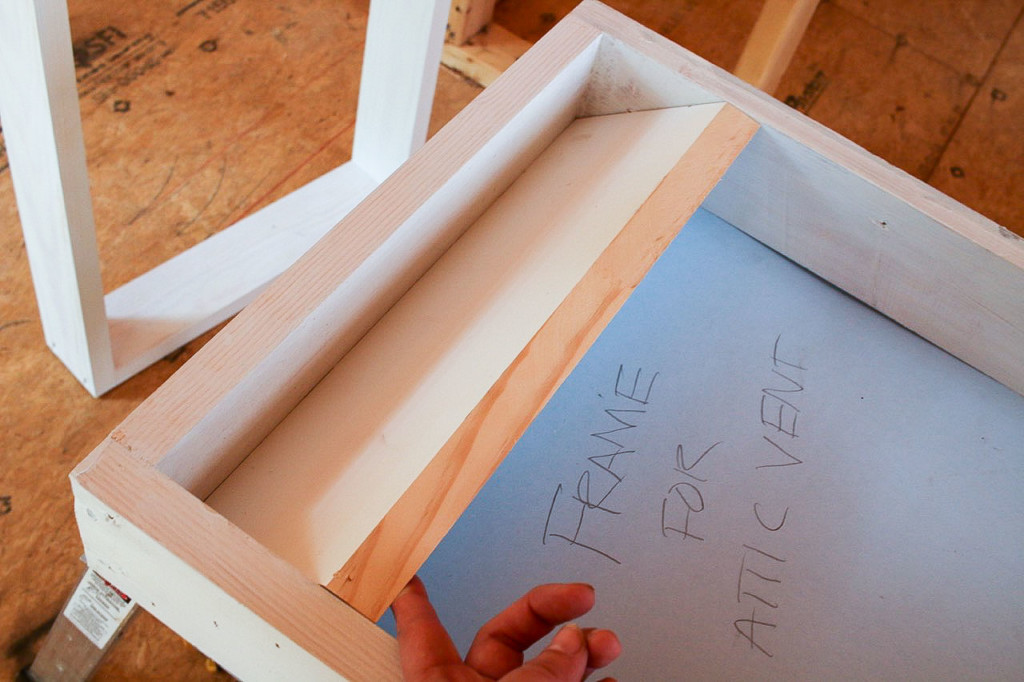
1. Build a rectangular box using the 1×4’s. Prime the frame (if wood) before installing the louvers.

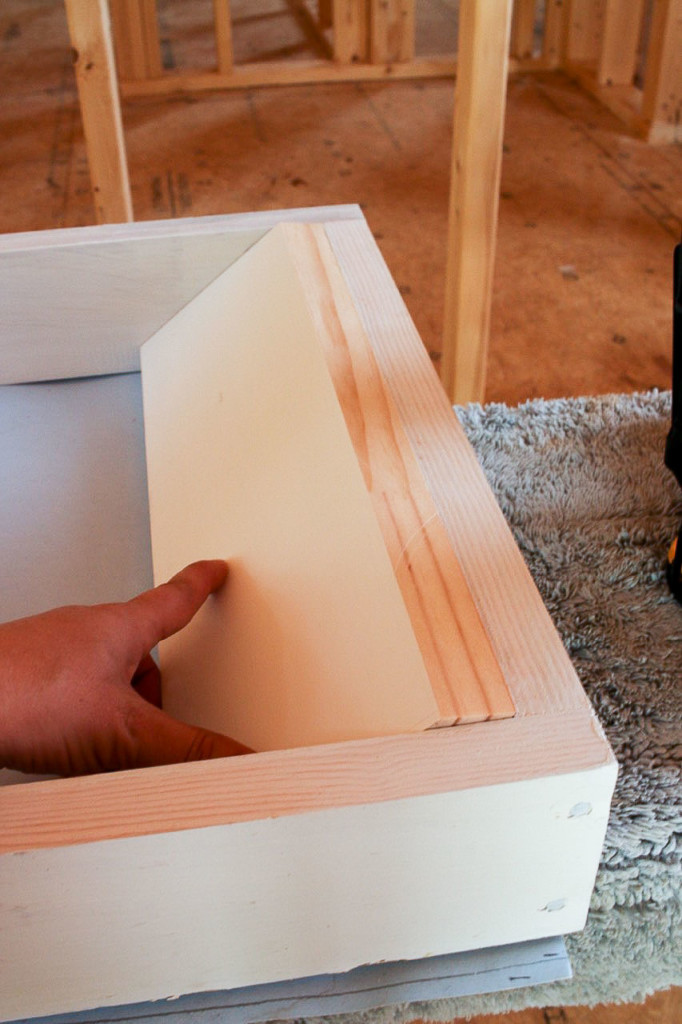
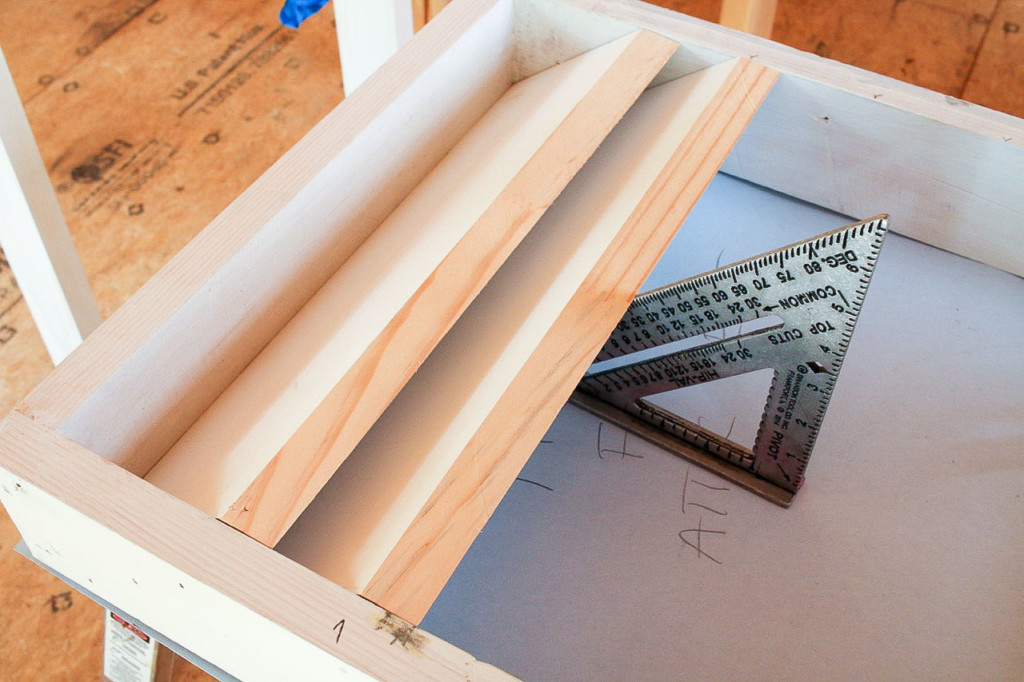
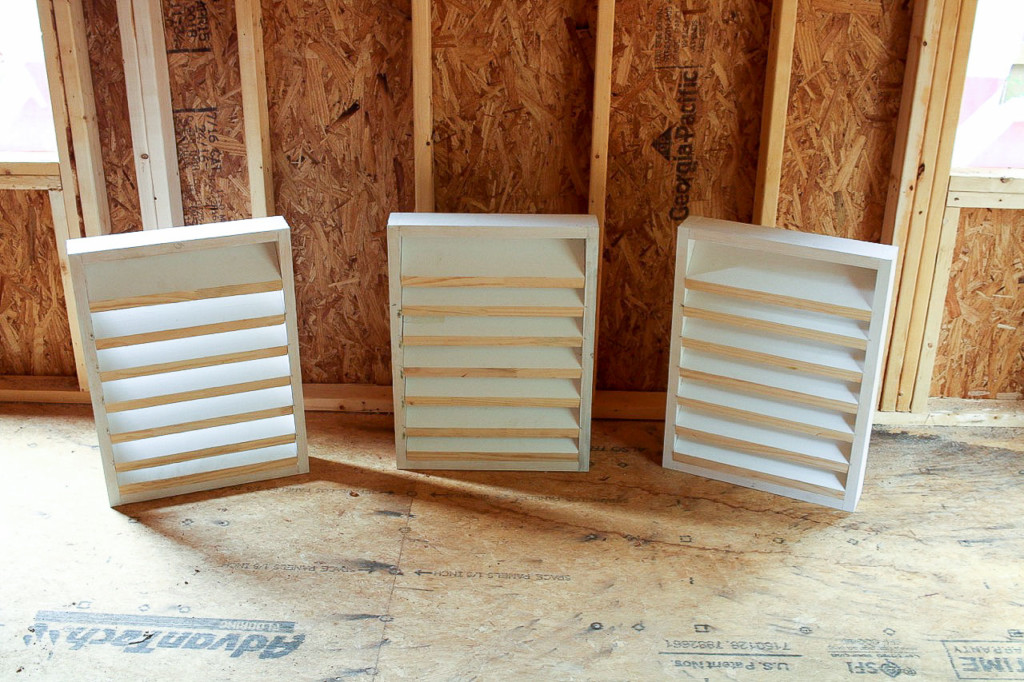
2. Run the 1×6 lumber through the table saw to cut a 45 degree angle onto one side. (Cut the first louver to test the fit inside the rectangular frame.) Make sure the louver fits and does not protrude past the front or back of the frame. You may need to rip more off your 1×6 material to make the louvers fit inside the 1×4 frame.

3. Cut and set a second louver into the bottom of the gable vent frame.

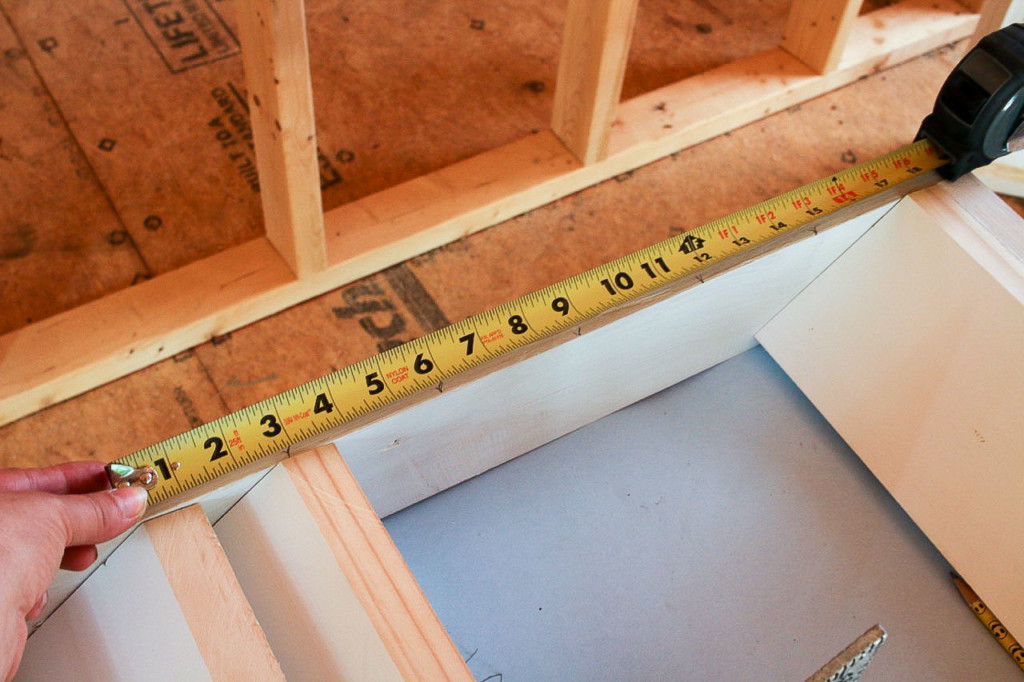
Measure the space between the top and bottom louver and divide the distance into equal spaces for your middle louvers.

Mark the location for each louver onto the gable vent frame.  This will give you the number of remaining louvers to cut. (For reference, my louvers are approximately three inches apart.)

signature

4. Tack the top louver in place using trim nails (2 ½”, 16 gauge nails.)

5. Use the speed square to hold the second louver in place. Line the louver up with your pre-marked spots. Secure the second louver in place with three nails on each side.

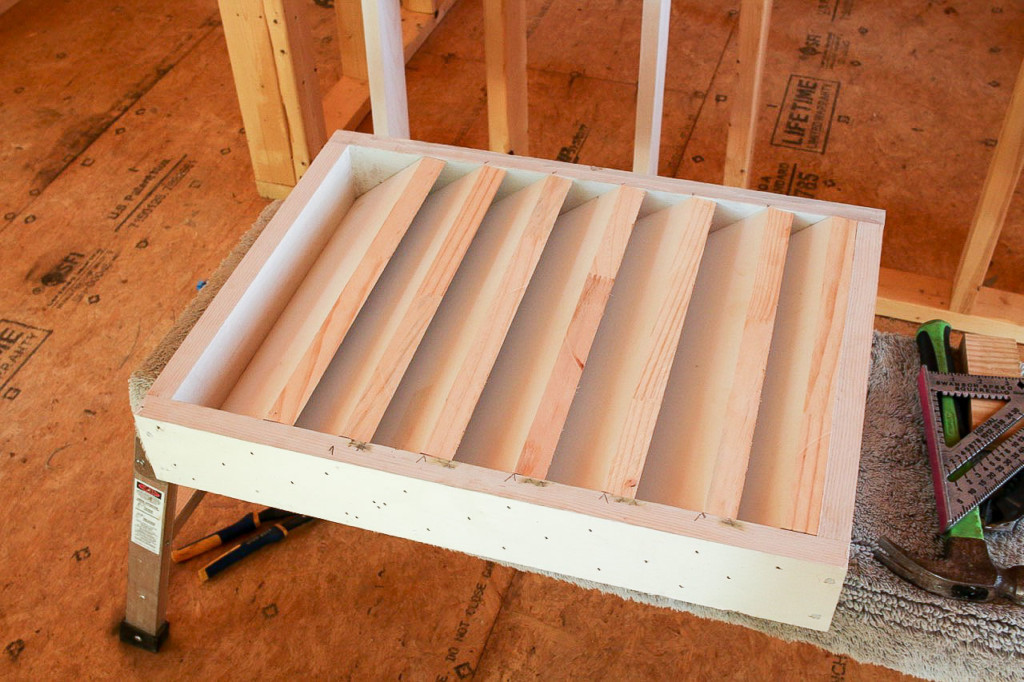
Continue attaching the louvers into the gable vent frame.

When all the louvers have been installed, it should look similar to the photo below.
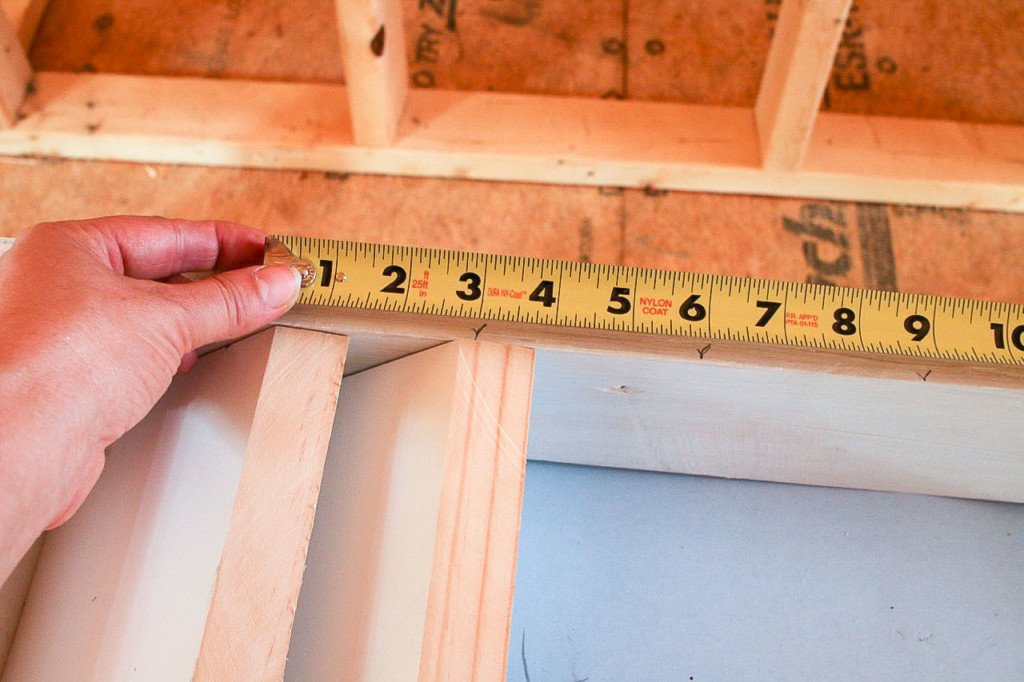
6. Caulk all the joints on the louvers and the frame. Let the caulk cure. Prime and paint the gable attic vent (especially while you have access to the back).

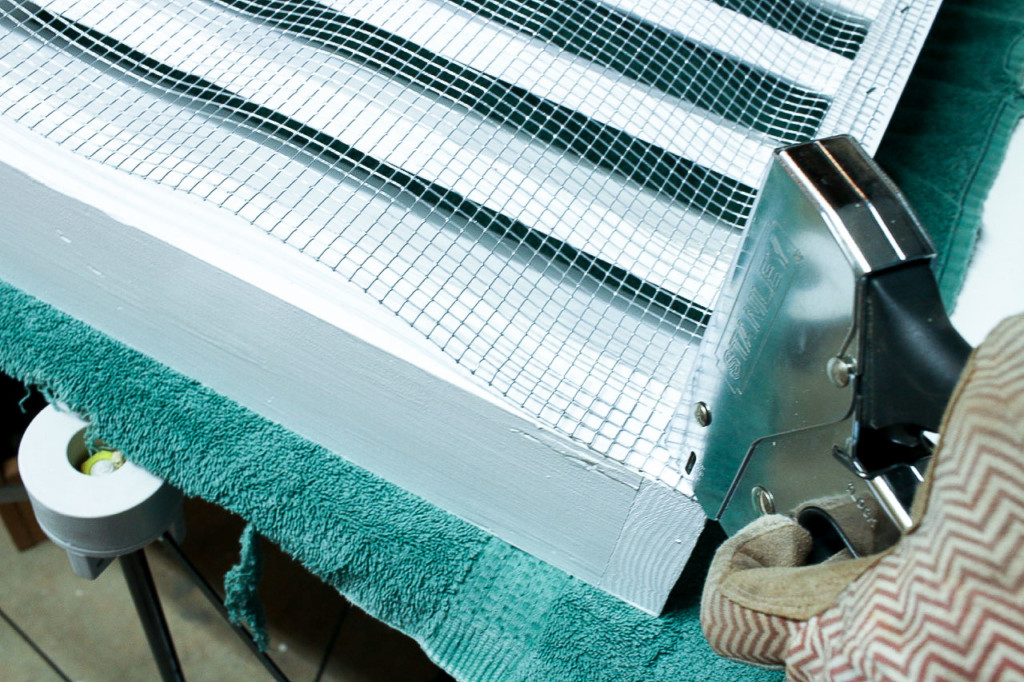
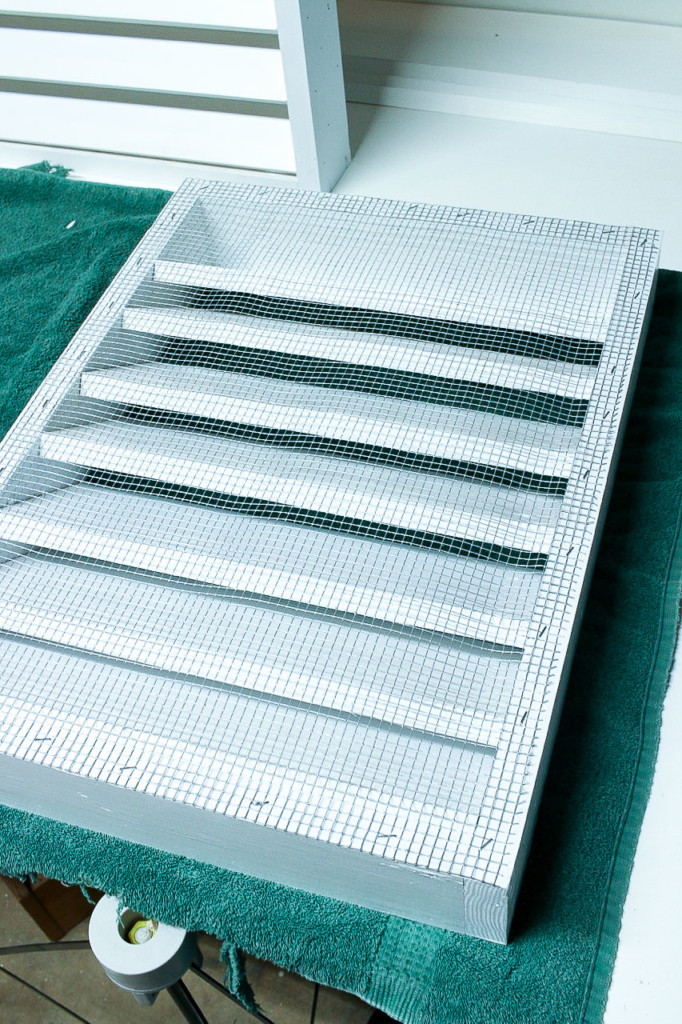
7. Flip the gable vent frame over and cut a piece of wire mesh hard cloth to fit onto the back of the vent frame.

Secure the mesh with heavy duty staples.

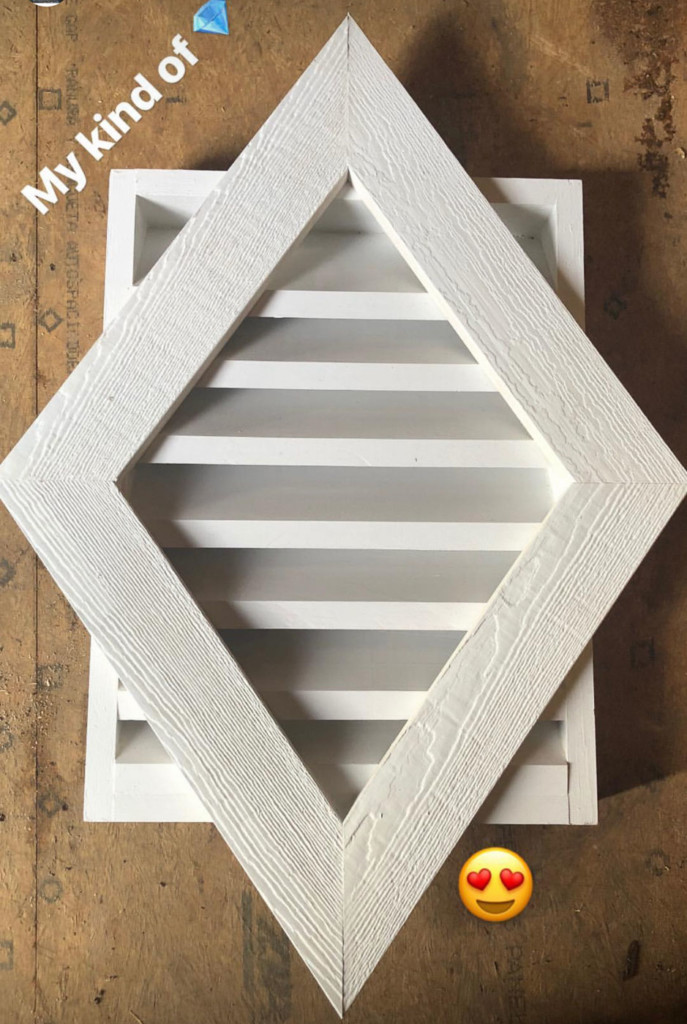
Now your gable attic vents are ready for their decorative shape!

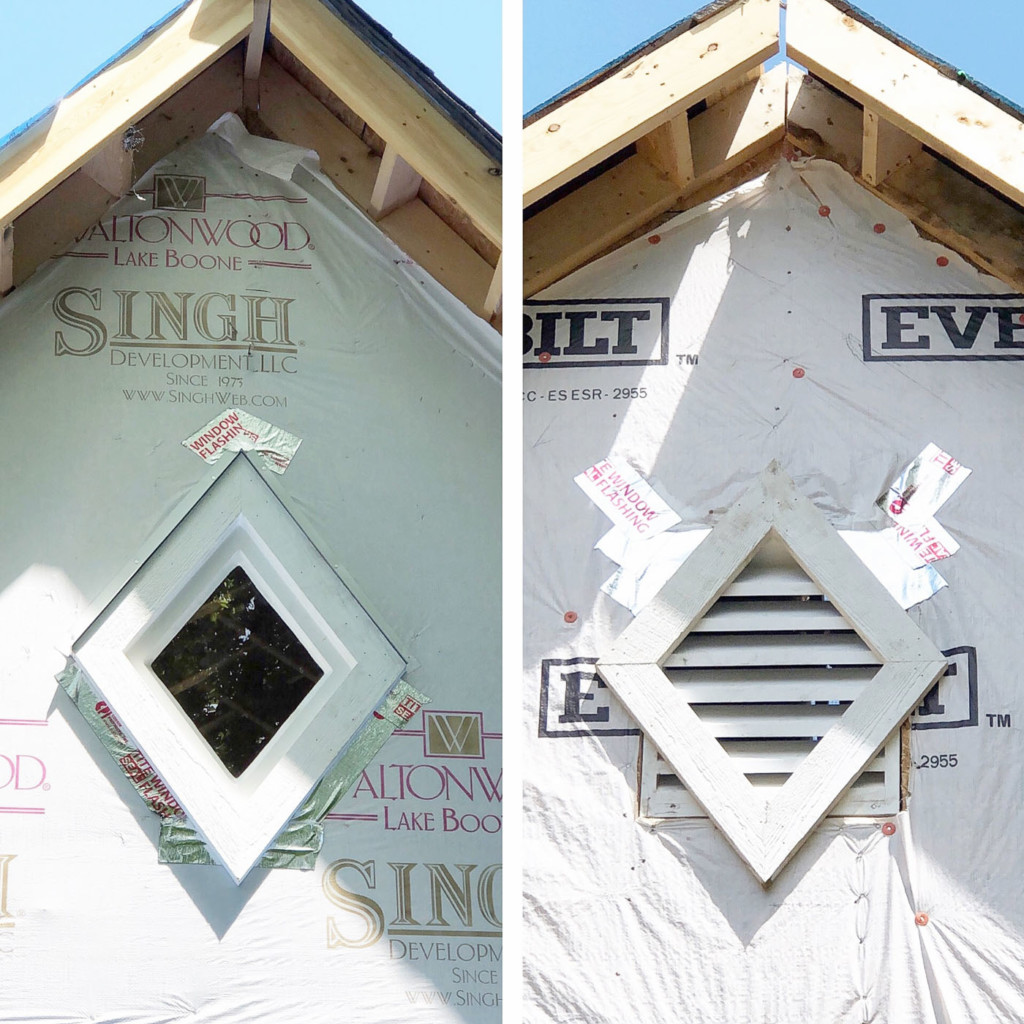
8. You can use any shape you like as long as it fits over the rectangular attic vent. The shape is simply created by attaching a frame to the front of the gable attic vent. I chose the diamond shape since the original house had diamonds. Using the original house vents as my template, I cut Miratec trim into the same diamond shape.

Connect the frame using wood glue and nails. Then secure the decorative frame shape to the gable vent with trim nails.

Installing Gable Attic Vents:

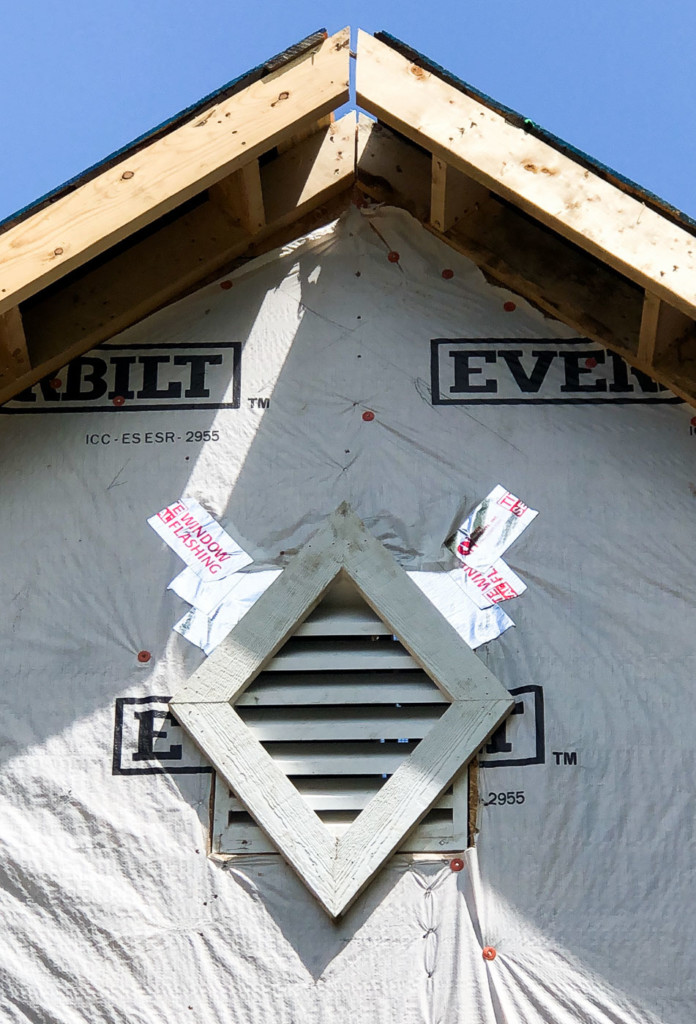
Secure the gable vent inside the house framing using trim nails or screws. The shape frame will sit on top of the house sheathing. Be sure to install house wrap or flashing behind the shape frame, but not over the vent.

A drip cap is installed on top of the shape frame to prevent water from seeping inside. Then the siding is installed.


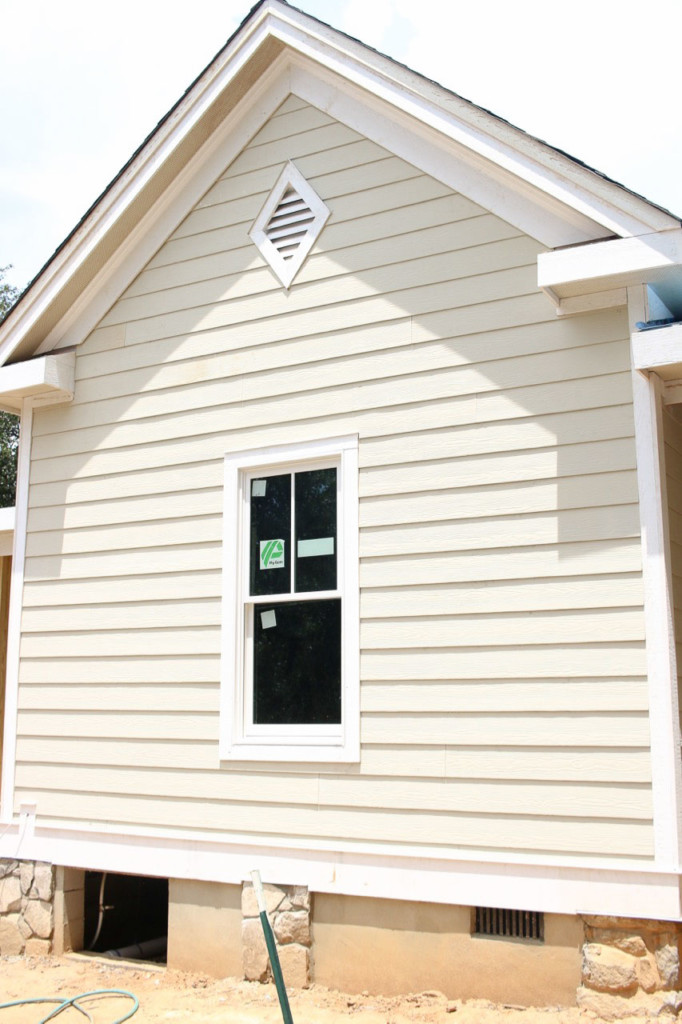
Finally the painters should caulk around all the seams where the gable attic vent meets the siding.

Saving Etta: 1900 Home Saved from Demolition and restored into a beautiful Triple A construction modern farmhouse. With Flat Sawn Ballusters on porch

Not bad considering the original gable vents were 118 years old! I consider it a win being able to keep the original architectural feature and hopefully allow it to last another 100 years or more.

Did I mention I had to build five decorative diamond gable attic vents? The house had three gables on the front original section of the house…

saving etta front view seeded and straw

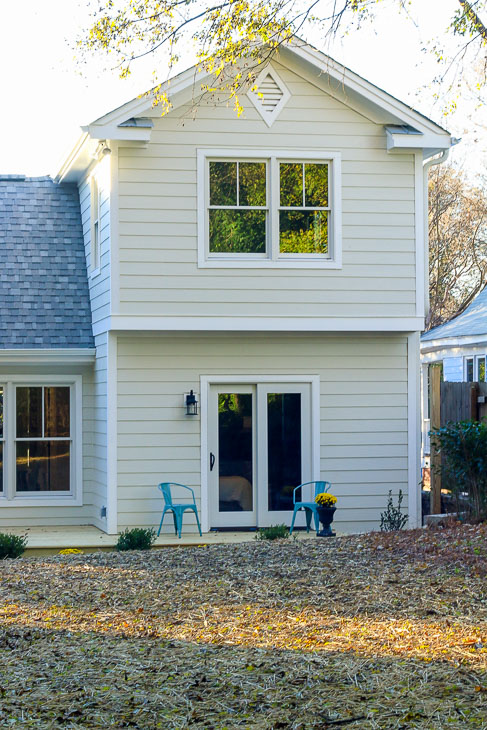
…and two on the addition side of the house.

two story side of house backyard transformed

Coming up, I’ll show you how I built the custom diamond shaped window to match the gable vents!

Let me know if you found this tutorial helpful in the comments. It only takes you a minute, but your comment helps keep me motivated.

I hope you are enjoying these tutorials from the Saving Etta house. If you are just visiting this website, you might want to read the entire Saving Etta series! It was a monumental undertaking (did I mention it was my first house rehab?)


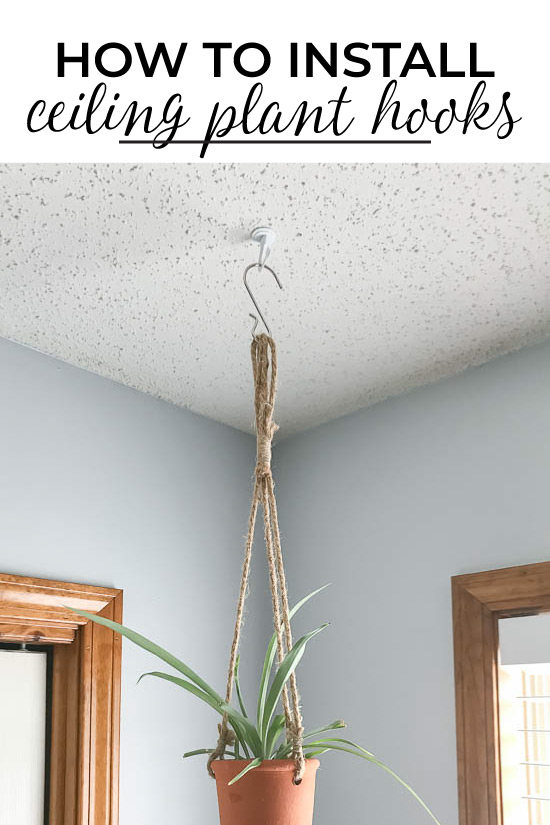
How to Install Ceiling Plant Hooks

How to Install Ceiling Plant Hooks

Two Ways to Install a Ceiling Hook for Plants

There are a few different methods to install a ceiling hook to hang a plant from, but this post is going to cover two of them. The first method involves finding a joist, and the second method uses a toggle bolt. Don’t let the words “joist” or “toggle bolt” worry you though, both of these methods are very easy, and require few tools. Read on for instructions for two ways to install a ceiling hook.

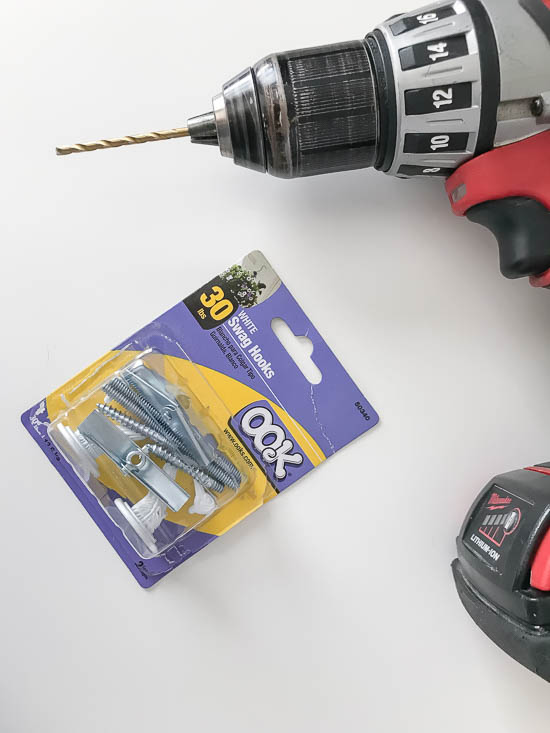
Supplies Needed for installing a ceiling hook

Install a Ceiling Hook into a Joist

Hanging a plant hook using a ceiling joist is the most secure way and the safest, especially if you plan to hang a heavy planter. 

Materials:

(I’ve included affiliate links for your convenience. I earn a small percentage from a purchase using these links. There is no additional cost to you. You can read more about affiliate links here.)

Instructions:

Step 1

Decide where you will install the hook. Grab the stud finder to locate a joist in that area. Don’t have a stud finder, try one of these 5 Ways to Find a Stud without a Stud Finder. Make several passes to ensure you know exactly where the joist begins and ends, and mark the area accordingly.

Step 2

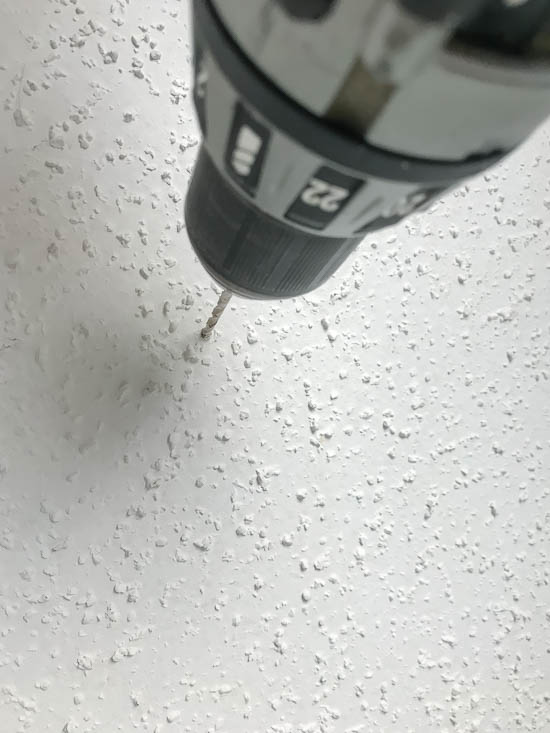
Drill a small pilot hole into the drywall and joist with a drill bit slightly smaller than the size of the screw being used.

drill pilot hole

Step 3

Hand screw the hook into place until it is flush against the drywall. (If it becomes too difficult to turn, you can put a screwdriver into the hook to use for leverage.)

Installing ceiling hook into joist

Step 4

Hang your planter and pat yourself on the back for a job well done!

Install a Ceiling Hook with a Toggle Bolt

If you don’t want to go through the trouble of finding a joist, or there isn’t a joist where you want to hang your plant, you can use a toggle bolt with the hook. (Just make sure your plant isn’t heavier than the specified weight limit for your ceiling hook.) It sounds intimidating, but it’s actually very easy!

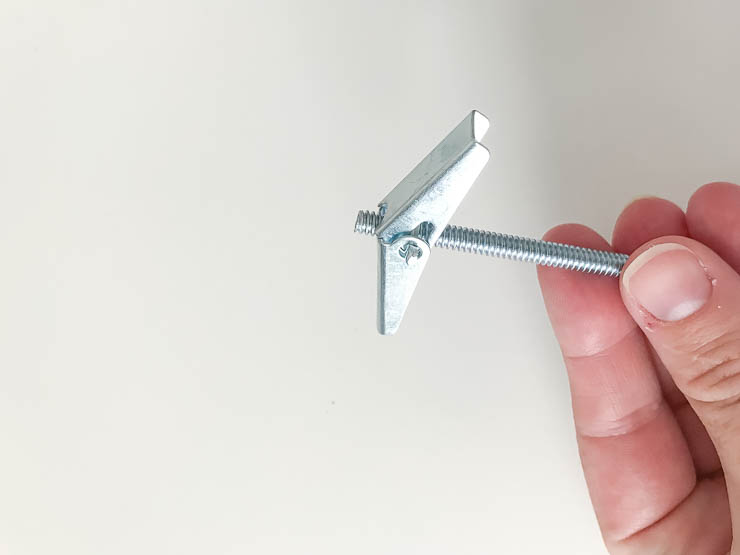
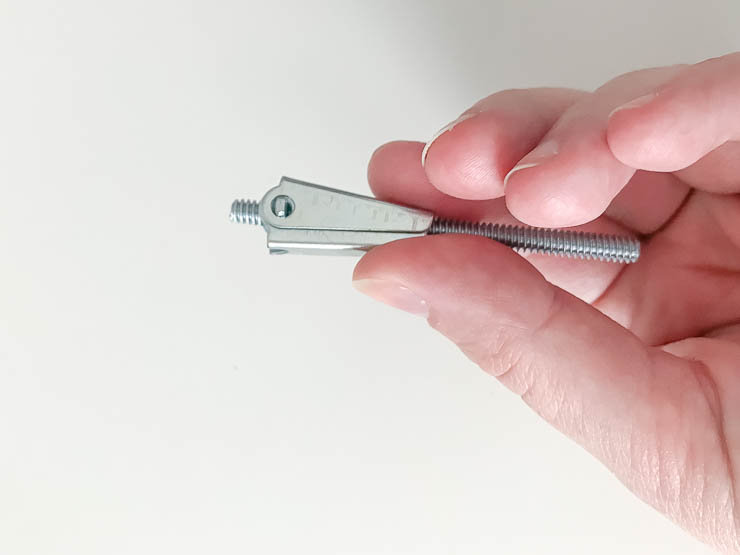
First, what is a toggle bolt? A toggle bolt is a bolt with “wings” that you hold closed to insert inside a hole in drywall, and once inside the hollow wall the wings spring back open. They are great for using with ceiling hooks!

Toggle bolt open

Instructions:

Step 1

Decide where you’ll be installing the ceiling hook for your plant and make a small mark with a pencil.

Step 2

Make a small pilot hole where you just marked using a drill and a 1/8″ drill bit. If you happen to hit a joist consider going back to the first method above, otherwise you’ll need to move to the left or right of the joist.

Step 3

Using a 3/8″ drill bit and drill, make a larger hole into the ceiling drywall to fit the end of the toggle bolt.

Step 4

Holding the wings on the toggle bolt closed, gently insert the bolt (hinge side first) into the hole in the ceiling drywall.

Toggle bolt closed

Once inserted the wings will pop open, securing the bolt inside the drywall.

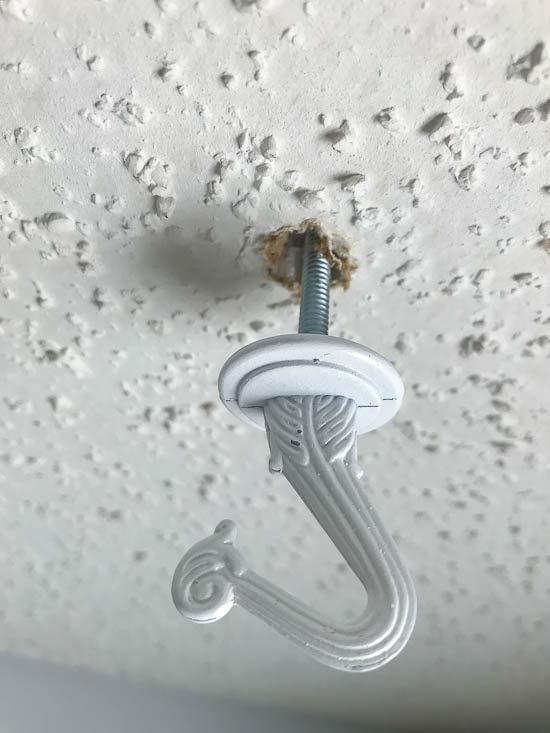
Installing ceiling hook with toggle bolt

Step 5

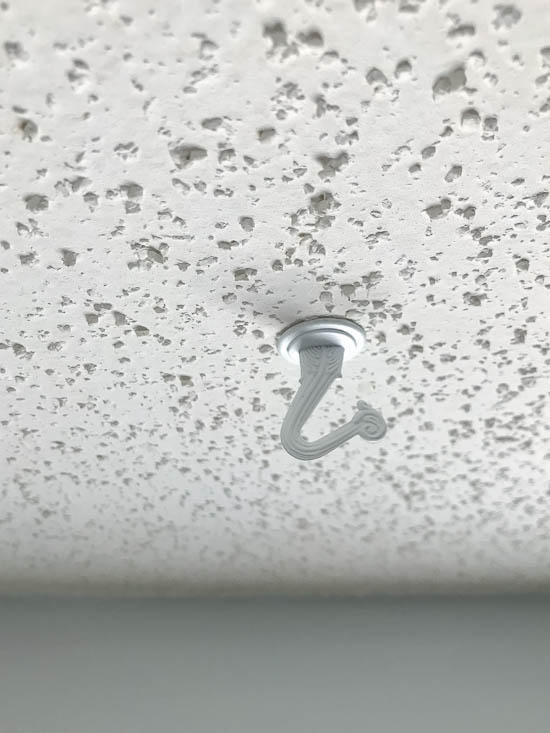
Screw the swag hook onto the bolt, and continue screwing until the hook is flush against the drywall. It’s helpful to pull down gently on the bolt while screwing the hook into place to keep it from just spinning in place.

Installed hook flush against ceiling

Step 6

Hang your planter and you are finished with this project!

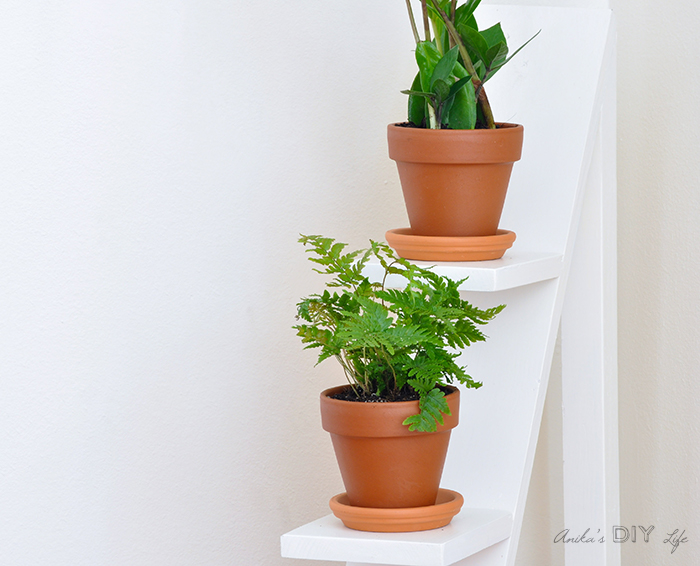
ceiling hook with hanging plant

I hope this tutorial gives you the confidence to install a ceiling hook in your own home!

Check out my other tutorials HERE.

I’m Amanda, and I am the creator and voice behind the food and DIY blog, Domestically Creative. What started as a place to share updates with friends and family after we moved from Illinois to Tennessee and then to Texas, turned into a passion for finding creative and frugal ways to feed us and decorate our homes.

I have always had the “make it myself” attitude and I’m not afraid to bust out the power tools or get creative when it comes to decorating our home on a budget. You can usually find me scouring the local thrift stores, garage sales and estate sales looking for my next makeover (like this litter box cabinet), or dreaming up ways to make our new house feel more like home. My most recent project was giving my home office a much needed facelift. Some of the plans included creating a fun inspirational accent wall and adding pegboard to store my craft hoards.

I currently call Missouri home, where I live with my husband, dog, and 2 cats in a pretty dull, late 90’s split level. My husband and I both love to travel the U.S and recently purchased a small travel trailer to tag along in our journeys. In our free time together we can usually be found working together on a home project, exploring a new place, or just lounging with our pup, Delilah.

I’d love for you to connect with me on social media via Facebook, Instagram, Pinterest and Twitter!

See all of Amanda’s tutorials HERE.


If you liked this tutorial, you’ll love this two-tiered scrap wood plant stand:

Easy two-tiered plant stand made from scrap wood

His and Hers Towel hooks pinterest

DIY His and Hers Towel Hooks

If you are short on space, add some extra storage and personality to your home with these customizable DIY his and hers towel hooks. No stencil or die cut machine required with this easy font transfer method.

Hanging towels in style

This project was born out of necessity for our camper. Right now we have one small double hook in the camper bathroom and we tend to fight over it. The hook isn’t big enough for both of our towels, so I usually find one has fallen off onto the floor. But, these adorable DIY his and hers towel hooks will help us solve the problem, and give our camper a bit of personality at the same time.

Here’s how to make your own pair:

Materials:

(I’ve included affiliate links for your convenience. I earn a small percentage from a purchase using these links. There is no additional cost to you. You can read more about affiliate links here.)

Instructions

1. Cut the wood:

Measure 8″ from the end of the pine 1×4 and mark it with a speed square. Use a miter saw to cut the 1×4 at the marked line. Repeat this step once more for two pieces of 1×4 cut to 8″ each.

2. Sand and stain the boards:

Use the palm sander and 100 grit sandpaper to sand each board, moving the sander with the grain. Step up to 150 grit and 220 grit consecutively to get the smoothest finish possible on each board.

When each board is completely smooth, wipe off the excess sawdust with a clean rag. Then use a tack cloth to wipe down each board to remove any lingering sawdust before staining.

To stain each board, use a foam brush to wipe on a thin coat of stain. Let the stain sit for 5-10 minutes and then wipe off the excess stain with a clean rag. Let the stain dry for 30 minutes before flipping the boards over to repeat staining on the back side. Make sure the stain dries fully before moving on to the next steps. (You might need to wait about 18-24 hours.)

3. Seal the Wood

Give both boards a coat of polyurethane. Let it dry and cure for 24 hours before moving on to the next step.

Don’t skip this step! If you do not add a layer of polyurethane, the paint in step 4 may bleed into the grain of the wood.

4. Add his and hers to the boards:

You can use a stencil for this step, or hand letter if you prefer, but this easy font transfer method just may change your DIY mind.

Cut out each word after printing them off onto a white sheet of paper.

Transferring printed text to wood

Next, take a piece of chalk and shade all over on the back side of the paper.

shade back of paper with chalk

Place the paper right side up and secure it to the wood board with a small piece of painter’s tape or washi tape. Then trace over the text with a pencil, but be careful not to press in too hard. Pressing down hard while tracing could leave an imprint in the wood.

Use a pencil to trace over text onto the wood

Remove the paper, and a chalk outline of the text will be left.

Chalk outline left from font transfer

Next, use an oil based Sharpie paint marker to trace over and fill in the text. Once the paint has dried, brush away any leftover chalk lines or dust.

Fill in outline with sharpie paint marker

5. Seal the Wood (again)

Give both boards a coat of polyurethane using a foam brush. Let it dry before moving on to the next step.

6. Add the towel hooks and hangers

Place one of the hooks in the center of one board under the “his” or “hers” text. Mark where the holes for the screws will go with a pencil. Drill a small pilot hole with a drill bit for each screw. This will prevent any splintering or splitting of the wood when driving in the screws.
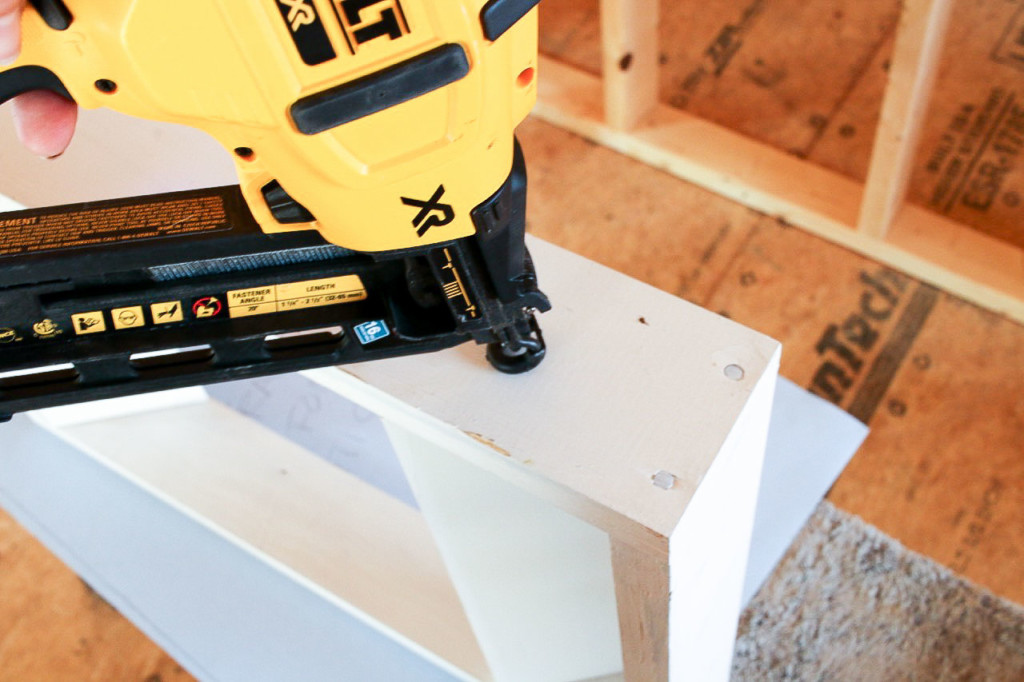
drill small pilot hole for screws to avoid splintering

Drive the screws into place to finish attaching the towel hooks to each board.

Drive the screws into place to finish attaching the towel hooks to each board.

Next, follow the same steps for adding a D-hook to the back of each board for hanging.

add a d-ring to the back to hang

When finished, hang your brand new towel hooks on the wall using an anchored drywall screw and stand back to admire your work!

Finished His and Hers towel hooks

These hooks will be relocated to my camper before our next trip out to save my sanity!

His and hers hooks perfect for towels

You could also use these his and hers hooks to hold clothes, hats or accessories in a closet. Use them to get the next day’s outfit ready by hanging tops, bottoms, and accessories on them. They would also work great in a guest room for guests to hang up their coats or small bags!

DIY his and hers Hooks to hang up clothes or accessories

I’m Amanda, and I am the creator and voice behind the food and DIY blog, Domestically Creative. What started as a place to share updates with friends and family after we moved from Illinois to Tennessee and then to Texas, turned into a passion for finding creative and frugal ways to feed us and decorate our homes.

I have always had the “make it myself” attitude and I’m not afraid to bust out the power tools or get creative when it comes to decorating our home on a budget. You can usually find me scouring the local thrift stores, garage sales and estate sales looking for my next makeover (like this litter box cabinet), or dreaming up ways to make our new house feel more like home. My most recent project was giving my home office a much needed facelift. Some of the plans included creating a fun inspirational accent wall and adding pegboard to store my craft hoards.

I currently call Missouri home, where I live with my husband, dog, and 2 cats in a pretty dull, late 90’s split level. My husband and I both love to travel the U.S and recently purchased a small travel trailer to tag along in our journeys. In our free time together we can usually be found working together on a home project, exploring a new place, or just lounging with our pup, Delilah.

I’d love for you to connect with me on social media via Facebook, Instagram, Pinterest and Twitter!

See all of Amanda’s tutorials HERE.