This Drab Screen Porch got a major Makeover with pops of Aqua and Green! Yummy Color!

How to Install Cable Railings | Pretty Handy Girl

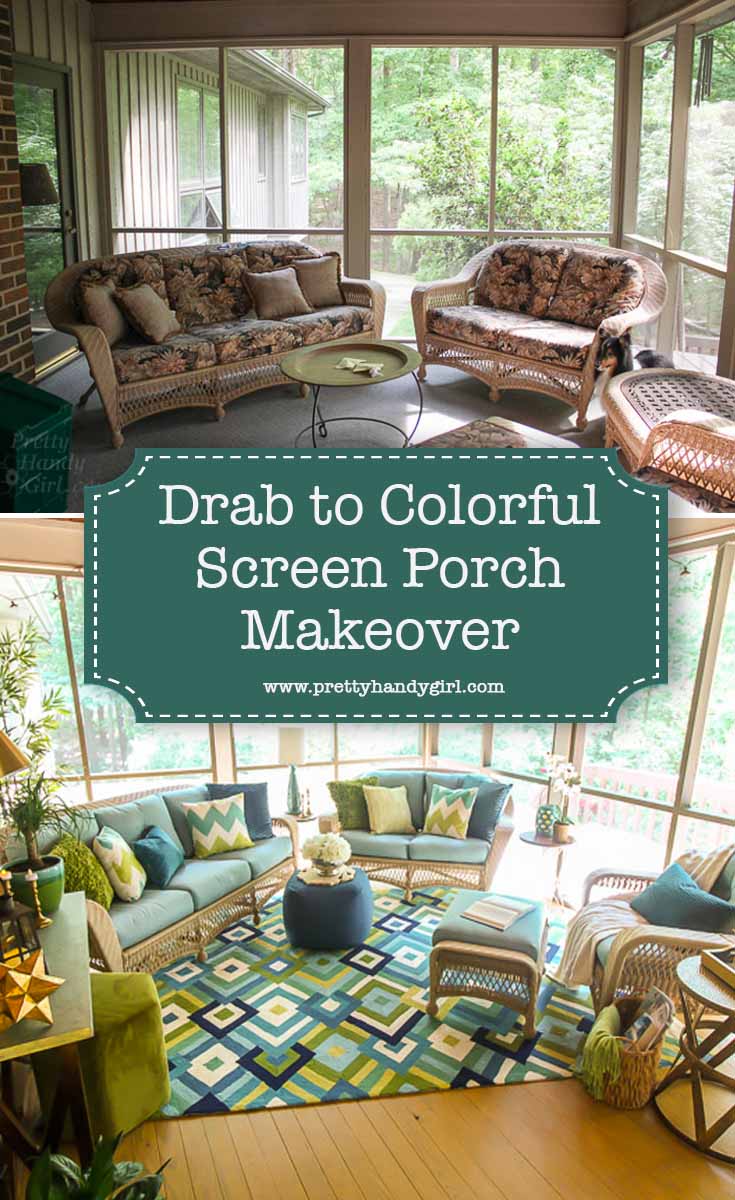
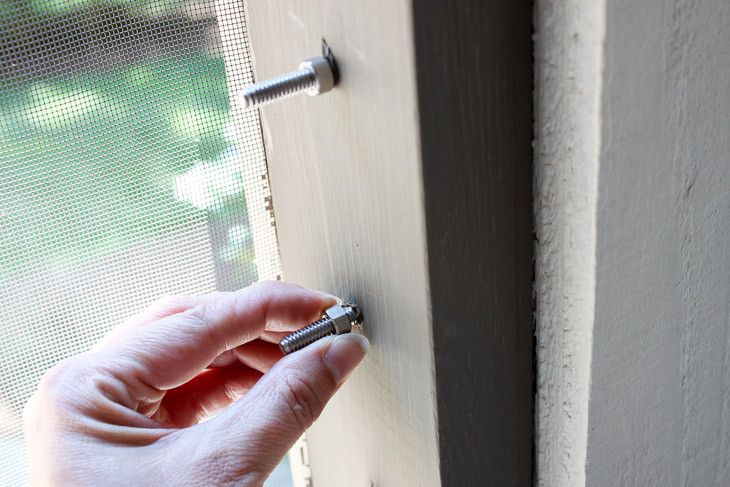
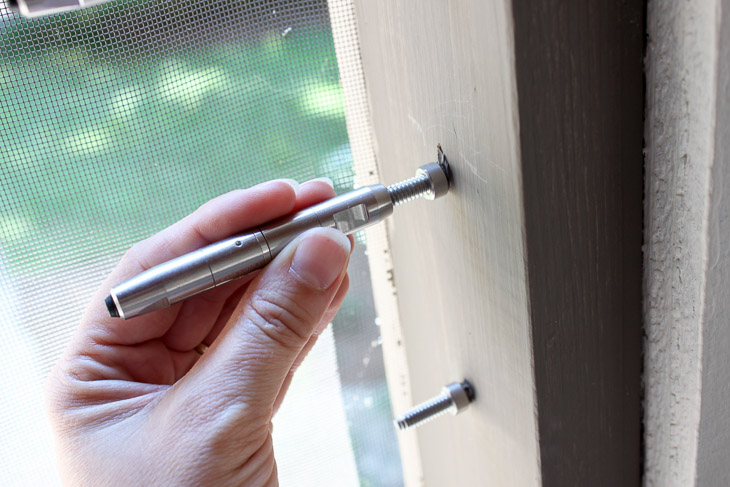
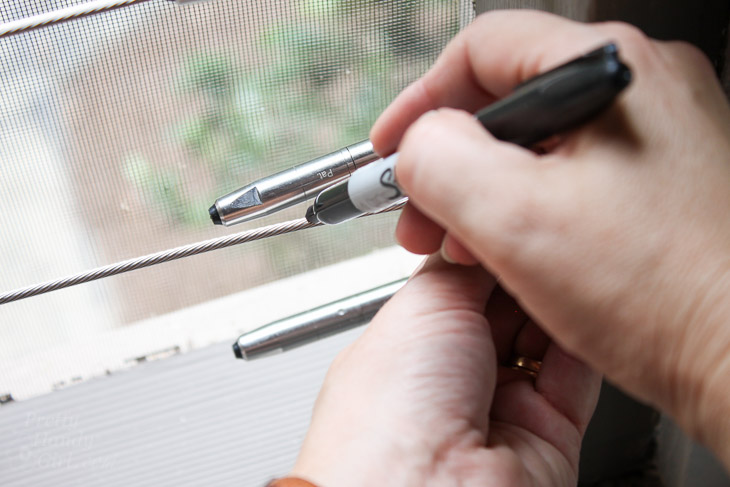
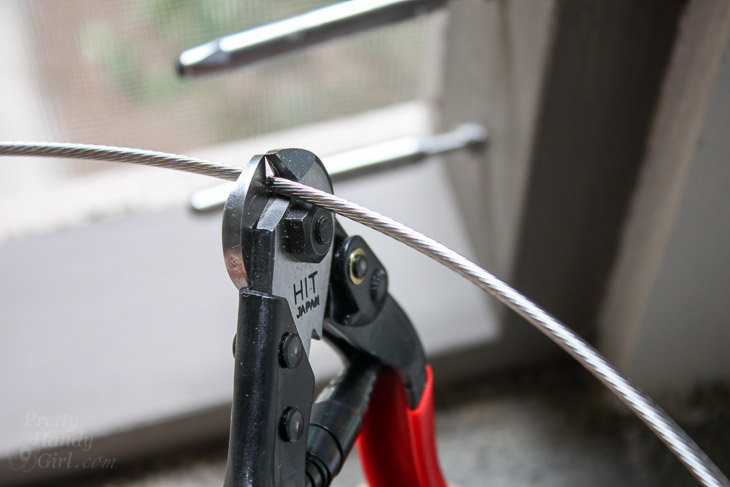
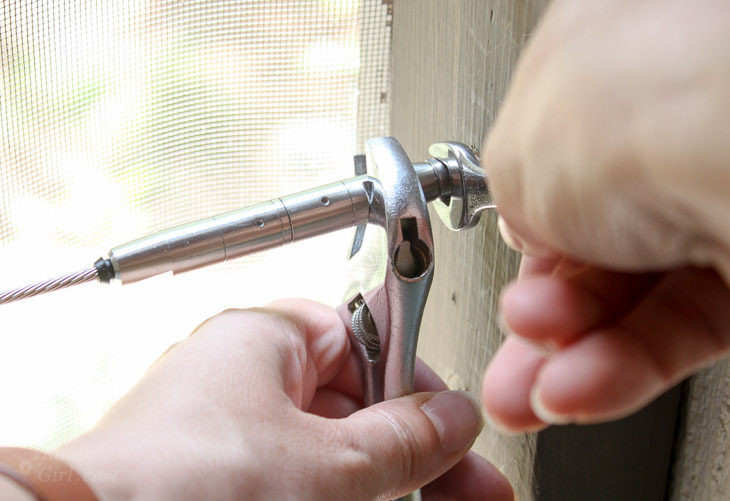
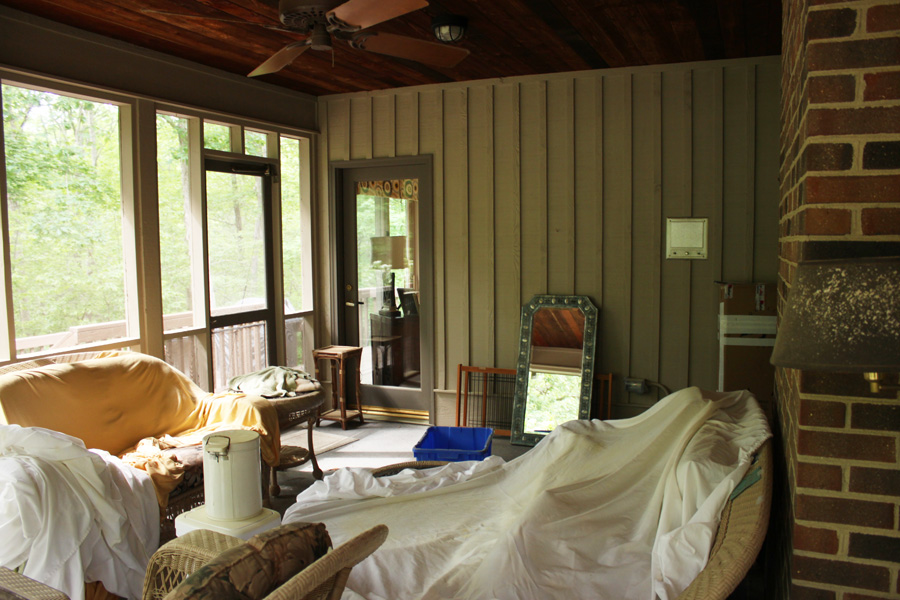
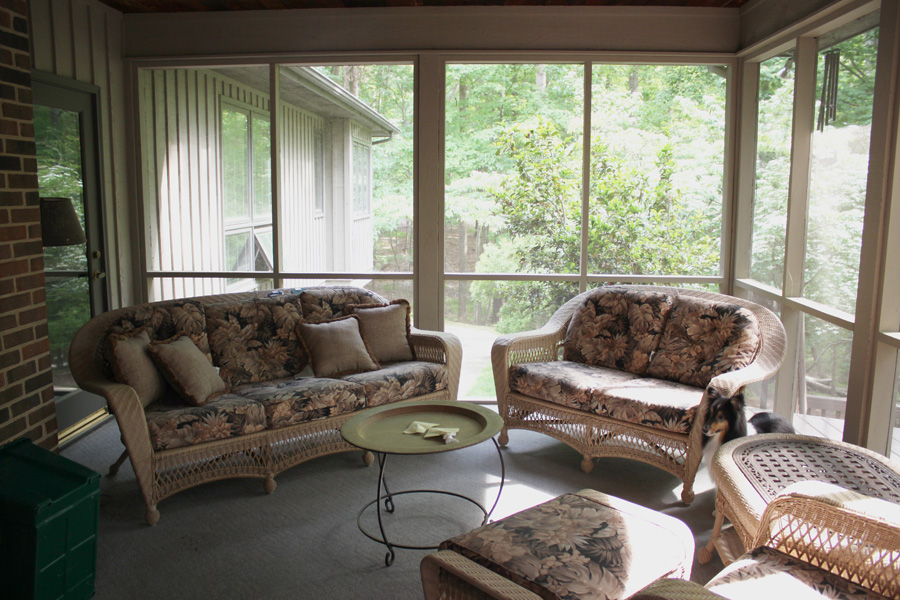
On Monday you got a sneak peek of my stepmom’s screen porch when I showed you how to install low visibility cable railings. I can tell you now, that you “ain’t seen nothing!” This drab screen porch got an amazing colorful makeover and I can’t wait to reveal it to you!

screen-porch-before1

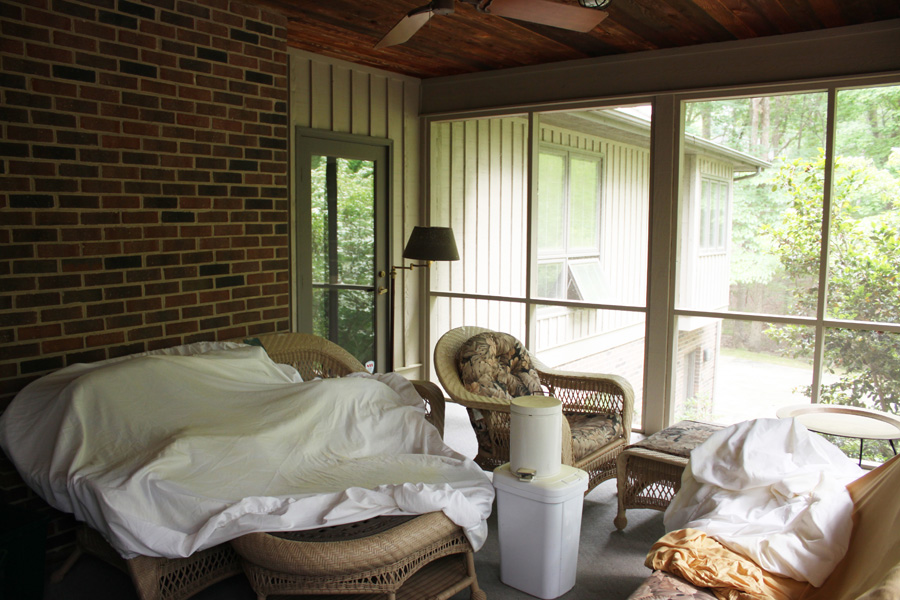
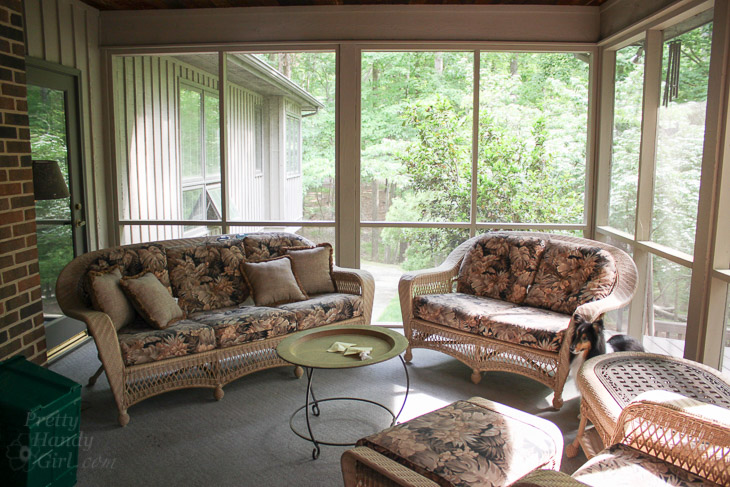
The screen porch has been in need of a makeover and on my “want to do” list for almost two years! Having a screen porch is a top selling feature for any home in the South. Unfortunately my stepmom’s porch wasn’t much to look at with its drab decor and monotone color palette.  (I may have told her that her cushions looked like the room threw up on them. Sorry Diane.) Luckily, I knew I could improve upon the view with some paint and some much needed color.

screen-porch-before-2

As an At Home Brand Ambassador, I knew this was the perfect project to showcase some At Home decor items. At Home graciously sponsored this project and provided me with some gift cards to purchase several of the items you’ll see. If you haven’t been to At Home yet, take a tour with me in this post.

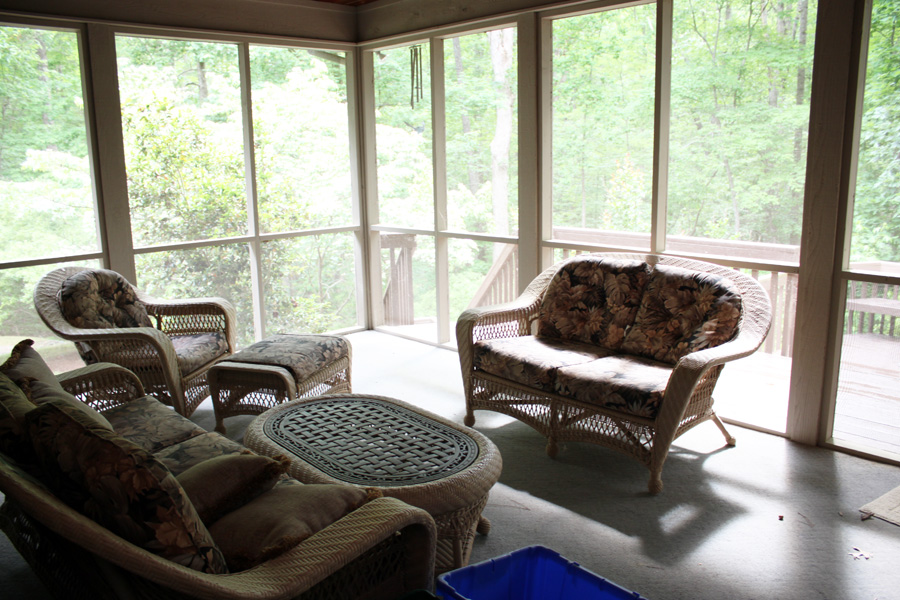
The first task was to play with the furniture arrangement. I put the wicker sofas on the diagonal to help improve the flow and conversation area. Then I took some notes about what was needed for the porch (a few end tables, lamps, a mirror, etc.)

How to Install Cable Railings | Pretty Handy Girl

After snapping a few before photos, I cleared the room so I could get to work. My first desire was to lighten up the room by repainting the walls with a lighter solid stain.

This Drab Screen Porch got a major Makeover with pops of Aqua and Green! Yummy Color!

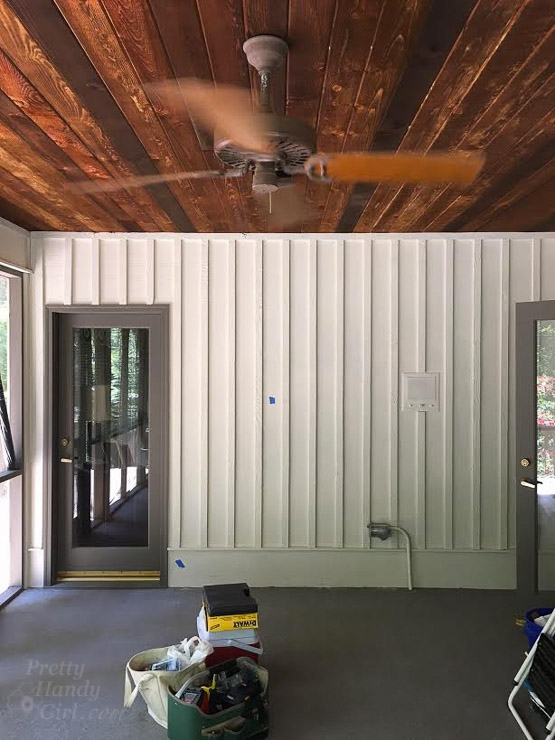
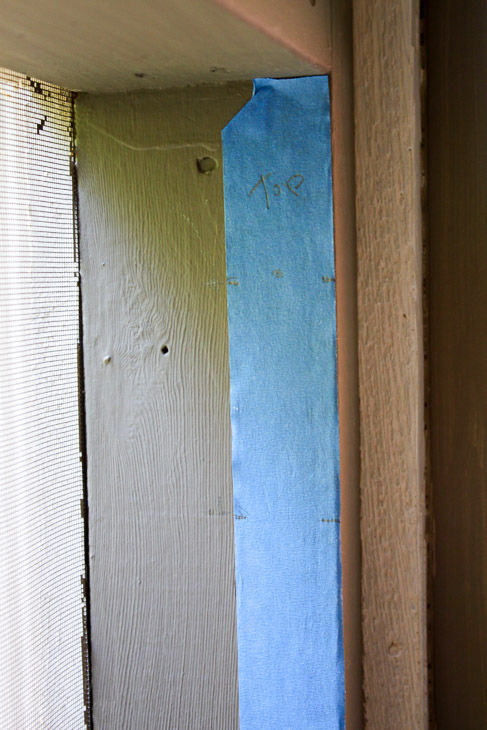
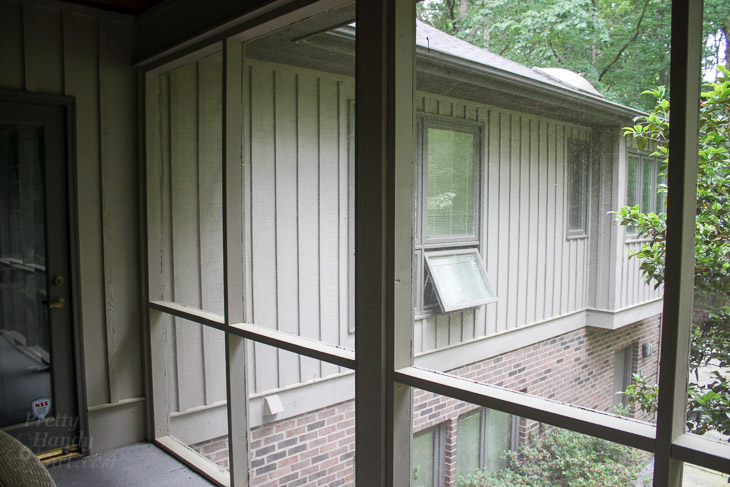
You can see the original color against the new lighter color above the screens. Everything was the same color except the doors were a dark brown.

This Drab Screen Porch got a major Makeover with pops of Aqua and Green! Yummy Color!

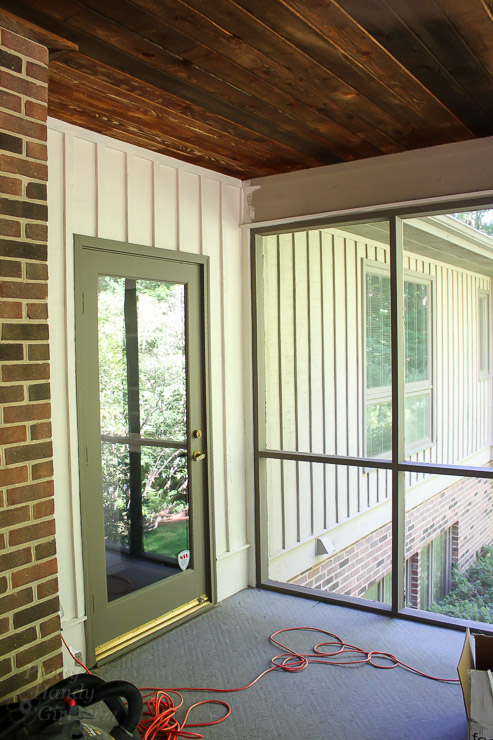
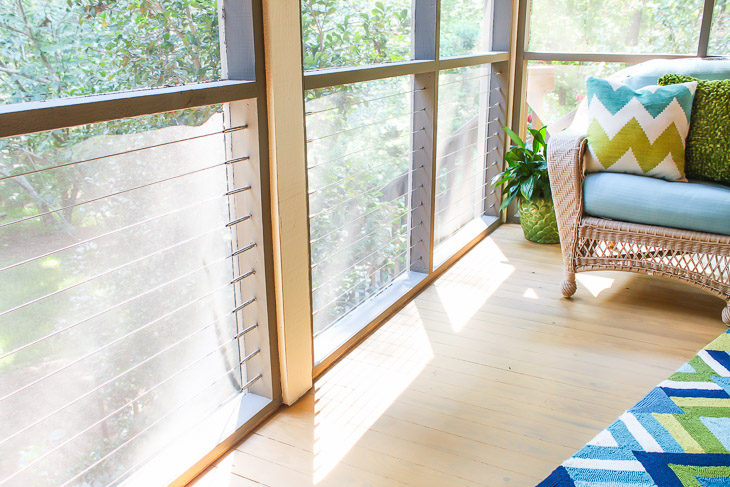
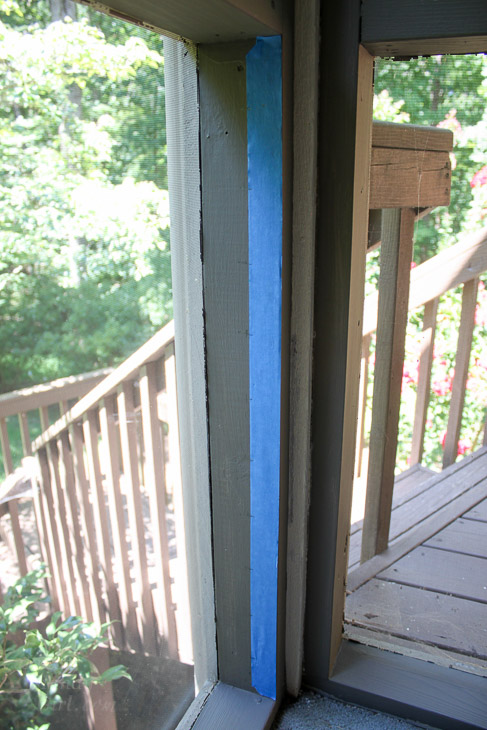
I painted the screen frames the same dark brown as the doors to help them disappear. I painted the supports the same light color (Sherwin Williams Woodscapes matched to Linen color.)

This Drab Screen Porch got a major Makeover with pops of Aqua and Green! Yummy Color!

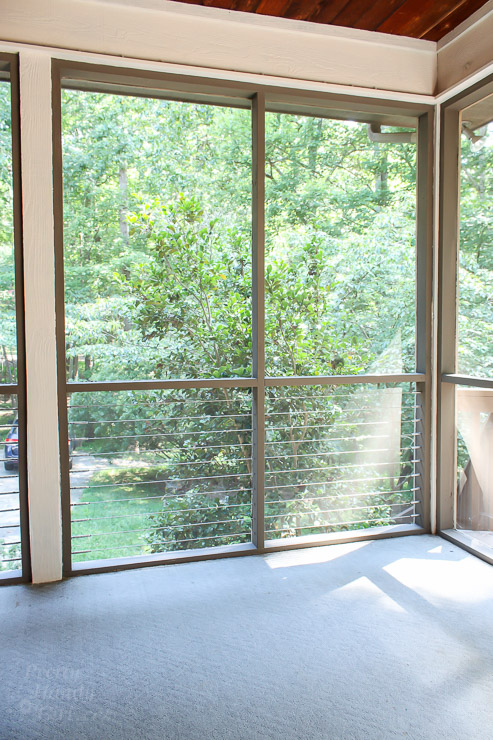
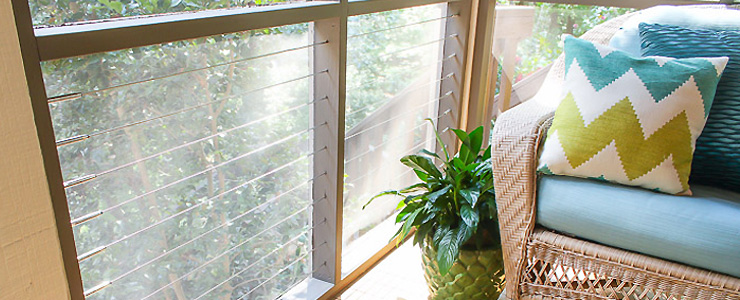
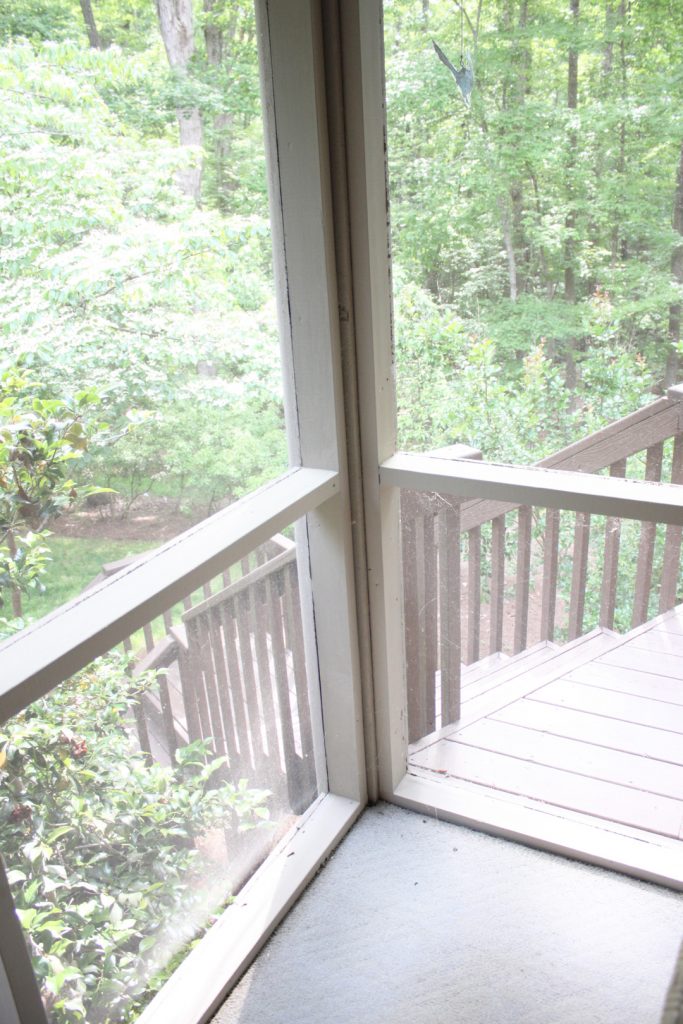
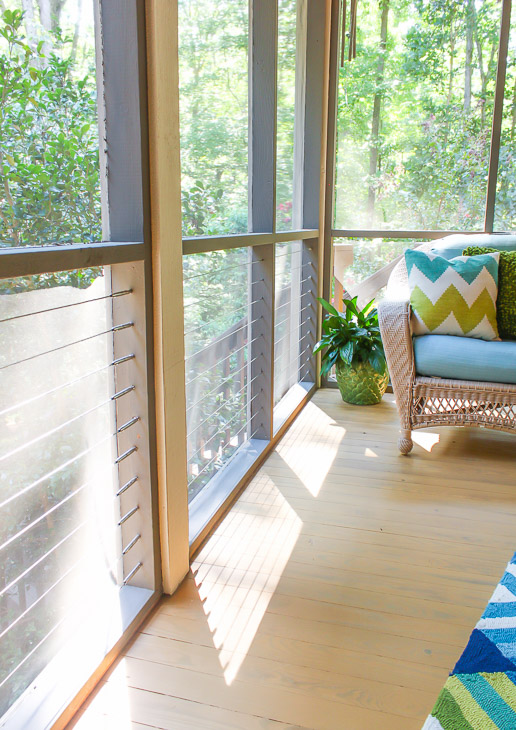
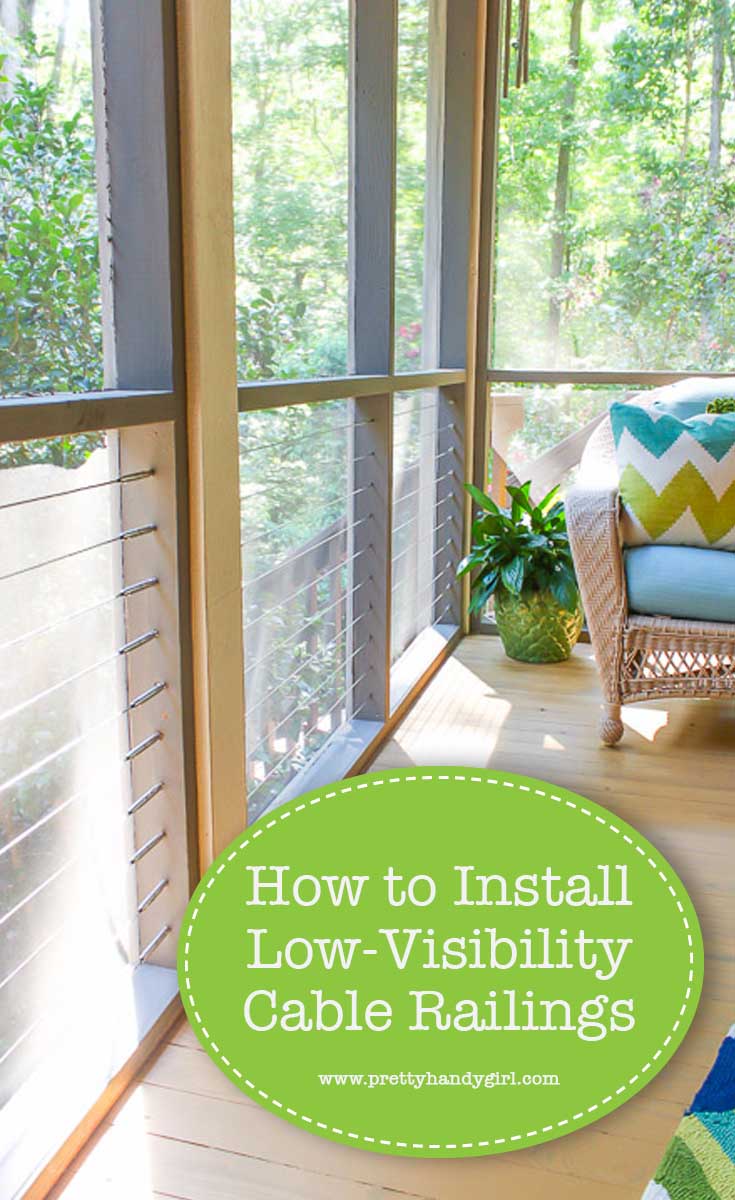
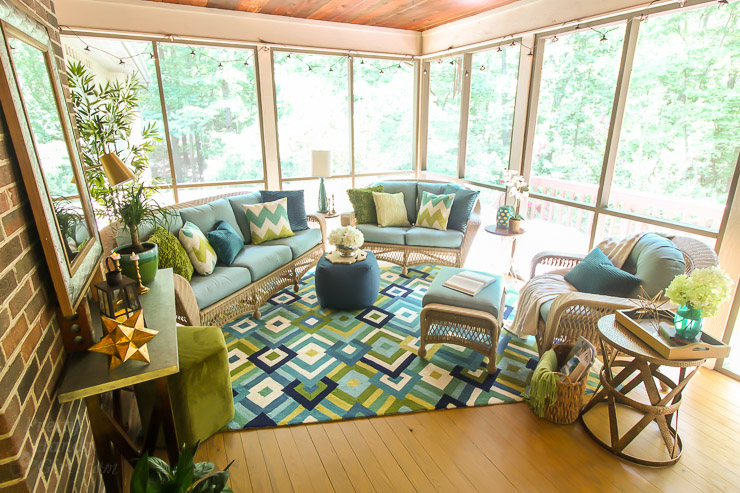
The new look is fresh and bright. Now the screens blend better into the surrounding trees giving the porch a more open feeling.

This Drab Screen Porch got a major Makeover with pops of Aqua and Green! Yummy Color!

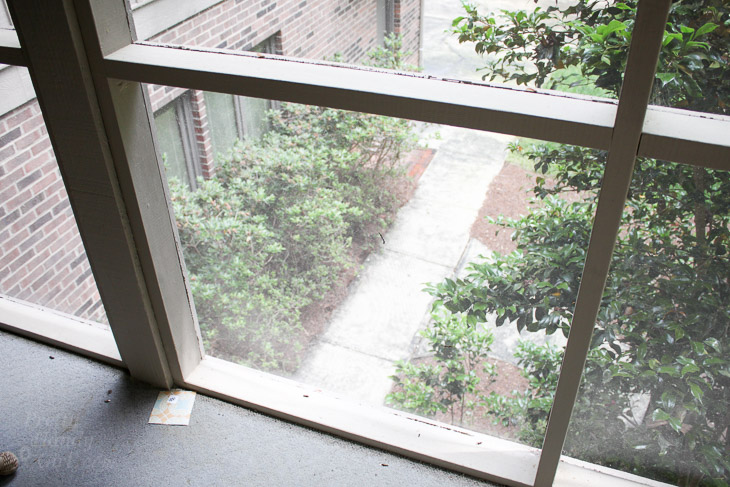
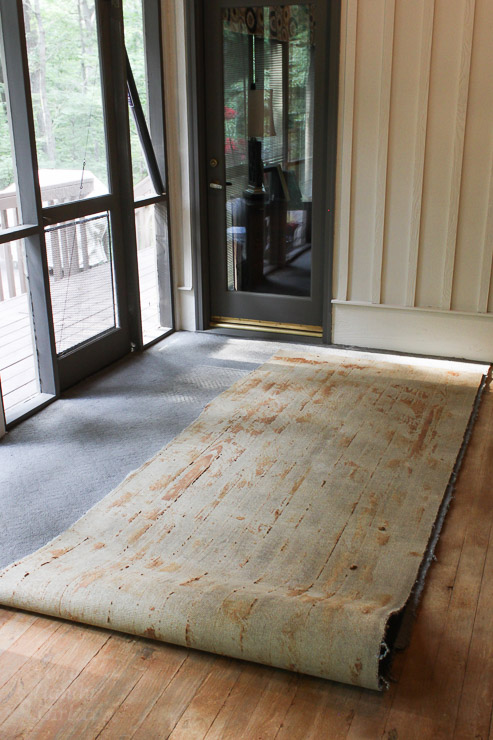
Next it was time to tackle that stained and ugly carpet. Not only was it ugly, but it was glued to the floor! UGH! Who does that?

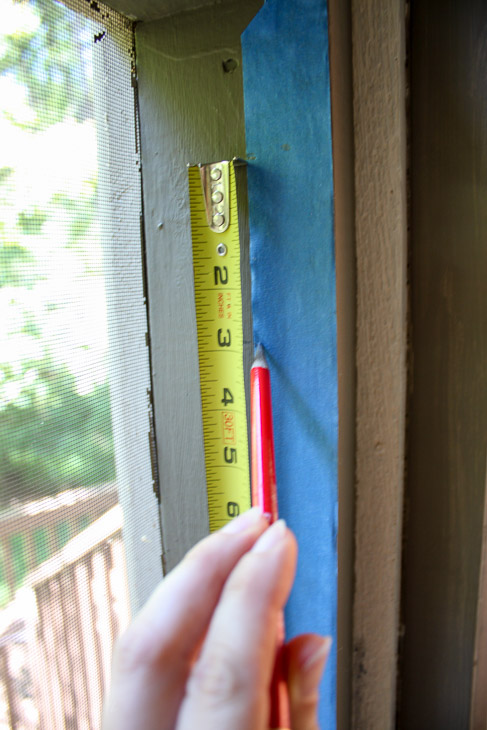
To remove the carpeting I carefully scored the carpet at 3′ increments.

cutting-old-carpet-out-utility-knife

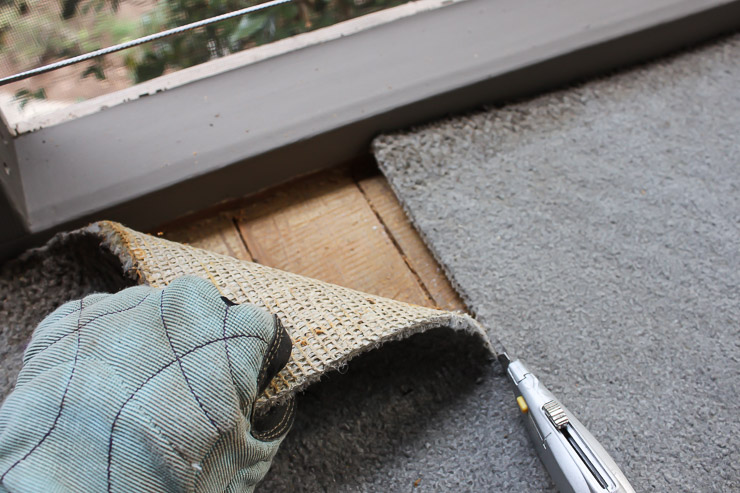
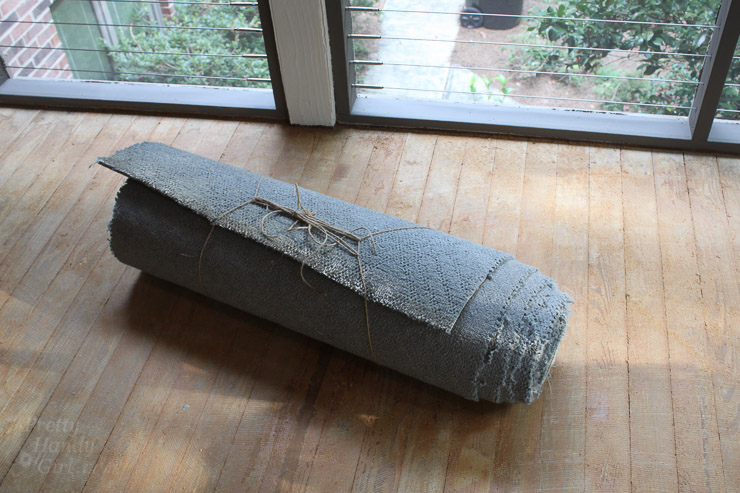
Then ripped the carpeting into strips. Luckily the glue wasn’t secured to the carpet any more.

This Drab Screen Porch got a major Makeover with pops of Aqua and Green! Yummy Color!

I rolled up each strip and tied it up for disposal.

How to remove old carpeting

The porch looks so much better already! Except for the nasty glue residue on the flooring.

rug-free-porch

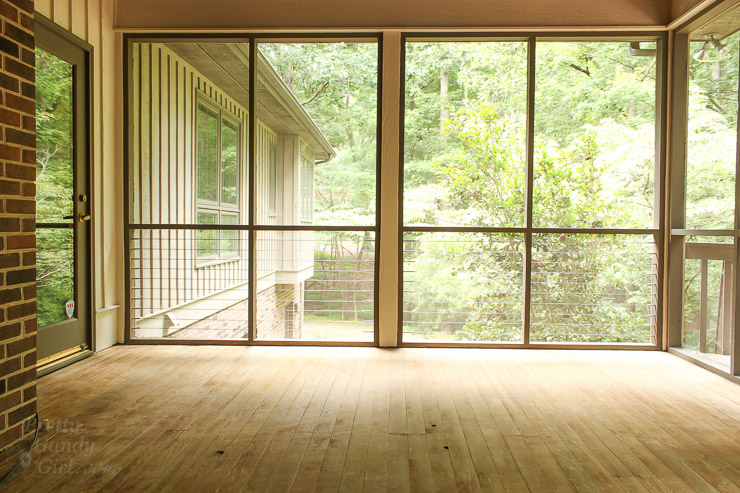
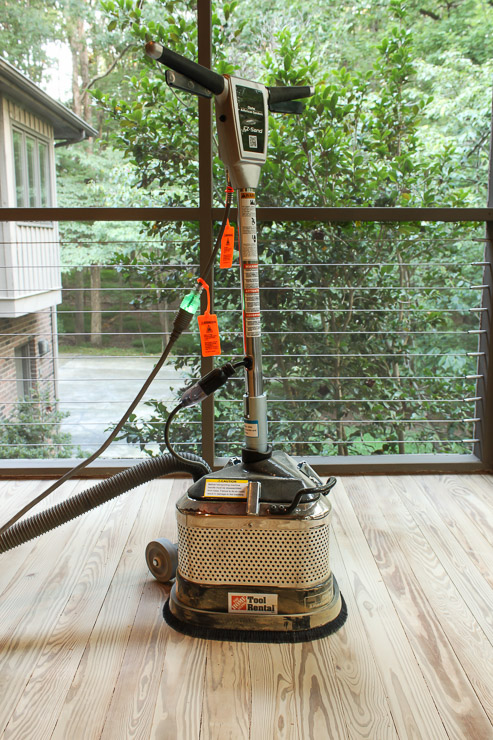
I rented a floor sander from Home Depot for a day. And it took me the ENTIRE day to sand the floor and get rid of all the glue. It was a real pain in the rear, but luckily the final result was beautiful tongue and groove flooring.

Rent a floor sander to sand flooring

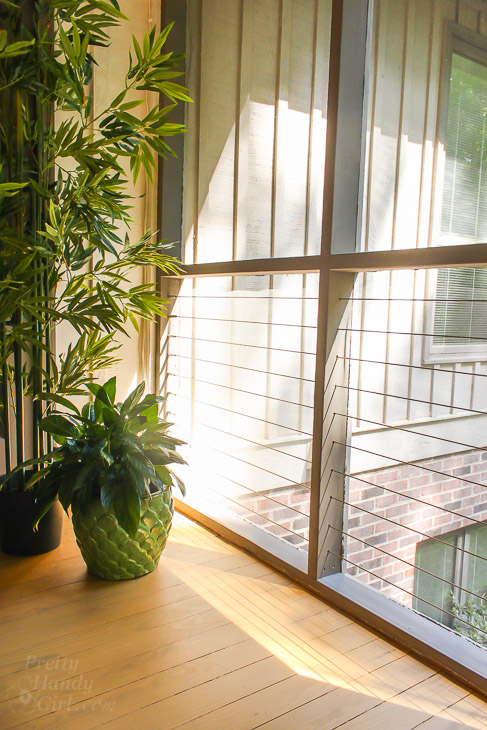
I stained the floor with Sherwin Williams Super Deck Bamboo color. The color has a yellow cast, but fits in nicely with the modern feel of the room.

How to Install Cable Railings | Pretty Handy Girl

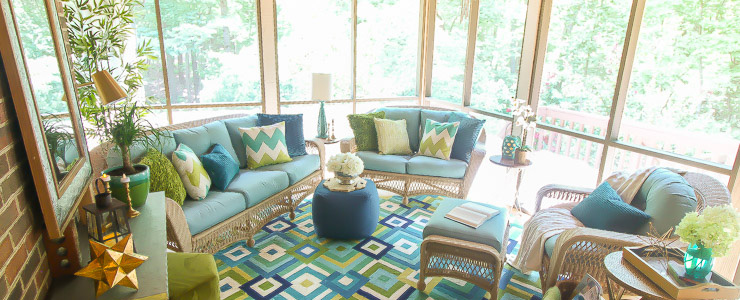
I bet you’re ready to see the rest of the porch, behold the amazing Drab to Colorful Screen Porch Reveal:

This Drab Screen Porch got a major Makeover with pops of Aqua and Green! Yummy Color!

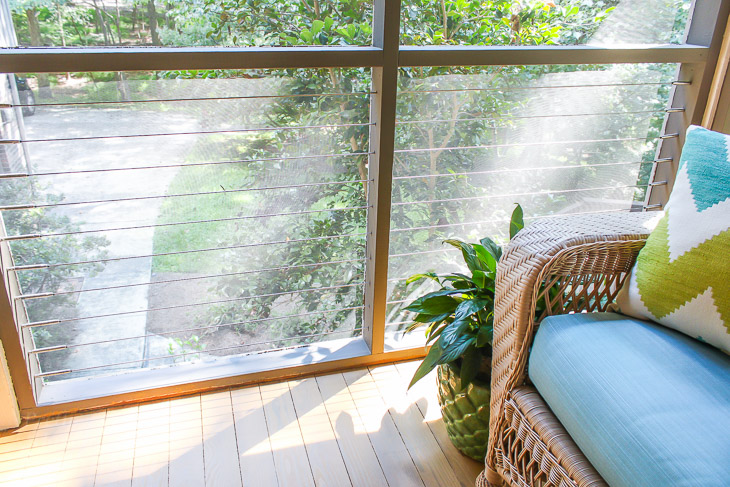
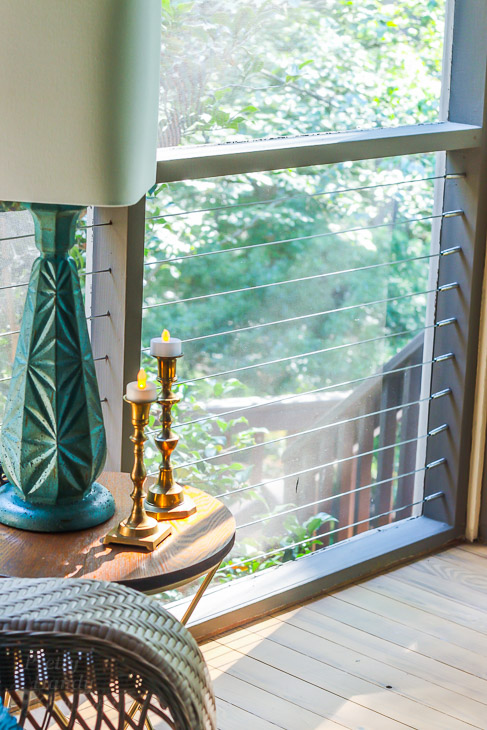
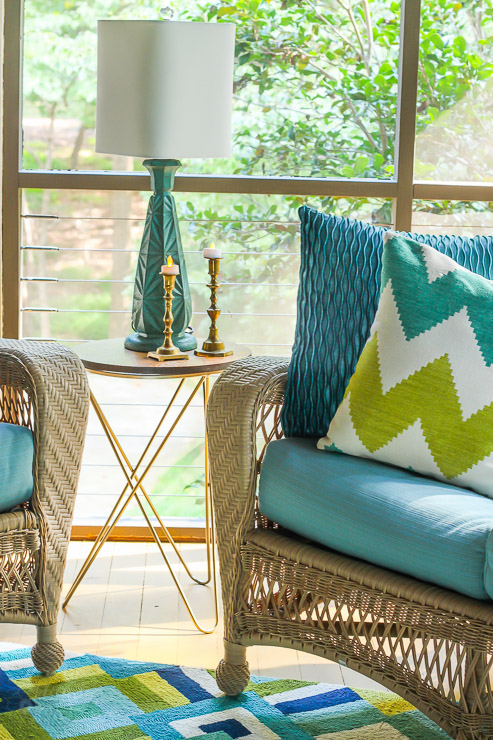
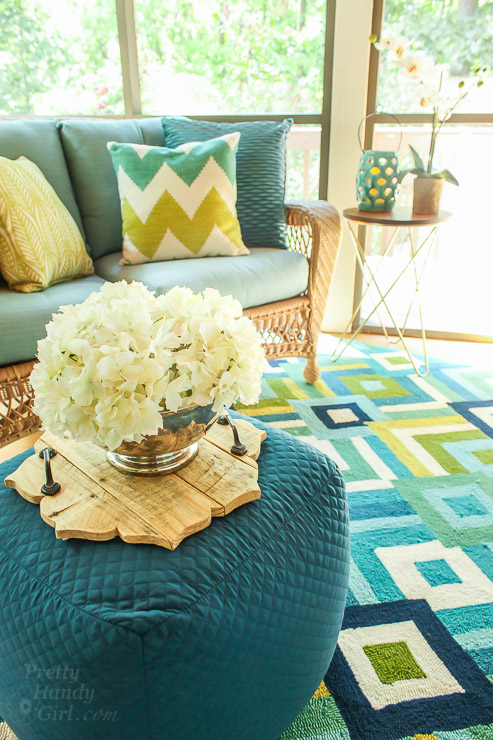
The lamp and mid-century modern round table are from At Home. The brass hairpin legs don’t obstruct the view and keep it feeling light and airy.

This Drab Screen Porch got a major Makeover with pops of Aqua and Green! Yummy Color!

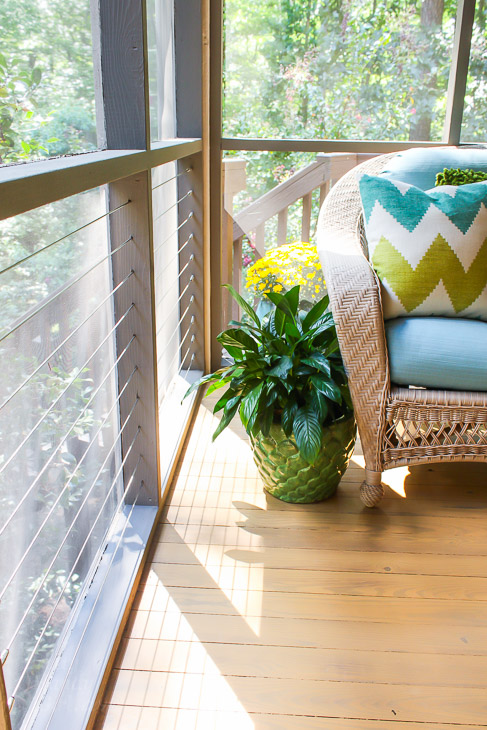
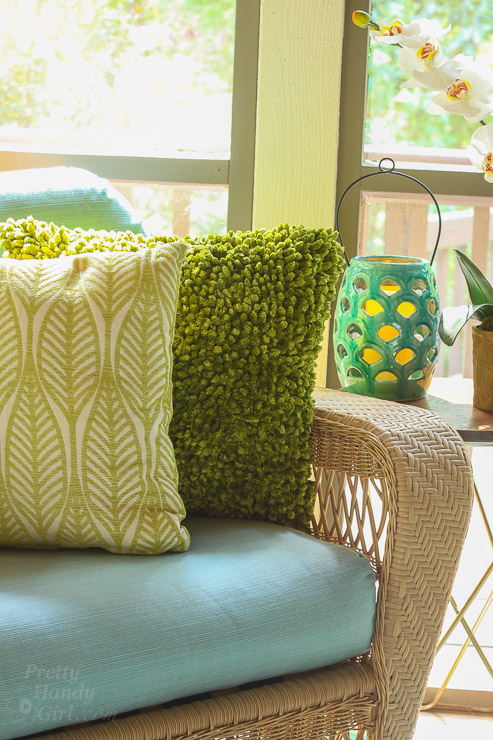
Diane purchased new custom cushions for her wicker furniture after I told her she had to get rid of the old ones. All the accent pillows are from At Home, including the adorable zig zag pillow. Truthfully, I might just go back and buy the nubby green and velvet blue wave pillows for myself. I couldn’t stop stroking them as I passed by. The faux bamboo plant, behind the sofa, blocks a door that is never used and helps the conversation area feel more intimate.

This Drab Screen Porch got a major Makeover with pops of Aqua and Green! Yummy Color!

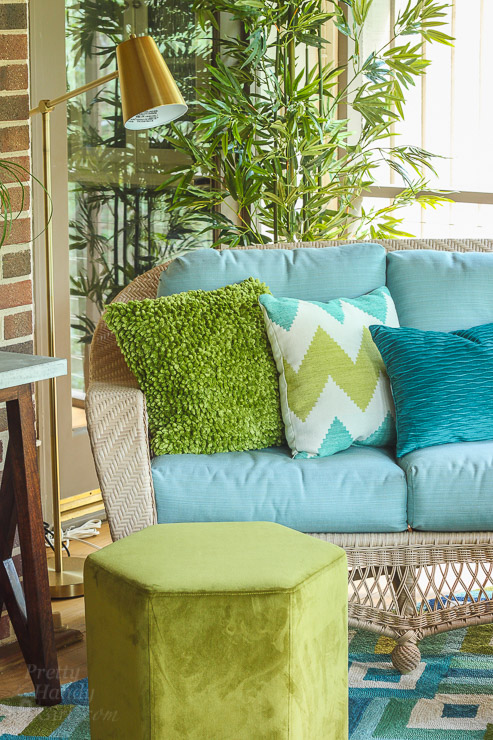
The hexagon ottoman was also from At Home and it adds extra seating, a spot to put your feet or somewhere to put a plate of food. (The ottoman’s soft velvet fabric is another item I can’t help stroking.)

This Drab Screen Porch got a major Makeover with pops of Aqua and Green! Yummy Color!

My stepmom, is Diane Chamberlain, a well known author. If you haven’t read any of her books, I have to warn you that they are addictive page-turners and might keep you up reading all night. I wanted to create an oasis for Diane to be able to sit and work on her books.

Beautiful accessories from At Home store. I need to visit one near me!

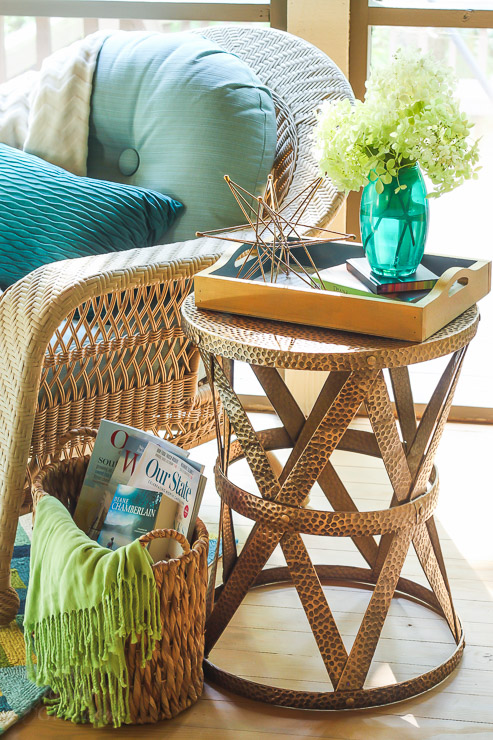
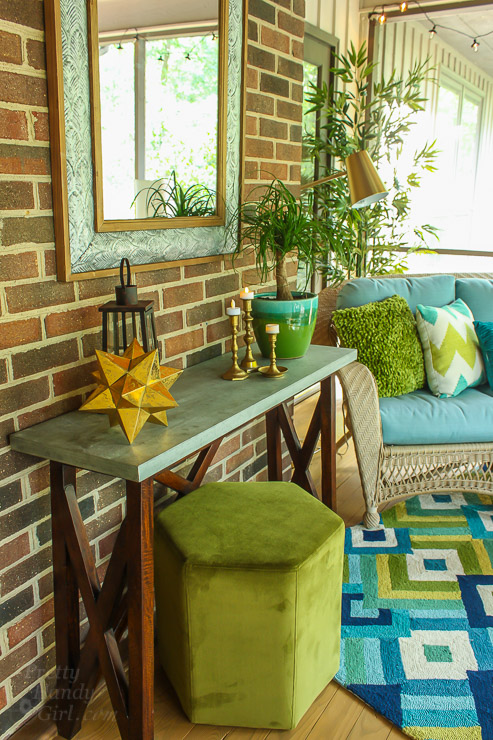
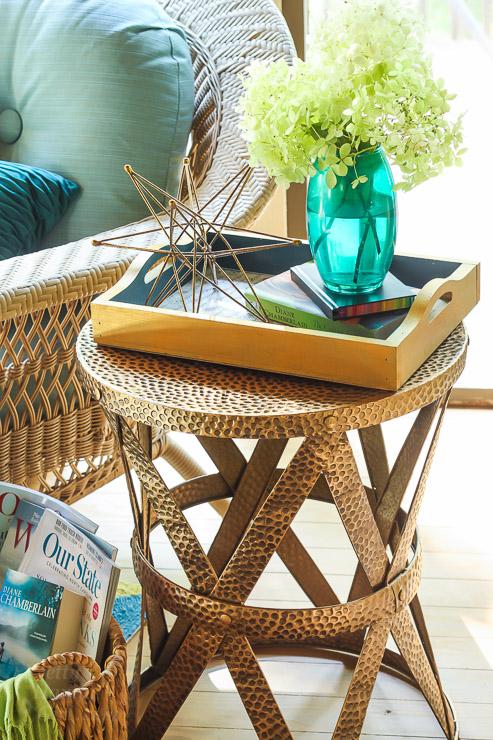
The hammered metal side table is larger and more sturdy for her to rest her laptop and food on. I was overjoyed when I found it tucked in the middle of a display shelf at At Home.

This Drab Screen Porch got a major Makeover with pops of Aqua and Green! Yummy Color!

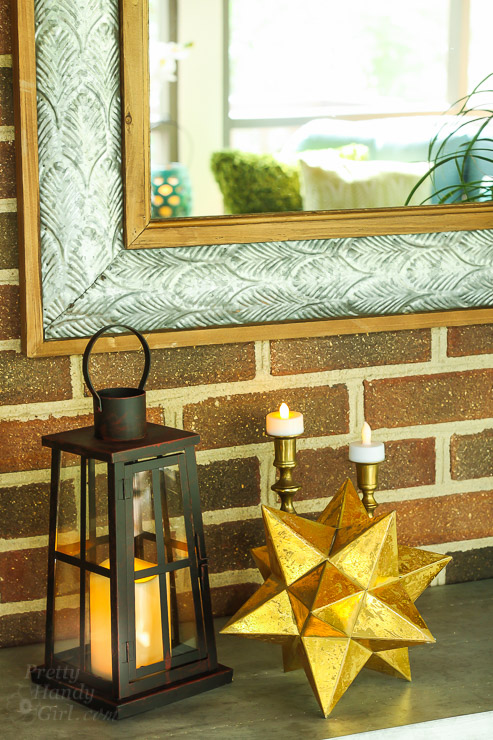
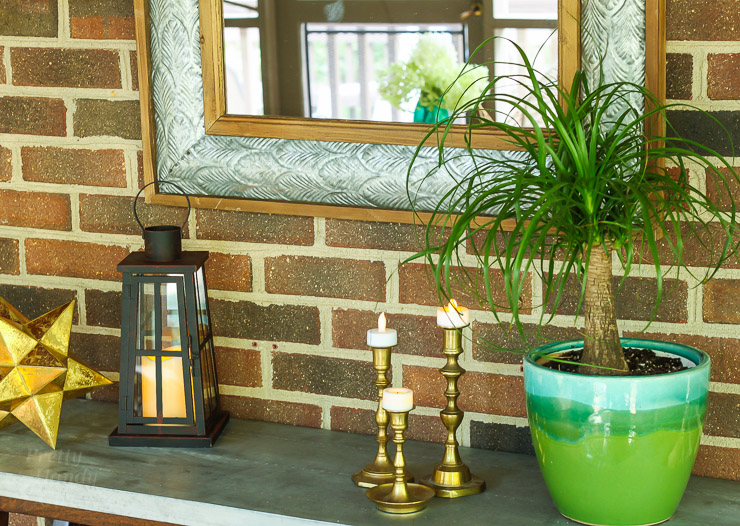
Across from her seat, I secured a metal and wood mirror to reflect the view off their deck and to increase the light on the porch.

This Drab Screen Porch got a major Makeover with pops of Aqua and Green! Yummy Color!

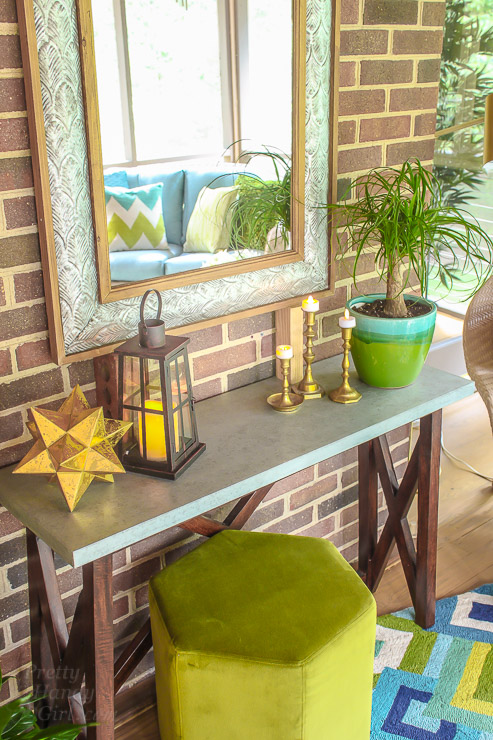
Centered under the mirror is a beautiful zinc-topped console table I found at At Home. The “X” pattern on the legs pairs nicely with the hairpin and hammered metal side tables (without matching them exactly. I’m not a big fan of matchy-matchy stuff.)

Throughout the screen porch I had fun mixing metals. I love the silver from the mirror and table with the brass candlesticks and the gold geometric star from At Home.

This Drab Screen Porch got a major Makeover with pops of Aqua and Green! Yummy Color!

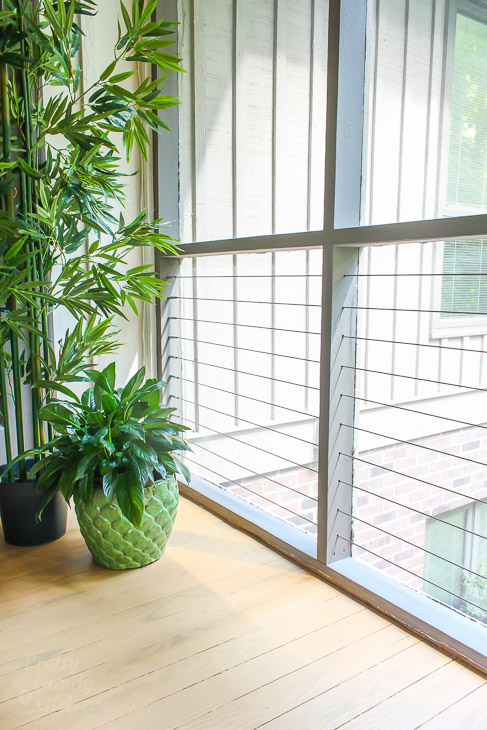
The little palm is a gift to Diane from me, but she’s afraid she might kill it. Only time will tell.

This Drab Screen Porch got a major Makeover with pops of Aqua and Green! Yummy Color!

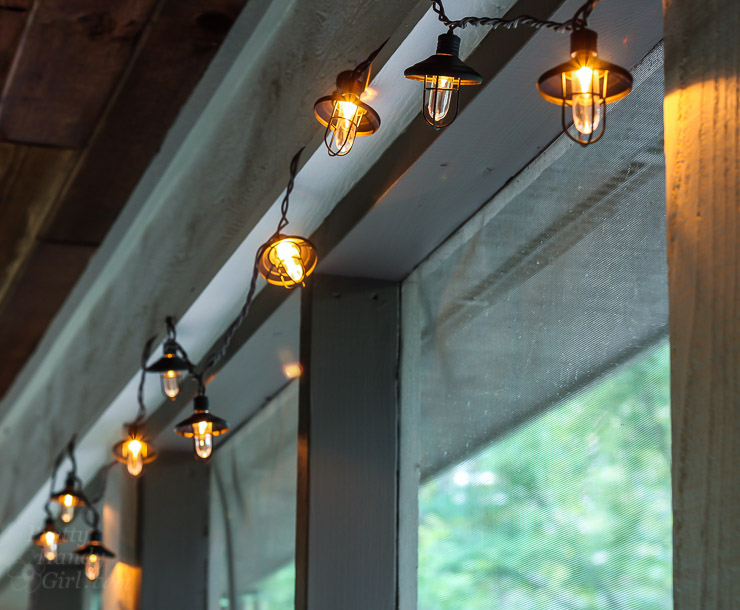
I found these adorable industrial string lights at At Home and they match the nautical lights already installed in the porch ceiling.

This Drab Screen Porch got a major Makeover with pops of Aqua and Green! Yummy Color!

I can’t forget the real star of the porch, the beautiful blue and green outdoor rug from At Home.

This Drab Screen Porch got a major Makeover with pops of Aqua and Green! Yummy Color!

Can you believe the transformation? From drab…

How to Install Cable Railings | Pretty Handy Girl

…to colorful and fantastic.

This Drab Screen Porch got a major Makeover with pops of Aqua and Green! Yummy Color!

You’ll definitely want to see what happened to her ugly old ceiling fan. It was replaced with the most beautiful ceiling fan I ever laid eyes on.

I’m so happy with how her screen porch turned out that I’m thinking I might need to make some changes on our screen porch. Do you have a screen porch? If so, how much time do you spend out there?

PHGFancySign

Disclosure: This is a sponsored post for At Home. I was compensated for my time writing this post. At Home also provided me with a gift card to purchase items to use in this post. All ideas and words are my own. I was not told what to write.

Pin for later!

Take your screen porch from drab to colorful with these simple and easy porch decor ideas! | Colorful home decor | Porch decor ideas | Pretty Handy Girl #prettyhandygirl #homedecor #porchdecor

Clay Skull Placecards | Pretty Handy Girl

clay skull place cards title

Jaime here from That’s My Letter today getting ready for a Halloween birthday party with these clay skull place cards.  I have two kids with birthdays that straddle Halloween which is reason enough to throw a Halloween themed Sugar Skull birthday party.  We looked high and low for skull shaped place cards and finally decided to make our own.

I used oven bake clay which is super easy, fun, and allows you to make any shape you desire.  We used white clay to mimic skulls but the color options are endless!

clay skull place cards 1

I attached the clay skulls to black goblets which serve as place cards and prevent the kids from mixing up their drinks!  When the party is over, simply insert a key chain and the kids can take home the clay skull as a favor.

Materials:
(I’ve included affiliate links for your convenience. I earn a small percentage from a purchase using these links. There is no additional cost to you. You can read more about affiliate links here.)

Instructions:

Step 1: Print out clip art skull (use this one or search google for your favorite) and cut out.

clay skull place cards step 1

Step 2: Roll out the oven bake clay to approximately 1/8″ thickness and large enough for your skull pattern.

clay skull place cards step 2

Step 3: Place the skull pattern on top of clay and cut around outside edges using an x-acto knife.

clay skull place cards step 3

Step 4: Make a hole for ribbon or key chain using a plastic straw.  You can also depress the clay where the eye sockets should be using a pinky finger.

clay skull place cards step 4

Step 5: Bake as directed on clay packaging.

clay skull place cards step 5

Step 6: Clean up rough edges using sandpaper for a smooth finish.

clay skull place cards step 6

Step 7: Using acrylic paint add names.  Tie onto glasses with ribbon or insert a key chain.

clay skull place cards step 7

Ready for your next Halloween party!

clay skull place cards 2

The name tags make a cute keychain favor after the party and look great on their backpacks!

clay skull key fobs

Thanks for reading along and I hope you enjoyed this quick craft.

Jaime signature~Read more of Jaime’s tutorials~

Pin for later

These easy DIY skull placecards are the perfect addition to your Halloween party! | Pretty Handy Girl #prettyhandygirl #seasonal #party #craft #DIY

How to Install Cable Railings | Pretty Handy Girl

How to Install Cable Railings | Pretty Handy Girl

Today I have a special tutorial for you! Have you ever fallen in love with cable railings but worried you couldn’t install them yourself? I have great news. You can learn How to Install Low Visibility Cable Railings from this tutorial!

How to Install Cable Railings | Pretty Handy Girl

(This tutorial is sponsored by Feeney. I approached them about working with me on this screen porch makeover because they had great reviews about their products.)

How to Install Cable Railings | Pretty Handy Girl

This is one makeover that has been in my head for almost two years. My much loved stepmom has a screen porch that needed a facelift. We started with a dark, dated and drab porch. All the porch surfaces were painted brown. The furniture had a monotone brown look. The only different color on the porch was from a very faded and dirty blue carpet that was glued to the porch floor. It was so dirty you could probably call it brown too!

How to Install Cable Railings | Pretty Handy Girl

In addition to an appearance upgrade, this screen porch needed a safety solution. This is the issue that has bugged me since my stepmom moved into her home. Can you spot it?

How to Install Cable Railings | Pretty Handy Girl

This side of the screen porch has always made me cringe. Can you see the problem from this angle?

How to Install Cable Railings | Pretty Handy Girl

There is a 10′ drop down from the screen porch. The only thing between this drop and people is a thin screen. For the record, this is not how you build a screen porch, it is not to code. There is supposed to be a railing on the lower sections.

How to Install Cable Railings | Pretty Handy Girl

I finally convinced my stepmom to let me solve the problem. One requirement she had was it couldn’t block the view. Luckily I had the perfect solution. Feeney CableRail System!

How to Install Cable Railings | Pretty Handy Girl

They are sleek, modern and nearly disappear. Feeney’s CableRail system with their special easy-to-use Quick-Connect® cable fittings can be installed by any homeowner. Ready to learn How to Install Low Visibility Cable Railings? This tutorial is for installing the cable railings on an existing structure. Installing cable railings on stairs, new construction decks and other applications can be learned about from the Feeney’s website.

Let’s get to it.

Materials:
(contains affiliate links)

Instructions:

Cut a piece of painter’s tape to fit against the porch’s end supports where the Quick-Connect® fittings will be installed.

How to Install Cable Railings | Pretty Handy Girl

Find the vertical center. Mark 3″ increments along the painter’s tape.

How to Install Cable Railings | Pretty Handy Girl

Label the top of the tape for reference.

How to Install Cable Railings | Pretty Handy Girl

Mark 2″ on your 7/64″ drill bit with a piece of painter’s tape.

How to Install Cable Railings | Pretty Handy Girl

Drill holes at the marked locations into the porch supports. Stop when the painter’s tape flag meets the frame.

How to Install Cable Railings | Pretty Handy Girl

When you finish drilling all the holes on one side, remove the marked painter’s tape and place it on the other end support. If the height differs, center it vertically.

How to Install Cable Railings | Pretty Handy Girl

To drill through the center supports, switch to the 1/4″ drill bit and drill completely through the support.

How to Install Cable Railings | Pretty Handy Girl

How to Install the Lag Hanger Bolts:

The lag bolt installation tool makes installing the lag bolt a breeze. One word of caution: go slow and steady with this tool or you will risk getting it stuck on the lag bolt.

How to Install Cable Railings | Pretty Handy Girl

Place the lag bolt installation tool into the drill. Tighten the chuck.

How to Install Cable Railings | Pretty Handy Girl

Select the lag bolt you need for your application. If you are securing into a wood post directly you can use the shorter screw. If you are securing into a post that has a wrap or sleeve you have to use the 2 1/2″ lag screws.

How to Install Cable Railings | Pretty Handy Girl

Thread the lag bolt into the installation tool in your drill.

How to Install Cable Railings | Pretty Handy Girl

Slowly drive the lag bolt into the porch support. Stop when you reach the fine threads (exactly 1″ exposed.)

How to Install Cable Railings | Pretty Handy Girl

Repeat until you’ve installed all the lag bolts into both end supports.

How to Install Cable Railings | Pretty Handy Girl

Squeeze a small amount of thread locking compound ONLY onto the lag bolts that will receive the Quick-Connect® Lag Fittings.

How to Install Cable Railings | Pretty Handy Girl

Turn the Feeney CableRail Quick-Connect® Lag Fitting onto the bolt until it stops against the wood.

How to Install Cable Railings | Pretty Handy Girl

Repeat until all the lag fittings are installed on one side of the porch.

How to Install Cable Railings | Pretty Handy Girl

If you have a middle support, thread the cable through the support before connecting to the Quick-Connect® Lag Fittings. Locate the cable needle. Slip it onto the cable end.

How to Install Cable Railings | Pretty Handy Girl

Thread the needle through the center support post toward the lag fittings.

How to Install Cable Railings | Pretty Handy Girl

Once the needle and cable have passed through the support, remove the needle. Press the cable straight into the Quick-Connect® Lag Fitting. It should slide in smoothly. Don’t force it in.

How to Install Cable Railings | Pretty Handy Girl

When the cable bottoms out, pull back to make sure it has locked into place.

How to Install Cable Railings | Pretty Handy Girl

Head to the opposite side of your porch. Thread the lock nuts onto the lag bolts until it touches the wood.

How to Install Cable Railings | Pretty Handy Girl

Thread the Quick-Connect® Lag Swivel Turnbuckle four full rotations onto the lag bolt.

How to Install Cable Railings | Pretty Handy Girl

While pulling the cable tight use a Sharpie to mark the cable against the mark on the turnbuckle fitting.

How to Install Cable Railings | Pretty Handy Girl

Use the cable cutters to cut the cable at the mark.

How to Install Cable Railings | Pretty Handy Girl

Loosen the turnbuckle two full rotations.

How to Install Cable Railings | Pretty Handy Girl

Insert the cable into the turnbuckle fitting.

How to Install Cable Railings | Pretty Handy Girl

If you make a mistake and need to remove a cable, don’t stress. Use the cable release tool.

How to Install Cable Railings | Pretty Handy Girl

Press the release tool into the connector.

How to Install Cable Railings | Pretty Handy Girl

You might need to tap the connector lightly with a hammer to get the tool to release the cable (especially if you already tightened the cable.)

How to Install Cable Railings | Pretty Handy Girl

Hand tighten the Quick-Connect® Swivel Turnbuckles. Use two wrenches to grasp the connectors at the notched ends. Hold the end with the cable steady and tighten the side closest to your post.

How to Install Cable Railings | Pretty Handy Girl

Follow the sequence for tightening as shown below:

How to Install Cable Railings | Pretty Handy Girl

Once the cables are all fully tightened, turn the nut until it is secure against the connector.

How to Install Cable Railings | Pretty Handy Girl

Secure the nut against the fitting with your wrenches.

How to Install Cable Railings | Pretty Handy Girl

For more detailed installation instructions, watch this video for Installing Feeney CableRail System to a Wood Post with Sleeve or browse these Feeney video tutorials for more installation tips and help.

Ready to see the difference? Behold the scary, unsafe…

Before:

How to Install Cable Railings | Pretty Handy Girl

And the sleek, beautiful and safe…

After:
How to Install Cable Railings | Pretty Handy Girl

Another before:

How to Install Cable Railings | Pretty Handy Girl

And after:How to Install Cable Railings | Pretty Handy Girl

How to Install Cable Railings | Pretty Handy Girl

Don’t you love the look of Low Visibility Cable Railings? Now you can install them in your own home!

How to Install Cable Railings | Pretty Handy Girl

Want to see the full screen porch reveal, take a look here.

If you use any Feeney systems, be sure to share your photos with Feeney to be entered to win cash prizes! The next deadline is in November!

Enter Feeney Photo Contest

PHGFancySign

Disclosure: This is a sponsored post for Feeney Cable Rail. I was provided with materials and compensation for my time. I was not told what to write. All opinions are my own. As always I’m very particular about the brands I partner with. 


Pin for later!

Learn How to Install Low Visibility Cable Railings from this tutorial from Pretty Handy Girl! | #prettyhandygirl #DIY #homeimprovement

Grown Up Swing Set | Pretty Handy Girl

Grown Up Swing Set | Pretty Handy Girl

Are your kids still using that old swing set in your backyard or have they long outgrown it? After our major landscaping project, we’ve been spending more time outside enjoying our new backyard. But, this eyesore was blocking the view. It was time to make this a Swing Set for Grown Ups!

Grown Up Swing Set | Pretty Handy Girl

The landscape designer wanted us to remove the swing set. I thought we could still use it (or I was in denial that my children are growing up.) I decided to make it a swing set for grown ups (and tweens.) That way we can turn it back into a swing set one day when we have grandchildren (hopefully in the very distant future.)

(I’ve included affiliate links in this post for your convenience. I make a small percentage on the purchase, but there is no additional cost to you. You can read more about affiliate links in my disclosure.)

Swing Set for Grown Ups

Grown Up Swing Set | Pretty Handy Girl

Here’s how you can convert your own swing set for the adults. Remove any slides and bright colorful objects (bright colors scream kid-friendly.) Most can be removed by taking out the bolts with a socket wrench.

Grown Up Swing Set | Pretty Handy Girl

Remove any swings, trapezes, or other hanging objects.

Grown Up Swing Set | Pretty Handy Girl

Replace the swings with two affordable chair hammocks using hammock swivel hardware kits.  If you have a swing set that accommodates three swings, you can usually fit two hammock chairs (but measure your set before you order.) You shouldn’t need to drill new holes, just hang the hammocks on the existing swing hooks (assuming they are securely fastened.)

Grown Up Swing Set | Pretty Handy Girl

I purchased the Mocha colored hammock chairs to blend into the scenery, but there are several colors available. (affiliate link)

Grown Up Swing Set | Pretty Handy Girl

Plant some climbing flowering vines around the base of the swing set. I planted a Lady Banks climbing rose on one side of the swing set. It should offer some privacy and when it blooms and will be covered with delicate yellow flowers some day.

Grown Up Swing Set | Pretty Handy Girl

On the other side I planted a clematis that has pretty purple flowers.

Grown Up Swing Set | Pretty Handy Girl

When you finish you’ll be surprised by the native species that flock to the new spot. Look I spot two book-reading skinny legged tweens right now! You’ll also probably notice that the bird will love hanging out on the hammock stretchers.

Grown Up Swing Set | Pretty Handy Girl

Our grown up swing set is the new favorite spot for my boys to curl up with a good book and a bottle of lemonade.

Grown Up Swing Set | Pretty Handy Girl

They haven’t missed the slide or the swings at all!

Before:

Grown Up Swing Set | Pretty Handy Girl

After:swing-set-for-grown-ups

I picked up the outdoor pillows at Lowe’s on clearance right now.

Grown Up Swing Set | Pretty Handy Girl

If you can’t find them at Lowe’s, I found some nice ones on Amazon that you might:

Blue Green Outdoor Pillows

Blue-Green Medallion & Striped | Turquoise Trellis  | Zig Zags | Elephant Dance

I think Pretty Handsome Guy and I are going to spend several evenings here with a glass of wine and some good conversation.

Grown Up Swing Set | Pretty Handy Girl

Want to add some lighting to your new favorite spot? I have a tutorial for installing low voltage landscape lighting.

Grown Up Swing Set | Pretty Handy Girl

We have all been using the swing set a lot more than before.

Grown Up Swing Set | Pretty Handy Girl

Hope you have a great time enjoying your grown-up swing set! I know we are.

PHGFancySign


Pin for later! 

Have your kids outgrown the swing set? Have no fear - transform it into a swing set for adults with this easy-to-follow tutorial from Pretty Handy Girl! | Swing set for adults | adult swing set | Pretty Handy Girl #prettyhandygirl #DIY #tutorial

Crab Pinwheels l Pretty Handy Girl

Hi everyone! This is Lindi, visiting again from Love Create Celebrate! I’m happy to be here again, this time sharing a quick and easy summer recipe. These Crab Pinwheels are one of my favourite summer appetizers. You will not be disappointed if you make them!

Crab Pinwheels l Pretty Handy Girl

The recipes I share are always two things 1) delicious and 2) easy! This recipe fits right in! If you are a gardener, I know that you are ready to use those fresh herbs that you’ve been growing all summer long. This recipe is the perfect way to use some of that green onion and parsley!

This is the perfect appetizer for all of those summer celebrations, from family reunions, to backyard BBQs, to potlucks. But potlucks don’t end when school starts! I honestly make this appetizer all year long when I have guests over. You will not be disappointed – even my toddler cannot stop eating them (and may have been stealing them off of the tray while I tried to photograph these ones!)

Ingredients:

  • 250 ml cream cheese package (at room temperature)
  • 3/4 cup red peppers, finely chopped
  • 2 green onions, finely chopped
  • 3 tbsp parsley, finely chopped
  • 1/2 cup grated cheddar cheese
  • cayenne pepper, to taste
  • 1 can crab, drained
  • 5-8 large soft tortillas

Instructions:

  1. Mix your cream cheese, red pepper, green onion, parsley, cheddar cheese, cayenne pepper, and crab together until mixed well.
  2. Spread your mixture on the tortillas and then roll them up. Cut slices of tortilla about 3/4″ thick
  3. Bake at 350 degrees for 8 minutes. Serve while warm.

You can serve them cool, but I definitely prefer them baked! This recipe makes at least 40 pinwheels.

Crab Pinwheels l Pretty Handy GirlCrab Pinwheels l Pretty Handy Girl

It only takes 20 minutes to prepare and cook these lovely appetizers, and your guests will thank you for making them!

If you need a drink to go with them, I shared my favourite Summer drink a couple of weeks ago: The Adult Tropical Slushie!

Crab Pinwheeels I PHG

Enjoy!

Lindi Signature

~Read more of Lindi’s Posts~


Pin for later!