Installing the Most Beautiful Ceiling Fan | Haiku Copper Luxe Ceiling Fan | Pretty Handy Girl

Installing the Most Beautiful Ceiling Fan | Haiku Copper Luxe Ceiling Fan | Pretty Handy Girl

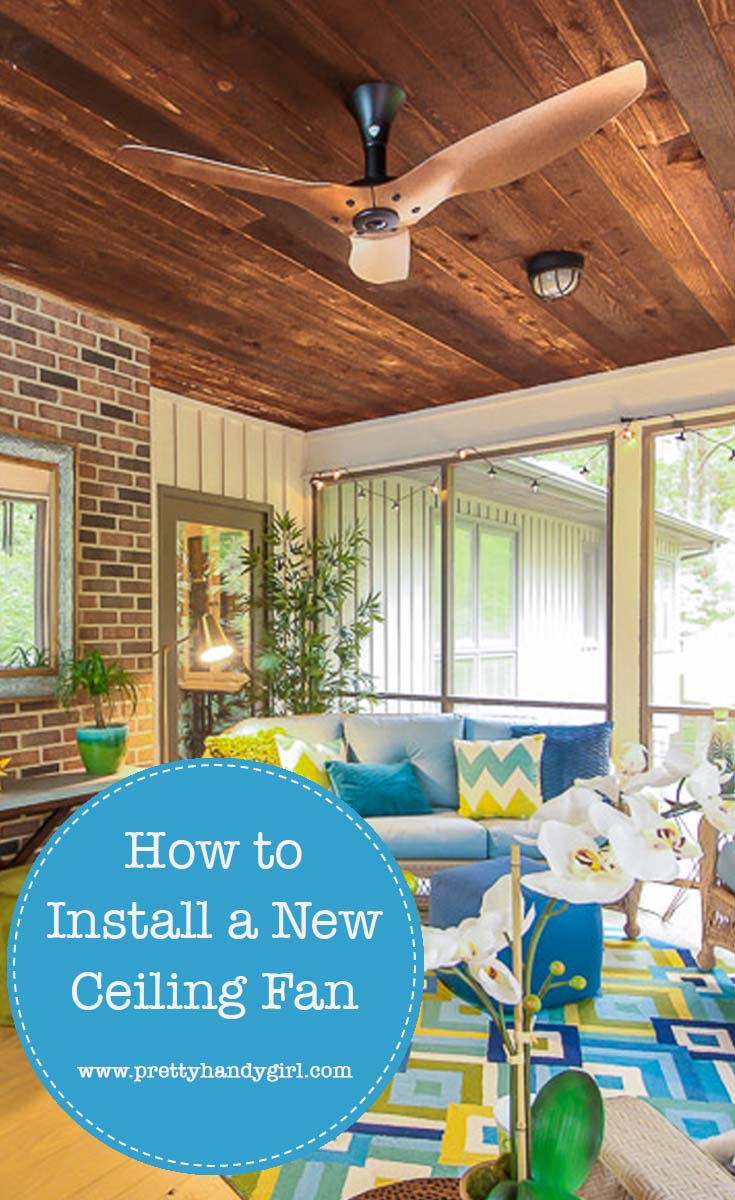
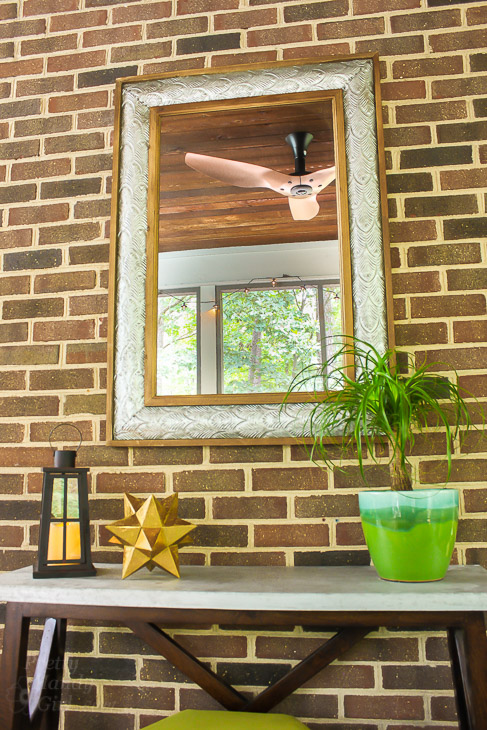
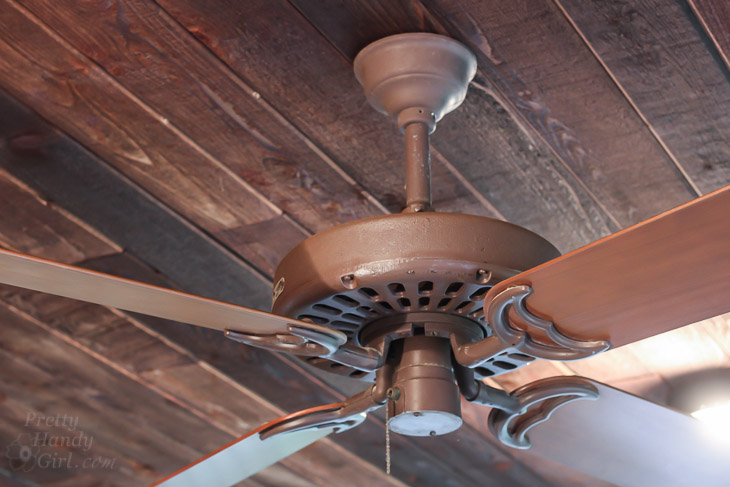
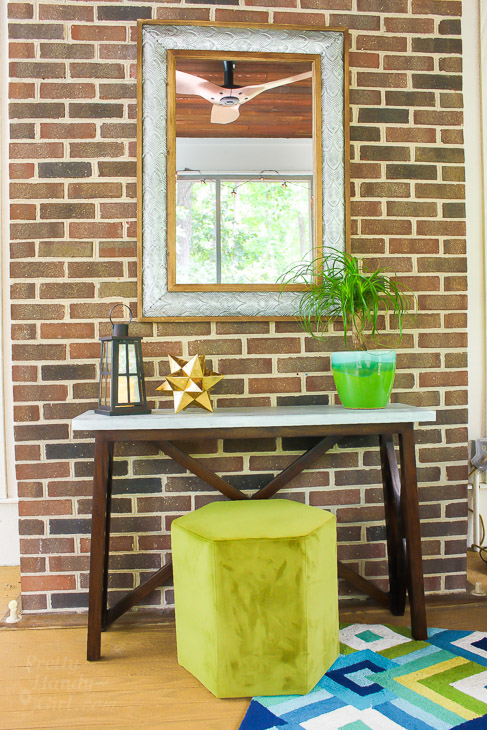
I’m super excited to share you How to Install the Most Beautiful Ceiling Fan I Ever Laid Eyes Upon! You remember last month when I gave my stepmom’s screen porch a drab to fab makeover, right? Well, I didn’t really complete the makeover. I strategically cropped this ugly ceiling fan out of the shots:

Installing the Most Beautiful Ceiling Fan | Haiku Copper Luxe Ceiling Fan | Pretty Handy Girl

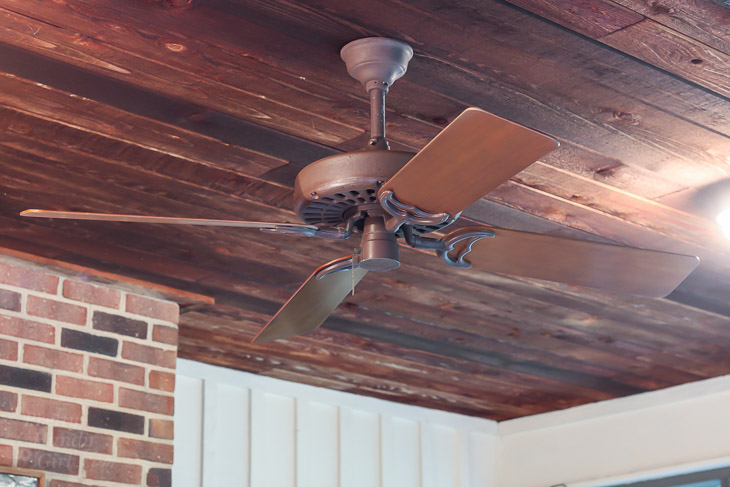
That ceiling fan isn’t just ugly. . .it’s truly F-U-G-L-Y! And we won’t even talk about the layer of black goopy dust on top of the motor and blades. Just thinking about it brings up the bile in my throat.

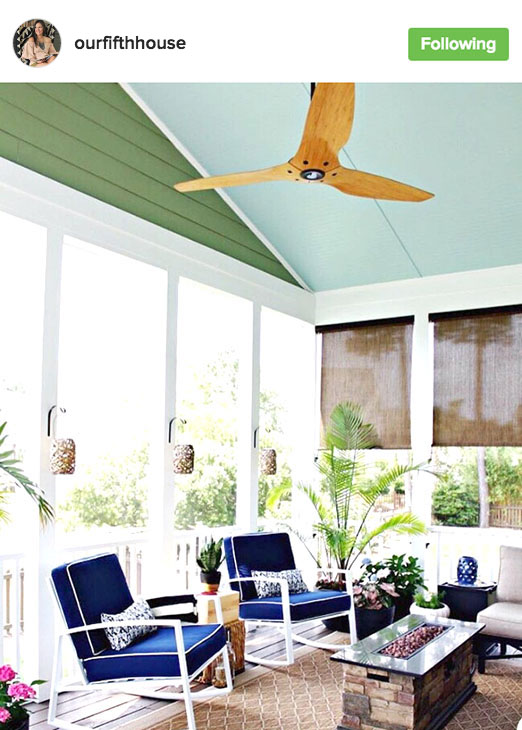
My stepmom and I knew we wanted to ditch the existing ceiling fan, but I wanted to replace it with an attractive ceiling fan. (I know, that seems like an oxymoron.) And then it happened, I saw a photo on Instagram that made my heart skip a beat. Our Fifth House posted a photo of her Haiku H Series Fan on her screen porch.

OurFifthHouse Instagram Photo of Screen Porch

That’s when I knew I had to install a Haiku Ceiling Fan on my stepmom’s screen porch. I approached Haiku Home (owned by Big Ass Solutions) about working with me on the screen porch makeover. They graciously agreed to supply the fan if I would supply the words and photos in this post. NOT ONLY THAT, they offered to give one of my readers a Haiku L Series Fan as well (read to the end of this post to enter.) Deal! Now that you know the back story, I present to you the Most Beautiful Ceiling Fan I Ever Laid Eyes Upon:

Installing the Most Beautiful Ceiling Fan | Haiku Copper Luxe Ceiling Fan | Pretty Handy Girl

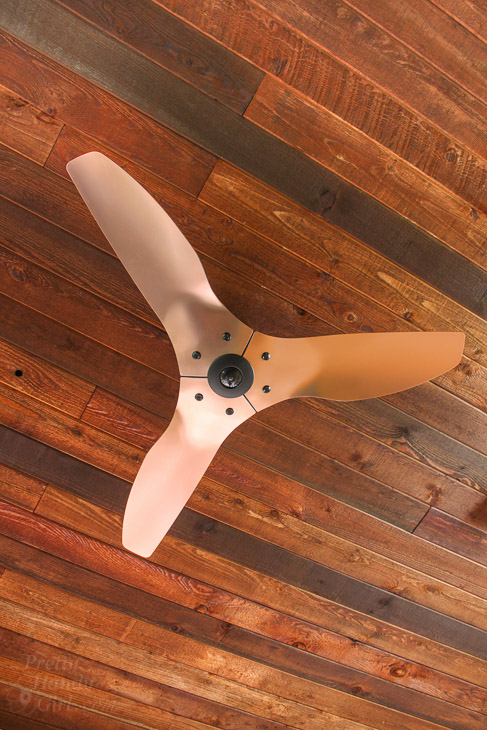
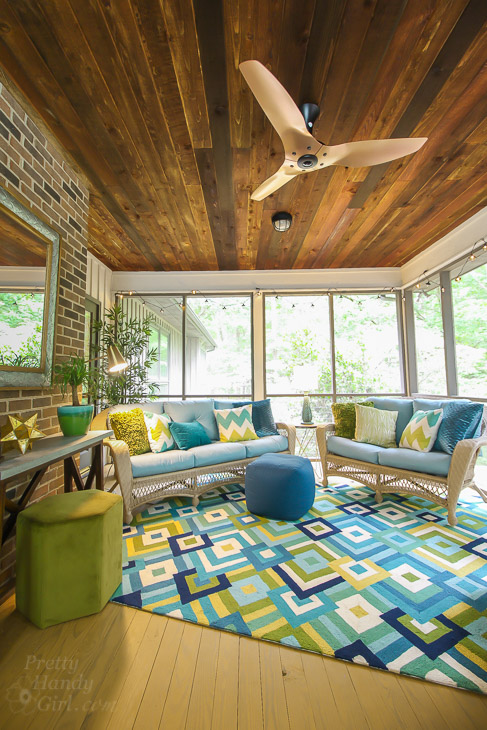
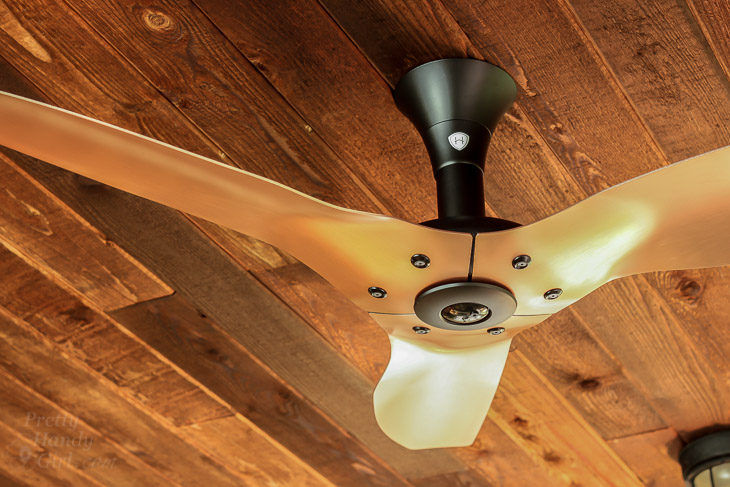
Isn’t that the most gorgeous ceiling fan you’ve ever seen? The motor is tiny and hidden by the beautiful brushed copper air foils. This fan is shiny, sleek, and modern. Best of all, it works great!

Installing the Most Beautiful Ceiling Fan | Haiku Copper Luxe Ceiling Fan | Pretty Handy Girl

My stepmom had one switch that controlled her ceiling fan before. The switch was inside the house, not even remotely close to the door she uses for the porch (stupid!) We solved that issue by requesting a remote control for the Haiku Luxe Series Fan. Now she can sit on the screen porch and control the ceiling fan without walking through the house to turn it on.

Installing the Most Beautiful Ceiling Fan | Haiku Copper Luxe Ceiling Fan | Pretty Handy Girl

Want to see how easy it is to install the Haiku Ceiling Fan? Let’s get busy.

(I’ve included affiliate links for your convenience. I earn a small percentage from a purchase using these links. There is no additional cost to you. You can read more about affiliate links here.)

Materials:

Instructions:

Shut off the circuit to your ceiling fan. (Turn on the fan, then shut the circuit off and check that the fan doesn’t have power.)

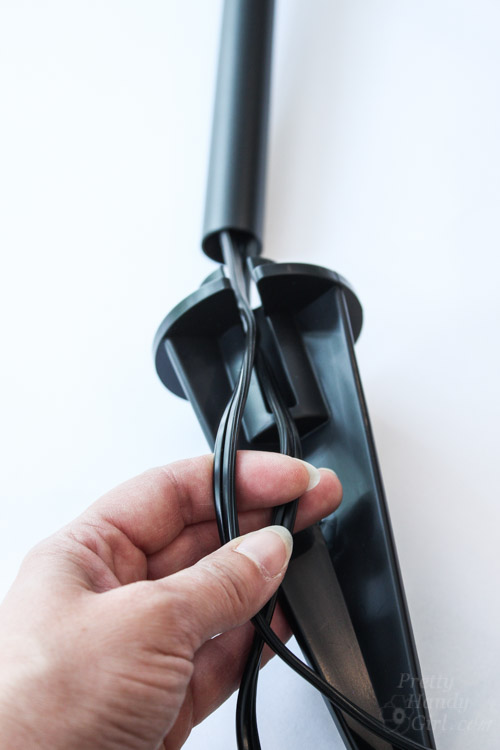
Begin by removing the fan blades from the old ceiling fan.

Installing the Most Beautiful Ceiling Fan | Haiku Copper Luxe Ceiling Fan | Pretty Handy Girl

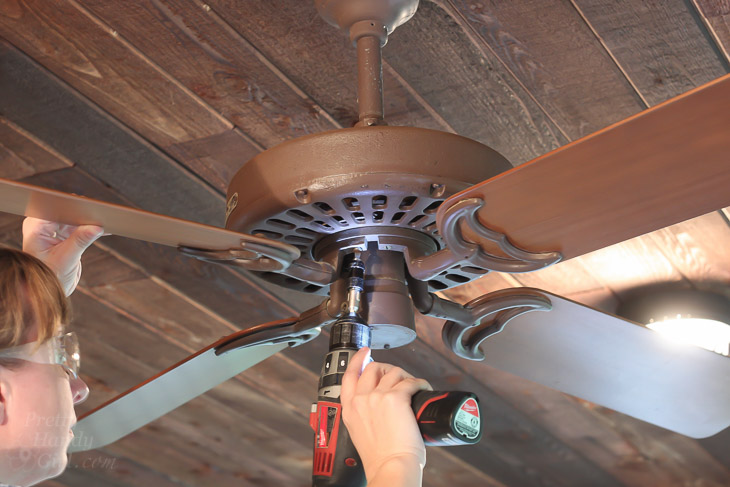
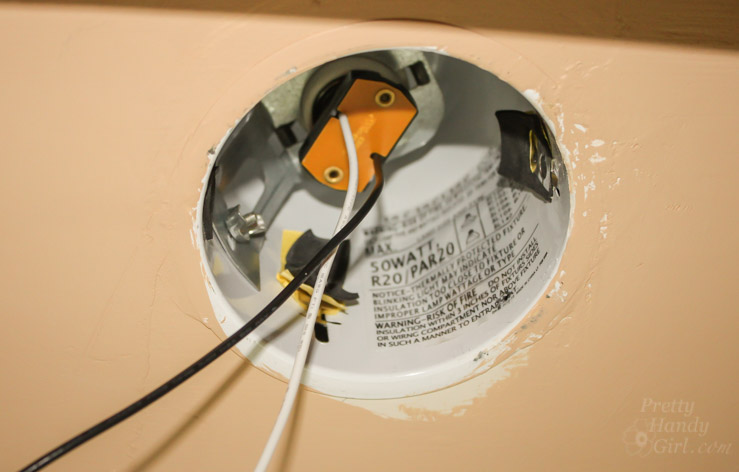
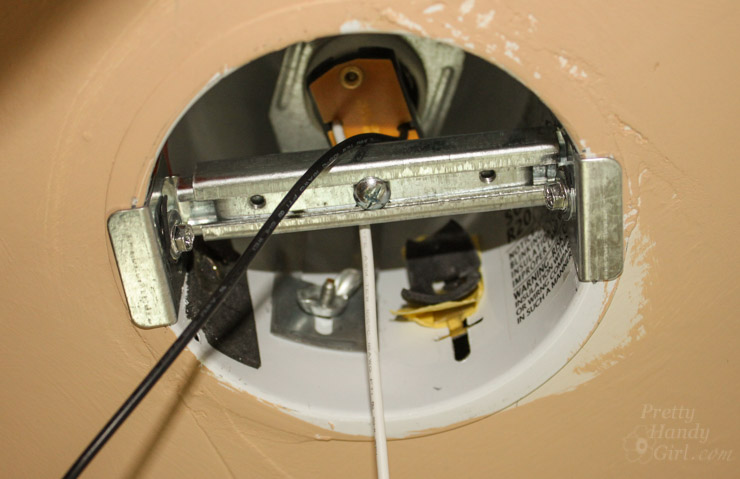
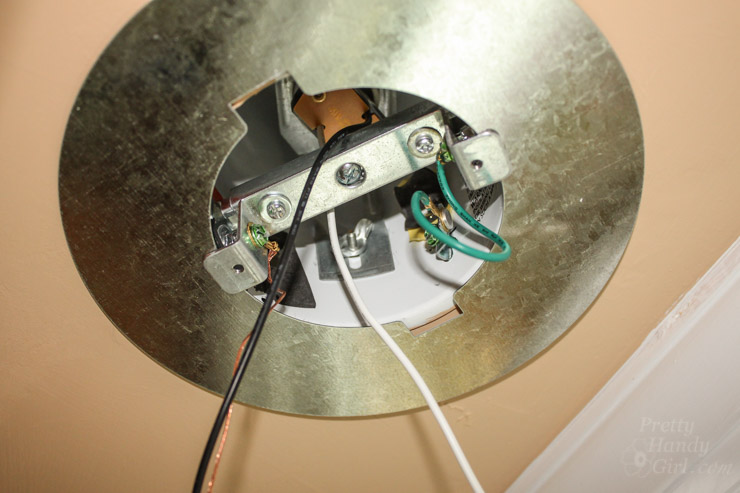
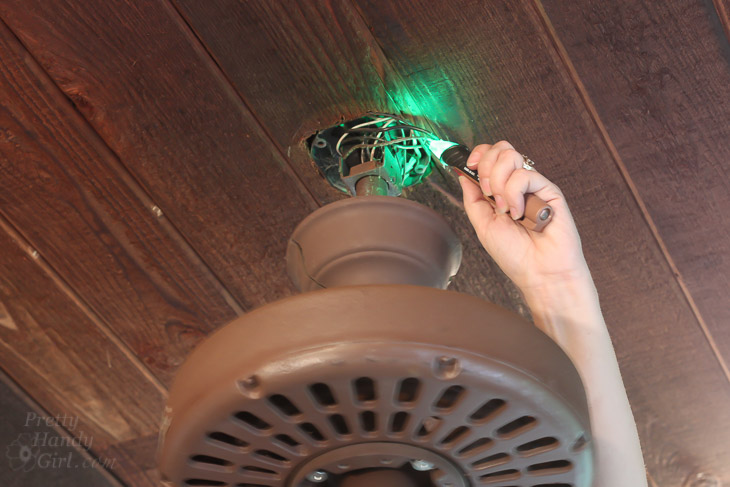
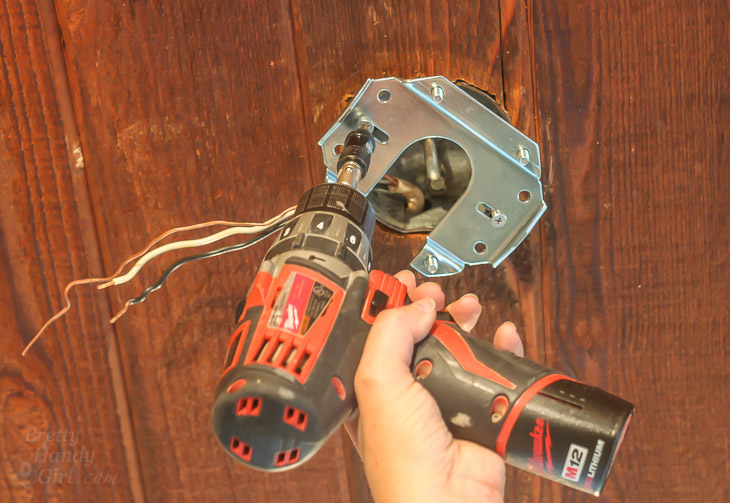
Remove the canopy covering the wiring. (All ceiling fans are different, look for screws or rotate the canopy to remove.)

Installing the Most Beautiful Ceiling Fan | Haiku Copper Luxe Ceiling Fan | Pretty Handy Girl

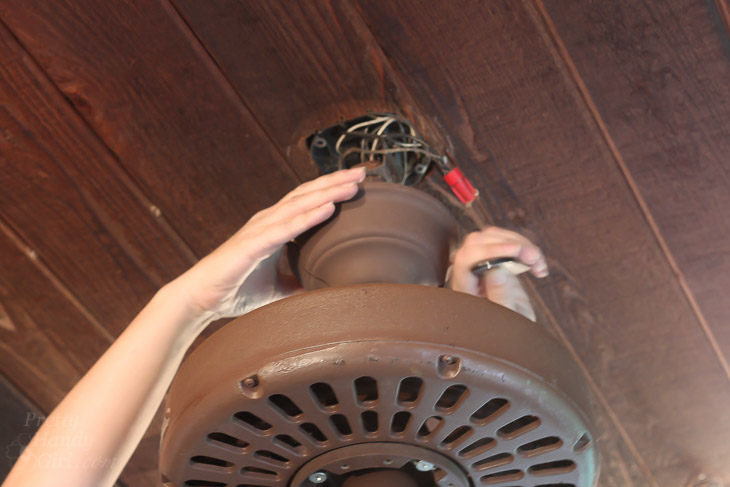
Use the voltage tester to check for power. The green light means it’s safe. Red light (and/or an audible alarm) means the power is still on.

Installing the Most Beautiful Ceiling Fan | Haiku Copper Luxe Ceiling Fan | Pretty Handy Girl

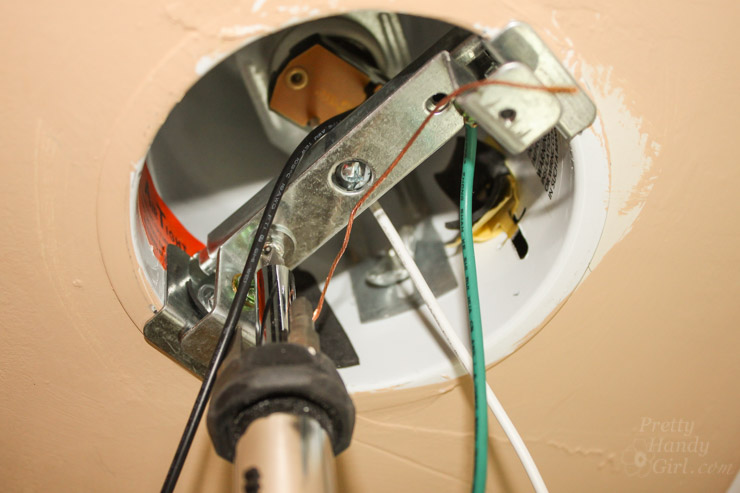
Disconnect the wires starting with the black “hot” wires. Then disconnect the white “neutral” wires and finally the bare “ground” wires.

Installing the Most Beautiful Ceiling Fan | Haiku Copper Luxe Ceiling Fan | Pretty Handy Girl

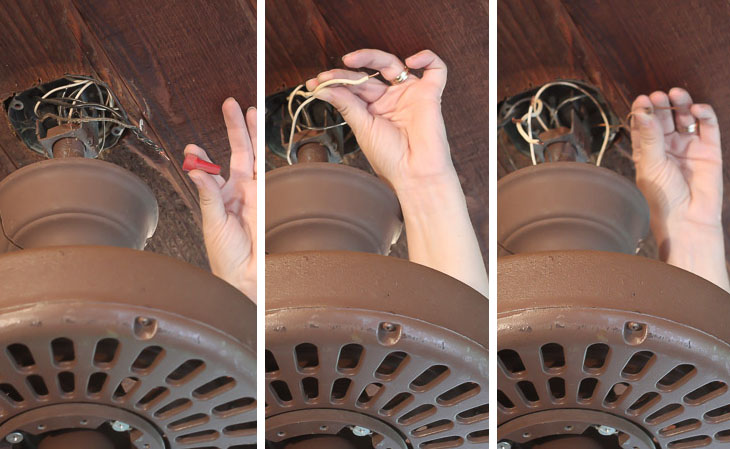
Have a friend support the fan as you remove it from the mounting bracket.

Installing the Most Beautiful Ceiling Fan | Haiku Copper Luxe Ceiling Fan | Pretty Handy Girl

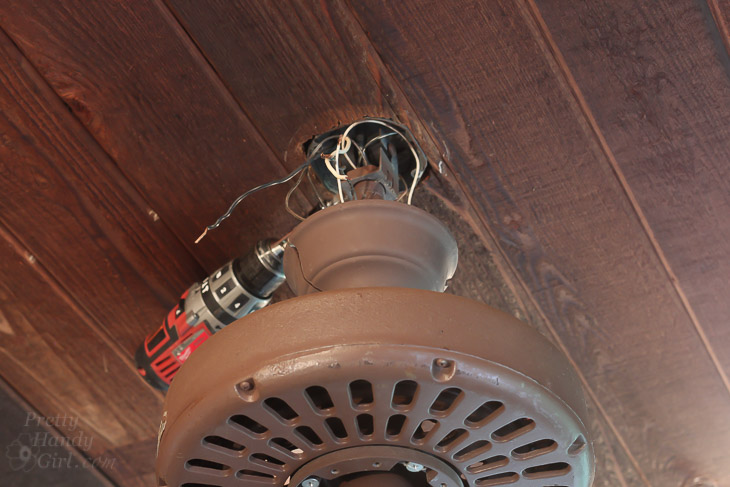
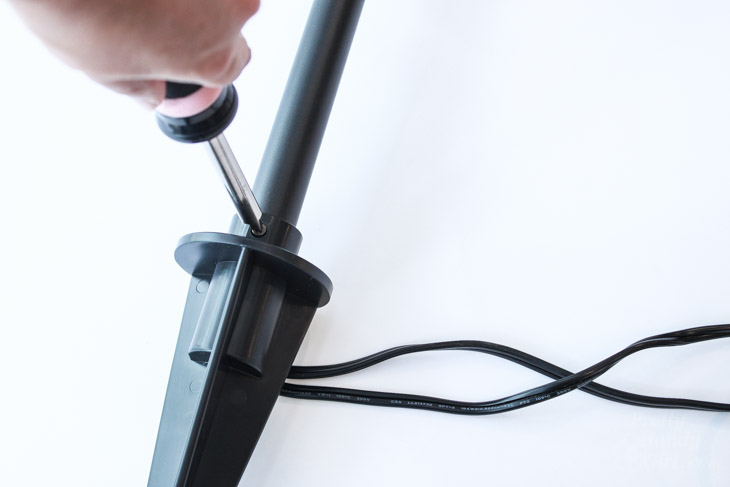
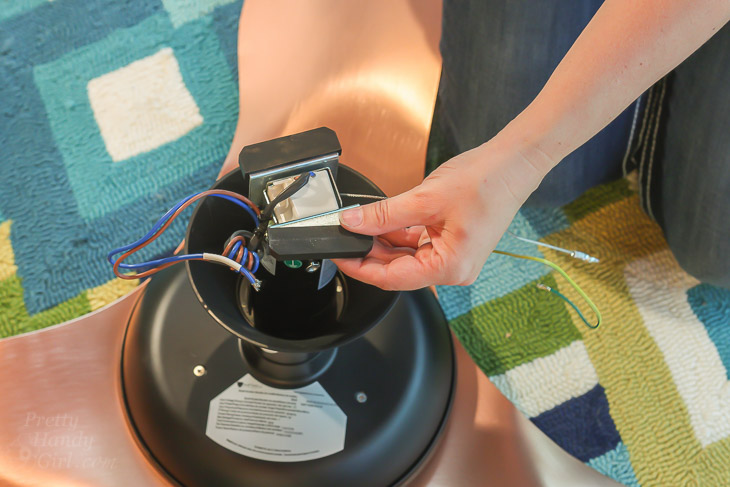
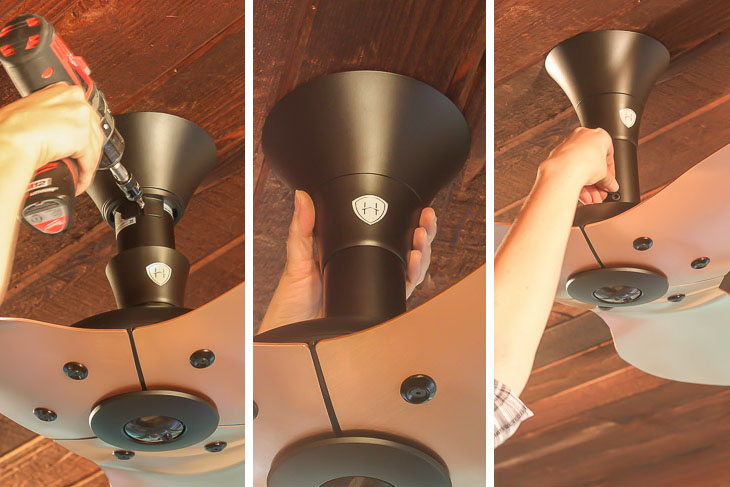
Time to prepare the Haiku Luxe Series Fan for installation. Be sure to follow the installation instructions included with your fan.

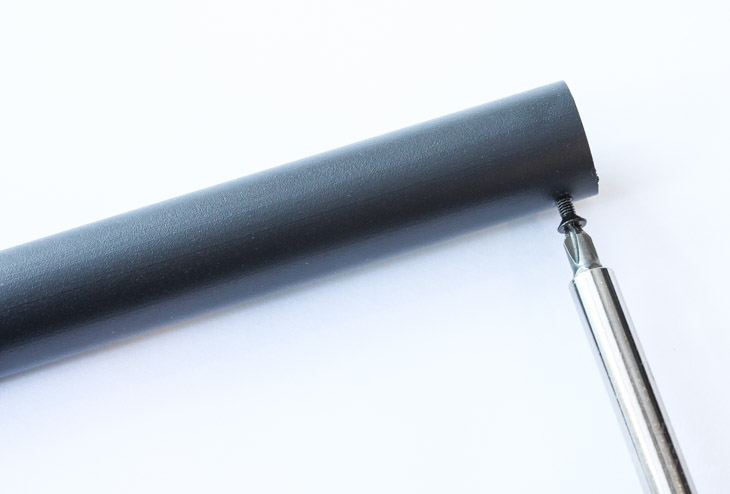
Remove the shipping screws and shipping cap.

Installing the Most Beautiful Ceiling Fan | Haiku Copper Luxe Ceiling Fan | Pretty Handy Girl

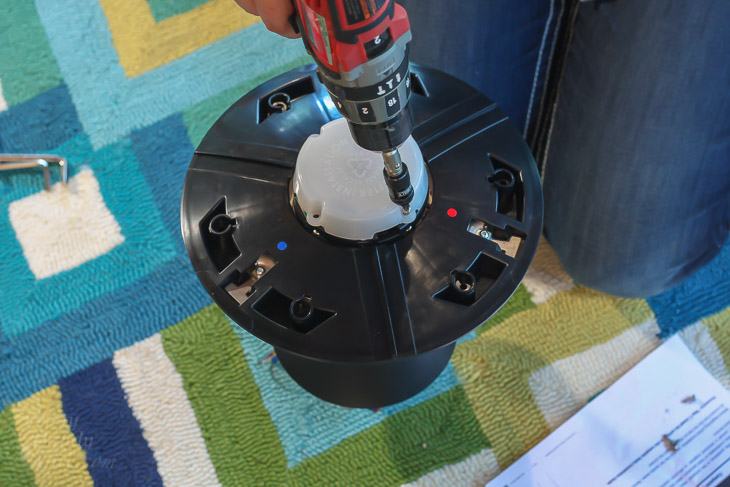
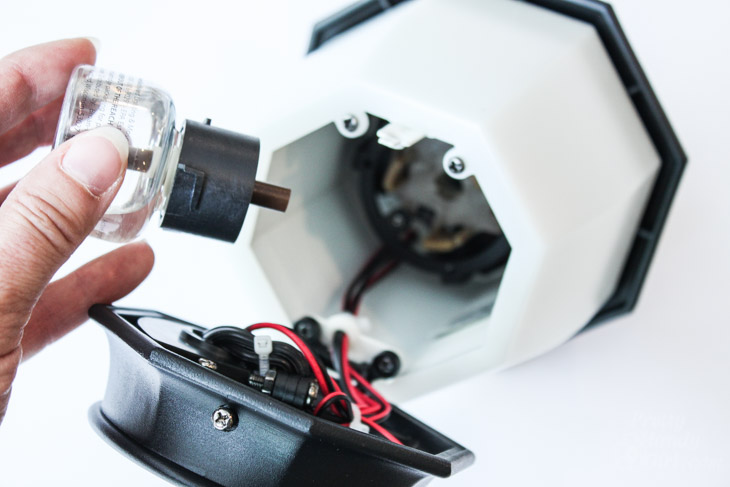
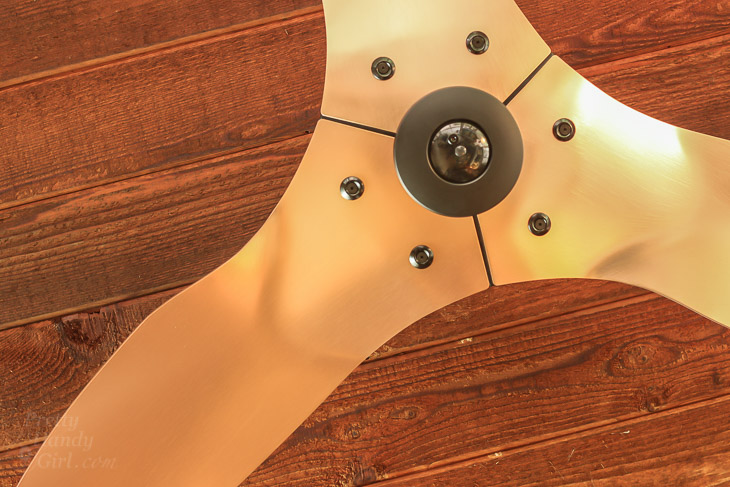
Locate the screws and grommets to attach the airfoils (fan blades).

Installing the Most Beautiful Ceiling Fan | Haiku Copper Luxe Ceiling Fan | Pretty Handy Girl

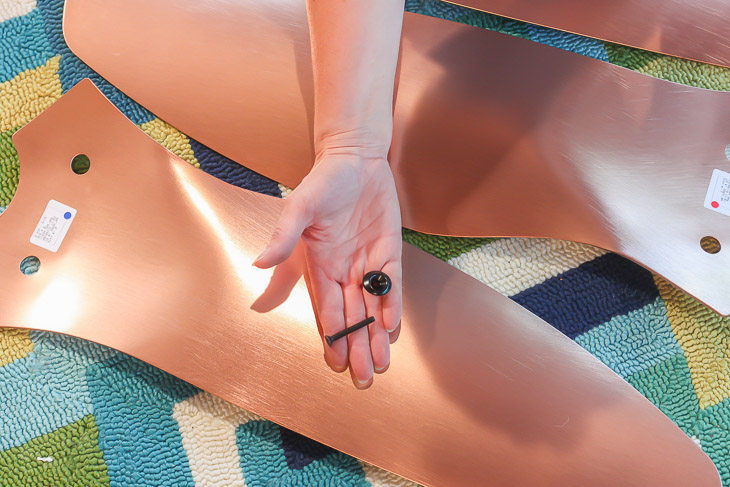
Match each airfoil with the color dot on the motor. Attach the airfoils using the screws and grommets provided.

Installing the Most Beautiful Ceiling Fan | Haiku Copper Luxe Ceiling Fan | Pretty Handy Girl

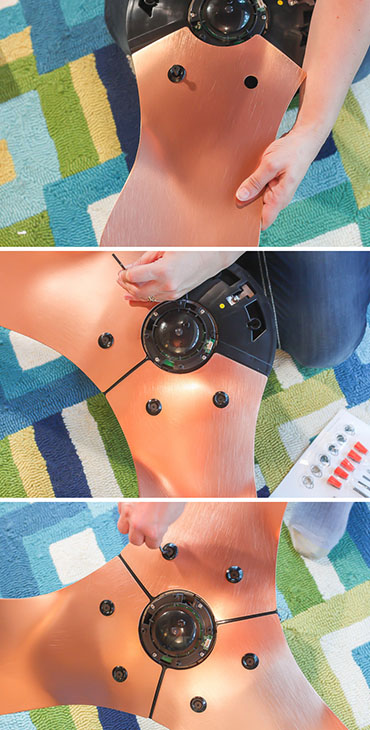
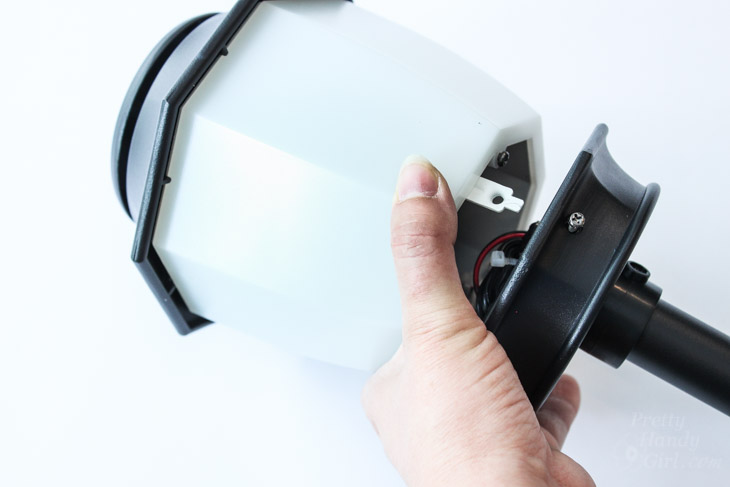
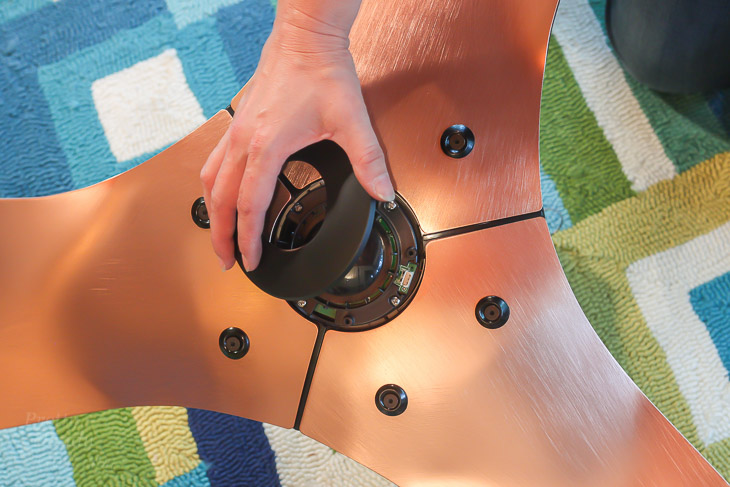
Attach the lower cover in the center of the airfoils.

Installing the Most Beautiful Ceiling Fan | Haiku Copper Luxe Ceiling Fan | Pretty Handy Girl

Locate the rubber bumpers and slide them onto the extension brackets.

Installing the Most Beautiful Ceiling Fan | Haiku Copper Luxe Ceiling Fan | Pretty Handy Girl

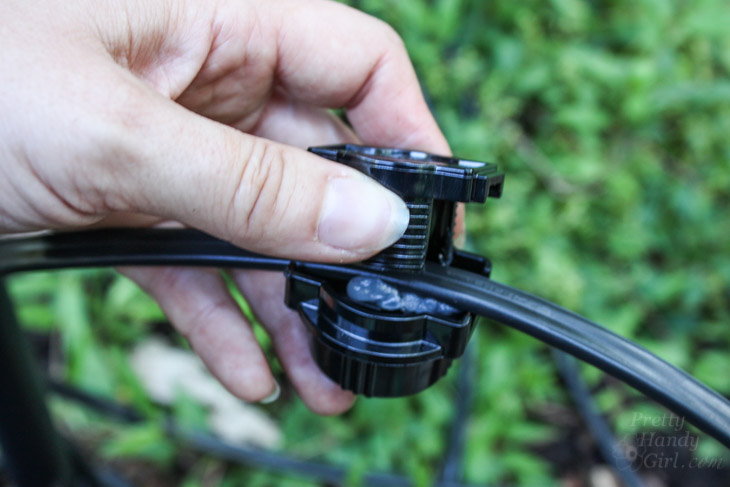
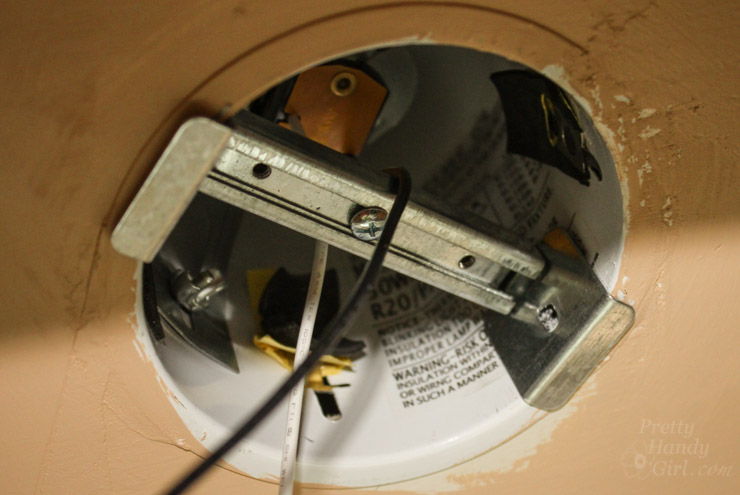
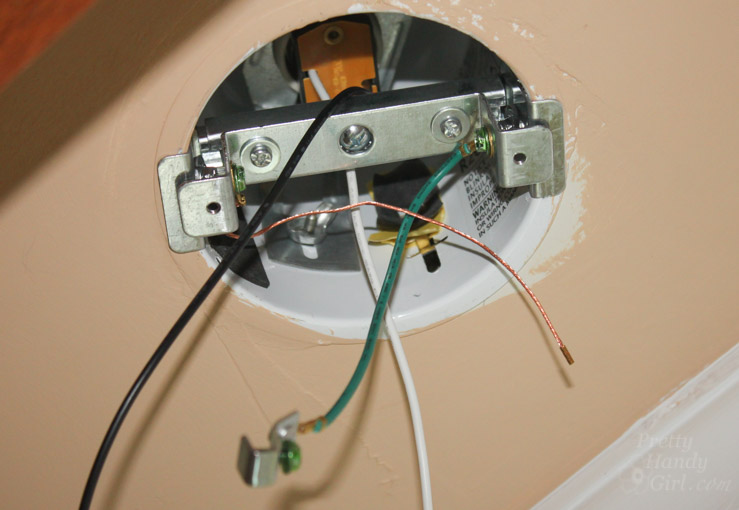
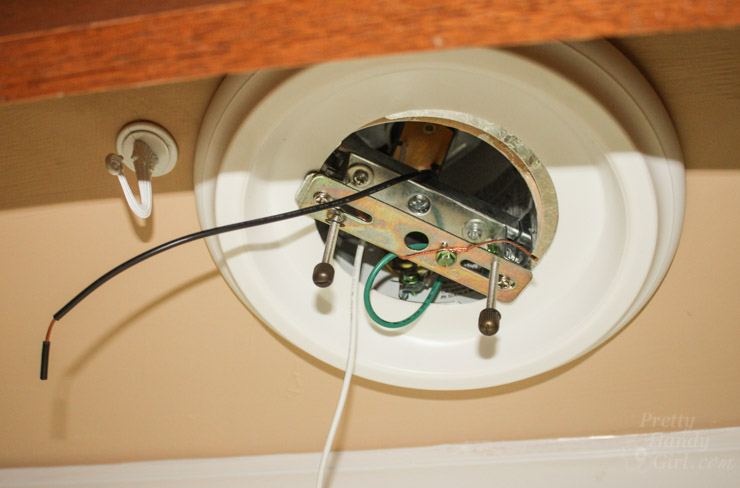
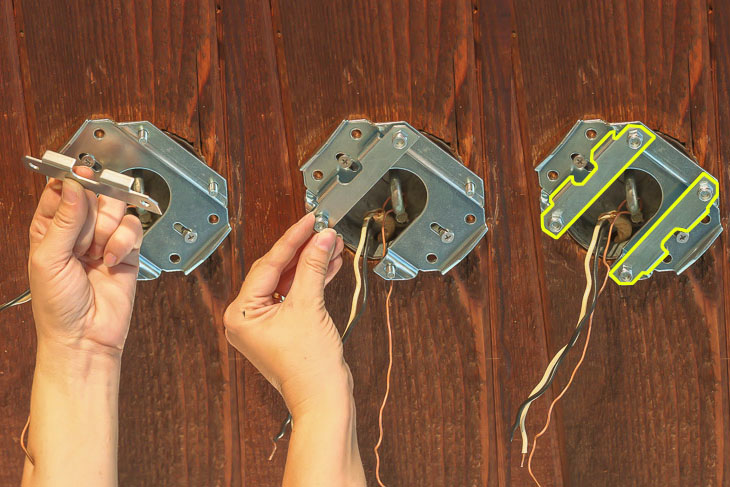
Attach the mounting plate to the ceiling box with screws from your ceiling junction box.

Installing the Most Beautiful Ceiling Fan | Haiku Copper Luxe Ceiling Fan | Pretty Handy Girl

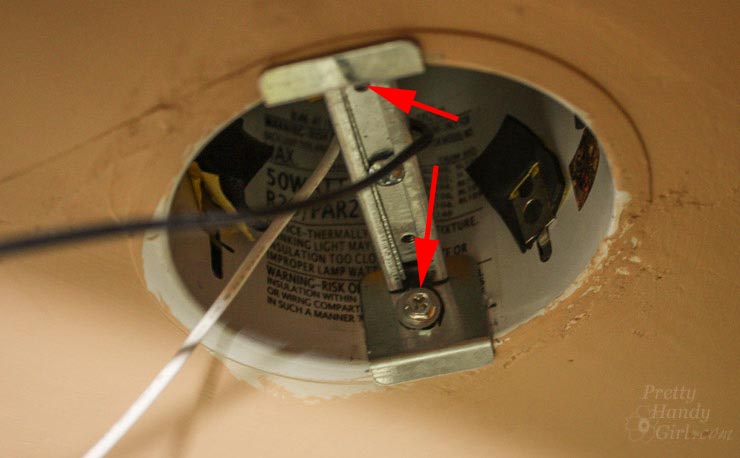
Locate the mounting brackets (outlined in yellow below) and loosely attach them to the mounting plate.

Installing the Most Beautiful Ceiling Fan | Haiku Copper Luxe Ceiling Fan | Pretty Handy Girl

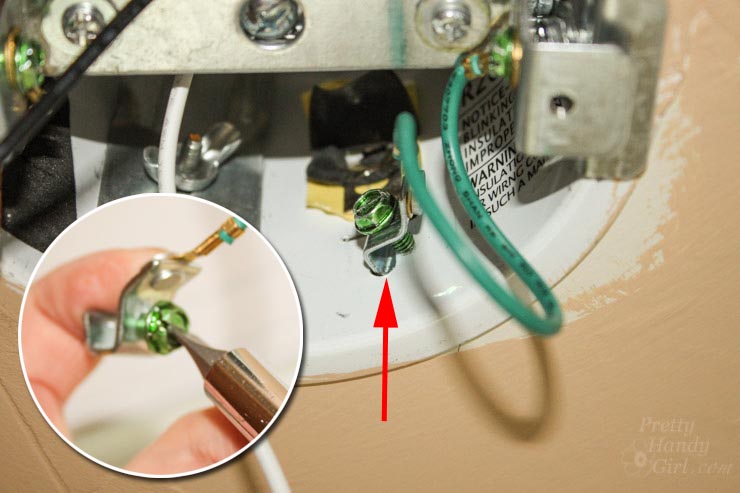
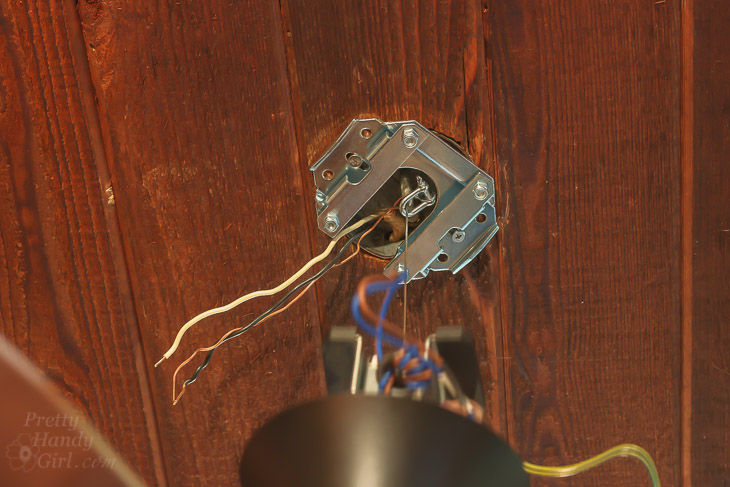
Attach the safety cable to a secured hook or stud in the ceiling (our junction box had a hook bolted to the ceiling joist which was a perfect anchor point.)

Installing the Most Beautiful Ceiling Fan | Haiku Copper Luxe Ceiling Fan | Pretty Handy Girl

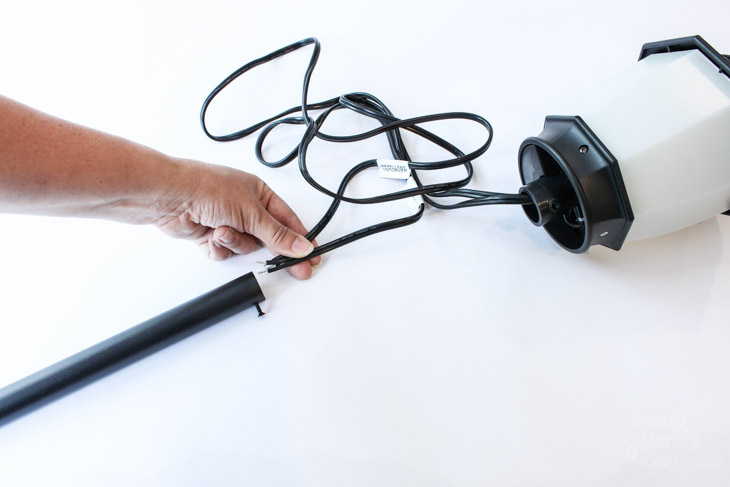
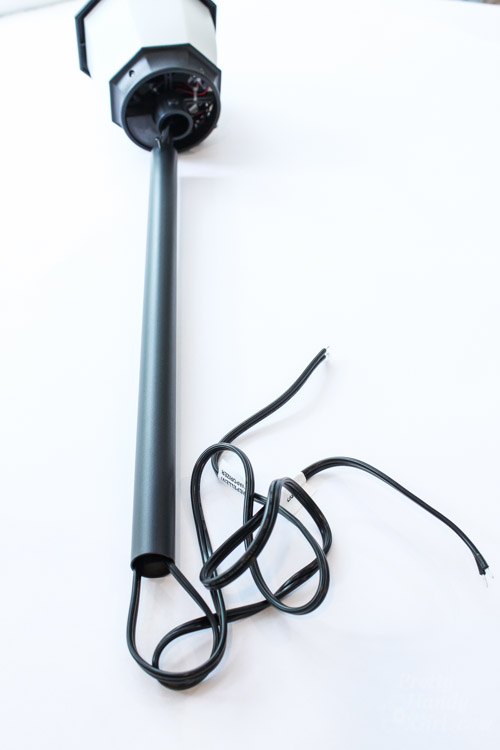
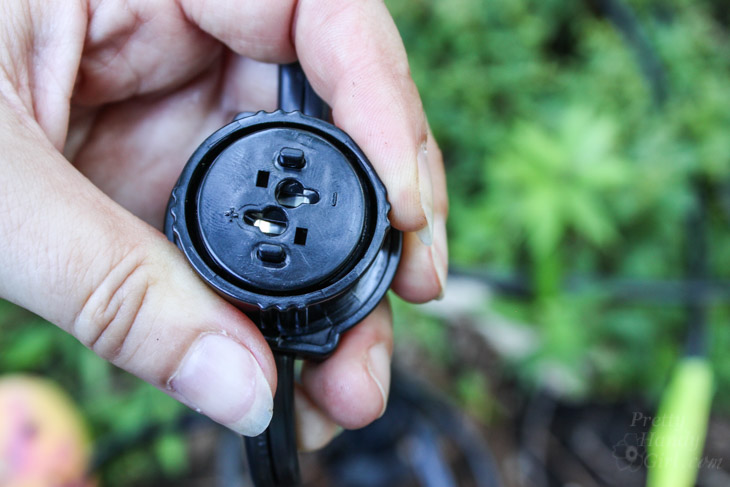
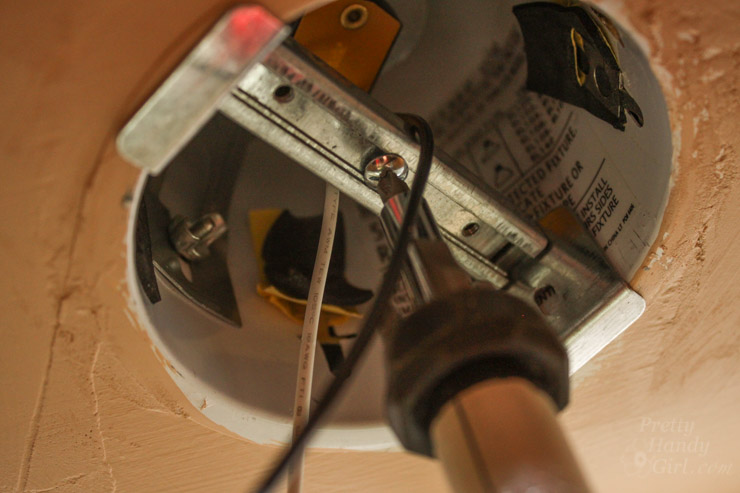
Wire the ceiling fan by attaching the wires in this order: 1. Green/yellow to bare “ground” 2. Blue to white “neutral” 3. Red to black “hot”.

Installing the Most Beautiful Ceiling Fan | Haiku Copper Luxe Ceiling Fan | Pretty Handy Girl
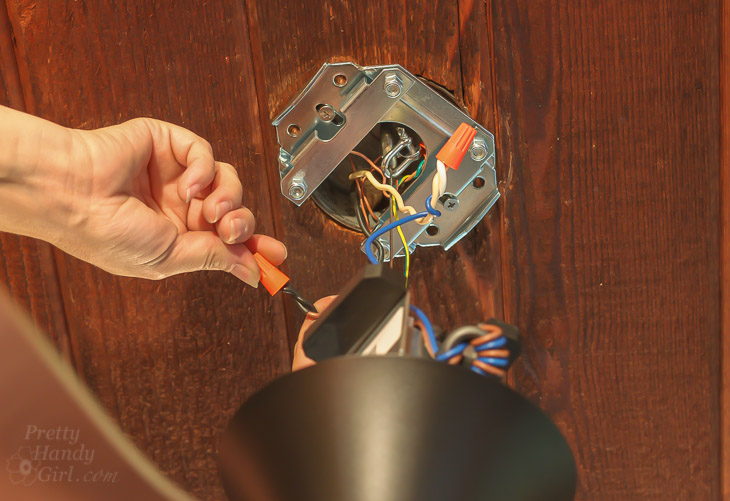
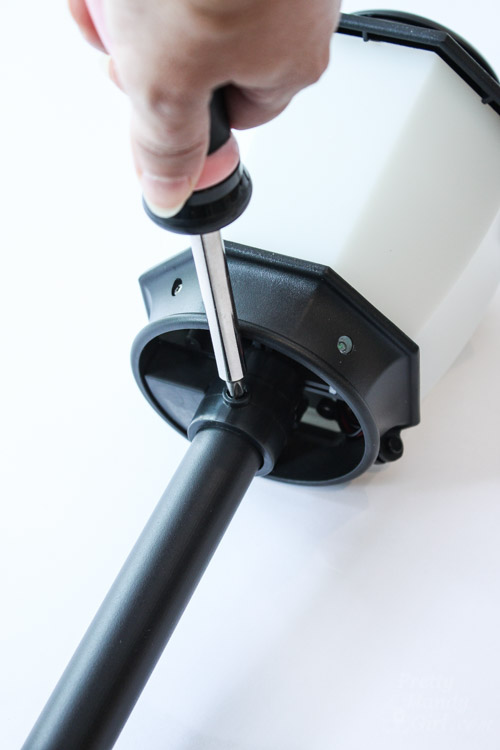
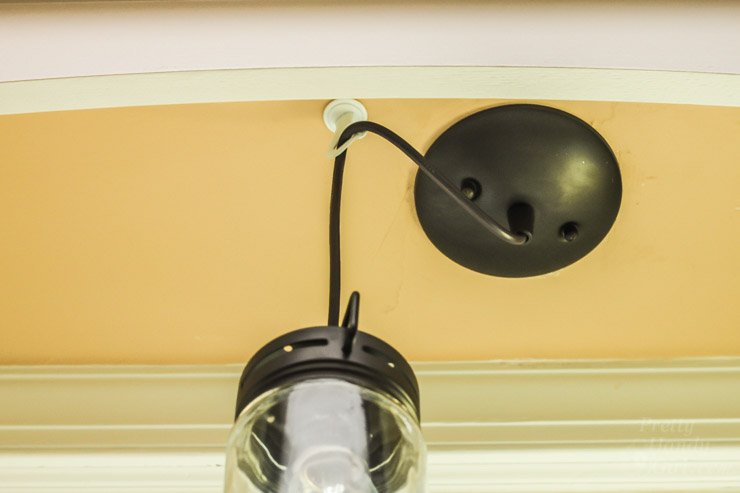
Tighten the bolts on the mounting brackets.

Installing the Most Beautiful Ceiling Fan | Haiku Copper Luxe Ceiling Fan | Pretty Handy Girl

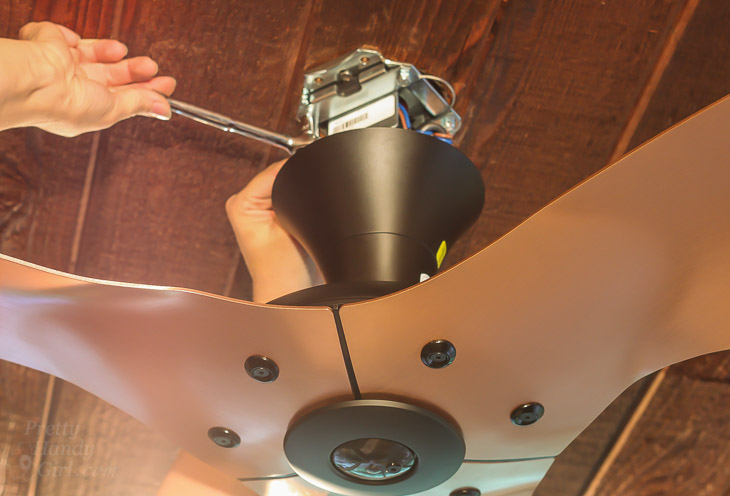
Secure the wire cover with screws provided. Slide the rest of the wiring cover up to cover the extension tube. Snap the cap on the side bolt.

Installing the Most Beautiful Ceiling Fan | Haiku Copper Luxe Ceiling Fan | Pretty Handy Girl

Now sit back and admire the view! Then use your remote control to turn the fan on and enjoy the breeze!

Installing the Most Beautiful Ceiling Fan | Haiku Copper Luxe Ceiling Fan | Pretty Handy Girl

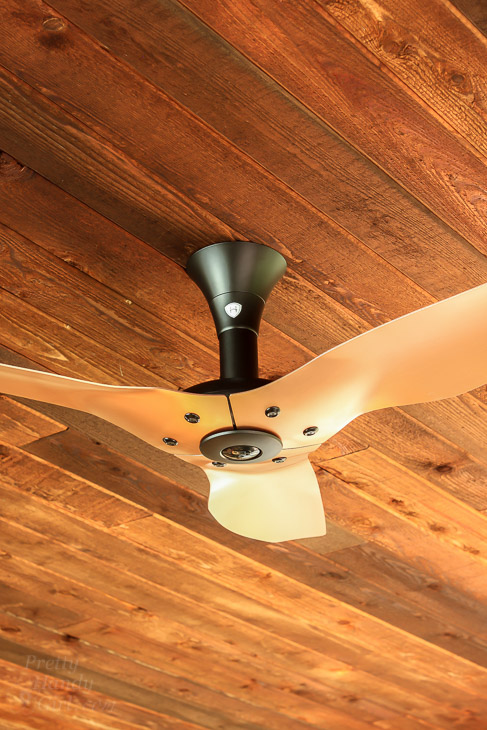
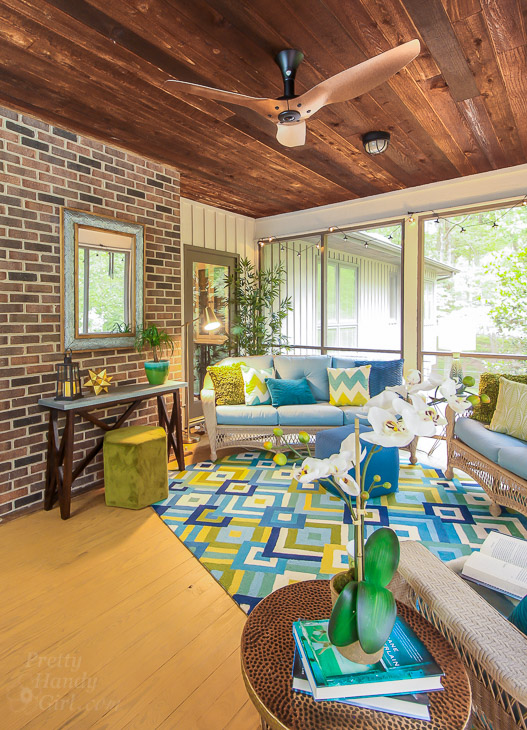
The Haiku Luxe Series fan is truly a thing of beauty. My stepmom and I love how it looks.

Installing the Most Beautiful Ceiling Fan | Haiku Copper Luxe Ceiling Fan | Pretty Handy Girl

It is definitely a show stopper. Especially if you remember the old fan that was there.

Installing the Most Beautiful Ceiling Fan | Haiku Copper Luxe Ceiling Fan | Pretty Handy Girl

Big coppery bling improvement!

Installing the Most Beautiful Ceiling Fan | Haiku Copper Luxe Ceiling Fan | Pretty Handy Girl

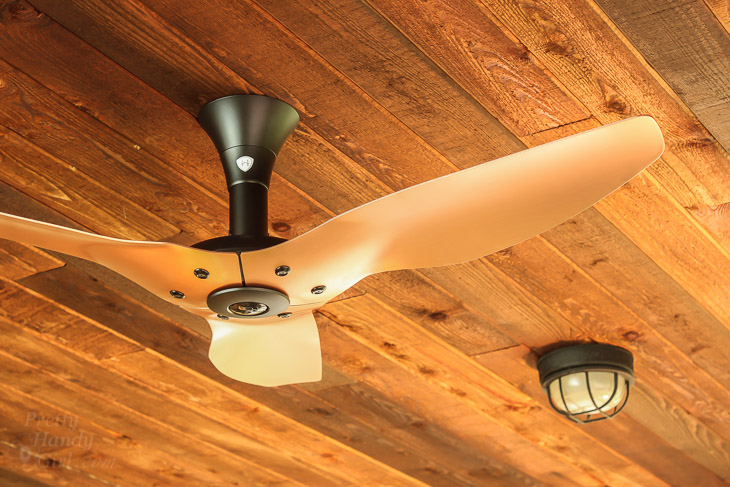
I think this fan needs to be in an art museum. . . but that’s just my opinion.

Installing the Most Beautiful Ceiling Fan | Haiku Copper Luxe Ceiling Fan | Pretty Handy Girl

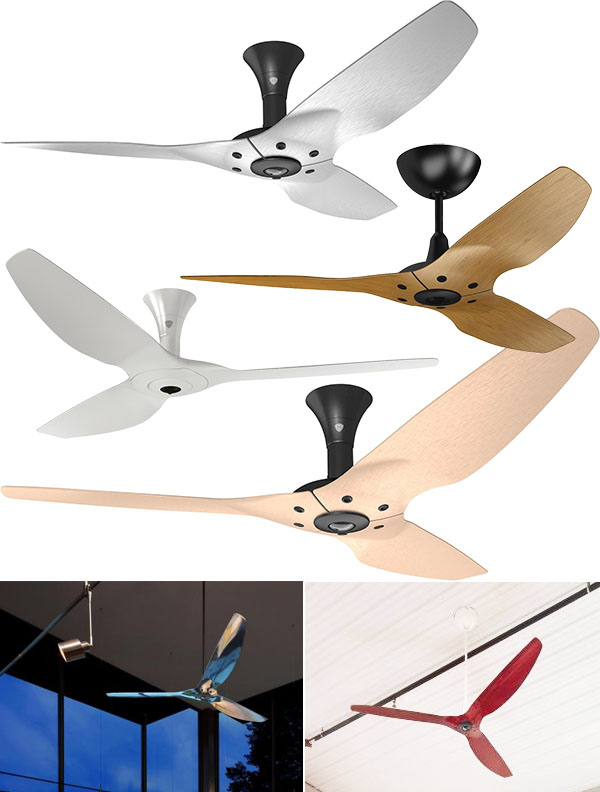
I’m thinking I might need to replace a ceiling fan or two in our home now. You should see all the options Haiku Home has:

Haiku Home Fans

Sorry, the giveaway has ended.

I have one question for you before you go, isn’t this the Most Beautiful Ceiling Fan You Ever Laid Eyes Upon?

Installing the Most Beautiful Ceiling Fan | Haiku Copper Luxe Ceiling Fan | Pretty Handy Girl

I’m definitely a fan! LOL. . . get it?

PHGFancySign

Disclosure: Big Ass Solutions sent me the Haiku Home Luxe Fan for this project. I was not paid to use the product. I was not told what to write about their product. I approached Big Ass Solutions about working with me because I know they make quality products. As usual, I’m vary particular about the brands I mention on the blog. 
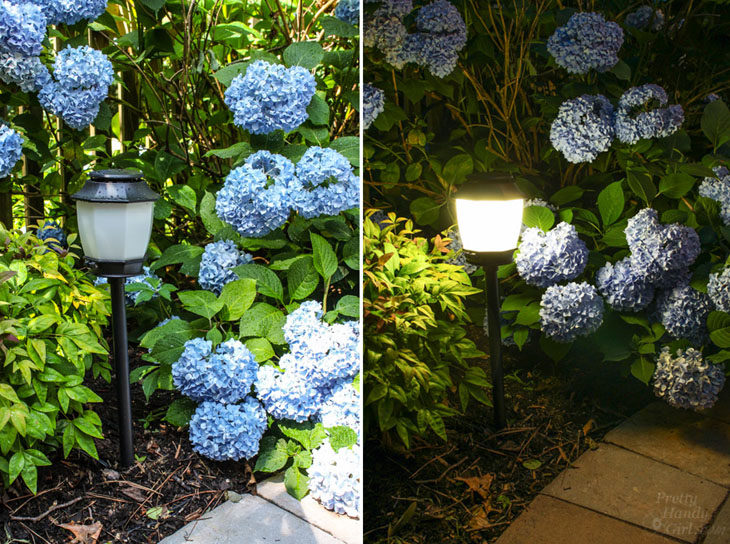
 

Pin for later!

How to Install Low Voltage Landscape Lights (that also repel mosquitos!) | Pretty Handy Girl

How to Install Low Voltage Landscape Lights (that also repel mosquitos!) | Pretty Handy Girl

Pop Quiz: How can you beautify your yard AND repel mosquitoes at the same time?

Do you give up? Introducing the new NuTone Haven Backyard Lighting & Mosquito Repellent System.

How to Install Low Voltage Landscape Lights (that also repel mosquitos!) | Pretty Handy Girl

As a resident of the North Carolina, we fight a losing battle against mosquitoes for a better part of the year. My son and I seem to be especially attractive to those pesky suckers. With the Zika virus in the news, I was thrilled when NuTone asked me to install and review their Haven lights (via a sponsored post.) Today I’ll show you how to install these low voltage landscape lights (similar to most landscape light installation.) At the end of the summer I’ll check back in to let you know how I like them.

Ready to learn How to Install Landscape Lights and Repel Mosquitoes?

Materials:

(I’ve included affiliate links for your convenience. I earn a small percentage from a purchase using these links. There is no additional cost to you. You can read more about affiliate links here.)

Instructions:

Unpack your Haven Light & Repellent system from the box. Pull out the stake, stem and light to assemble.

Assembling the Fixture:

How to Install Low Voltage Landscape Lights (that also repel mosquitos!) | Pretty Handy Girl

Loosen the screw on the stake.How to Install Low Voltage Landscape Lights (that also repel mosquitos!) | Pretty Handy Girl

Loosen the screw on the stem.loosen-screw-on-post

Feed the wires from the light fixture through the stem.How to Install Low Voltage Landscape Lights (that also repel mosquitos!) | Pretty Handy Girl

Pull the wires through the other end of the stem.

How to Install Low Voltage Landscape Lights (that also repel mosquitos!) | Pretty Handy Girl
Loosen the screw on the light fixture base and insert the stem into the light fixture. Tighten the screw.

How to Install Low Voltage Landscape Lights (that also repel mosquitos!) | Pretty Handy Girl

Feed the other end of the stem into the stake and position the wires into the open slot in the stake.

How to Install Low Voltage Landscape Lights (that also repel mosquitos!) | Pretty Handy Girl

Tighten the stake onto the stem.

How to Install Low Voltage Landscape Lights (that also repel mosquitos!) | Pretty Handy Girl

How to Install the Repellent:

Locate the bottle of repellent. Remove the green protective cap. Attach the locking adaptor cap onto the bottle (make sure the spurs are at the bottom.) Twist the locking cap until secure.

How to Install Low Voltage Landscape Lights (that also repel mosquitos!) | Pretty Handy Girl

Loosen the screw just below the white shade on the light fixture.
How to Install Low Voltage Landscape Lights (that also repel mosquitos!) | Pretty Handy Girl

Tilt the fixture open to expose inside.
How to Install Low Voltage Landscape Lights (that also repel mosquitos!) | Pretty Handy Girl

Insert the repellent into the light fixture. The wick fits into the hole in the center of the fixture.

How to Install Low Voltage Landscape Lights (that also repel mosquitos!) | Pretty Handy Girl

Twist the bottle 30 degrees to secure in place.
How to Install Low Voltage Landscape Lights (that also repel mosquitos!) | Pretty Handy Girl

Close the light fixture and tighten the screw.

How to Install Low Voltage Landscape Lights (that also repel mosquitos!) | Pretty Handy Girl

Repeat for any additional fixtures.

Installing Landscape Lights in Your Yard:

Set the fixtures in your yard and adjust the spacing (leave approximately 10 – 12′ between fixtures.)

How to Install Low Voltage Landscape Lights (that also repel mosquitos!) | Pretty Handy Girl

When you are happy with the layout. Choose a location for your transformer (must be able to plug into a covered GFCI outlet.) Choose a path to connect your lights. (Ideally you’ll want to use the least amount of wire possible.) Run the first line of 12/2 low voltage wire from the transformer and around each light.

How to Install Low Voltage Landscape Lights (that also repel mosquitos!) | Pretty Handy Girl

Loosely loop the wire around each fixture. It’s best to allow some slack in the wiring in case you have to move anything. Or to prevent connections from coming undone should someone pull the wire. Wrap colored duct tape around this wire near each fixture. This will label your first wire as the lighting wire.

How to Install Low Voltage Landscape Lights (that also repel mosquitos!) | Pretty Handy Girl

Run a separate 12/2 low voltage wire around each fixture. Do not put tape on this wire.

Loosen the screw in the stake and remove the light fixture. Place the provided cap on each stake.

How to Install Low Voltage Landscape Lights (that also repel mosquitos!) | Pretty Handy Girl

Hammer the stakes into the ground until they are flush with the soil.

How to Install Low Voltage Landscape Lights (that also repel mosquitos!) | Pretty Handy Girl

Replace the light fixture into the stake and tighten the screw.

How to Wire Low Voltage Landscape Lights:

Please note that low voltage landscaping light connectors will differ. They are all similar in that there is a connector that has metal prongs to puncture and connect to the low voltage wire cable. The NuTone Haven Backyard Lighting & Mosquito Repellent System requires two separate wires (one for lights and one for repellent.) The Mosquito Repellent-Only fixtures (and most low voltage lights) only require one wire.

Locate the wire that was marked with colored duct tape.

How to Install Low Voltage Landscape Lights (that also repel mosquitos!) | Pretty Handy Girl

Place some dielectric grease on the wire where you wish to connect the fixture.

How to Install Low Voltage Landscape Lights (that also repel mosquitos!) | Pretty Handy Girl

Locate one connector. Unscrew the connector. Press the wire firmly (grease side toward the prongs) into the lower portion of the connector (has metal prongs). (I’m not sure if this is necessary or not, but I made sure the negative prong for all my fixtures was on the side that has writing on my low voltage wire cable.)

How to Install Low Voltage Landscape Lights (that also repel mosquitos!) | Pretty Handy Girl

Thread the upper half of the connector onto the bottom portion.

How to Install Low Voltage Landscape Lights (that also repel mosquitos!) | Pretty Handy Girl

Twist the ring until the connector is tight. To help get a good connection. Tug at the wire to help the prongs pierce the wire insulation. Then tighten the ring further.

How to Install Low Voltage Landscape Lights (that also repel mosquitos!) | Pretty Handy Girl

Squeeze some dielectric grease into both holes on the connector.

How to Install Low Voltage Landscape Lights (that also repel mosquitos!) | Pretty Handy Girl

Firmly press the lighting wires into the slots.

How to Install Low Voltage Landscape Lights (that also repel mosquitos!) | Pretty Handy Girl

Repeat these steps to connect the repellent wires to the non-marked low voltage cable wire. Connect all your fixtures to the light and repellent cable wires.

Installing the Low Voltage Transformer and Controller:

Install the controller and transformer near a covered GFCI outlet. For ease of connection, you may want to remove them from the mounting screws during wiring. Make sure the transformer is unplugged.

How to Install Low Voltage Landscape Lights (that also repel mosquitos!) | Pretty Handy Girl

Locate the light sensor. While pressing down on the green buttons with a screwdriver, press both wires into the green “CDS” slots on the controller. Release the buttons and tug gently on the wires to make sure they are secured.

How to Install Low Voltage Landscape Lights (that also repel mosquitos!) | Pretty Handy Girl

Cut a 12″ length of 12/2 low voltage wire. Split the two wires by scoring the center with a utility knife. Repeat on the other end.

How to Install Low Voltage Landscape Lights (that also repel mosquitos!) | Pretty Handy Girl

Remove about 1/4″ from the end of both sides of the wire.How to Install Low Voltage Landscape Lights (that also repel mosquitos!) | Pretty Handy Girl

Attach one end of the cable wire to the transformer. Make sure the screws are tight over the wire ends.

How to Install Low Voltage Landscape Lights (that also repel mosquitos!) | Pretty Handy Girl

Attach the other end to the “AC 12V” screws on the controller. This will supply the controller with power.How to Install Low Voltage Landscape Lights (that also repel mosquitos!) | Pretty Handy Girl

Connect the light wire cable to the “Light” screws on the controller. Connect the repellent wire cable to the “Repellent” screws.

How to Install Low Voltage Landscape Lights (that also repel mosquitos!) | Pretty Handy Girl

Time to test your lights! Plug in the transformer and turn it on. Turn on the lights by pushing the light on/off button on the controller. Look around your yard and make sure all the lights are lit.

How to Install Low Voltage Landscape Lights (that also repel mosquitos!) | Pretty Handy Girl

Turn on the repellent by pushing the “Repellent On/Off” button. Check to see if the green light is illuminated at the base of each fixture.

How to Install Low Voltage Landscape Lights (that also repel mosquitos!) | Pretty Handy Girl

If you have any fixtures that are not lit, check that the connections are tightened completely.

If everything is working, program your timer/controller per the instructions provided with the controller.

Burying the Landscape Wires:

Use the garden shovel to dig a trench 6″ deep next to the landscape wire (be very careful not to slice the wire.)

How to Install Low Voltage Landscape Lights (that also repel mosquitos!) | Pretty Handy Girl

Press the landscape wiring and connectors into the trench and replace the dirt.

How to Install Low Voltage Landscape Lights (that also repel mosquitos!) | Pretty Handy Girl

Now stick your tongue out and say “Nah Nee Nah Nee Boo Boo, You Can’t Get Me!” to all the mosquitoes.

How to Install Low Voltage Landscape Lights (that also repel mosquitos!) | Pretty Handy Girl

And enjoy your beautifully illuminated yard!

How to Install Low Voltage Landscape Lights (that also repel mosquitos!) | Pretty Handy Girl

According to the manual that came with the Haven Backyard Lighting and Mosquito Repellant, the repellant will last approximately 215 hours. You control how many hours the repellant is emitted per day which will either extend or shorten the number of days until you need to buy refills.

How to Install Low Voltage Landscape Lights (that also repel mosquitos!) | Pretty Handy Girl

I definitely like the look of the landscape lights when they are lit…

How to Install Low Voltage Landscape Lights (that also repel mosquitos!) | Pretty Handy Girl

…and not lit.

How to Install Low Voltage Landscape Lights (that also repel mosquitos!) | Pretty Handy Girl

Do you have a yard that could use some mosquito protection? NuTone has a stand alone repellant fixture. But, personally I like having the 2-in-1 fixture, because who doesn’t love having an illuminated yard at night.

PHGFancySign

Disclosure: This is a sponsored post for NuTone. I was provided with the landscape lights and compensated for my time. I was not told what to write. All instructions and opinions are my own. I have not had time to test these fixtures fully, but will write a review at the end of the summer.

Convert a Recessed Light to Accept a Hardwire Fixture | Pretty Handy Girl

Things are winding up at my client’s home. We’ve been getting her 3000 sq. ft. home ready to sell. Most of the changes we’ve made have been simple cosmetic changes. A few outdated light fixtures have been updated. In the kitchen, I wanted to add a stylish pendant light over the kitchen sink.

plain-jane-kitchen-window-sink

But, I ran into a slight problem when I realized that it was actually a recessed light fixture and I bought a hard-wired pendant.

Without giving up the style of the cool pendant light, I found a way to Convert a Recessed Light to Accept a Hardwire Fixture. I also solved the issue of the light fixture not being centered over the sink. This can happen if you have a joist in your way. But, it’s an easy fix.

off-centered-light

Okay, ready to get started? Here’s is a quick tutorial for How to Convert a Recessed Light to Accept a Hardwire Fixture and the slick little gadget I used to do it.

Materials:
(contains affiliate links)

Instructions:

Unscrew your bulb from the recessed can. (This bulb was so big, I didn’t realize it was actually a light bulb in a recessed fixture. I could not for the life of me figure out how to remove the globe to start removing the fixture. Finally I turned it and voila, I realized it was just a large light bulb. Definitely a head smack moment and a good laugh.)

remove-light-fixture

You will need this nifty recessed light converter.

recessed-light-converter

Alternatively, you can find lots of all-in-one converter and pendant fixtures like I used here.

Screw the converter into the socket in your recessed fixture.

screw-in-bulb-base-converter

The converter should sit snuggly into the socket.

installed-screw-in-converter

Fit the provided brace into the recessed can with the wings snug against the outside of the can.

place-fixture-brace-into-can-fixture

When the brace is at its widest position, turn the set screw to secure the brace in position.

widen-brace-tighten-middle-screw

Use provided sheet metal screws to tap into the recessed can on both sides of the brace.

Convert a Recessed Light to Accept a Hardwire Fixture | Pretty Handy Girl

The brace should be strong enough to hold your pendant light (within reason.)

installed-light-fixture-brace

Attach the mounting bracket to the brace with the provided screws.

attach-mounting-bracket-to-brace

installed-recessed-fixture-converter

Loosen the screw on the green ground wire and slip the clip into one of the slots on the recessed can. Tighten the ground screw.

Converting a Recessed Light to Accept a Hardwire Fixture | Pretty Handy Girl

Slip the metal shield over the mounting bracket and rotate 90 degrees.

slip-metal-collar-over-brace

Time to add that hook if you need to center your pendant light. Either screw the hook into a joist, or use the anchor.

Converting a Recessed Light to Accept a Hardwire Fixture | Pretty Handy Girl

Slip the ceiling medallion over the metal shield. Attach your new light fixture’s mounting bracket to the recessed converter bracket.

Converting a Recessed Light to Accept a Hardwire Fixture | Pretty Handy Girl

Install your hard-wired pendant light per the manufacturer’s instructions (or follow this tutorial to install a hard-wired pendant light).

Convert a Recessed Light to Accept a Hardwire Fixture | Pretty Handy Girl

Thread your pendant wire through the hook.

Enjoy your new centered and updated pendant light!

Convert a Recessed Light to Accept a Hardwire Fixture | Pretty Handy Girl

Honest, this is the same kitchen! We had the cabinets painted to give the kitchen a brighter and updated feel.

Convert a Recessed Light to Accept a Hardwire Fixture | Pretty Handy Girl

I can’t wait to show you the rest of the changes we’ve completed in the house. Stay tuned!

PHGFancySign

DIY Twinkling Light Pendant |Pretty Handy Girl

DIY Twinkling Pendant Light | Pretty Handy Girl

Happy Leap Day!

How was your weekend? I had so much fun making this DIY Twinkling Pendant Light.  This idea has been floating in my head for a while. It’s a relatively easy light to make. You need very few supplies. I used a waste paper basket from Lowe’s that I bought a year ago. I’m not sure if the same can is available, but you can buy this similar one on Amazon (affiliate link).

DIY Lighting Challenge Link Up | PrettyHandyGirl

You’ll also want to check out my fellow creative DIYers and the amazing light fixtures they made:
The House of Wood | Sawdust 2 Stitches | My Love 2 Create | Kim Six Fix | The Ugly Duckling House


The best part about my project, is that I didn’t need to do any wiring. I used a recessed can converter kit from Worth Home Products. I used a similar one a few years ago to convert a recessed can light to hang this sphere light in our art & craft room. I’m a huge fan of the convenience of this product.

DIY Twinkling Light Pendant |Pretty Handy Girl

Want to make your own DIY Twinkling Pendant Light? Grab a few supplies and let’s get started.

DIY Twinkling Light Pendant |Pretty Handy Girl

Materials:

(I’ve included affiliate links for your convenience. I earn a small percentage from a purchase using these links. There is no additional cost to you. You can read more about affiliate links here.)

DIY Twinkling Pendant Light | Pretty Handy Girl

Instructions:

Clean your waste paper basket and dry.

DIY Twinkling Light Pendant |Pretty Handy Girl

Tape painter’s tape around the basket bin. Read more

DIY Light Challenge

DIY-light-challenge-graphic

I have a love affair with lighting. Lights are akin to your home’s jewelry. But, that “jewelry” can be expensive unless you DIY your own light fixtures. How about you? Do you like to make your own light fixtures or lamps?

If you do too, I’m thrilled to be hosting a DIY Lighting Challenge in February. A few other blogger friends and I have been challenging each other once a month to create according to a theme. This was my month, so I’m throwing down the glowing gauntlet and challenging you to make your own light fixture or lamp.

If you want to join in the fun, take the rest of the month to create your own DIY Light. You have until Monday, February 29th. On that day, I’ll share my DIY Light project with you and you can share your’s with me in a InLinkz link up.

Ready? Set! Go!

Need some inspiration? I created an entire Pinterest board of DIY Lighting Ideas. Use the hashtag #DIYLightingChallenge if you want to post some teasers.

Or you can check out some of my tutorials: Read more