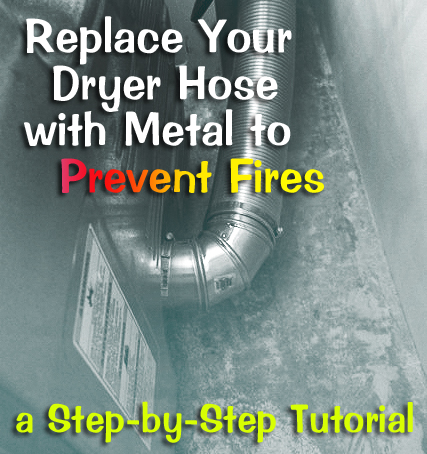
Installing Semi-Rigid Dryer Hose to Prevent Fire Hazard
It’s time to take on a little fix in your laundry room. This single upgrade can prevent your home from a house fire. Let me show you how installing semi-rigid dryer duct can prevent a fire hazard!
Installing Semi-Rigid Dryer Hose to Prevent Fire Hazard
Last year when I showed you how to clean out your dryer hose to prevent dryer fires, I didn’t realize that I still had a fire hazard living in our laundry room. Since then, I stumbled across a video that scared the bejeezus out of me. Matt from Great Lakes Home Performance created this video showing what happens to foil dryer hoses.
I knew that white plastic dryer hoses were bad and had previously replaced ours with the flexible foil hose. But, I felt duped when Matt showed what happens to those “foil” hoses. First, what I didn’t realize is that those shiny metal hoses aren’t foil! They are made of flammable plastic. Go ahead, run to your dryer right now and see what type of duct work you have — I’ll wait. If it is white or shiny foil, I’ll show you how to replace it with semi-rigid duct to keep you and your home safe from a dryer fire. This is an easy tutorial, you can definitely do this (if your exterior dryer vent is on the 2nd floor, you can keep the same vent and just replace the hose.)
Materials:
(I’ve included affiliate links for your convenience. I earn a small percentage from a purchase using these links. There is no additional cost to you. You can read more about affiliate links here.)
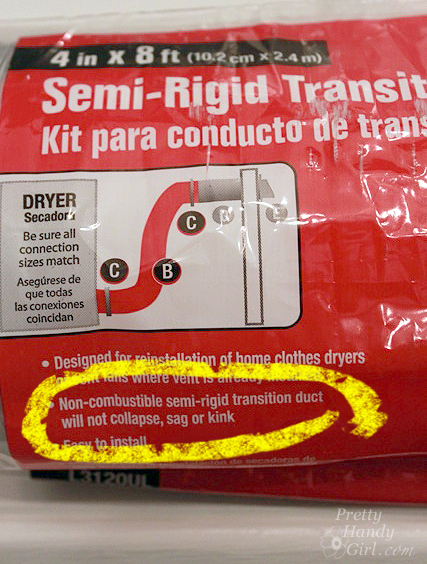
- Semi-Rigid Transition Dryer Duct Kit
- 2 Adjustable Duct Elbows
- Tin Snips
- Drill or flat head screwdriver
- 4 Hose clamps (2 included with the kit above)
- Pliers
- Gloves
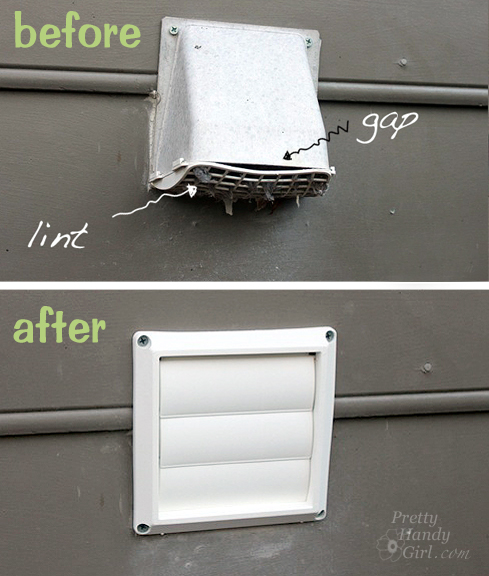
How to Replace the Dryer Vent Cover:
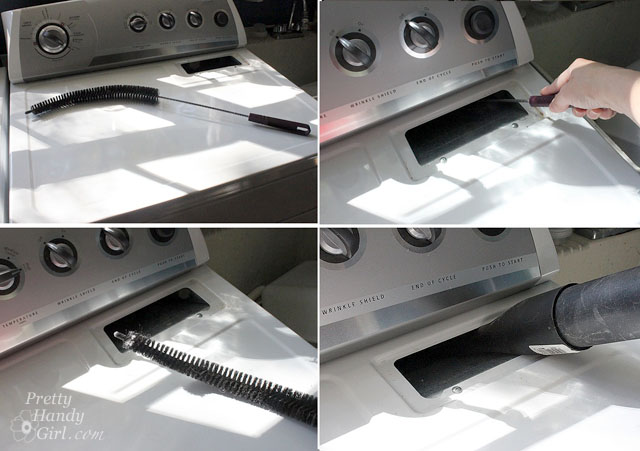
First, take a look at your dryer vent outside your house. Is it loaded with lint? If so, follow my tutorial for cleaning your own dryer vent.
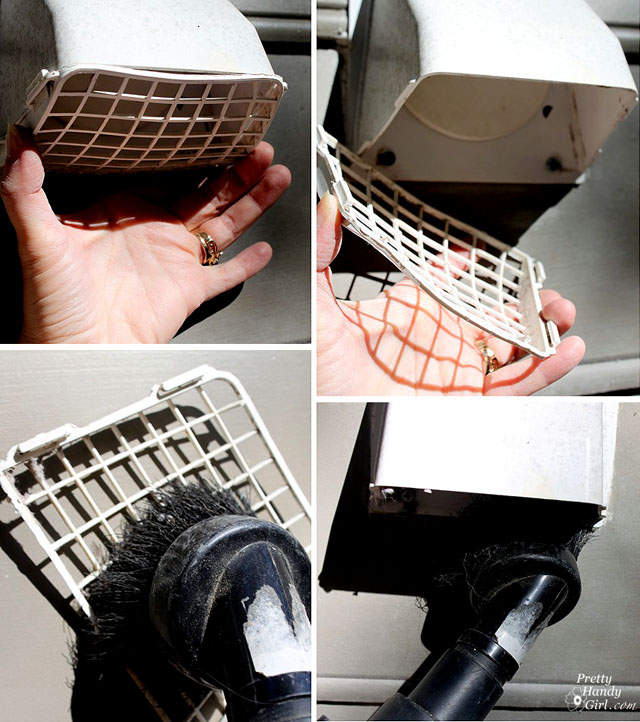
Does the vent stick open or have gaps in it?
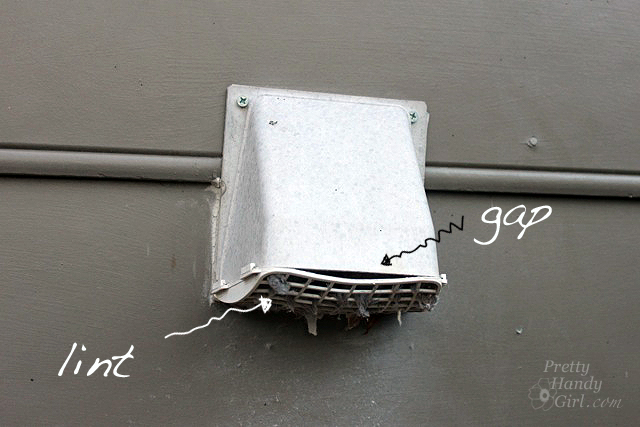
Were you nodding your head, yes? Well, if you like to keep your home rodent and bug-free, I highly recommend replacing the exterior vent at this time.
Detach the dryer duct (hose) from the wall inside your home first. Use the screwdriver to loosen the hose clamp.
Or if you have the tension style clamp, pinch the clamp wings together to release the hose.
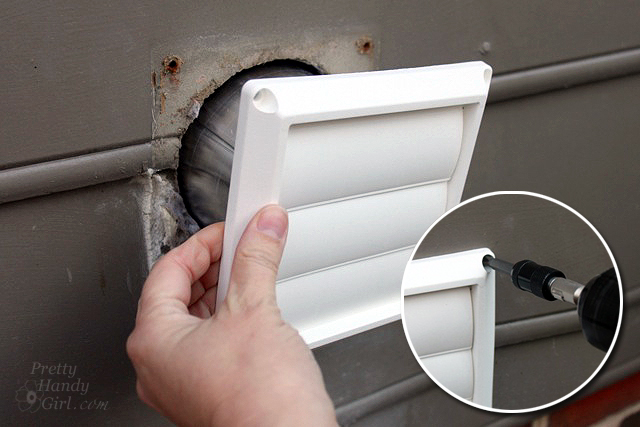
Head back outside. Unscrew the mounting screws from around the dryer vent and lift the dryer vent off.

Slide the new vent into the hole and attach it to the house with the screws provided.
For additional draft and bug protection, caulk around the edge of the vent cover where it meets the house.
When the dryer is on and air is forced through the duct, the louvers will open.

When the dryer is off the louvers will close and prevent unwanted house guests (spider, mice, etc.) from taking up residence into your dryer.
Ahhhh, much better, right?!
Periodically check the vent to make sure the louvers close and there is no lint build-up.
How to Replace the Dryer Duct Hose:
Pull your dryer out from the wall. Now is a good time to vacuum behind it to clean up any lint that has accumulated back there.
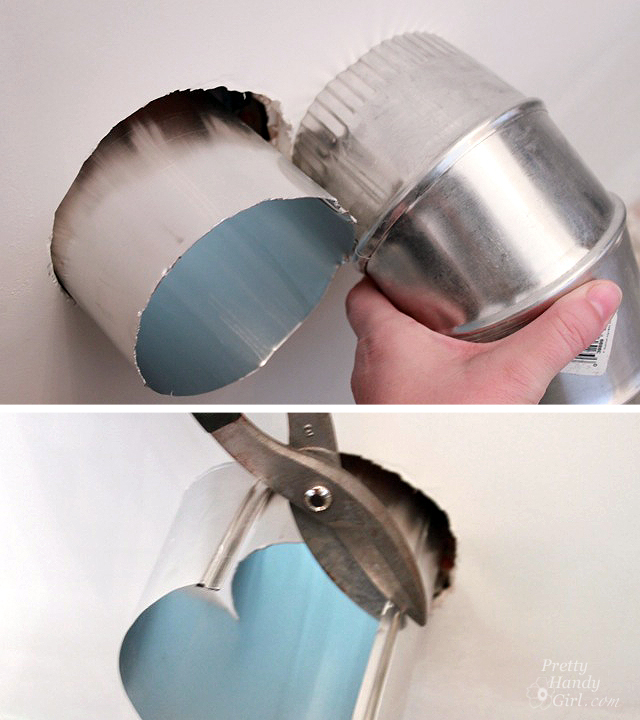
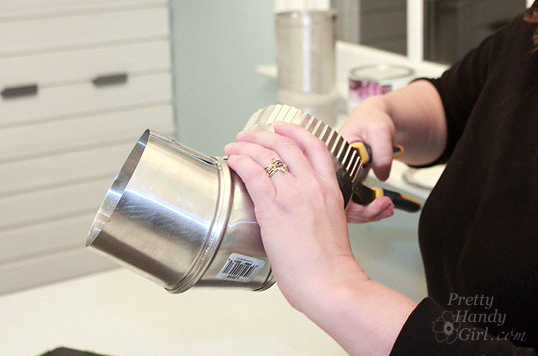
Hold the adjustable elbow next to the vent duct where it enters your laundry room. If it is too long, trim it with the tin snips to the depth of the elbow.
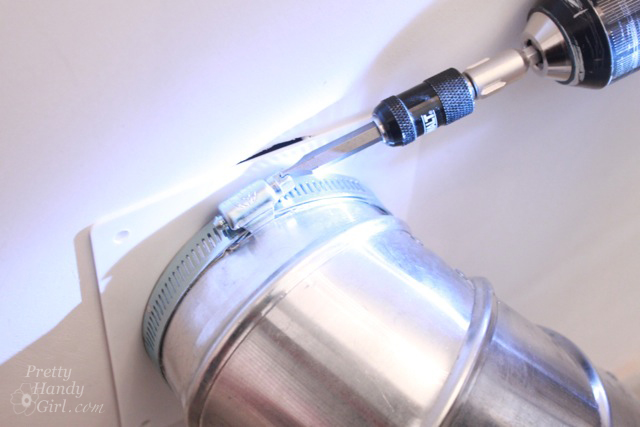
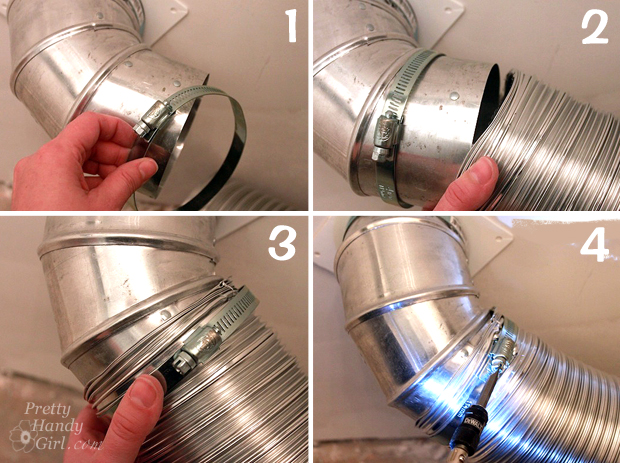
1) Feed the collar over the vent duct to cover the hole in the wall (and seal out any drafts.) Attach the collar with screws. 2) Feed one hose clamp over the vent duct.
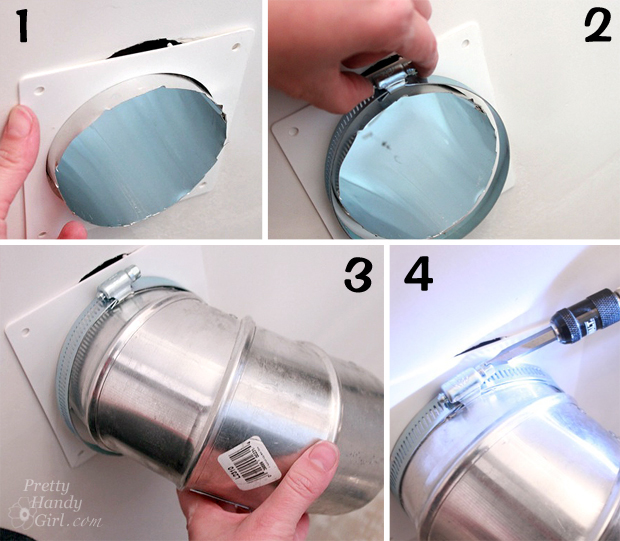
3) Slide one elbow over the vent duct. 4) Tighten the hose clamp with the screwdriver until the elbow is secured to the duct. Tug lightly to make sure it won’t inadvertently slip off.
If you are having trouble slipping the elbow into the duct, you can use pliers to cut the tabs on the crimped end to allow you to collapse the collar a little more.
Remove the semi-rigid duct from the packaging. Extend the hose only long enough to reach your dryer. If your distance is short (and the duct too long), you might need to trim excess duct with the tin snips.
How to Connect the New Dryer Duct:
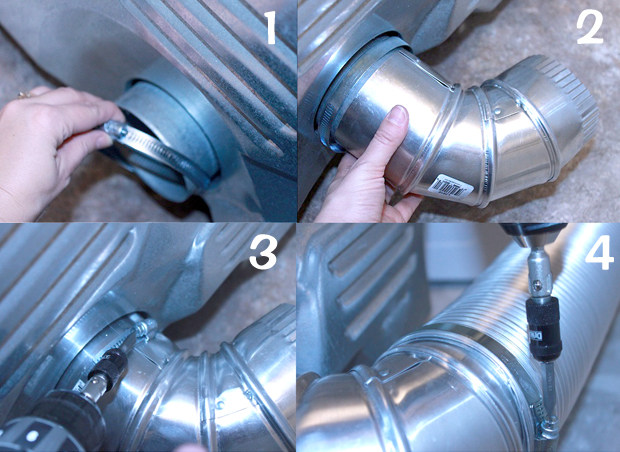
1) Slide the hose clamp over the end of the elbow. 2) Slip the semi-rigid duct over the elbow.
3) Slide the hose clamp over the semi-rigid duct and elbow. 4) Tighten the hose clamp until the duct is secured to the elbow. Gently tug the semi-rigid duct to make sure your connection is tight.
Shimmy behind your dryer (this reminds me of the time I was pregnant and had hired a handyman to re-route our dryer hose to a closer location. Handsome Guy and the Handyman were both struggling with the short duct and couldn’t attach it. I really wanted to push them both aside and do it myself. Unfortunately, at that point in my pregnancy, my belly’s depth was equal to my width and there was no shimmying behind any dryer for me.)
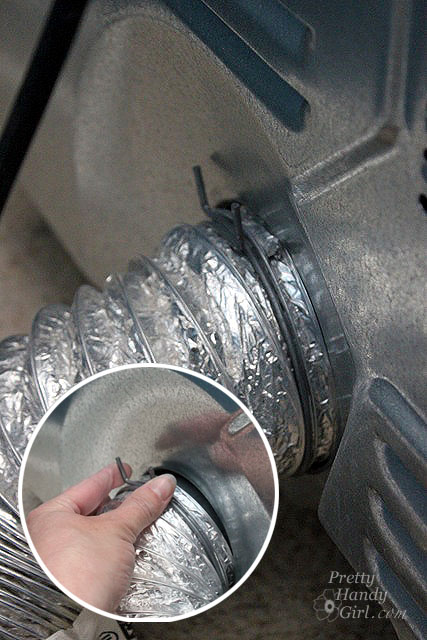
1.) Slide the hose clamp over the dryer exhaust. 2) Attach the elbow to the dryer.
3) Tighten the hose clamp onto the dryer. 4) You’ve got this right? Tighten the hose clamp onto the semi-rigid duct and elbow.
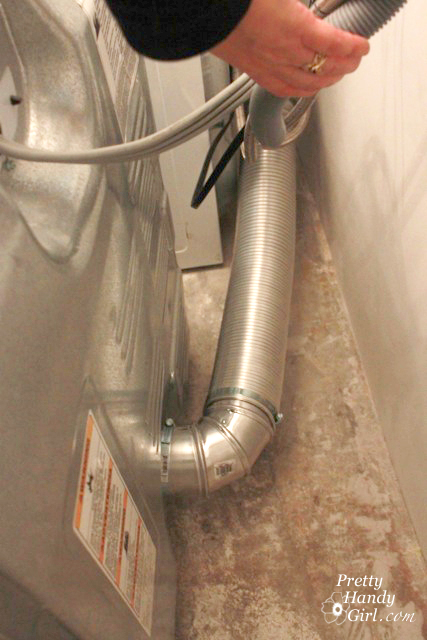
BAM! You’re done! When you push your dryer back, make sure you aren’t crushing the ductwork. Are you happy you learned how to install a semi-rigid dryer duct to prevent a fire hazard? Don’t forget to clean out your dryer and the ductwork at least twice a year.
Take care and stay safe! I care about you all a lot.

You might also like:
How to Clean Out Your Dryer Ducts to Prevent Fires
Learn how to keep your HE Washer Clean like the day it was delivered!

DIY Laundry Detergent & Miracle Stain Remover
Regarding photo #2 where you shimmy the semi-rigid hose over the elbow duct. HOW? They are EXACTLY the same size, and I can’t fit the hose outside or inside the duct. I’m at risk of distorting the metal so much it’ll be useless, and I don’t have a crimper.
You can cut tabs at the opening and bend them in.
Brittany- you rock- amazon doesn’t stock that kit anymore- also, how to test if the final ductwork is leaking air ?
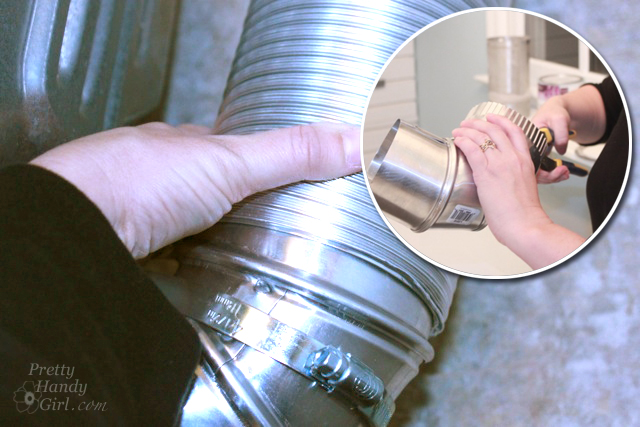
Thanks for letting me know about the Amazon link. I updated to a similar item. Regarding leaking. You can do one of two things. The first is to wet your hand and slowly run it along the ductwork. You should be able to feel any air on your wet skin. The other option is to hold a fluffy feather and run it along the duct looking for the feather to tremble. (I think you could use a lit match too, but this is a bit more dangerous, especially around a lot of lint build up.
I was wondering what you neant by “shimmying”?
Wow…never knew this! Thanks so much for this important information. I am in the process of buying a house and would never have known this had I not stumbled upon this video!
Thanks for the help! I live in Arizona so this is definitely a a necessity, it’s so dry and hot here
What secures the sleeve through the wall? i see it does not attach to the louvered vent and also with a pipe clamp to the first 90. but prvents the 90 and hose from slipping out?
Selling my home and the buyer’s inspector suggested I do this. I thought I already had the fireproof kind, thanks for helping me understand.
I know you posted this fantastic tutorial several years ago, but I’m hoping you can tell me where you got the white plastic collar that you put over the vent duct to cover the hole in the wall (on the inside wall). I’ve searched online for it with no luck. Thanks!
Deb, it came with this kit: http://amzn.to/1RwYFYK (affiliate link)
I want a FIREPROOF sleeve that will slide over the 4″ pipe that goes thru the wall. There are several wires in the wall that are above the vent that could catch fire. Do you
have any recommendations? Thanks.
I saw a tutorial online where a guy enlarged the hole to 5″ and slid a 5″ aluminum vent pipe into the space (very slightly angled downward so condensation will run outside). He caulked the space between that pipe and the wall. Then he slid a 4″ dryer vent pipe through the 5″ pipe, inserted pieces of flame-retardant foam or insulation between both pipes (to hold the 4″ pipe in the center of the 5″ pipe), and used fire-retardant expanding foam (small expansion so the pipes aren’t bent/distorted) between both pipes.
Thanks so much for posting this– I replaced my foil dryer vult vent with a semi-rigid one today. I did have to use Nashua tape to seal the new duct to the elbows, but other than that it worked well.
Great post! Please excuse my ignorance, but why are the “elbows” necessary? Is there a reason you can’t connect the semi-rigid hose without the elbows?
Megan, it’s hard to turn the semi-rigid duct to a full 90 degree turn within a small space. If you have room, you may not need it.
In 2011 a fireproof flexable foil type dryer duct was put on the market.
Good to know, I haven’t found it yet but will have to be on the lookout.
Hi, thanks for posing this. We are remodeling the laundry room and I’m definitely considering doing this. I just have a question. Where did you get the collar in step 1 of replacing the vent? Did it come with the vent? I’m having trouble finding something like this. Thanks!
I’m assuming you are talking about the white square collar that fits over the vent coming into the house. If os, yes, it came with the exterior vent.
Wanted to share another tip for keeping your dryer hose free from built up lint. Twice a year I disconnect the dryer from the hose and use my leaf blower to clean out all the internal duct work in my wall. We have a second floor laundry room, therefore the duct work is in the wall and comes out the roof. We put the blower (detach the extention) right on the metal opening and let it blow until nothing comes out the vent. I usually get on the roof to make sure the lint is coming out ( not recommended for ppl afraid of heights…. I am safe about this). Or watch the vent from the ground and if you see its snowing lint all over you know it’s working. I researched this online ( utube). Just wanted to share my preventive maintenance.
Thanks for this tutorial..I am planning to make a trip today to pick up the things I need to replace ours. Do the semi-rigid ducts come in one size, what about the duct elbows? Just want to make sure before I go so I don’t have to make several trips…thank you.
It’s a semi-rigid metal that is definitely harder to bend. It’s not super flexible like I’ve seen online. That’s what is crushed against the wall. Not sure if this link will work but here it is just to confirm: http://tinyurl.com/oks43qy
If we’re talking about the kinds and bends rule for lint collection hazard, then I most certainly have that problem. The semi-rigid hose we have looks completely mangled. There are no straight parts to it. The dryer connection is at the very bottom of the dryer, and the wall connection is about a foot and a half above from the dryer connection. It’s not that much distance to cover, but we do experience a problem fitting that dryer into the closet. It is a flat back dryer too, which meets our closet dimensions. With the mangled hose, the door barely closes (but it does close).
That 90 degree periscope vent looks like a really great idea. The only concern with that is it says it starts at 24″ and extends longer. Our wall-to-dryer distance is about 18″ (I can confirm that tonight after work). The dryer installation guy did recommend a “flex vent” which at the time I didn’t know what he meant, because we have the semi-rigid hose. Then I realized he’s probably talking about the foil/very flexible hose, which probably wouldn’t have the same issues we have now. What do you think? Should we toss the crushed hose and purchase a more flexible hose? We are renting this apartment so any changes to the apartment may not be kosher, like the Dryerbox idea: http://www.dryerbox.com/ which seems fantastic, by the way.
Thanks for responding by the way! I was taking a shot in the dark since this thread was a good year ago. Definitely appreciate your help. Thanks again.
Scotty, can you talk to the homeowner/landlord? That dryer box does seem like a good idea. If it was my house, I’d definitely want the safest solution and be willing to have it installed. I believe the flex vent is the foil kind and that is flammable. Steer clear of that. The flex vent is the same diameter as the semi-rigid, so the same crushing problem would happen and make it even more likely to cause a fire.
Hi there! Great advice on this page about dryer hose safety. I am curious about something, my spouse and I just moved into a new apartment last weekend and had Sears come in and install a washer and dryer into our cramped small closet. They are two side-by-side Whirlpools and they look great. The problem was that the aluminum hose that they installed for the dryer seemed like it was squished up against the wall when they pushed the dryer back. The dryer wouldn’t have fit into the closet if they didn’t crush the hose like they did. It looks pretty scary for someone with no dryer experience, but there are no holes created in the hose, it only looks crushed and I’m worried that it may be dangerous down the road. What do you think? How important is it that the hose was crushed? Hope you can help.
Thanks!
Scotty, I have two concerns. The first and most concerning is that you mention it is an aluminum hose. Is it the shiny foil type hose that is super flexible? Or is it semi-rigid metal that is harder to bend?
My second concern is that any kink or bend in the hose is another location that lint can build up and get caught. This is a fire hazard as well. I would definitely have Sears come back out and fix it. They might need to make some type of modification to the wall or install a product like this: http://www.improvementscatalog.com/imp/10013?cm_mmc=GooglePLA-_-Maintenance%2CDryerVentsandStorage-_-2014-_-110098&mr:trackingCode=60E3FEAF-AA35-DF11-9DA0-002219319097&mr:referralID=NA&mr:filter=98946355372&intlShippingCtx=US%7CUSD&code-macs=MP4XW091&mr:ad=43916408932&mr:device=c&mr:match=&SourceCode=MP4XW091&mr:adType=pla&mr:keyword=&redirect=y
Cleaned my dryer vent yesterday, Improved drying time to 40 minutes from 3 hours. Do this annually. I shortened the silver (plastic) vet hose and just tested it, It burns, Another job this week.
My vent is through the roof with about 20′ of rigid metal pipe. There is a screen with a flap door on the vent and the screen gets clogged. vent flap works fine. Can I cut out the screen to prevent clogging?n Vent flap should keep birds etc. out. Also, there is a Deflecto solid metal adjustable tube that looks interesting. it allows getting dryer closed to the wall than elbows. Has anyone used it. It extend to 31″ and is oval. Thanks for the hints.
I bought one of those adjustable tubes but was disappointed to find out that it has lots of seams that aren’t riveted well, so there are many gaps for air leaks and for lint to get stuck in. I ended up taking it to the dump/recycling center.
Great post! I searched for this on Google since we had the old plastic/foil kind and your awesome post came up. Great explanation of how to change it too. I went to Home Depot with your post bookmarked on my phone as I went shopping for the new vent hose. 🙂 Thanks!!
I knew our dryer hose had been dented for a while, but never realized how easy it was to replace! Thank you for such helpful tutorials! My 5-year-old (future mechanical engineer) son and I worked together to replace our hose and we feel much safer! Thanks!
After changing a broken belt on my dryer, I decided to change the vent hose from the foil type due it being worn out and also because I’ve read that they are a fire hazard. My issue is that my laundry room is in the basement and the vent hose needs to extend obviously from the dryer up to the ceiling where the vent pipe is, which means I need to extend the semi-rigid hose to nearly the full 8′ length. After trying to extend the hose to its full length, it actually ripped in the middle, so I can no longer use it (guess I don’t know my own strength!). What is the best way to extend it fully without destroying it? I bought another one and don’t want to ruin it as well. If need be, is there a way to splice the two together, securing with metal tape in order to make it long enough? Thanks for your advice.
Tina, absolutely. You’ll need a coupler (a small piece of rigid ductwork that you can then put a hose clamp on both pieces of the semi-rigid dryer ductwork that secure it over the coupler. The coupler is just like the metal ductwork that comes into your wall. Does that make sense? Here is the link to the part: http://www.lowes.com/pd_39734-85334-VTL0012_4294857922__?productId=3203203&Ns=p_product_price%7C0&pl=1¤tURL=%3FNs%3Dp_product_price%7C0&facetInfo=
That does make sense, and I’ll make another trip to Lowe’s to look for the coupler! Thanks so much!
I know this is a few years later, but I would replace the flexible duct with a length of rigid ductwork. You’ll have less friction because the airflow inside won’t be as turbulent (the motor will be able to move the hot air more easily), but more importantly you won’t have all of those ridges inside the ductwork where lint can get stuck and start to build up. That’s a pretty significant fire hazard.
Great advice. Only thing I added was a large enough piece of wood behind the dryer legs to prevent it from being pushed back and possibly damaging the metal vent. Nailing to the floor is not necessary. Thank you.
Edith, that’s a great idea!
Thanks so much for this tutorial! Used it this weekend and the project was actually quite simple.
Even with the new exterior louvered vent, you may want to put a plastic cage over it or a screen inside…I had starlings colonize my stove vent with the louvers in place! You can bet it’s blocked now. I haven’t had this happen to my dryer vent, but I suspect that’s because it’s close enough to the ground that neighbourhood-roaming cats are a risk.
Jill, oh no! I was thinking about the other day when I was installing the range hood vent which has just one large flapper. I might put a cage over that! Thanks for the hint.
You’re very welcome. Given the mess those things made (at least 5 different plugs, one after the other) and the injury sustained by the pest control guy when cleaning it up (he fell off his ladder and tore a tendon in his ankle, poor guy) I don’t want it to happen to anybody else!
Also, thanks for the heads up on the dryer duct issue; I suspect mine needs replacing and I’m definitely going to refer to your tutorial to do it!
I bought a new dryer a few years ago. Last year or so it wasn’t drying well. I had the repairman but he said that he couldn’t fix anything. I needed to get someone to check the exhaust vent and he didn’t work on those. Well, eventually I found someone who would take it on. My vent went to the ceiling, then traveled over the mechanical room for about 8 feet. The outside vent was built into the stone foundation, so you could barely get a hand in there. But, someone else could get in there. When they took down the solid metal pipe thing from the ceiling, over five feet was packed with feathers, straw, dog hair (came from the dryer) twigs, and…a few petrified teeny tiny birds eggs. Someone was sneaking in there and building nests. The dryer works fine now. I needed a new washer so I read all the reviews. I wanted a top loader but everyone was out of stock. I found the one I needed in Costco. They loaded it into my car and I found an installer. Perfect.
Oh Ann, how scary!!! You could have had a fire on your hands.
Thanks for the post i was actually fitting one of these ducts the other day and ran into a few problems, if only i knew your blog was here. Its only when i searched the internet that i came across this blog. I’m sure your tutorials will help me out in the future
It seems that every DIY project will throw at least one wrench in the way. Good for you for persisting!
Thanks Brittany for this great tutorial.
It’s scary how easy the old foil dryer hose caught on fire. The video is a must see for anyone who doesn’t believe in the flammable properties of these kind of hoses.
Your boys are fantastic helpers. I need to start bugging my daughters more 🙂
Jeff, I don’t ask them to help enough. I have to be better about that.
Having the kids help is not only helpful & having together time with them but it’s teaching them how to do these things and about maintaining a home including the safety aspects. Great job!
Where were these tips & all when my kids were growing up?
Great instructions and detailed pictures. I wonder how many people have these flexible flammable dryer hoses?
Yikes, I changed my 30 year old plastic dryer hose about 5 years ago and I installed the shiny one thinking it was metal and therefore safe. I can’t understand why they sell this if it’s not fire proof. I wonder what building codes say..
Hi Brittany!!!
Guess what I’ll be doing tomorrow?? I’ll be visiting my laundry room to make sure my dryer
isn’t a fire hazard.
Thank you so much for caring about all of us. You’re a sweet heart!!
Pam
Yup, I’m safe here. My son in law changed mine out when we bought this house last year. I didn’t realize those “metal looking” ones were that combustible. I just read an article from our local newspaper last week about how prevalent fires are regarding dryer vents. Excellent post! THANK YOU Brittany!
A few years ago one of my louvers had loosened and during spring birds were all coming around to get nesting material from all the lint. While cleaning it out I realized we had that foil stuff in our upstairs long vent.( our laundry closet is in the hallway- so it is about 9 ft. long.)
When we replaced our washer last year I knew that replacing the vent with the solid metal stuff was essential. Thankfully Lowe’s is not too far away as I had to go back and forth 37 million times. I was working on a ladder on my deck, and a hole in the floor in the back of the laundry closet. Long story short—it was a project that lasted a few days. It works so much better than before, but I would’t want to do it again.
fantastic post and tutorial Brittany, thank you for sharing this super important info. we also recently installed this dryer hose, along with those flood safe auto-shut off washing machine hoses and a pan under the washer. not a cute project but definitely important 🙂
thanks again for bringing this one up.