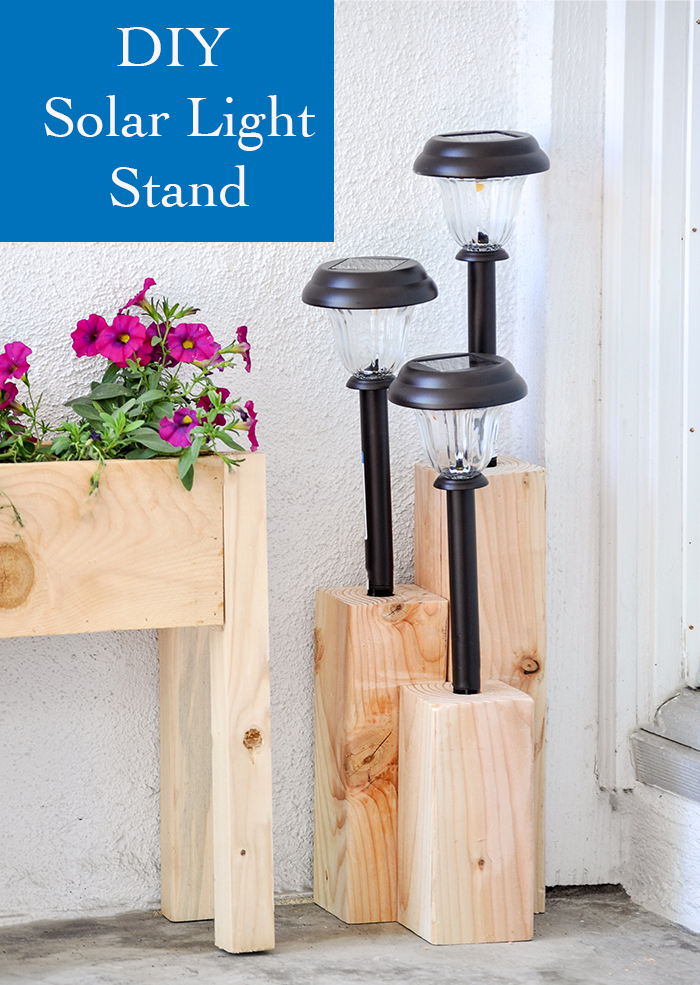
Hello, Pretty Handy Girl readers! Anika here from Anika’s DIY Life. I am back today with a super easy and quick tutorial to take simple solar lights to the next level in your outdoor decor.
As the weather is warming up, you are probably looking for fun ways to spruce up your outdoor areas. Lighting is a key element for adding magic to those warm summer nights. This easy solar light stand is the perfect addition to your front porch or backyard. Plus, it is easily customizable – you can make it as high or wide as you like.
Materials:
(I’ve included affiliate links for your convenience. I earn a small percentage from a purchase using these links. There is no additional cost to you. You can read more about affiliate links here.)
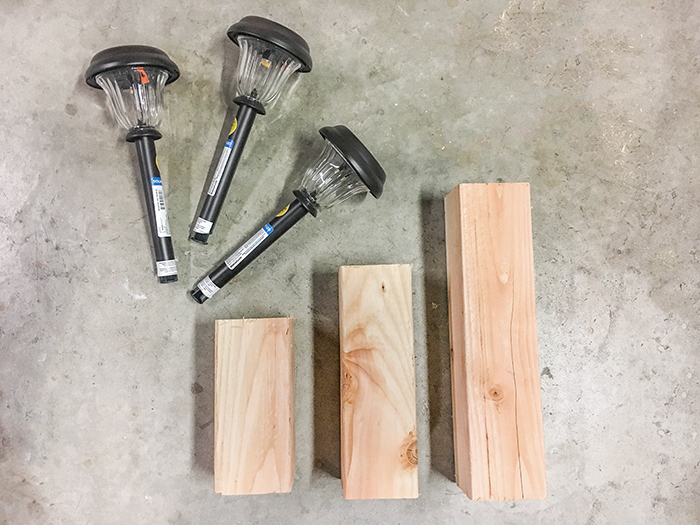
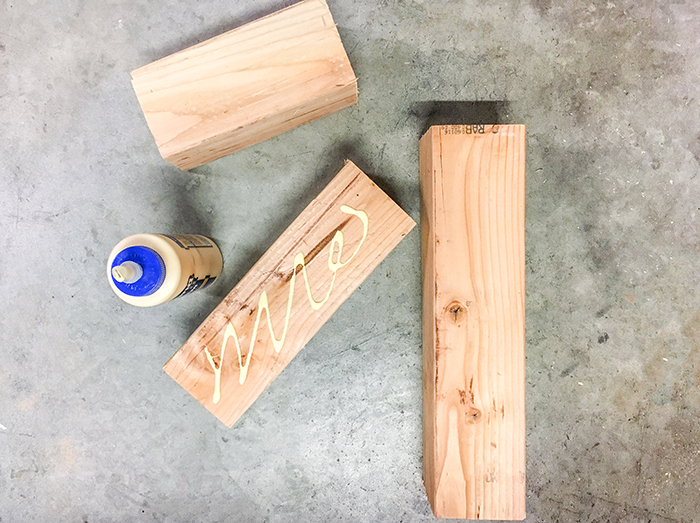
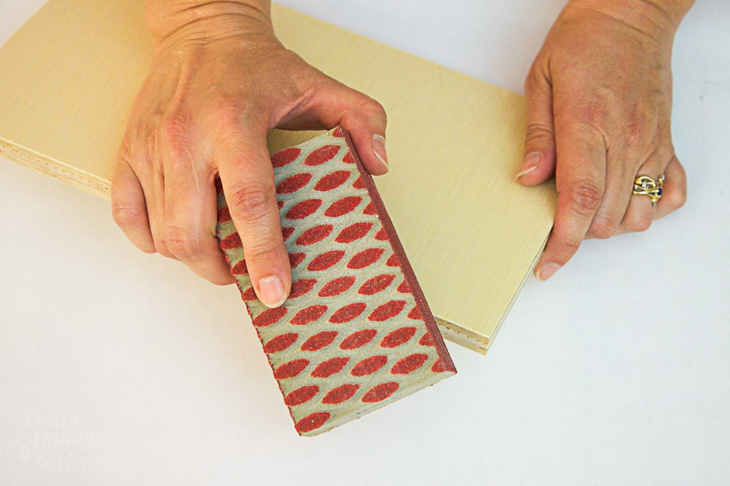
Step 1 – Cut the 4″ x 4″ lumber down to the sizes you desire and sand the edges. I used three pieces cut to 8″, 11″ and 15″.
Step 2 – Use wood glue and clamps to attach the 4″ x 4″ pieces one-by-one. Allow 12 hours of drying time between each.
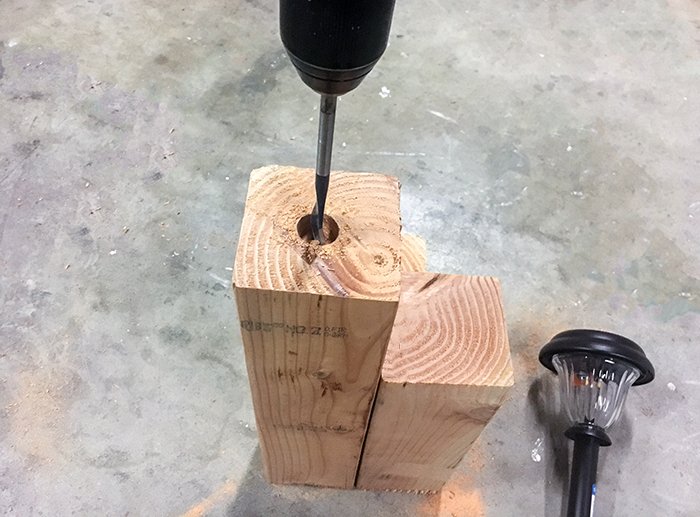
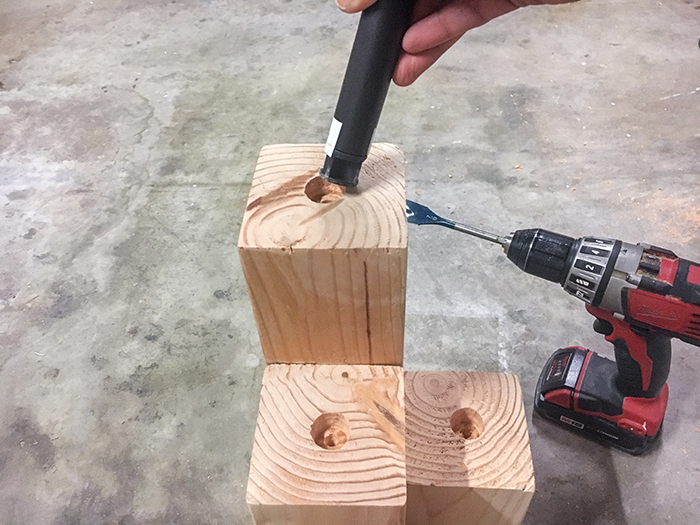
Step 3 – Drill holes into the top of each pillar. The 7/8″ spade bit worked perfectly for my solar lights. You may need larger or smaller depending on the width of your solar lights. Make sure it is a nice tight fit.
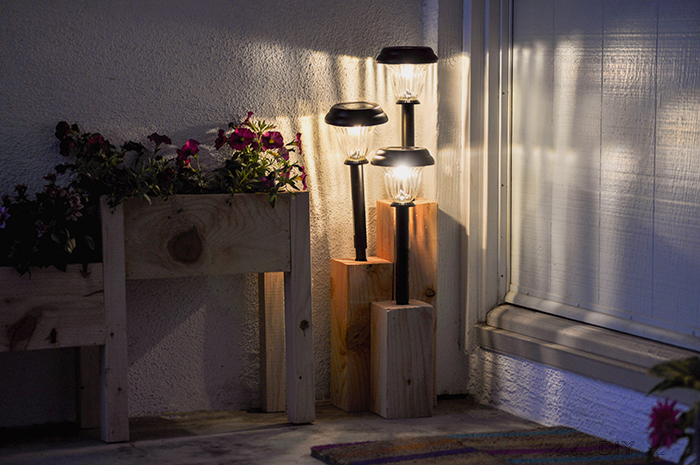
Step 4 – Fit the solar lights into each hole. You can glue them for permanency. I decided against it so it is easy to change out the lights if needed.
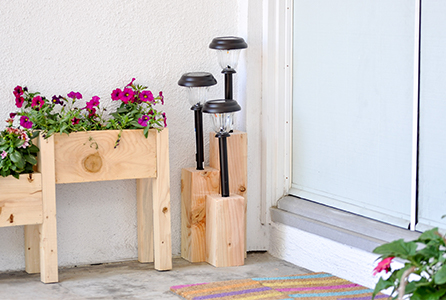
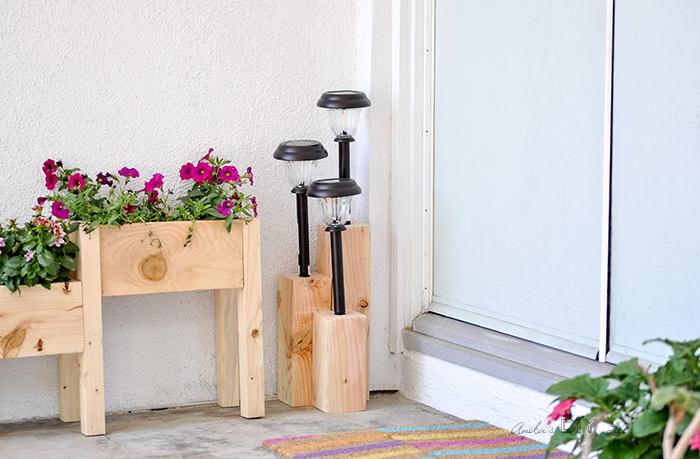
That’s it! They look perfect on my front porch next to the $10 tiered cedar planter. The front porch was very neglected until I gave it a quick makeover. Now it is fun and welcoming, especially at night.
https://prettyhandygirl.com/wp-content/uploads/2017/06/Solar-light-stand-Anikas-DIY-Life-feature.jpg300446Anika Gandhihttps://prettyhandygirl.com/wp-content/uploads/2021/07/PHG-logo-tagline-2020-1030x211-R.jpgAnika Gandhi2017-06-14 07:00:092017-06-14 00:50:37Easy Solar Light Stand
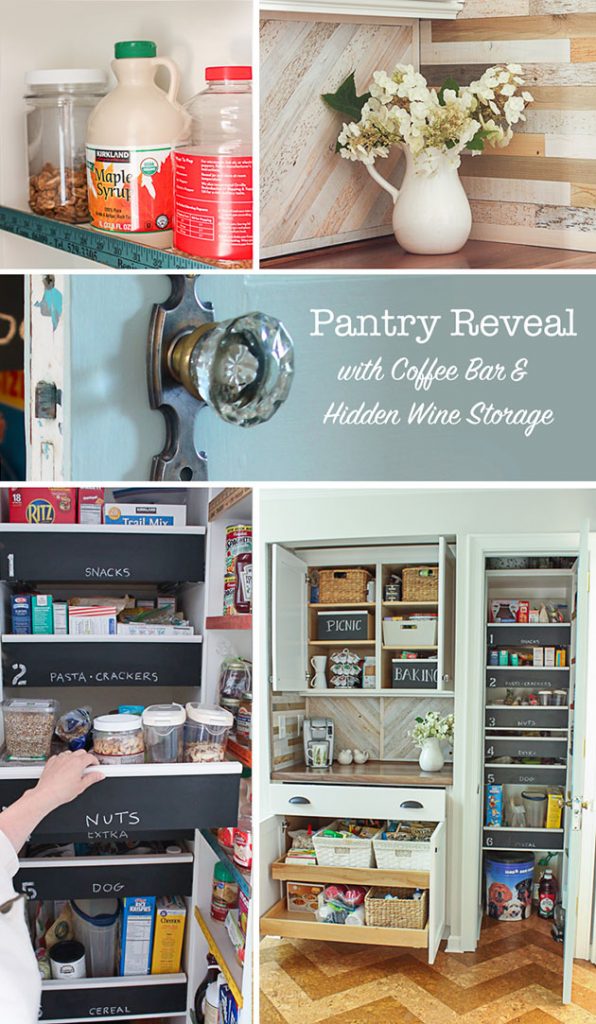
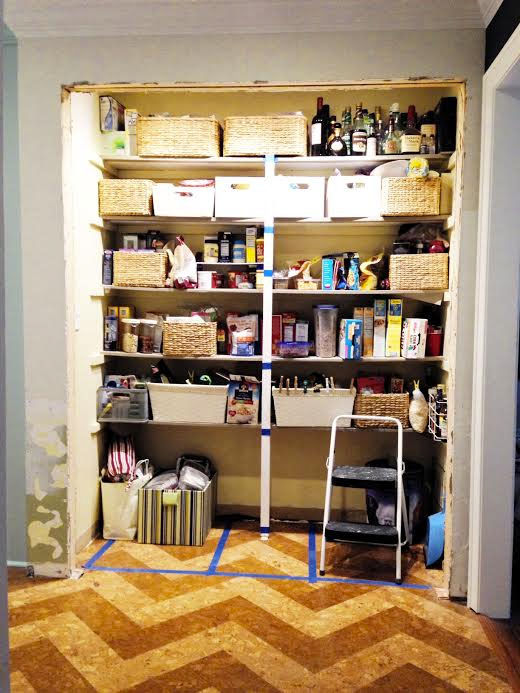
Today’s the day I’m finally sharing the Pantry Reveal, complete with a Coffee Bar and Hidden Wine Storage! Let me warn you, this isn’t your ordinary pantry. This space is multi-functional. The dreams of a better and more organized pantry started four years ago while I was in the thick of our kitchen renovation. For 48 months I’ve mulled over the plans to have food storage that works better for how my family lives. At first I used painter’s tape to try to figure out better spacing (excuse the poor photo quality. This was taken before I improved my photography skills):
The shelves were only 12″ deep in a 36″ deep closet. That’s 2/3 of the pantry not being utilized. I’m sure you or someone you known has a similar 6 foot wide pantry with bi-fold doors. Be sure to share this post so they know there is hope for a more organized pantry.
As another year past, my plans began to take shape utilizing more of the depth of the pantry:
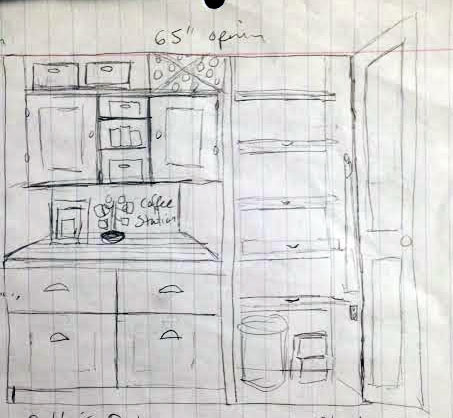
Then my plans evolved into this chicken scratch sketch:
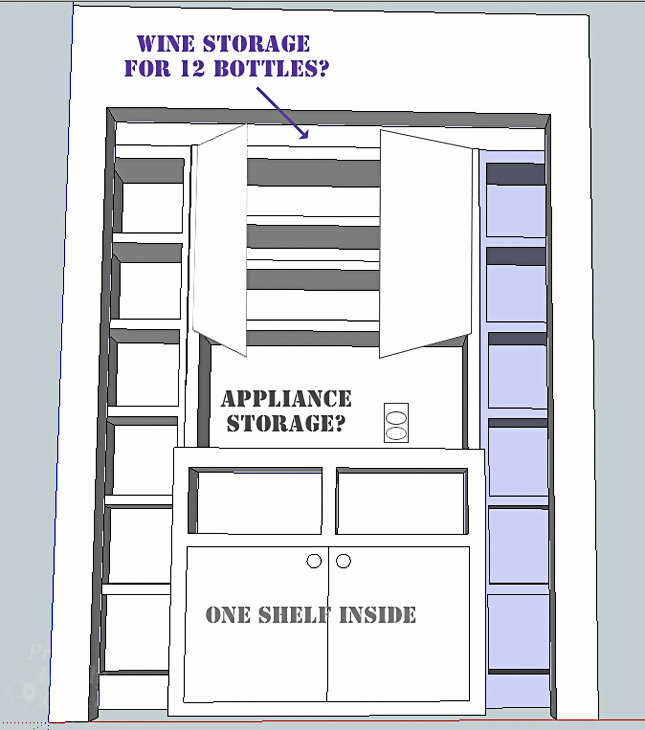
After the plans sat in my head for a while, I used Sketch Up to utilize every square inch of space in the closet side. . .
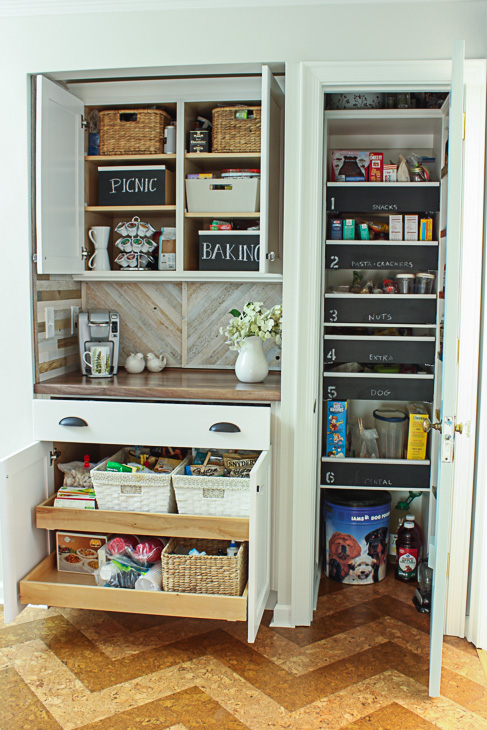
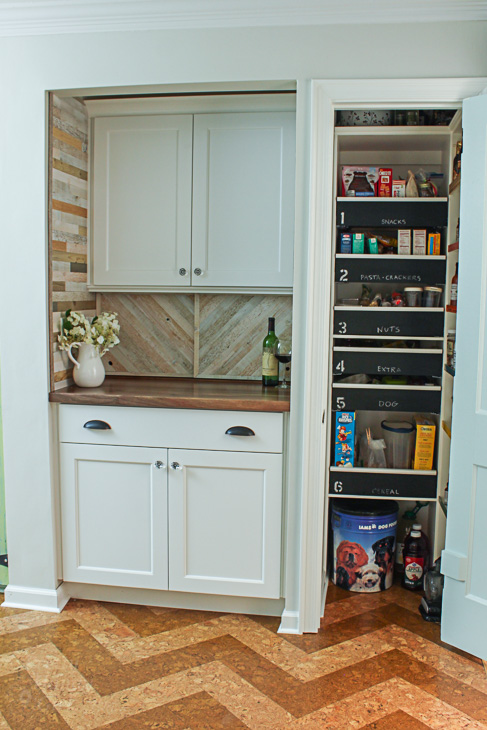
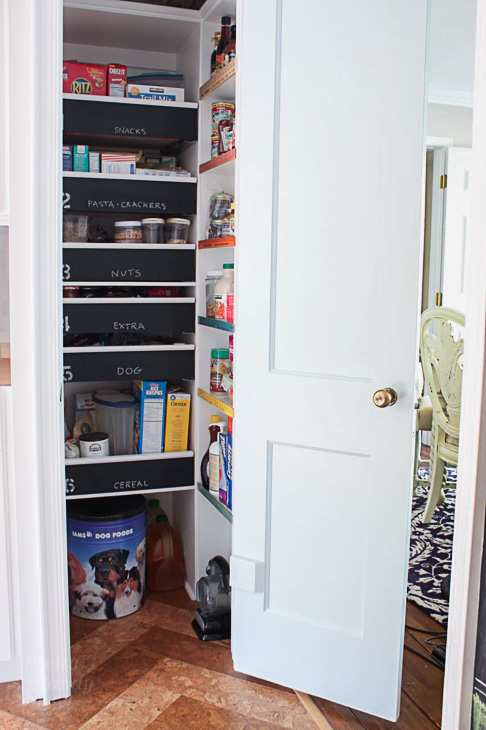
The closet side of the pantry holds roughly 2/3 of what the original 6 foot wide pantry did!
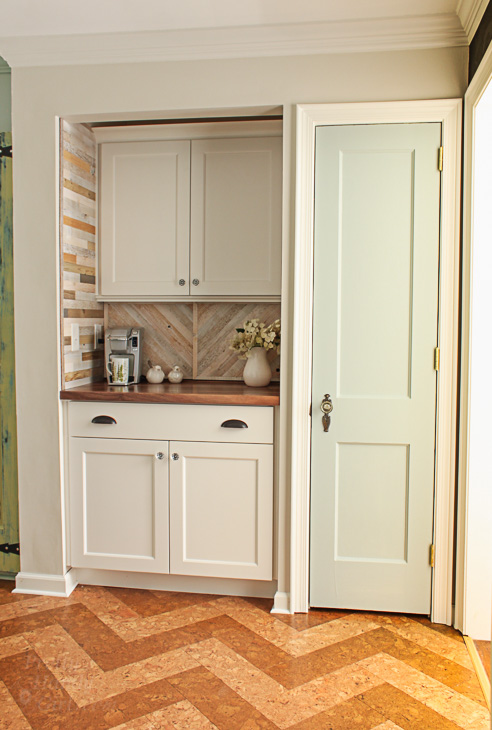
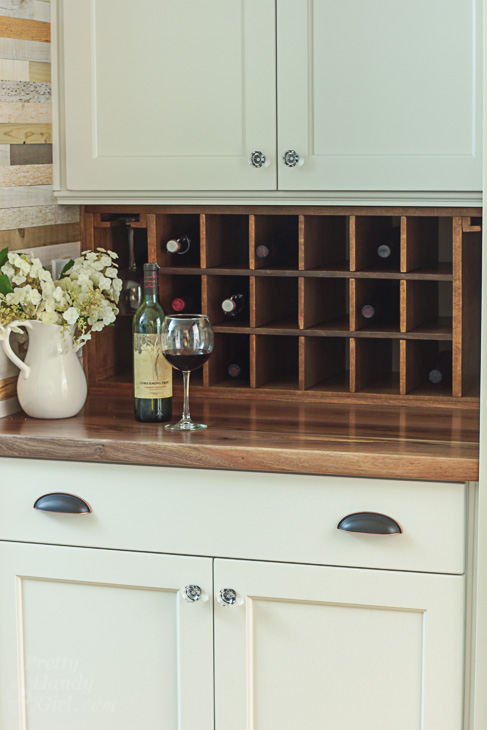
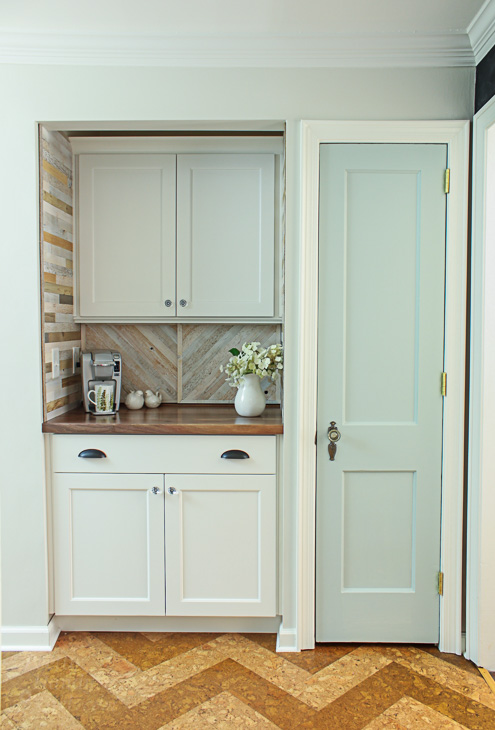
The other two thirds of the pantry area was set up with upper and lower cabinets and a walnut counter top. I ordered the cabinets from Kith Cabinets (the same manufacturer that made the rest of our kitchen cabinets) because I worried that I wouldn’t be able to match the quality if I built them myself.
The upper cabinet is deceiving because it is actually 18″ deep (as opposed to a normal 12″ deep upper). Which means we have a lot more storage within those cabinets.
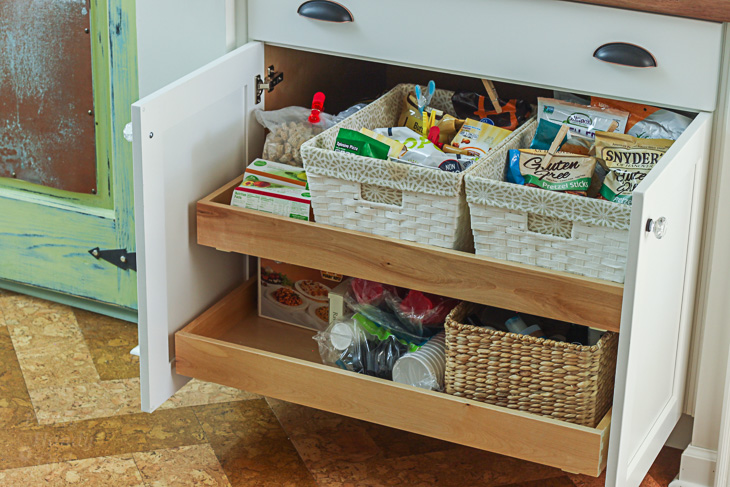
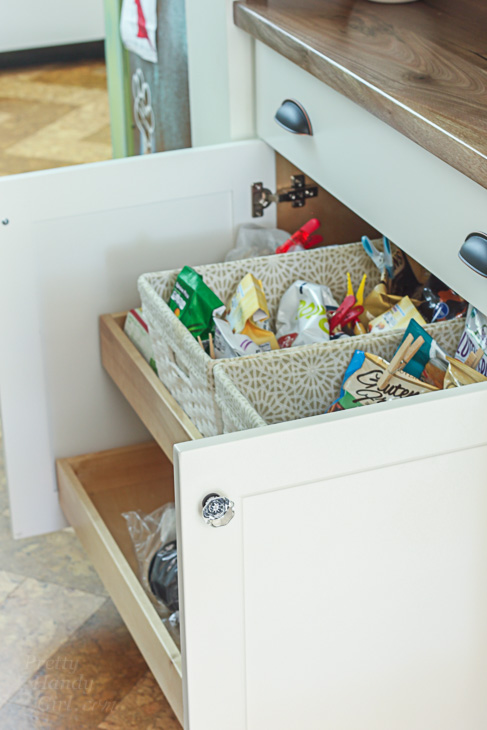
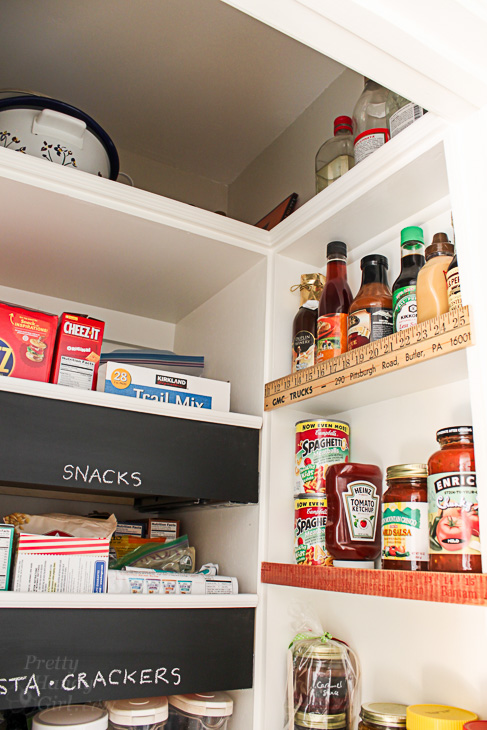
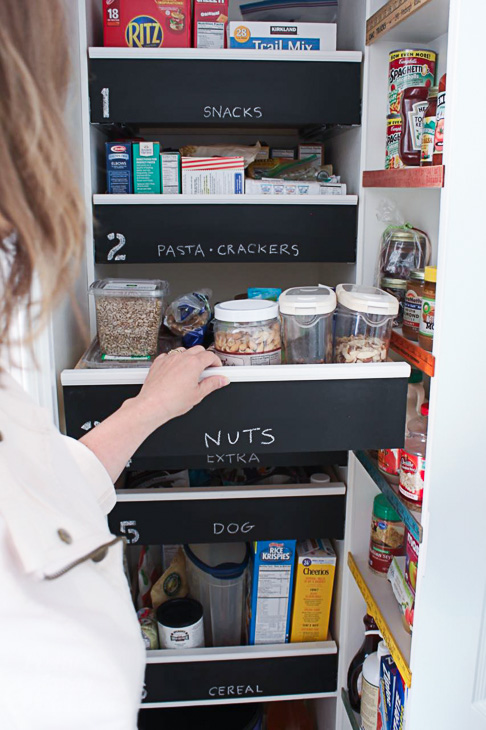
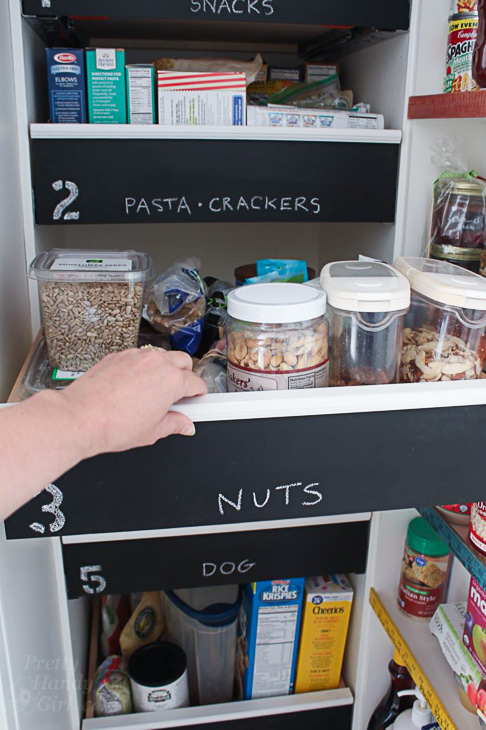
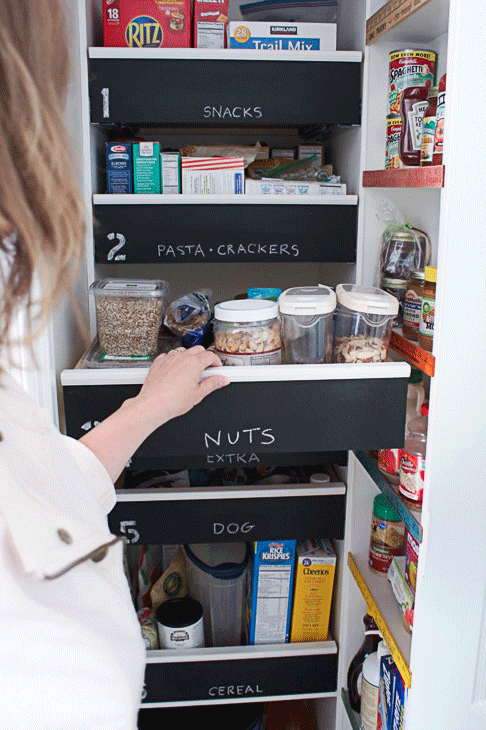
We have some amazing storage now! Large pull out shelves hold all the chips, pretzels and snacks. I debated ordering a three drawer cabinet, but ultimately knew I’d prefer the deeper storage that the trays offered.
At some point, I’ll build custom dividers for the chips and snacks. The baskets work well, but there is a 3-4″ gap behind them that I could use. (I’m all about utilizing that space wasted space!)
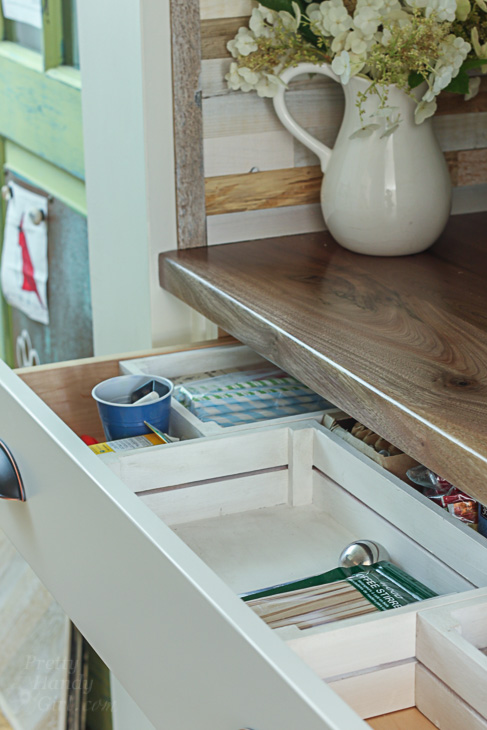
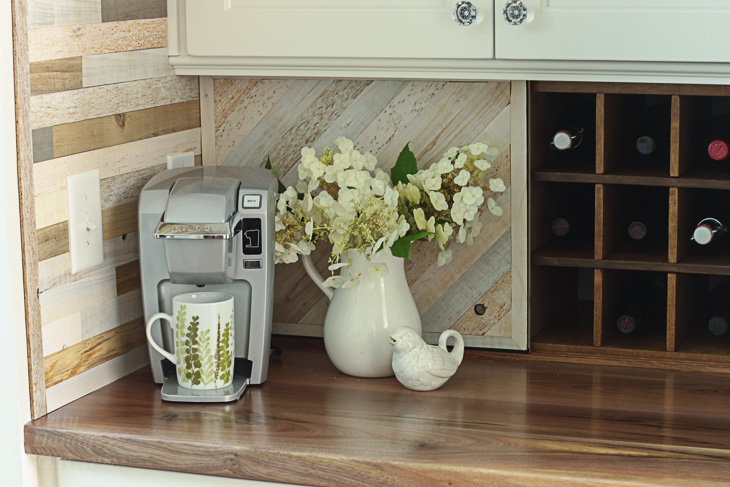
The drawer is perfect for coffee stirrers, extra k-cups, plastic utensils, straws and more.
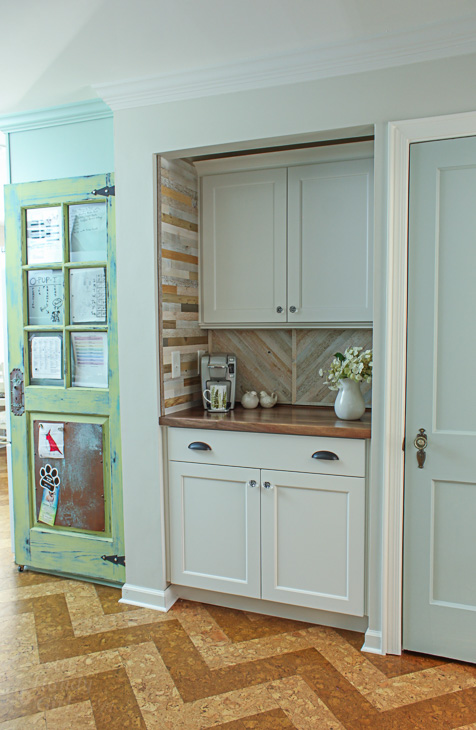
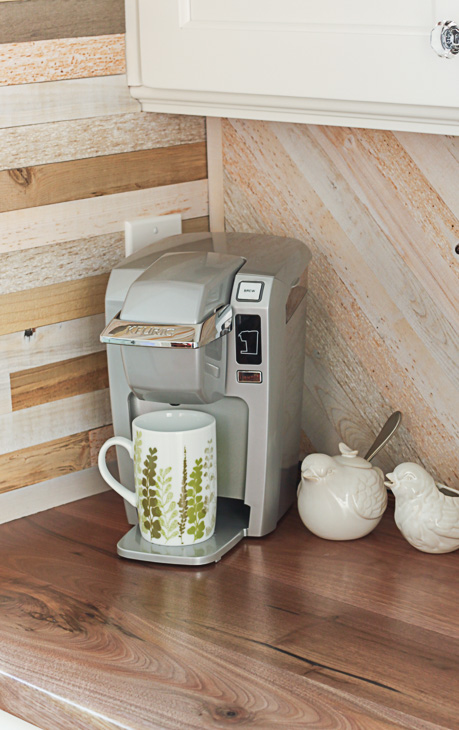
Speaking of coffee, it’s a wonderful feeling having a dedicated coffee station now.
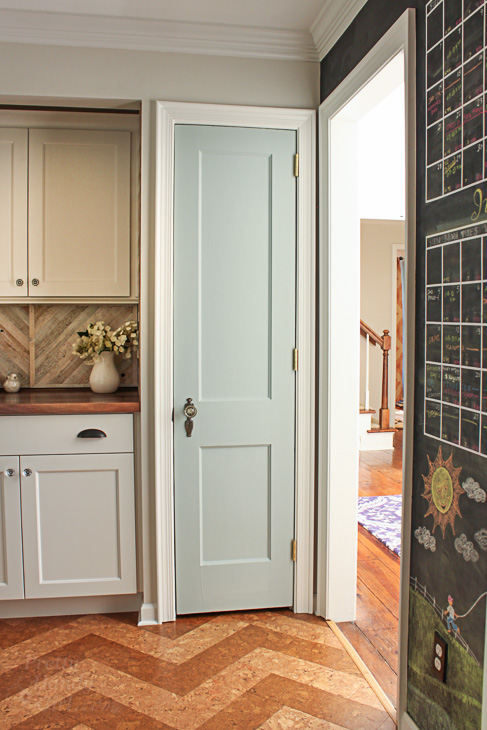
When guests come to our house, the first stop (after the mudroom) is the coffee bar! I wish I had a photo of the bi-fold pantry doors before. They were uninviting and bland. This is essentially what they looked like:
You may recall our DIY Chalkboard Calendar wall. We still use it for the kids’ and family’s activities. It helps the boys feel more connected with our schedule and lets them keep up with events and upcoming travel.
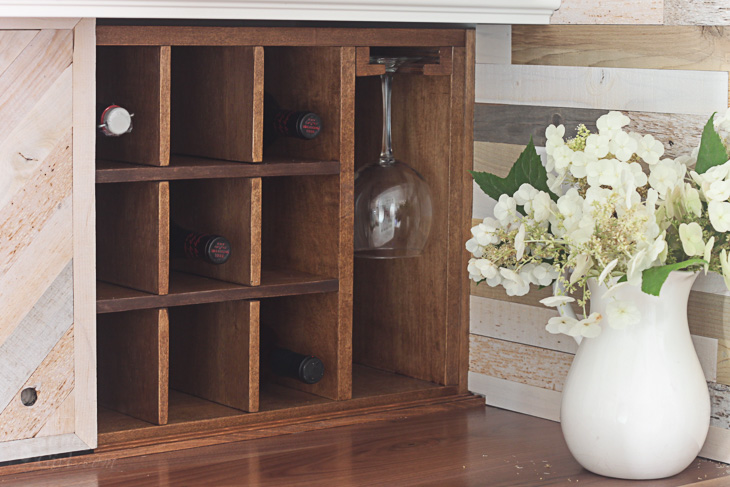
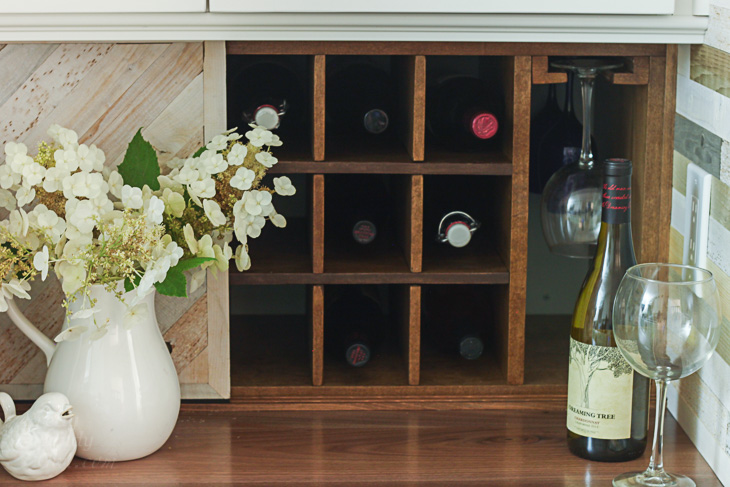
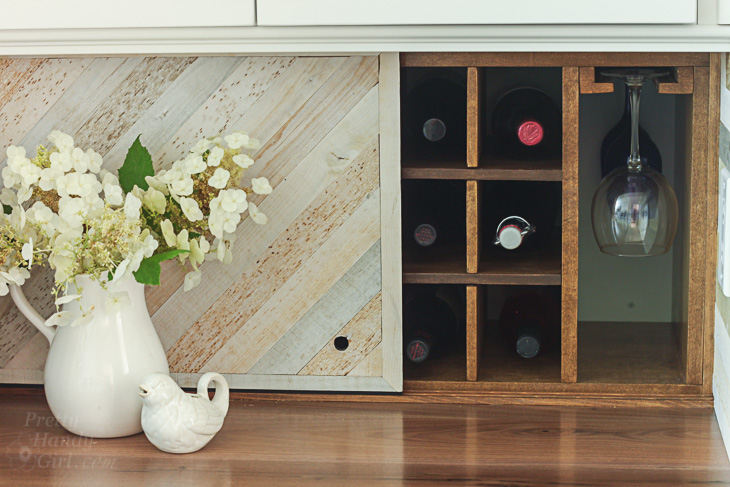
But wait, that’s not all! Are you ready to see the hidden wine storage?
Hold onto your wine glass!
How cool is that?
We can remove the doors if we want.
This makes the perfect spot for self serve wine at an open house party.
Normally we access half the wine storage at a time.
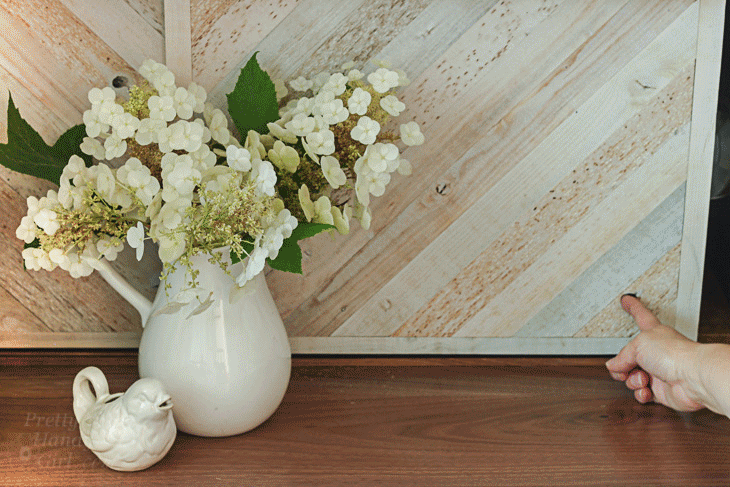
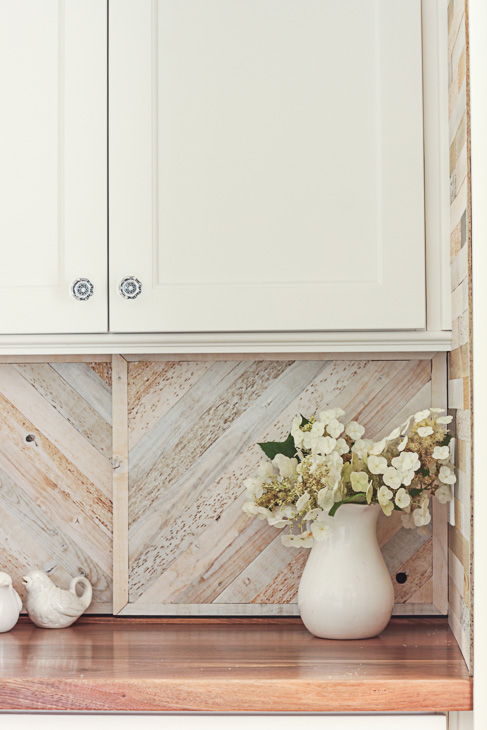
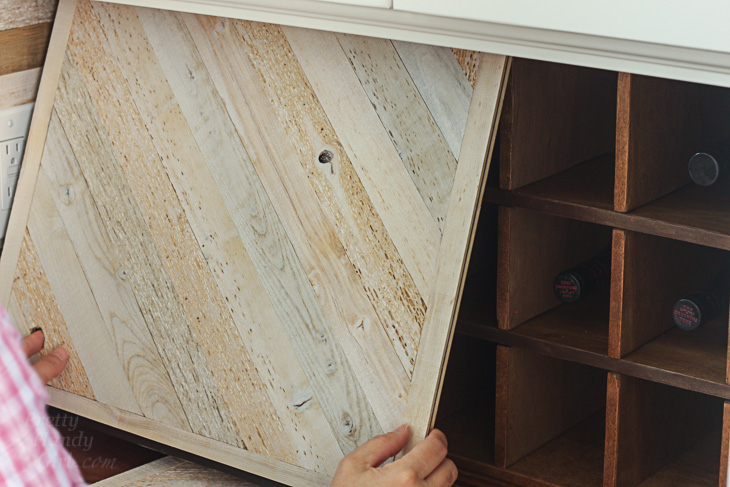
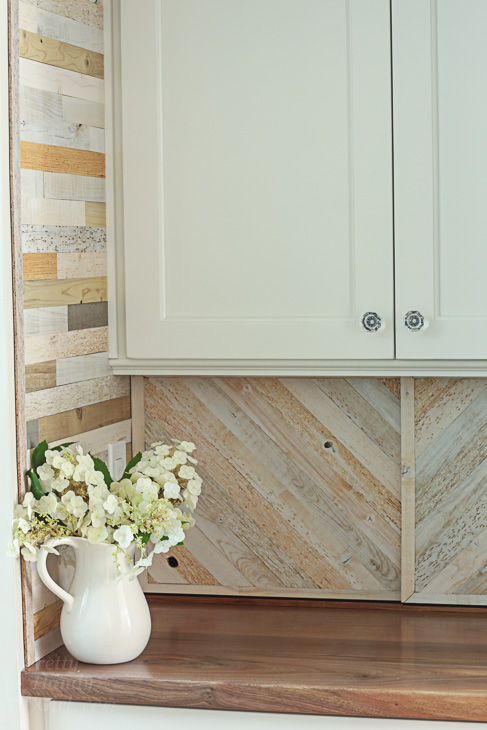
The real star of this pantry makeover is the rustic reclaimed wood plank wall. (I need to mention that I was approached by Timberchic about working with them on a sponsored post. A year passed before I contacted them back with the idea to use their wood panels in my pantry makeover.)
In the meantime, I put together this little video to show you how easy it is to install the Timberchic panels:
Now we have a beverage center for day or night!
What do you think? Do you like the new pantry, coffee bar and hidden wine storage area?
I’m not sure I can still call this a pantry. A Pantry with Coffee Bar and Hidden Wine Storage?
or does it qualify as a butler’s pantry?
I don’t know for sure, but I do know that I love all the storage. . .
. . .and the view when we come into the kitchen.
Do you have a 6 foot bi-fold pantry? Why not turn it into something you’ve always dreamed about.
Disclosure: This is a sponsored post for Timberchic. I was compensated for my time and promotion of the Timberchic products. As always, I’m very particular about the brands I represent. I only work with products I love and want to share with my closest friends.
https://prettyhandygirl.com/wp-content/uploads/2017/06/open-wine-storage-door-animation.gif487730Brittany Baileyhttps://prettyhandygirl.com/wp-content/uploads/2021/07/PHG-logo-tagline-2020-1030x211-R.jpgBrittany Bailey2017-06-05 07:00:002021-06-10 13:33:54Pantry Reveal with Coffee Bar and Hidden Wine Storage
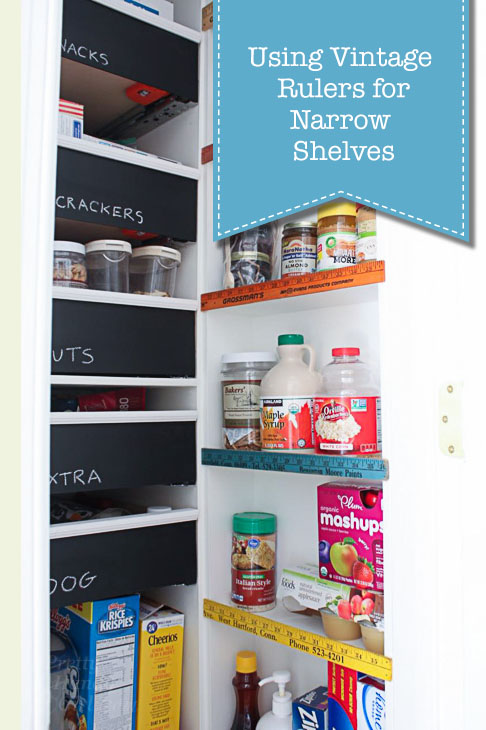
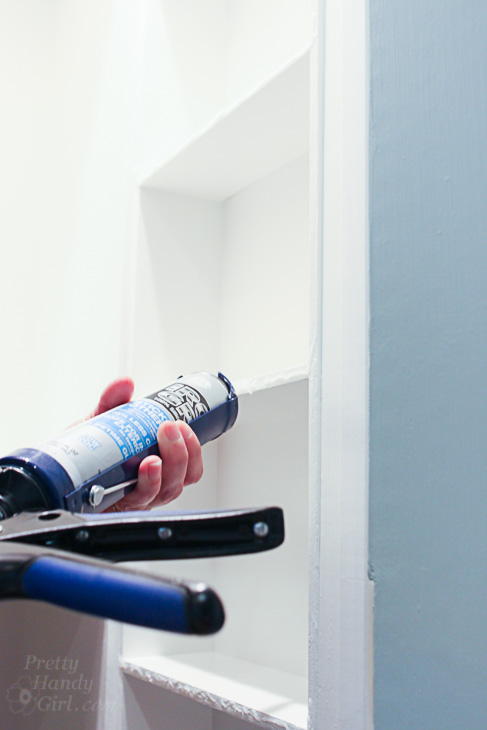
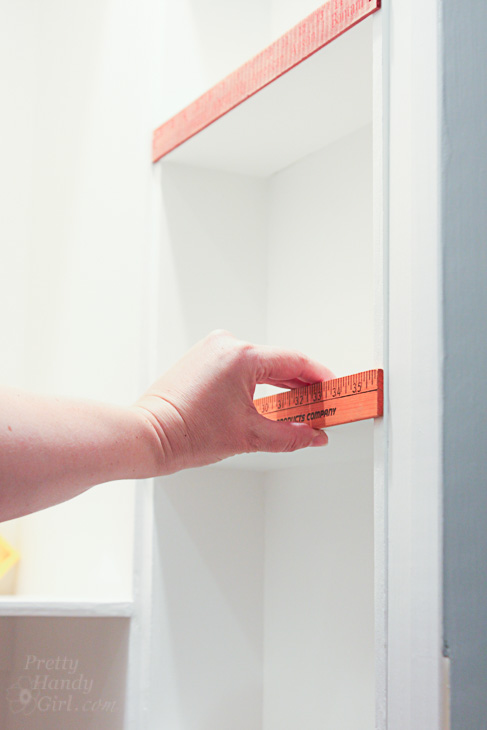
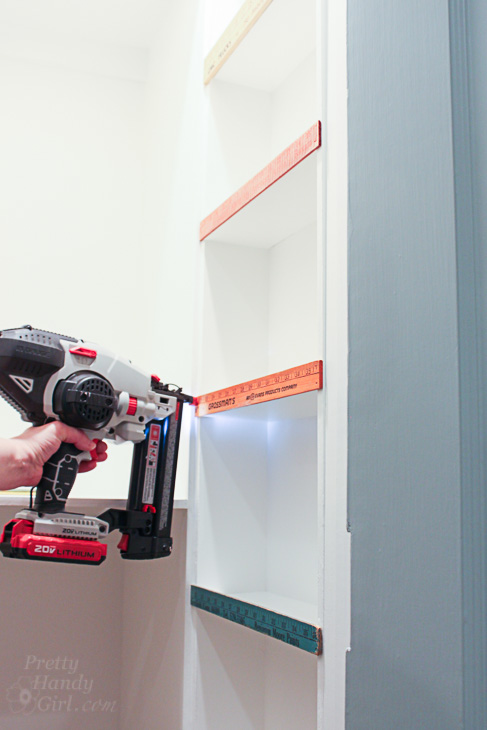
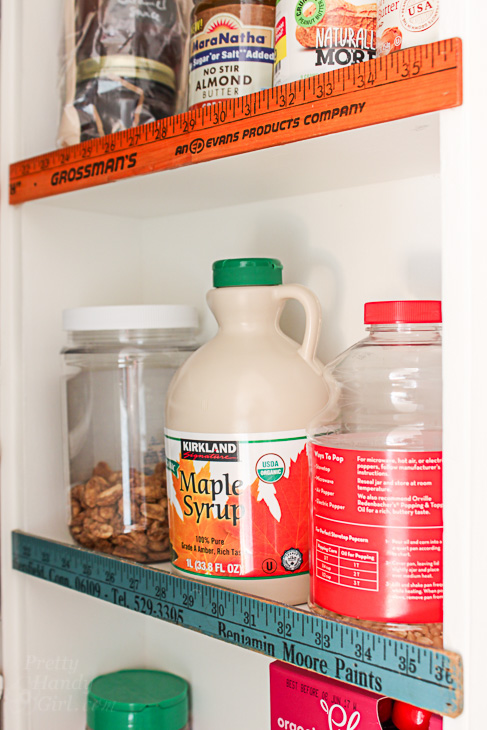
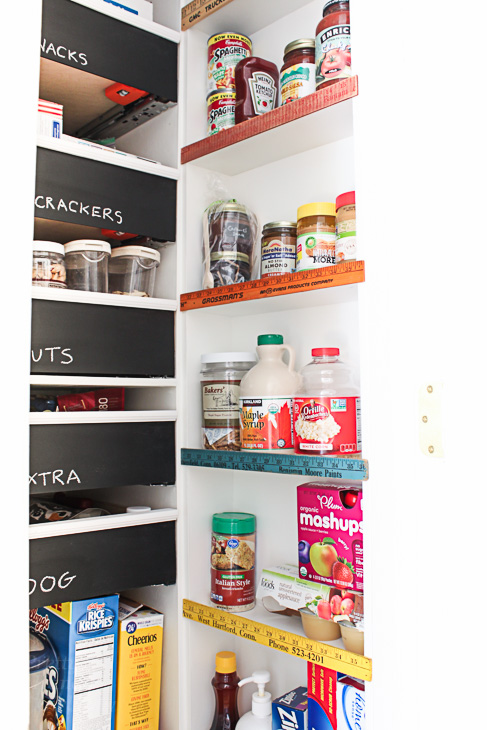
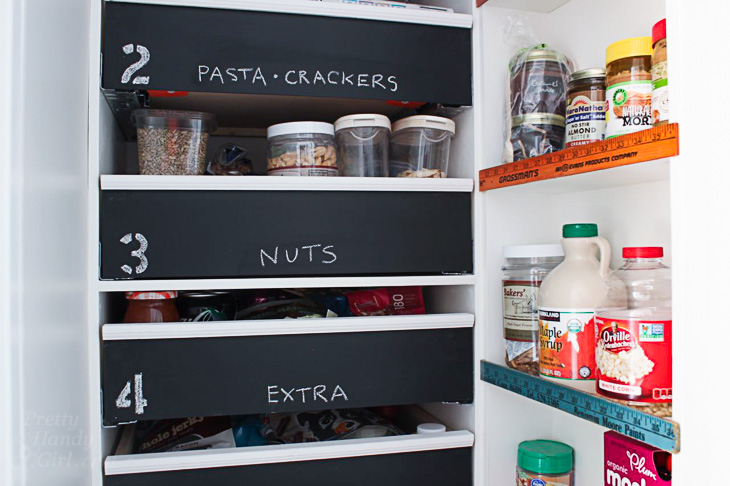
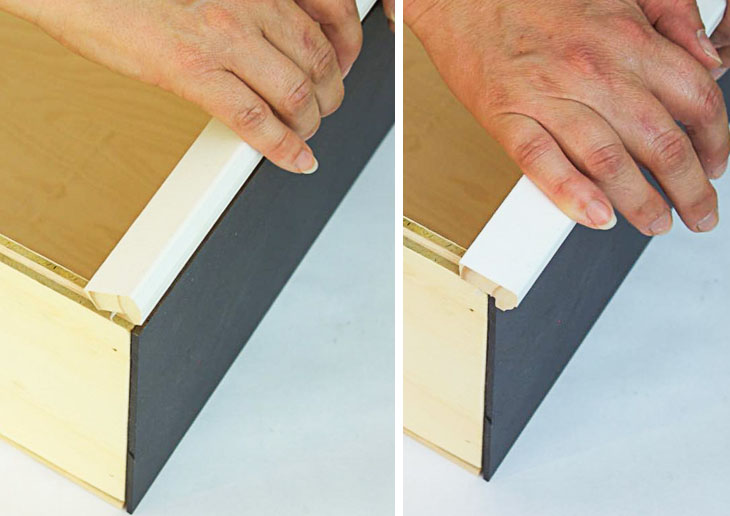
While configuring the new pantry, I knew I wanted to use up any and all available space to maximize storage. A shallow shelf took advantage of the 3 inches behind the door frame in the closet side of the pantry. To prevent items from tumbling off these shelves, you can use thin slats of wood. But, I utilized Vintage Ruler Stops on the Narrow Pantry Shelves. Not only do the rulers prevent items from being bumped or knocked off, but they provide a rainbow of color.
(I’ve included affiliate links for your convenience. I earn a small percentage from a purchase using these links. There is no additional cost to you. You can read more about affiliate links here.)
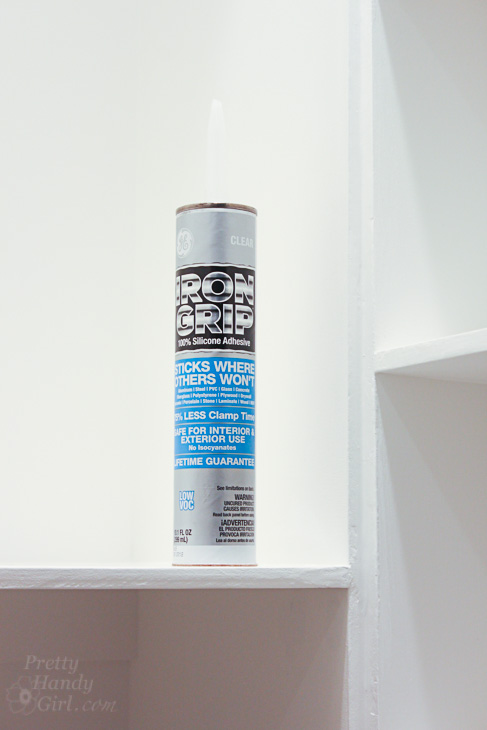
Cut vintage rulers (or other thin wood material) to the width of the shelf cabinet box. Squeeze a line of Iron Grip Silicone Adhesive along the bottom edge of the shelf and about an inch up on either side.
Press the ruler into the glue and line it up with the bottom edge of the shelf.
Use painter’s tape or a few brad nails to support the ruler while the adhesive cures. Once the GE Iron Grip Adhesive cures it will hold the ruler firmly. Without the adhesive, brad nails will eventually work their way through the wood or fall out.
Repeat for the remaining shelves.
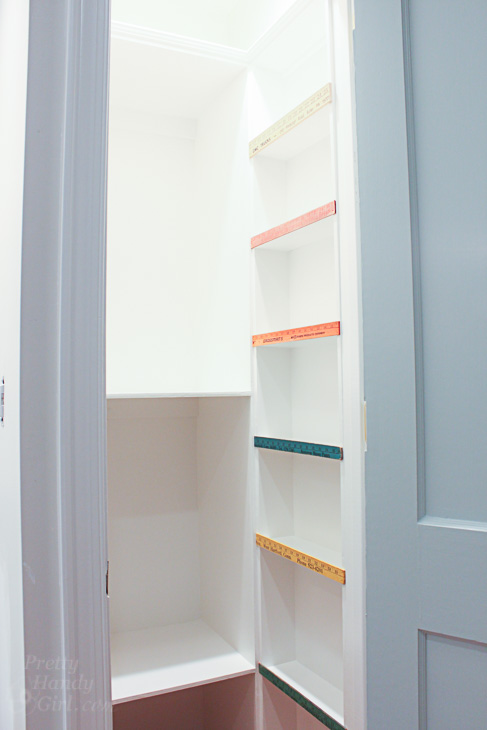
Your shelves are ready to load up with jars and cans!
I love the side storage that was reclaimed in the closet. That was definitely one of my biggest pet peeves about the old pantry — wasted space.
It’s amazing how many jars and cans I can fit on the side.
Do you have a pantry or closet that can use narrow shelves for additional storage? I bet you do ;-).
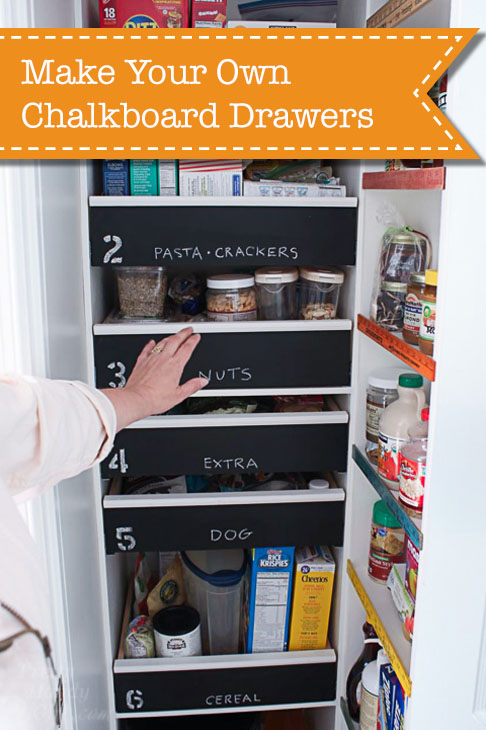
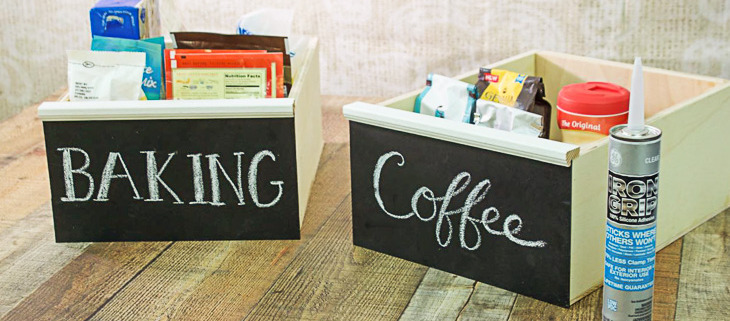
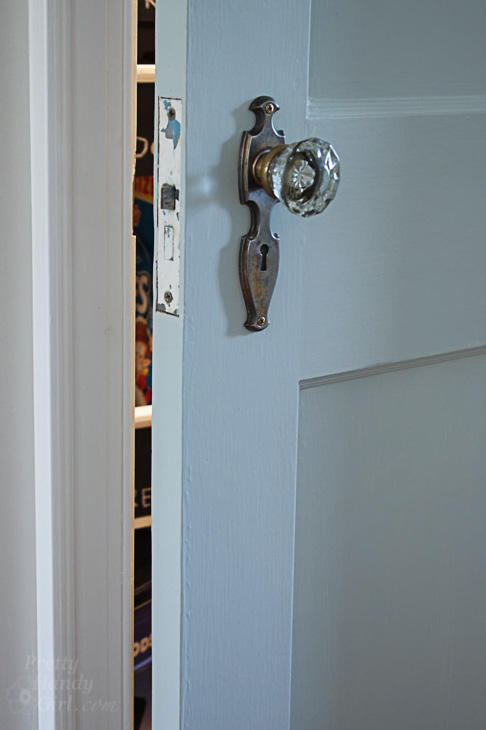
Did you enjoy that sneak peek of the pantry renovation project? I’m sure you are dying to see what lies behind that closet door. Well, you’re in luck because today you get to see the reveal and learn how I made these Pull Out Drawers with Chalkboard Fronts.
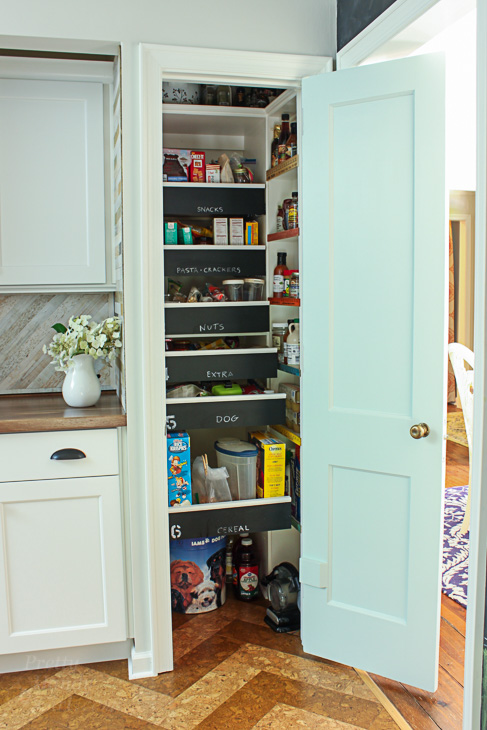
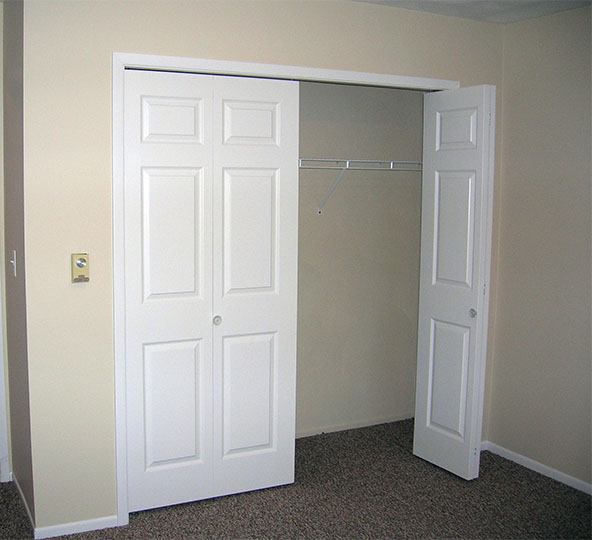
Recently I’ve been putting the finishing touches on the big pantry renovation. Although the space wasn’t that big to start with, I’ve created more usable spots to store our food and pantry items. Part of the renovation involved putting up a wall to create a closet with pull out shelving. This area is 1/3 of the original pantry. But, it holds about 2/3 of the original food items. Amazing!
I started with your standard 6′ wide by 3′ deep closet with bi-fold doors. It may sound like a fair amount of storage space, but the shelves were only 12″ deep and there were only five shelves. Trust me when I say there was a lot of wasted space.
Ready to see the new closet portion of the pantry? Let’s throw open that door and let you see the organization I have in there now!
Hark, I think I hear singing angels! Keep in mind this is only 1/3 of the pantry renovation. The other two thirds will have more storage than you can shake a stick at.
A drastic improvement from the before:
Enough of the ugly, I’m sure you’re really here to find out how to create these fun Pull Out Drawers withChalkboard Fronts.
Before we begin, I want to thank my sponsor for providing me with GE Iron Grip* 100% silicone adhesive for this project and for the giveaway. Just to be clear, I have partnered with the manufacturer of GE-branded sealants and adhesives to bring you this post, and have been compensated for my honest opinions.
Since receiving this product, I have put it to the test. So far I give it a top score. The curing time is much faster than some other adhesives I’ve worked with. What really sets it apart for me is the clear color, so it blends in with any project: wood, metal, masonry, tile, glass, you name it.
Ready to get building? Great! Let’s get busy making these fun organizational chalkboard front drawers.
Building Chalkboard Front Drawers:
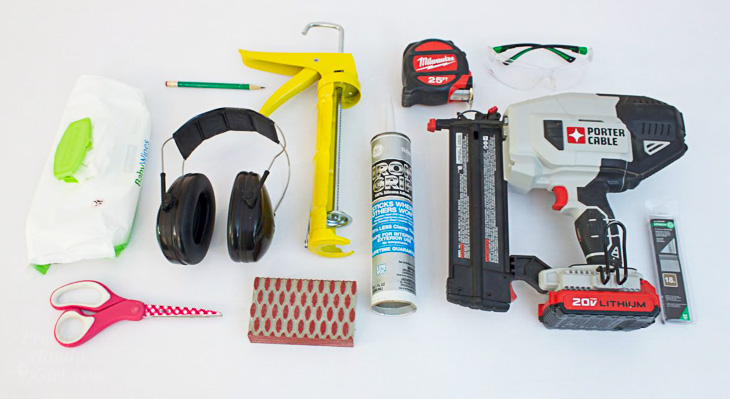
This is an easy build project. You don’t have to use a nail gun if you don’t have one. The brad nails simply hold the box structure in place while the adhesive cures. If you do choose to not use the nail gun, be sure to secure the box with clamps for the required clamp time.
Materials:
(I’ve included affiliate links for your convenience. I earn a small percentage from a purchase using these links. There is no additional cost to you. You can read more about affiliate links here.)
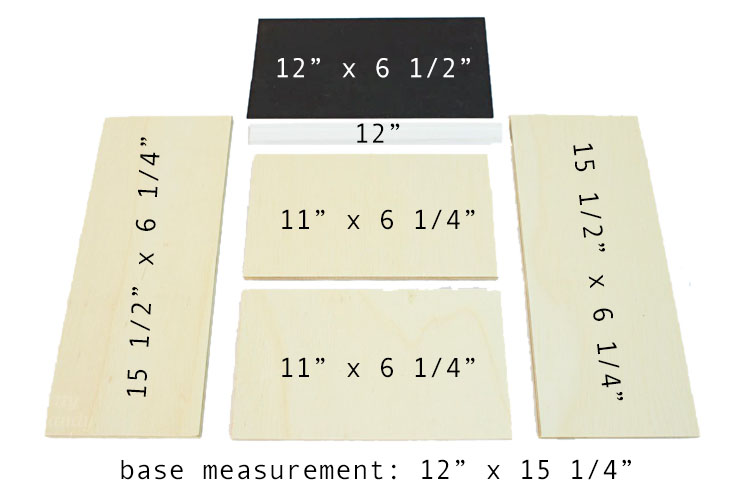
Note: If you are using the drawers in an existing cabinet box, measure your opening and create the drawer to your specifications. You’ll also want to follow the guidelines and measurements provided by the drawer slide manufacturer*.
To make things simple for you, I put together this brief video to show you how to build the chalkboard front boxes:
Instructions:
Sand the edges of your plywood pieces to knock off any splinters.
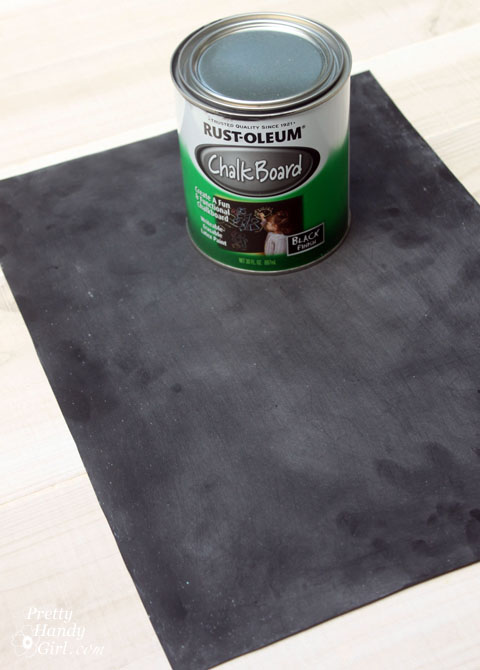
Paint one side of the masonite panel with two coats of chalkboard paint (sand between coats.)
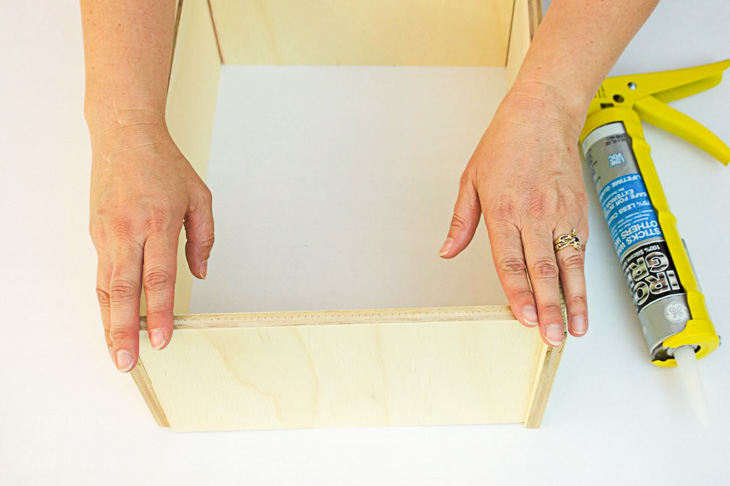
Dry fit your plywood drawer pieces together.
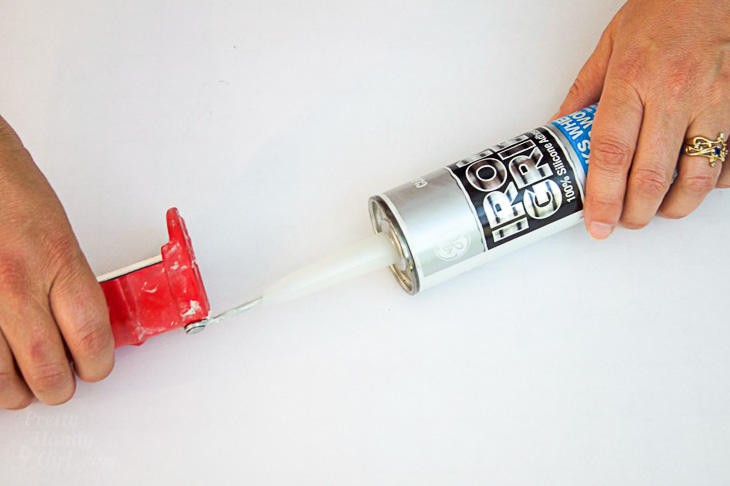
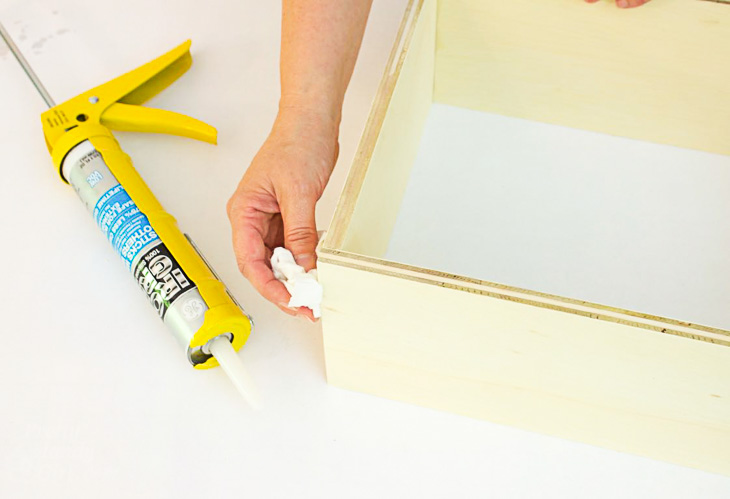
Cut off the tip of your GE Iron Grip* adhesive tube.
Use the stick on your caulk gun to puncture the inner seal.
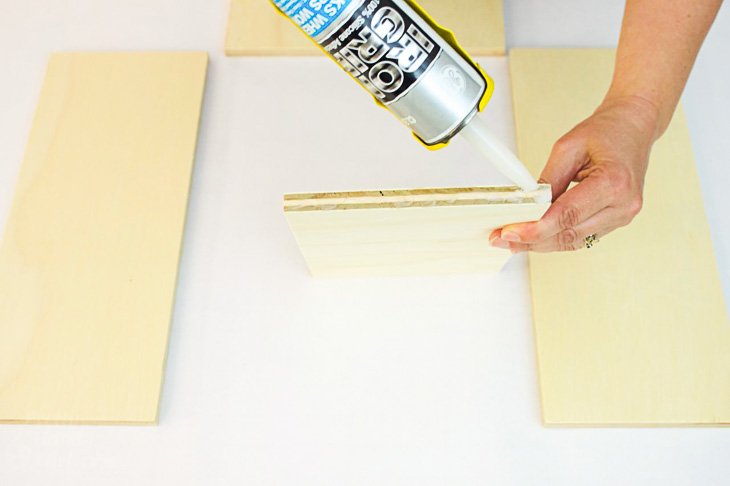
Run a line of adhesive along the sides of your front and back pieces.
Sandwich the front and back pieces between the side pieces.
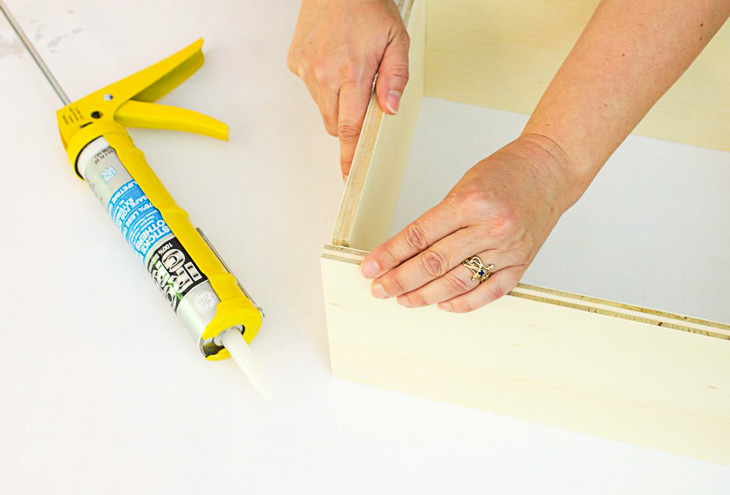
Check the box to see if it is square by measuring both diagonals and making adjustments until they are the same length.
Add 2-3 brad nails into the side pieces to secure the box while the adhesive cures.
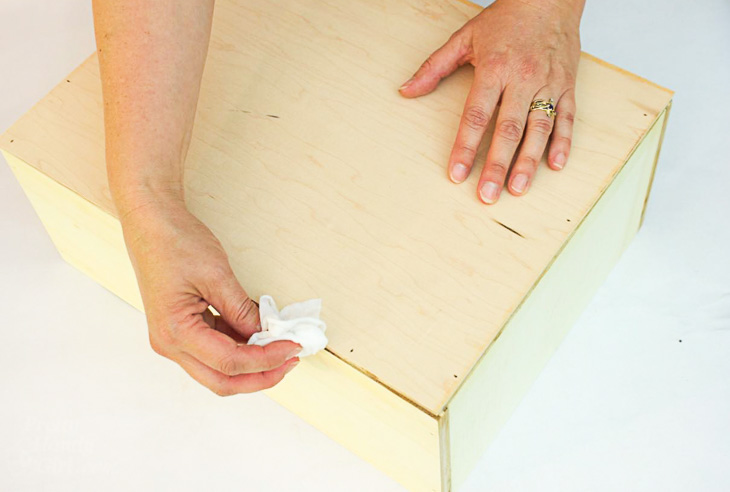
Wipe off any excess adhesive with a baby wipe or damp paper towel.
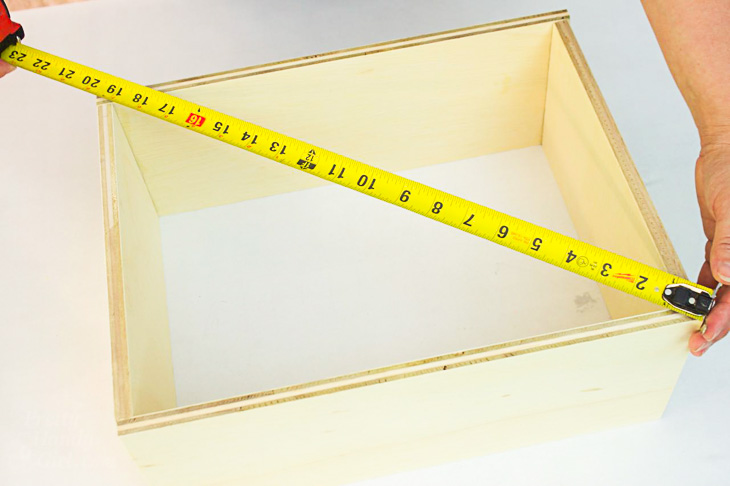
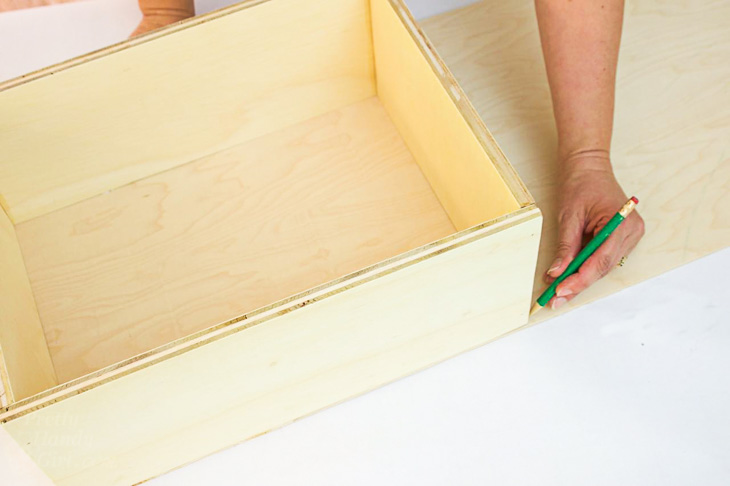
If you haven’t cut your 1/4″ plywood base yet, that’s fine. I prefer to cut the base after building the drawer box to insure an accurate fit. Lay the box on top of the 1/4″ plywood and mark the perimeter onto the base.
Cut the plywood base and sand any rough edges.
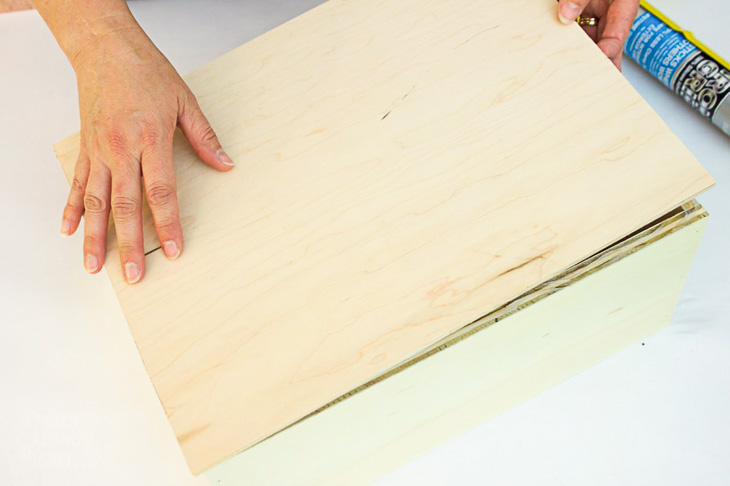
Run a line of adhesive along the bottom edges of your drawer box.
Line up the base and press it onto the drawer box.
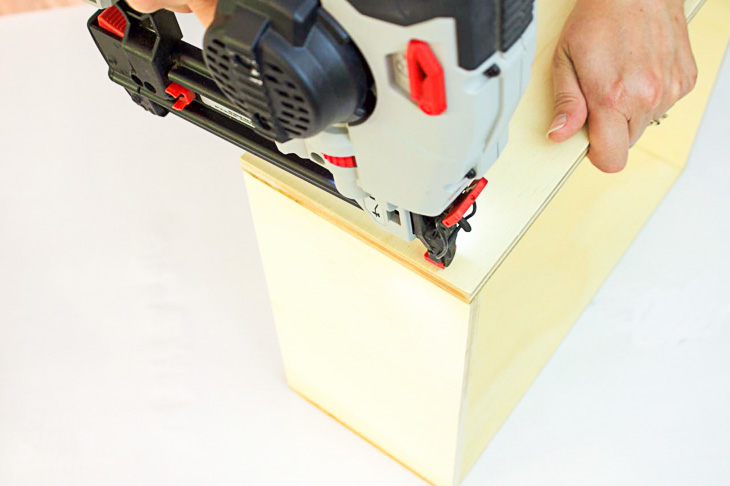
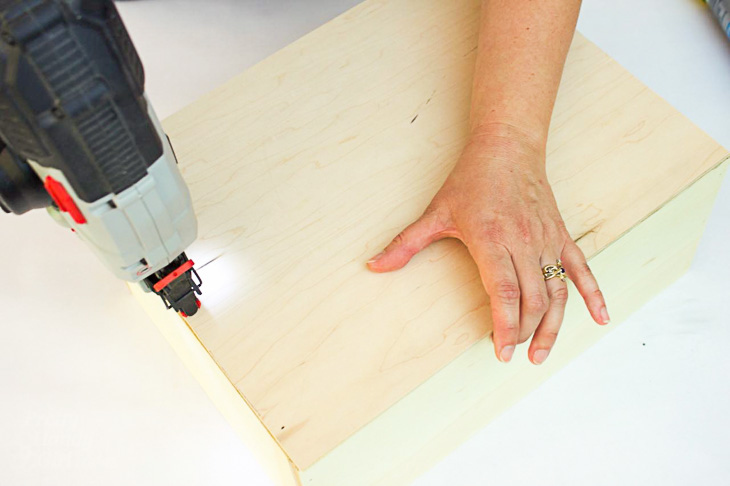
Secure the base with a few nails to hold it in place while the GE Iron Grip* adhesive cures.
Wipe off any excess adhesive that may have squeezed out.
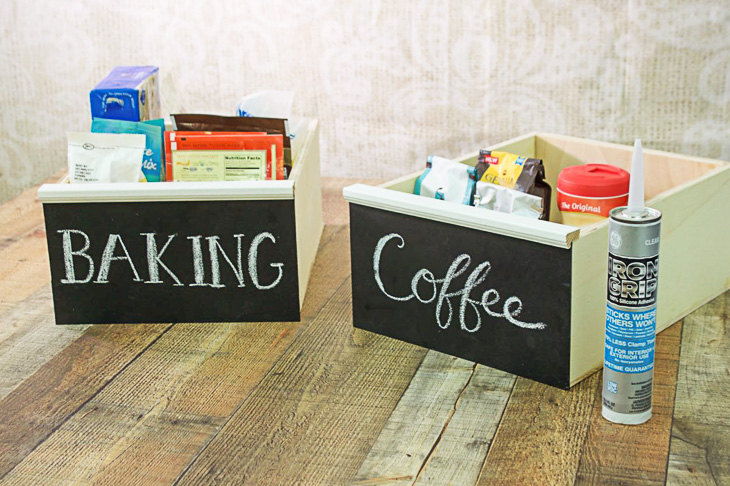
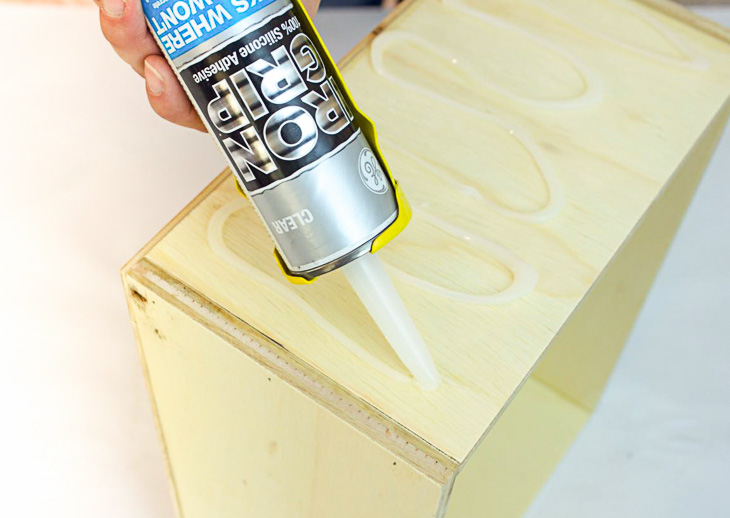
Time to add the chalkboard face. Add a liberal amount of GE Iron Grip* adhesive to the front panel of your drawer.
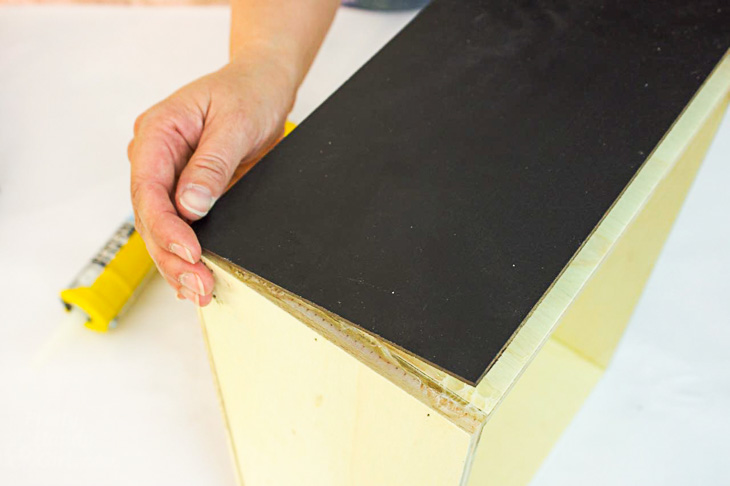
Center the chalkboard panel on your drawer front. Press firmly on the chalkboard panel to set in place. Let the drawer sit face up until the adhesive has cured.
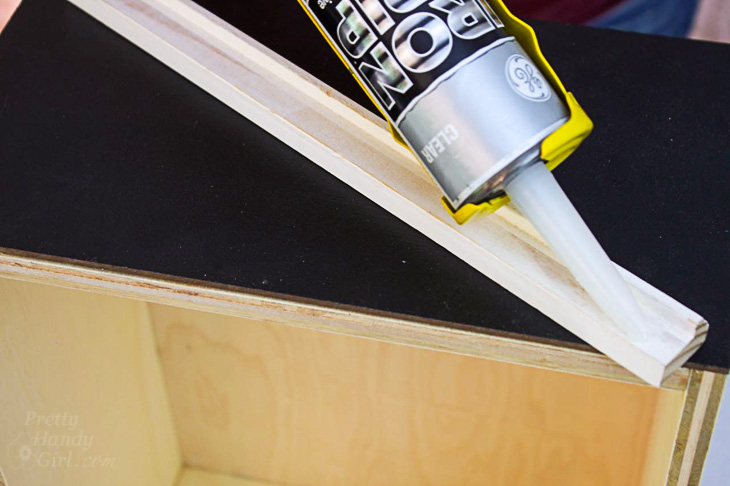
For a finishing touch, add your backer band piece to act as a handle. Run a line of GE Iron Grip* adhesive along the inside edge of the backer band moulding.
Press the backer band over the front edge of the plywood drawer and chalkboard panel.
Insert your drawers into any cabinet box using the drawer slides of your choice or simply slide the drawer box onto a shelf for better organization of smaller items.
I’m loving my new full extension chalkboard front drawers. It helps the kids (and me) find all our pantry items and keep them organized.
Disclosure: This is a sponsored post for GE –branded sealants and adhesives.
*Iron Grip is a trademark of Momentive Performance Materials Inc.
https://prettyhandygirl.com/wp-content/uploads/2017/05/chalkboard-drawers-3.jpg486730Brittany Baileyhttps://prettyhandygirl.com/wp-content/uploads/2021/07/PHG-logo-tagline-2020-1030x211-R.jpgBrittany Bailey2017-06-01 12:00:002017-06-14 12:01:37Pull Out Drawers with Chalkboard Fronts
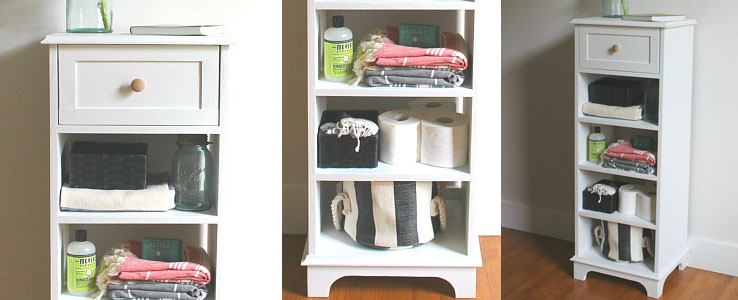
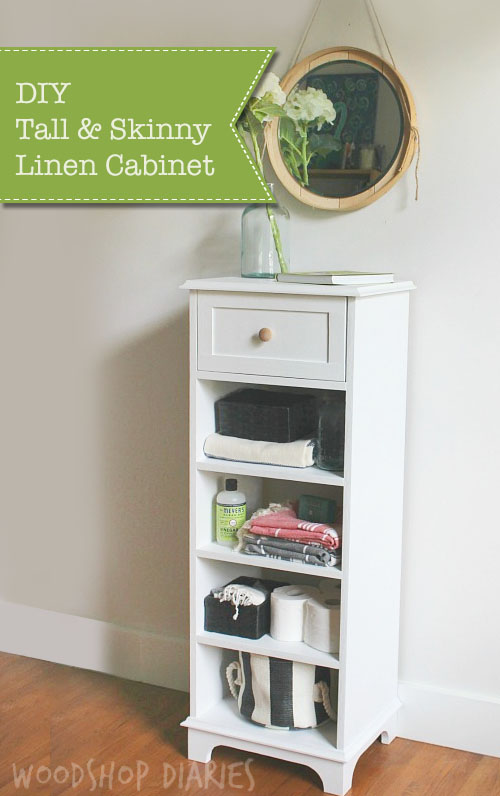
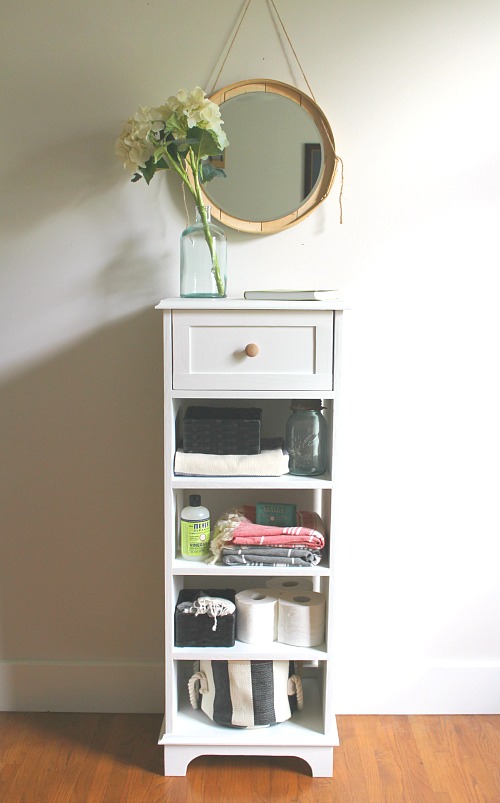
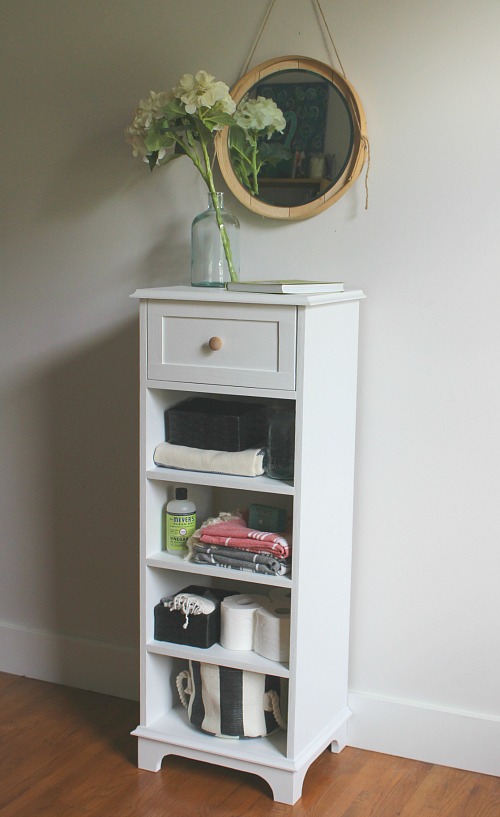
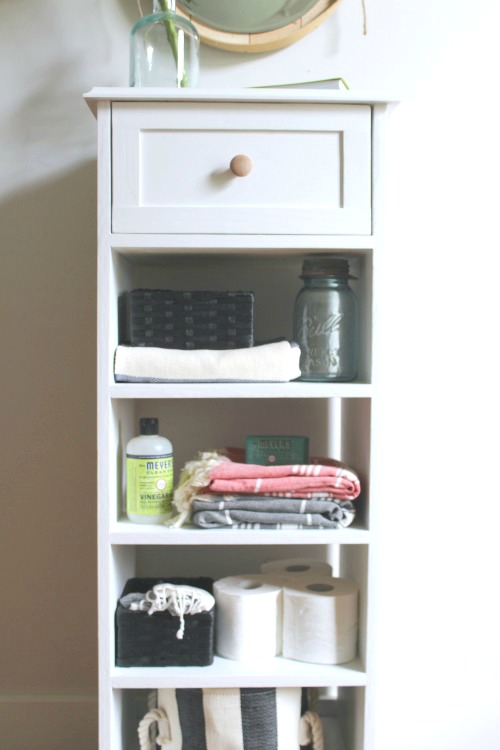
Hey everyone!! It’s Shara from Woodshop Diaries back to show you How to Build a Tall & Skinny Storage Cabinet. This storage unit works perfectly as a bathroom linen cabinet. Of course, it could work elsewhere besides a bathroom. An entryway would make another perfect spot for it. I use mine in the bathroom because it is the perfect size for towels, toilet paper rolls, baskets, and cleaning supplies.
If you need something a bigger, you can check out this “whatchamacallit” cabinet that would be really cute for storing linens and such. Ready to learn How to Build a Tall & Skinny Storage Cabinet? Let’s gather a few items and get building.
Tools:
(I’ve included affiliate links for your convenience. I earn a small percentage from a purchase using these links. There is no additional cost to you. You can read more about affiliate links here.)
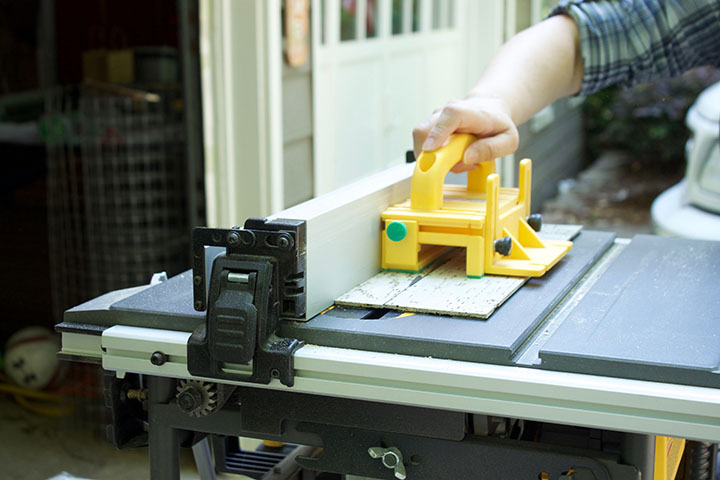
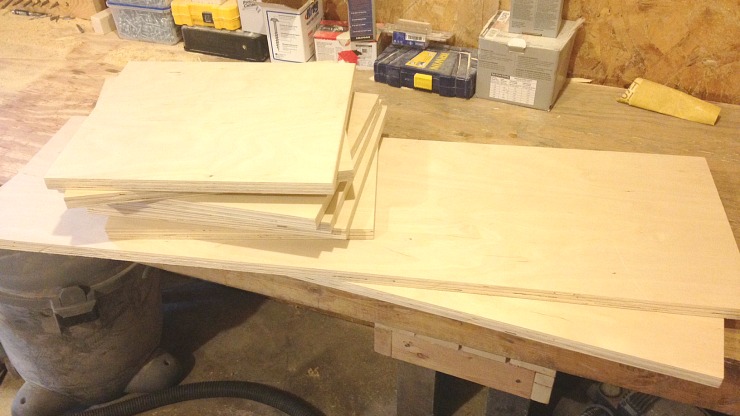
Cut down your 3/4” plywood. I used a Kreg Rip Cut to help with this, but you could also use a straight edge with your circular saw, or skip the circular saw altogether and use a table saw.
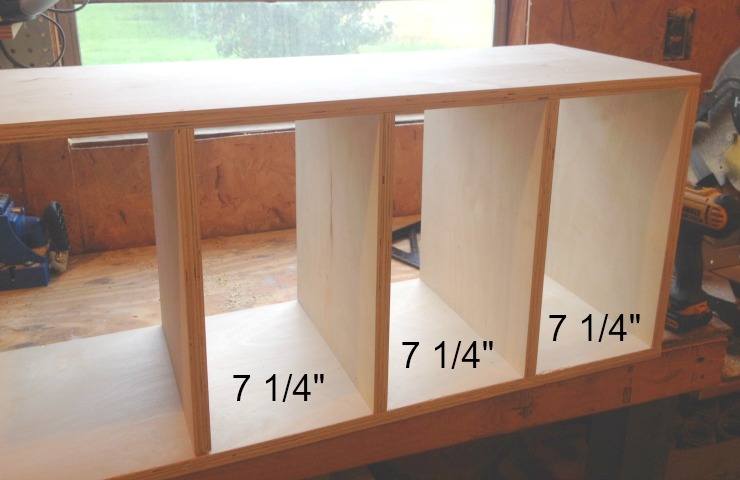
Cut your plywood into two 13” wide strips. Then, cut two pieces at 40” long. You will also cut five pieces at 14 ½”. And finally, one piece at 16” long. Did you get all that?? Lots of cutting at first, but the rest is easy 🙂
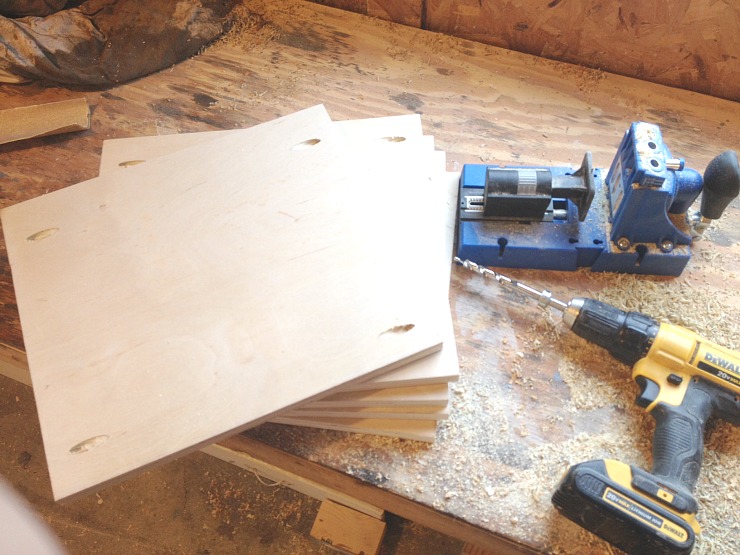
Drill pocket holes into both ends of all five of the 14 ½” pieces…
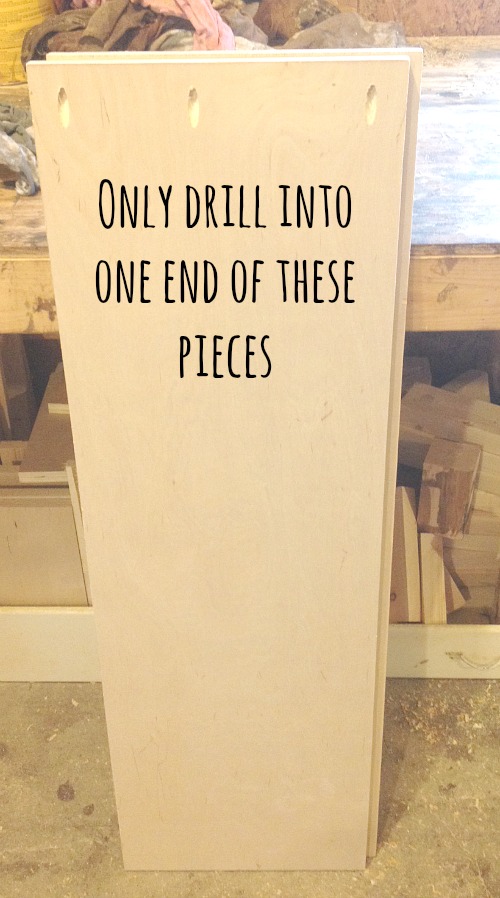
…and into only ONE end of the 40” pieces.
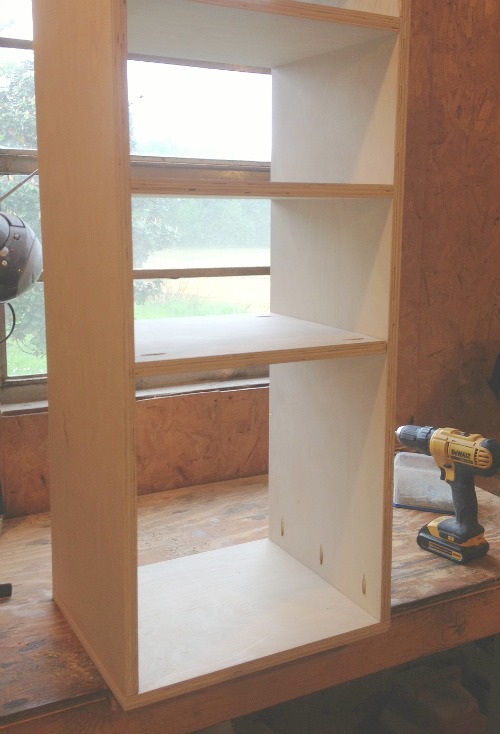
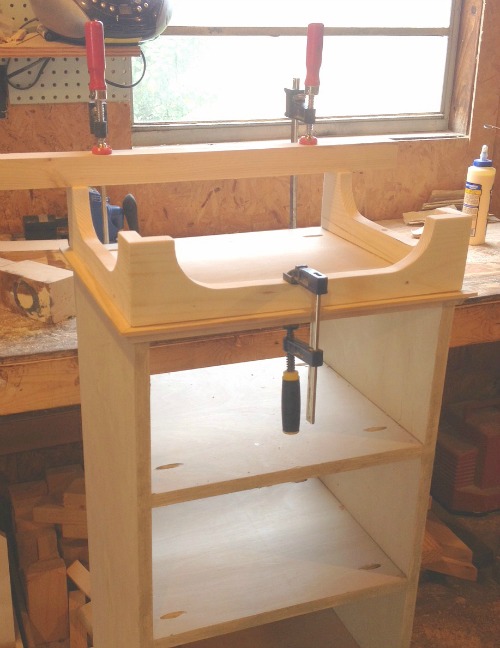
Assemble the Cabinet
Attach the shelves between the two 40” boards using 1 ¼” pocket hole screws. Make sure you attach the bottom shelf on the opposite end from where you drilled the holes on the 40” boards. Those are for attaching the top later.
Space the shelves 7 ¼” apart. It helps to use a measuring tape and square to line them up.
Before you attach the last shelf, attach the top (the 16” long piece you cut in step 1 using 1 ¼” pocket hole screws.)
Then, attach the last shelf in place.
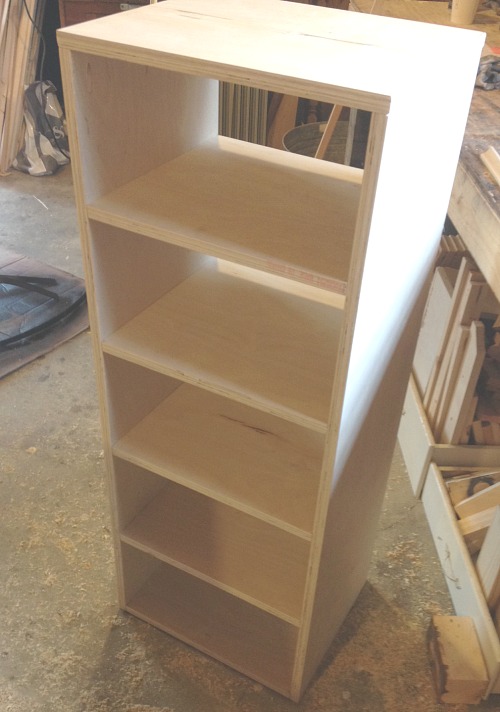
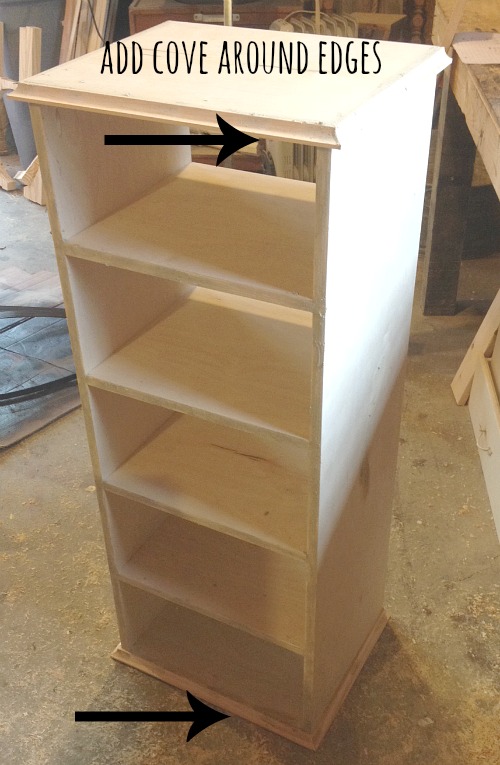
Add Trim:
Measure and cut the cove molding to fit along the top and bottom edges of the cabinet. Using wood glue and 1 ¼” brad nails, attach cove molding along the edges of the top and bottom.
Putty the nail holes and corners. Let the putty dry while you move on to the next steps.
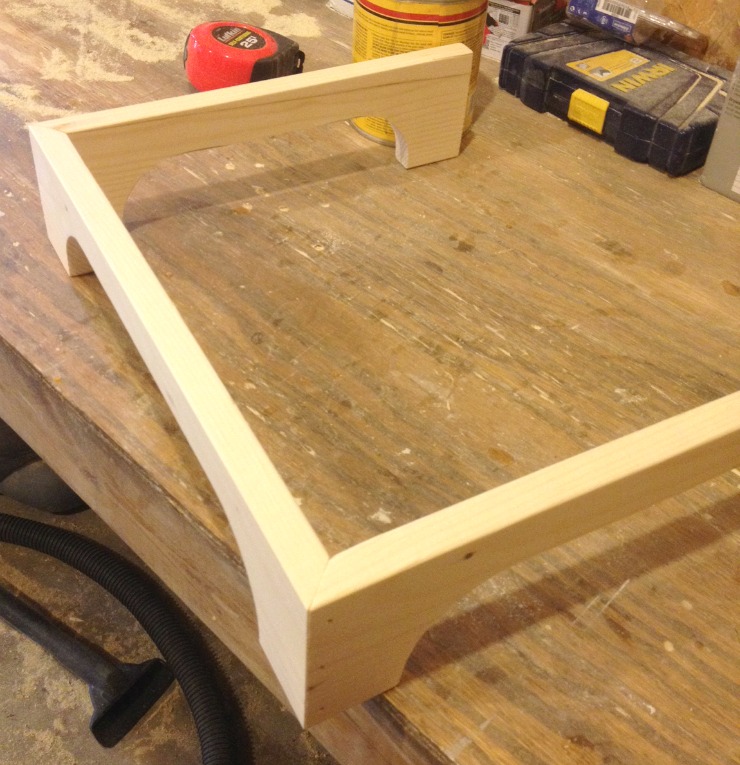
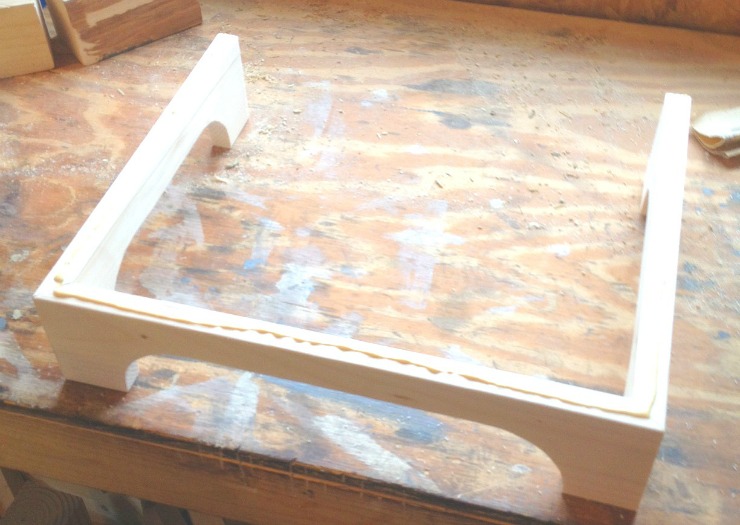
Cut two pieces of your 1” x 4” board at 13” long and one piece at 16” long. Miter both corners of the 16” long piece at 45 degrees and miter one end of each 13” long piece.
Use a jig saw to cut out a decorative pattern in the pieces (if desired). I used a stain can to help me draw perfect curves.
Sand all the pieces, then glue them together at the corners and use 1 ¼” brad nails to hold them in place.
Flip your cabinet upside down and glue this piece onto the bottom making sure everything is square and lined up nicely. You can use a heavy object or clamps to hold it in place until the glue dries.
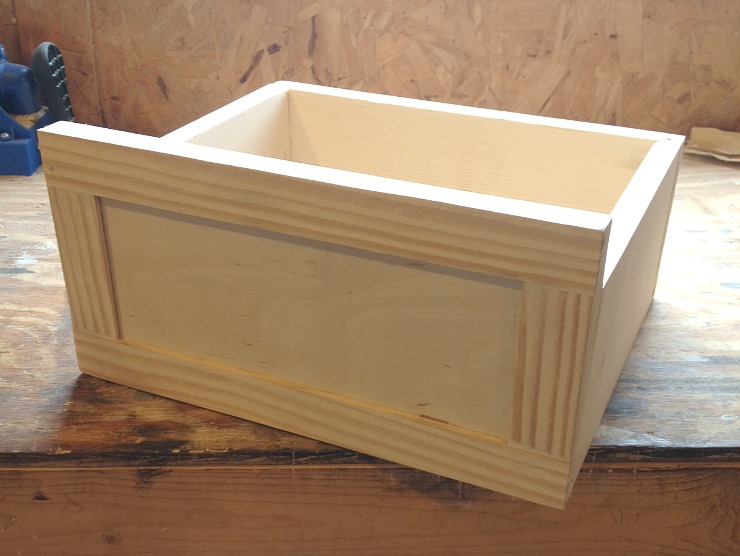
Construct Drawers:
You don’t necessarily have to add drawers. You could leave it open if you’d like. To see how to make drawers, check out my post about maknig drawers here.
You could cut a piece of ¾” plywood from the remaining sheet 5 ½” wide and then cut two pieces 12” long and one piece 12 ¾” long. Glue and nail the 12” long pieces onto the end of the 12 ¾” piece.
Cut a piece of 1/4” plywood to 12” x 14 ¼” and glue and nail it onto the bottom of the drawer box.
Then cut another small piece of 3/4” plywood 1/4” narrower and about 1/8 – 1/4” shorter. Making sure your box stays square, glue and nail this piece onto the front of the drawer. I added some thin wood strips to the front for decoration. That’s optional.
Finally, to keep the drawer in its place, glue and nail some small pieces of scrap wood onto the back to keep the drawer from sliding out the back side.