Laundry Room Reveal using Flow Wall
TGIF! Our spring break is officially here. Sadly I’m not going to Cancun to party it up like a bunch of MTV teenagers (As if!). But, I am hanging with two guys! My two little guys that is. I’m looking forward to crafting a little bit with them and maybe catch up on some sewing. My boys both like to sew. They also like to build with hammers. That’s my parenting mission at work. I vow to teach them to do everything that I know how to do no matter which gender that talent is associated with.
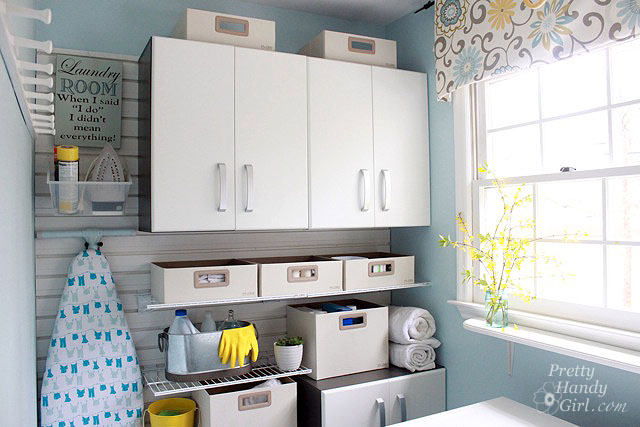
But, enough about me, what you are really here to see is the laundry room reveal! Before I give you the whole 5′ x 8′ tour, I want to show you how the Flow Wall cabinets and shelving are installed. Because you aren’t going to believe how easy it was. Before installing the cabinets, I installed the slat wall in no time!

The cabinets were shipped flat and need to be assembled, but there are detailed directions included. And if you’ve ever put together any flat packed furniture, this will be a breeze.
Each cabinet comes with four metal brackets that tilt into the Flow Wall. I inserted the hangers into the Flow Wall panel and gave them a skeptical glance.

Having just installed cabinets in my garage using a french cleat system, I wasn’t ready to trust those little metal brackets. I lifted the first cabinet (and was very relieved that I could lift them myself without assistance) and lined up the metal bar spanning the back of the cabinet over the brackets. The photo below shows the cabinet seated in the brackets and after I installed one shelf (which is hung after the cabinet is installed.)

Then I gently let the cabinet slide down until it was seated into the brackets. I might have yelled out “Suhweet!” Because — honestly — that was the easiest cabinet installation I had ever attempted. Plus, they seem solid and held up to my test of pulling on them!
I saved the best part, they are totally repositionable! Slide them side-to-side. Or remove them and move the brackets. No screws, no nails, they are easily reconfigured.

By sliding the one cabinet flush against the wall, I had room to install a twin next to the first.
The doors are attached with a hidden hinge. The white coated doors are hard and glossy, which means they should be a snap to wipe clean!

After the doors were installed, I simply added the two handles. Again, everything was super easy and the directions were easy to follow.

And the shelves? Easy peasy! Simply slip the top of the mounting bracket in and then lower the shelf until it snaps into the bottom ridge.

The wire shelves can be removed and re-installed infinite number of times. This allows for customizable storage on the fly.

Like the shelving, these translucent storage bins simply slip into the grooves to hold supplies you reach for on a regular basis.
![]()
Here is my laundry room Flow Wall in all its nakedness. Shhh, don’t tell Flow Wall that I shared naked photos of their products online.

You can look back, I’m sorry you had to avert your eyes. Here they are loaded up with my somewhat excessive collection of vases.

The other cabinet has room for all our beach towels and workout “stuff”.

There is enough open storage for everything I need to grab while doing laundry. And yet, it is conveniently hidden in the Flow Wall décor bins.

Speaking of the décor bins, check out this cute little storage cube that turns the bins into drawers.

The bins also come in a jumbo size which is perfect for hiding all my DIY Laundry Detergent supplies!

The Flow Wall shelves are coated so they make an excellent drying rack for rags waiting to be laundered.

More storage than you can shake a stick at.

I really love that the smart tile adhesive tiles work with the new wall color.

Two of my favorite additions to the room are the sunny yellow chandelier…

…and this sign I bought at Carolina Pottery (my new favorite discount decor spot.)

I had some leftover pieces of Flow Wall panels that I installed on a short section of wall.

Just enough room to hold cleaning and dusting supplies.

The valance is still just the loose fabric draped over the rod. But, hopefully one day soon I’m going to make it a faux roman shade.

Okay, just one more look at my new laundry room wall. Do you remember the before?

And now the ahhhh-after:

Can you believe it is the same room? Yeah, me either. I absolutely adore the Flow Wall System and I’m thanking my lucky stars that they offered to send me their products to try.


Disclosure: I have been compensated for my time and received the Flow Wall System compliments of Flow Wall. However, the ideas and words are all my own. I was not told what to write. I believe you have the right to know when a post is sponsored. Regardless of whether a post is sponsored or not, I believe in honesty, truthfulness, and complete transparency in my posts.

Love this makeover! Never thought of those adhesive tiles. Great idea!
– Sandy
Where did you get the fabric for the valance?
I have just viewed your Laundry room, fell in love with it, I am especially interested in the fabric you used in your window. Would you mind telling where I can purchase some of that fabric? The designer, name of print… I have been looking everywhere for the right fabric to complement my wall color and I know that will work perfect. Thank you.
Thanks Liz. I think it’s called Waverly Pom Pom Play Spa.
I can’t believe it’s the same room. And I love the yellow light fixture. It’s sunny and cheerful!
Thank you! I may end up making my own, I have been unsuccessful finding one in the colors I want. 🙂
This looks amazing! I love the little curtain and the spray painted light fixture! I priced this system online and it is kinda pricey. I have a very small weird shaped laundry room, but it would still cost me several hundred for the system to do just the wall over the W/D. It is still a very impressive system, however, and you did a great job!
The question that nobody seems to be asking is where did that adorable ironing board cover come from? This would be perfect with my laundry room colors!
Cheryl, 😉 I’m pretty certain I bought it at Target last year.
Love your laundry room. What was the paint color you chose to match the fabric?
Love every detail! Do you know the name of the fabric you used? It’s gorgeous.
Danielle, it is called Waverly Pom Pom Spa. I got it here, but looks like it’s sold out: http://www.fabric.com/ProductDetail.aspx?ProductID=14fb3e76-4204-4c19-b8db-1e3c766378c4&CategoryID=2170fc07-92c6-4059-b731-7373285bca44
Amazing I’m going to love your site!! Where did you get the fabric it is so super cute!
What color are the walls in your laundry room? Just put in white and grey cabinets and this color would be perfect. Thanks!
I would love to know what color your walls are too… I am having a hard time find the right color for a completely different room.
Thanks, Kim
The color I used was Tropical Surf by Glidden, but I had Benjamin Moore match the color ;-).
Just saw this. Thanks for the color.
Your laundry room looks amazing…so clean and neat. The valance fabric is a great touch of whimsy. Also love your ironing board cover!
Hi there! I found your ite through the linky at Oopsey Daisy and had to come over and check it out. I am so glad I did! I love your new laundry room, but I also clicked all around your blog and am so impressed with everything I have seen! I am now proud to say I am your newest follower. I can’t wait to see what you do next and will be trolling through the archives as well I am sure.
Thanks for a very informative and helpful blog site, truly one of the best I have ever seen. I hope you win with the laundry room.
Maureen
pinterest ageorgiamomma
http://pinterest.com/ageorgiamomma/
I like the Soft Storage Bin (6pk)
I pinned your completed wall on Pinterest at http://pinterest.com/pin/277745501989370044/ and added a comment and link to the giveaway. Can’t wait to see what’s up next with you!
I follow you on FB and by e-mail subscription. I’m just getting into Pinterest.
You did an amazing job on this project, Brittany. I have a small laundry room and could certainly make use of this. The “starter package” is ideal, but I really like those metal shelves. What a versatile product with endless combinations.
I follow on Pinterest as Angie Martinez
I like the 24 sq ft Lawn and Garden Starter Set for my garage. I have my gardening stuff scattered all over the garage.
I love the garage and hardware set, but I really just love them all. So clean and organized. Swoon!
I like you on facebook … and I will be following you on pinterst within the next few minutes 🙂
I think all of the products are pretty amazing. They would work perfectly in my laundry room!
I love the clear bins that attach to the wall…so cool! This system would make my laundry room amazing!
I love all the products! Oh the things I could do with them – actually make more room for the 6 of us in a 3 bedroom house.
I think the cabinets would be great to have!
I’d like to add the tall wall cabinet to our home for extra pantry space.
This is so sweet! The cabinets would come in so handy in our office as would some of the decor bins.
I can’t pick just one piece I like b/c I love them all!! I so need this for my laundry room
I love the garage shelving and garage cabinets and everything else I saw.
I would love the Heavy Duty Dual Bracket Hook
I love the whole Flow Wall System. What a great organization system. I’d love a chance to win it as I’m moving into a new house soon & it’d look great in the new laundry room. I also love your blog.
You seriously amaze me! What a transformation!!
Wow, I love how the room turned out…it’s very bright and cheery (and super organized!). 🙂 This system would be perfect to organize a garage and I like that you can mix open shelves, cabinets. and bins!
wow, I just stumbled across your site. Love it and all the great, great ideas and tutorials! Thank you!
I would love the system that you have used in your laundry room. It looks easy to install, you can vary the placement and when you’re done, it looks great. What more could I want?
I love how easy it is to put together – especially the wire shelves!
That looks incredible! Great job 🙂 I wish my laundry room looked HALF as good. Entered twice. Fingers crossed lol
Wow, this is incredible!! I love all of the organization!! Thanks for sharing at oopsey daisy!
I love them ALL~ I want my new laundry room to look JUST. LIKE. YOURS!!!!!!! I like the storage bins, the adjustable shelves, the wire racks for hanging…… Oh my!! What’s not to luuurrrrrrrve! Eeeeekkkk!
The storage bins are so useful and I love the two drawer system. Sadly my raffle copter did not work 🙁 so I wasn’t able to enter all parts. I’d love to win however. My husband is drill disabled.
Um, I can’t pick one product! I want them all! Question: can I just do the flow wall system on a section of wall or does it have to go wall-to wall?
Yes, you can install them as wide or as tall as you like! They are awesomely customizable ;-).
I love the storage cabinets. Having everything behind closed doors really makes things look tidy
Wow, this Flo wall system just blew my mind — you just turned my whole world upside down
I want this so bad…. We are taking a room that’s too small for anything and making it a laundry room (to get my washer and dryer OUT. of. my. KITCHEN.) and sewing/craft room for me. It will also serve as pantry storage and storage for my small appliances that aren’t used every day and my mason jars through the year until it’s time to make jam again. 🙂
I NEED this. NEED. LOL!
I would start with:
http://www.flowwall.com/storage/Products/Lifestyles/ModelNumber/FWS-4812-6WB14.html
And I have to say, I don’t think I would stop there!
I’m digging the shelf and bin set! I have lots of misc. small items that bins work best for.
So cute! Your new laundry room would ALMOST make laundry fun! 😉 I love the Storage Cubes; they’re so functional and attractive.
I LOVE your new laundry room, everything about it is cheery! I so would love to make this happen in my own laundry room, as it is now looks like a dungeon .
The wall unit is completely awesome! and I love the window fabric! good job here. love it!
That is wonderful! I love the fabric you have for the shade can you tell me where you purchased it?
[email protected] thanks!
The fabric is from Fabric.com and it is Waverly Pom Pom PLay Spa
I would love to have this in our garage, our mudroom AND my craft room! Just wondered how much “stuff” you have to move to a better place or get rid of?
I love the easy to install cabinets the best!
I love how streamline the baskets are. They would work great with the whole system or just on their own.
Love the shelves!
Love those soft side bins!
love the bins with the storage cube
I love the
24 sq/ft Bin Starter Set and the slat wall panels. This would make it so much easier to organize my craft/business room!!
I like the soft wall storage bins. They would be super handy in a garage or a foyer.
I love the cabinets and storage bins!! Beautiful and functional way to organize.
Love the little side bins with the flowers. Always need something pretty in the laundry room!! Of course the sign adds the wonderful amount of humor needed too.
What a great improvement. Looks easy and so organized.
How sad is it that I think this would be perfect for the wall behind my desk so that I could organize (finally?!?!) my office. I love the whole wall system and it’s a toss up between the cube and the shelves..
we have a tiny condo and this would be perfect in our laundry closet, they have so many great products with this system, I love it all! The cupboards and shelves are great, and everything is so interchangeable!
Wow, just wonderful. I’d love to have a laundry room as wonderful as yours!
…and now i’m following your DIY boards on pinterest too…
pinned it! http://pinterest.com/pin/186055028325855043/
Boy that is a really tough question! I think I like the cabinets and the bins the best, it’s very hard to pick only one. But I think I will be looking into this for our garage and my studio.
Fave is 24 sq/ft Bin Starter Set.
I moved into a new house this year and I’m missing my built in cabinets in my office from my last class. These look perfect for installing in my new craft/office space! Thanks, Julie
Snort. I have a somewhat excessive collection of vases, as well. Also, I never can find the right storage for my beach towels.
Which Flow Wall product do I like best? So hard to choose. I guess I’d have to go with the décor cube that turns the bins into drawers. So versatile.
Thank you for showing how you redid your laundry room (it looks absolutely fantastic, by the way) and for introducing us to the Flow Wall products.
I like the storage cube that turns the bins into drawers. How versatible.
I love all the products – the organization qualities make everything a ‘must have’!
I love the cabinets!! They would hid a multitude of sins in there!!! What I could do with that system i my utility room!!!
Very nice change. Happy speaking at your upcoming events.
I’d love the 24/sq. ft bin starter set. That would be awesome!
I like the Flow Wall Cabinets. I am so impressed with all the projects you tackle. Job well done!!
Your “Before” definitely resembles what I have going on currently! 😉 Love the transformation!!!
Thank you all for your glowing comments about my laundry room and the Flow Wall system. I was so relieved by how easy it was to install. Because the day I was installing it was also the day that we fought like crazy to keep my son from getting dehydrated and require a hospital visit a third time. Apparently setting a timer and giving him 2 tsp. of gatorade every 15 minutes is a good technique. Although, it made it kind of tough when working on a project. 😉
I LOVE the clear bins! I have been needing something like this in my dull boring laundry room – I have two cabinets with fixed shelves designed to hold NOTHING. Just about everything I’d want to put in a cabinet is too tall. 🙁
I would truly love this system in our shop! How great to be able to organize and put away items rather than stack and cram them like I do now. The fact that you can slide and move everything to accommodate new configurations is super cool! I really like the different sized Flow Wall cabinets.
Love that you can slide and change around the location of your shelves and bins! Nice laundry room makeover!
I love the Flow Wall Cabinets and bins
I’m a follower already!
Pinned it!
LOVE IT! Your laundry room looks amazing! I would have to say that the wall itself is my favorite, since without it, none of the beautifulness would happen!
Honestly, I like the storage bins the best.
I love many of their products, but I would love to hang bikes in the garage with the horizontal bike rack. Also, it would be great to hang the ladders instead of leaning them against the wall.
Can’t decide which I like best! This is quite the system! I just love the idea that there are so many ways to display it.
What a difference in the before and after! You did a beautiful job on the remodel. I love the Flow Wall System! I’ve been wanting to make a craft room, and this looks easy enough….and it’s so versatile!
I love the bins 🙂
I love the white shelves.
The end result with Flow Wall is perfection ! I love the way you made it fit your space and look so tidy. I think this would be a great addition to our garage. Going on my list of “MUST HAVE” . Beautiful job as usual Britt!!!
i absolutely love the 6 PC Cabinet System – with 48 sqft Starter Pack (silver)!
I love how easy the wire shelves look to install – and then change your mind about! 🙂
I love your laundry room. The Flow System is really cool. I have the perfect wall in my laundry for the Flow System. Thanks for the great giveaway and the inspiration.
I like the storage boxes!!! So attractive and neat looking!
I love everything about the flow system. I guess if I had to pick one it would be the opening shelving. So much I can do with that. Love what you have done with it!
I definitely like this storage system and the great tutorial. I’ve FB shared it, Pinned it, Liked it. Of course I couldn’t help but think a nice Turquoise & Yellow Sinkadoodle would look nice on your washer, dryer or laundry sink. 😉
Gorgeous! Love the colors and fabric choice on the valance!
I love the curtains — where did you find them?!?!
Love the sleekness of the wall itself, and how easy it is to reconfigure everything!
Your laundry room looks great. I would love this in my craft room. The hard bins are amazing. Love all the different sizes!
The reveal is GORGEOUS! I’m super jealous. Because I rent, I’m kinda limited in which products I could install (even though my landlord would probably ok it), but I’d love a cabinet set for my studio space.
I love the cabinets and the unit that turns the bins into drawers…. You have an amazing laundry room!!
I wish I could get my laundry room looking like this. Right now it’s dark and dreary with old dark oak cabinets.
I Love this organization..The Flow is wonderful! I like the cabinets and the fact that it can all be changed whenever desired. Thank you for sharing this awesome makeover.
Loving the bins!
I love the repositionable cabinets!
Loving those bins! But most of all the decor! And how organized it all is. Good job, Brittany!! 🙂
I love that you can hang cabinets and not just hooks etc. That is great!
It looks amazing Brittany! That flow system seems pretty neat! The valance & chandy are AWESOME!!
The cabinets. I like how even the base cabinets are up off the floor! This would be ideal in a damp basement.
My laundry room is a mess. I would love to win this system! Your new room looks gorgeous! 🙂
Any of the products would be great! I need to clean up my laundry room and find a place to store my painting supplies!
I am SOOOOOoooooo putting these on my wish/dream/fantasy list! What is my favorite? Well boy howdy girlfriend, you honestly want me to choose???? Ok, those bins that hide things, but what would they be without the shelves and what would the shelves be without the cabinets and well, you have to install the wall unit first….. We have invited my daughter and SIL to move in with us and have grand plans for our basement great room to be turned in to a joint hobby room. This system would be awesome!
Looks like a really nice system and fairly easy to install. Love the hanging cabinets. Easy access, but hides the clutter.
I love all of the wall cabinets! ‘Looks like an easy way to hide away items that do not need to be in reach of my two-year-old…I mean, I’m pretty sure he would find a way to get to them if he really wanted to, but it’s a good thought, right?
I love the cabinets with doors. Gotta hide the clutter!
I love how the bins can be used as drawers!
I like the cabinets because they are respositionable and look easy to install.
So very nice! I hope I can have my own laundry room some day. CAn you tell me what that fabric is and where you got it? thanks.
Looks great! I got new laundry machines, but I still need storage. I’ll add this to the wish list! (husband loves how long it’s getting…)
Brittany – I am envious of your amazing organization!! It looks fantastic. I could totally use this in my shed for my potting bench. It’s fantastic!!
Becky B.
http://www.organizingmadefun.com
Organizing Made Fun
LOVE those wall cabinets!
lol oh I didn’t see the entry form
I pinned it
Oh my gosh, this is my favorite. This is so awesome. I really hope I win this. I live in an apartment with really limited space. this would be amazing.
You know I’m a sucker for a perfectly organized Laundry Room! This flow system is awesome I could totally get into those baskets … Love it!
-Jacque
I just started following several of your Pinterest boards. How did I miss them before?!
I love all the garage stuff they offer.
And your laundry room is amazing!!!
Wow Britt, it looks amazing! Congrats for getting it all done, I’m sure you love it.
And it’s so organized too, I love how you’ve fit all those things into one nice space.
So lovely! You’ve accessorized the Flow system beautifully!
I love your transformation and those flow walls are amazing… I love all their bins and how versatile they are.
TOO COOL! This flow system is way better than I previously thought. Now I want one. And the whole room looks so pretty. I would totally be happy doing laundry in that room. 🙂
I would love to have the Flow Wall system in my garage!
I love the one they are giving away AND the 24sg ft bin starter set! both would be great for my in process craft room. Thanks for the chance to win.
I have to save my pennies. I want this in my garage. I love the wall cabinets because they can hide stuff, like my paint cans, which are not all that pretty. Great job on the LR makeover.
I love the Flow Decor shelves – they look like the Ikea floating shelves – they’d be great for putting smaller items up without worrying about edges getting caught on the wire shelving
OMG! I love it all! I especially like the wire shelves. I need those and it would be nice to have a place to hang dry clothes!!
I have loved how you’ve shown us how this can be done! I love the cabinets and storage bins!! Wonderful way to organize.
Thanks for the giveaway too!
It’s gorgeous! I love it!
I want cupboards! Anything I can use to hide stuff from view would be great, though!
It looks wonderful!!
Amazing! The room looks so bright and beautiful.
Amazing! You have a way of writing your posts so they seem very approachable and not at all intimidating!
I really like the Flow Wall System’s cabinets. I like that they mount to that board!
love the Soft Storage Bin (6pk)
oh gosh. i have laundry room envy like you wouldnt believe. ANY of these products would be my favorite if they would come to my house! can they be installed on block walls?
Hey, I’d like to know that too! We have cinder block basement walls, can we figure a way to put these wonderful items up with that limitation? Thanks, you have a swell blog!
Amanda, sorry for the delay, yes they can but you need to use special concrete fasteners purchased at your local hardware store. I think they are molly bolts. I believe you will have to pre-drill holes. But, once you Flow Wall is hung you can change the shelves and cabinets anytime you want super easily!
I think you should be proud of yourself because you do amazing projects, take amazing photos and give amazing tutorials. You are not afraid to tackle anything and when you do you make sure you do everything as perfectly as possible. You impress me with every post. You are a top notch blogger.