How to Fix Your Garden Gnome (and Other Garden Decor)

Garden gnomes are the cute little guardian angels that watch over our homes. And sometimes they get a bit neglected.
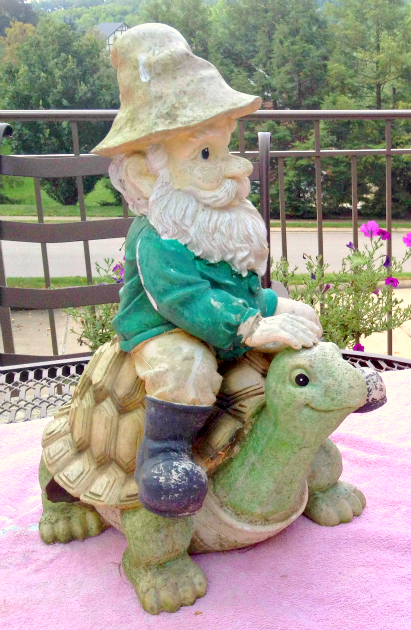
In our case the poor fella was beaten up a bit by string trimming and the sun.
So today I’m going to share how you can fix any small holes or cracks and repaint your gnome so that it looks like new. These tips will also work with other garden decor that you’d like to repair.
Here are the supplies you need
- Hydraulic cement
- Bucket
- Margin trowel
- Gloves
- Great stuff
- Old towel
- Rust-Oleum Primer (spray)
- Hobby paint brushes
- Valspar paint samples
- Rust-Oleum Clear Coat (spray)
This is a pretty fun project and the kids can participate, too.
Let’s get to it 🙂
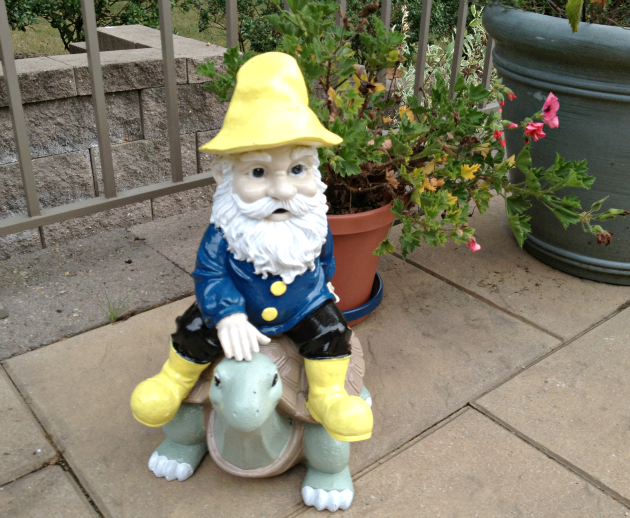
Before we get started let me introduce you to Hanz, he’s our garden gnome. Unfortunately, the turtle he’s riding is missing it’s right knee cap. Ouch!!
But this is an easy fix. If your gnome is hollow, fill in the hole with Great Stuff insulation foam. Make sure to wear gloves so that your hands don’t get sticky and place a towel on any surface you’d like to protect.
Allow the Great Stuff to completely dry and harden. This usually takes a good hour and it helps to keep the gnome out of the sun. You can trim the foam with a utility knife if it expanded too much. This is what I did with the foam that filled in the Turtle’s knee.
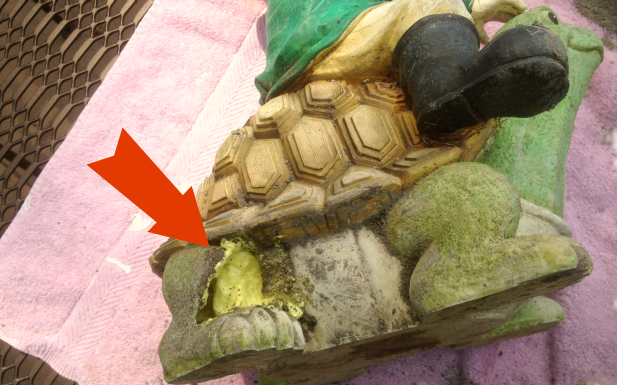
You can then mold hydraulic water stop cement with your hands to re-create missing pieces or fix cracks (again, wear gloves because the cement gets warm and could burn bare skin). This step takes a little artistic touch but you can do it. Hydraulic cement sets up within 5 minutes, which means you’ll have to work quickly.
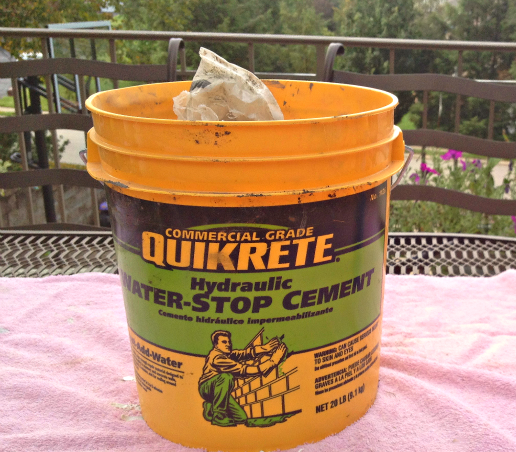
Quikrete makes hydraulic cement in small buckets which you can find at Lowe’s or other home stores. This type of cement also comes in handy for fixing all sorts of things around the house, (e.g. where the hot water tank vents to your chimney or water lines that protrude through cinder block walls.)
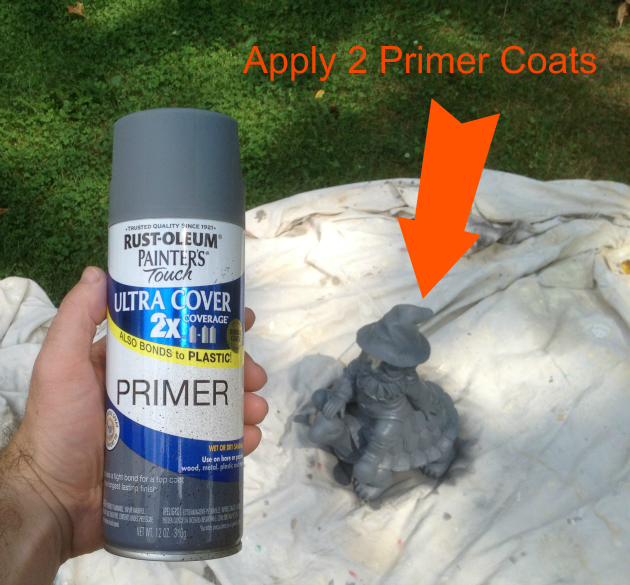
After the cement has dried, prime your gnome with Rust-Oleum spray primer. Two coats are a good idea since there are many fine details to fill in. The primer will allow the top coat of paint to stick. Depending on the weather conditions your primer should be dry within 30 minutes.
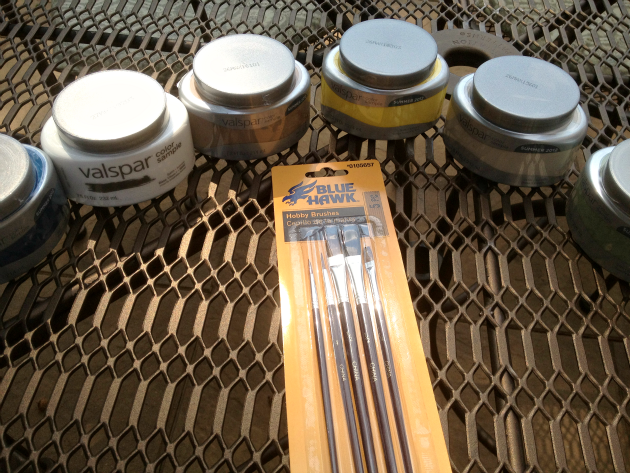
While shopping at Lowe’s I found these great Valspar paint samples. They were only a few bucks each and a great fit for this project because of the wide selection of colors.The hobby brushes by Blue Hawk were in the same section as the paint samples — talk about convenience.
Here’s a PAINTING TIP: start painting at the top and work your way down. This helps with unwanted paint drips. In my case we painted the hat first. Next we painted the hair, face, and body, etc. You can paint the details like the eyes, mustache & beard, and buttons after all the major areas finish drying.
Once you’re done painting your gnome let it dry for a few hours. Then apply the Rust-Oleum protective clear coat. This stuff is awesome because it will protect your hard work from the harmful UV rays of the sun and add a gloss finish that makes the paint job pop. It’s an absolute must if you’re using indoor latex paint like I did. Hanz has been tanning in the sun for over 6 months and his skin tone still looks like new (eat your heart out Joan Rivers).

Oh, and remember how I said this was a kid friendly project? Well, if your kids don’t want to participate bribe them with a sleepover or trip to the movies. It worked for me. I do have some funny before and after photos of my daughter which crack me up.
Here’s a picture of the final product.
Hanz and his turtle (which we haven’t named yet, so I’m all ears) look pretty darn good. He went from looking tired and worn out to being rejuvenated in one day. Now that I think about it, Hanz got a gnome spa treatment. What kind of things need to be fixed in your garden? Let me know in the comment section and I’ll try to assist you with repair ideas. 🙂
Have a great day!


Hi Jeff, I read your post about the gnome on a turtle. Nice. I have a gnome with a large hole in his head. He is about 27 in tall. Can you walk me through steps to fix him? I can send pics
I have a garden gnome that is completely hollow with a full open bottom, how do I fill this gnome to make it more sturdy
How to fix a turtle who no longer has a head
Thanks for the tip that the proper use of the right kind of cement will help in fixing sculptures that might have gotten damaged in my garden. I plan to buy some geometric stone sculptures in order to have a bit more color in my garden aside from green. I hope that I can find a good spot for them that will minimize the likelihood of corrosion.
Good idea!
I have an oldish gnome who was originally glazed.
A lot of the glaze is damaged & missing.
If I took off all the glaze (Don’t want to) there is plaster underneath.
Is it possible to lightly sand the glazed portion and then repaint the gnome?
What would you use to fill in missing pieces?
I have done a couple of acrylic gnomes
With great results. This one is a little intimidating.
Thank you for reading!
Hi Jeff, I have 2 new “cement” looking turtles & already see cracks. Should I use primer and then the protective clear coat? I don’t want to paint them, just want to stop the cracks and I’m worried the primer will make the turtles look a different color, lIke ghostly white. Please advise.
Can I just brush and spray new paint on garden statues to renew the color? They are starting to flake the current white/cream color and need to be spruced up.
Hi Jeff,
I inherited a number of very old garden ornaments (some antiques) from my mom who is downsizing. Some have cracks and chips and some just are clay and have no paint left on them. I’m having trouble finding the right eyes to paint. Any ideas?
In your piece about the cement it would be helpful to do a video because you lost me here.
I’m in Alberta Canada and I’m sure I can find the products required.
Thank you so much!
Carol
Do you happen to know what the original colors are on the gnome riding the turtle? or the gnome riding a frog?
This was great, but did you spray the primer over already painted surface? I have a dutch boy and girl that the paint is peeling and your site gave me plenty of info on repainting but nothing or the removal of chipping paint. Thank you.
Gail, you should scrape off any loose paint first, then sand your boy and girl until they are smooth (not more chipping paint flakes). Then prime and paint.
I have an old vintage cement boy. His head was hit and is a clean cut. He’s been the yard sitting with head just sitting in place. Head has to 🙂 george 10 lbs. Think I can use this to attach head to body. Super write up here. Thanks
Where did you ever find such a treasure?
Need to fix cracking pond. Water still holds, but fear it will split one day. Thanks for your advice. ..
Need to fix a pond that is beginning to crack on the top. Water still holds, but fear that it will split wide open. Help!
I need to repainted a set of frogs. I have noticed fine surface cracks , especially in the eye area. Any suggestions of a filler that is not too expensive and paintable after?
my gnome hat is broken in small pieces my husband my daughter and my cat acting suspicious. Hydraulic cement is not available in my country, is there another method
The primer is key Mike, it allows the paint to stick to the little guy and last a lot longer. And I highly recommend the UV clear coat – it will save years on the paint job.
Personally I like the weathered patina of a garden gnome that has seen many years outdoors. That being said, there are times when restoration is needed. Never thought of using a primer before. Will have to give this a try next time I need to repaint one of the garden gnomes in my collection.
My gnome is not cement, he is acrylic, I need to repair a fair sized hole and crack, what do you suggest for patching him up?
I absolutely love to read DIY (anything) I was wondering if Quikrete would work in one of my projects, I am making concrete globes for my flower garden? What do you think???
Diana, thanks for your question. It depends on how fast you can work. Hydraulic cement setsup super quick-faster than it takes my youngest daughter to use the bathroom (like 5 minutes). If you want to have a better working time try fast setting cement which has a setup time of 10-15 minutes. Let me know if this helps 🙂
Jeff,
First off, I love that you have a garden gnome and a turtle! Second, what a great way to give them a fix and a makeover! I think you should totally send this over to Quickrete and show them a new use for their hydraulic cement! Very cool idea!
Matt, good idea. I love Quikrete products. They’ve saved me more than a few times. The only bad part is having partially used bags of mortar or cement in my garage, haha.
You help me fix my dilemma, I have a cement duck that has been in my family for 80 yrs. He has a chunk missing on his back and couldn’t figure out what to use to fix him, hydraulic cement. That is now going to be my weekend project. Thank you. Can’t wait to fix him up and show the family how great he looks.
Kate, 80 years!! That’s impressive to say the least. So happy you’ll be able to fix up the duck and show it off to your family. Hope you’re having a great day.
Wish I had saved the gnome that I threw away after my grandson whacked his hat off with a baseball bat! I should have researched more about how to repair this little gnome. I did put him and his broken hat in the recycle bin so maybe someone will put him together again.
Those baseball bats do magical things-Lol. Well, at least you have a good excuse to get a new little guy (gnome or grandson). Just kidding of course.
Would hydraulic cement work to replace broken areas on the rim of a pedestal flower urn? What about cracks?
Kerri, you could always give it a shot and see what happens. Dampen the urn before applying the hydraulic cement to create a better bond. If it doesn’t work at least you gave it a shot. The cement could certainly help with cracks, too.
Interesting project. I don’t happen to have a gnome, but I’m intrigued by hydraulic cement. Maybe you could do another post with other ideas for how to use it around the house, and why.
Thanks Cath, there are so many different uses for Hydraulic cement. Here are a few: sealing gaps around pipes coming into or going out of the house (e.g. hot water tank or furnace vents), sealing leaks in pools or cracked concrete walls, etc. Here’s the link to the product site http://www.quikrete.com/ProductLines/HydraulicWaterStopCement.asp
You want to use this kind of cement for leaks because it sets up quickly and for vents because it seals them very well. Hope this helps.
Any suggestions for re-freshing a plastic fawn that has been out in the sun and weather for almost 45 years now? The plastic is still thick and firm, but he’s faded rather sadly.
You can’t go wrong with Rust-Oleum spray paint for plastic items. Make sure to add a primer coat, let it dry, then apply at least two coats of your top coat. It’s great that your plastic is still in good shape. You’ll be surprised at how well Rust-Oleum will work. Let us know how your project turns out.
wonderful tip! i’d like to suggest the name “Franz” for the turtle (like the SNL skit). 🙂
LOL, Franz is a great name Colleen. Hanz & Franz!!! That was a great skit on SNL between Dana Carvey and Kevin Nealon. Thanks for the good laugh.
Great job!! Hanz looks wonderful!! Maybe Gretel would be a good name for the turle LOL TFS!!
Nice suggestion Alisha, so far it’s between Gretel and Franz. I’ll have to ask my daughters which name they like best and post it here.