When I first walked through the Millie’s Remodel house, I knew I had to do two things to the home. First, I needed to add a doorway for the laundry room inside the house. Second, I really needed to add a second bathroom. Believe it or not, I was able to accomplish both goals in one room. Come see my design plans for the shared powder room and laundry room.
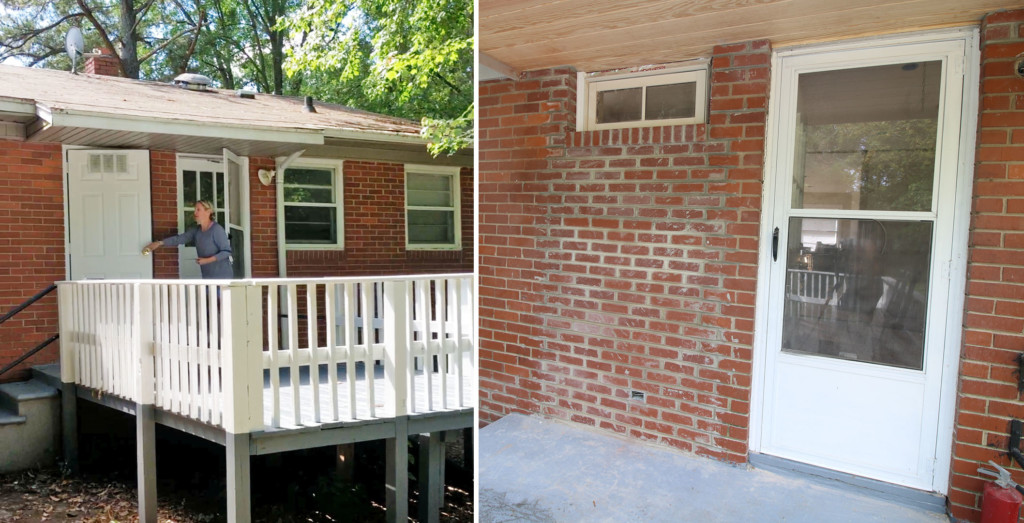
If you remember, Millie’s laundry room was only accessible from the back deck. You had to walk out the back door, make a U-turn and go into the laundry room. I’m certain it was a major inconvenience doing laundry if it was raining, snowing, or just plain cold outside.
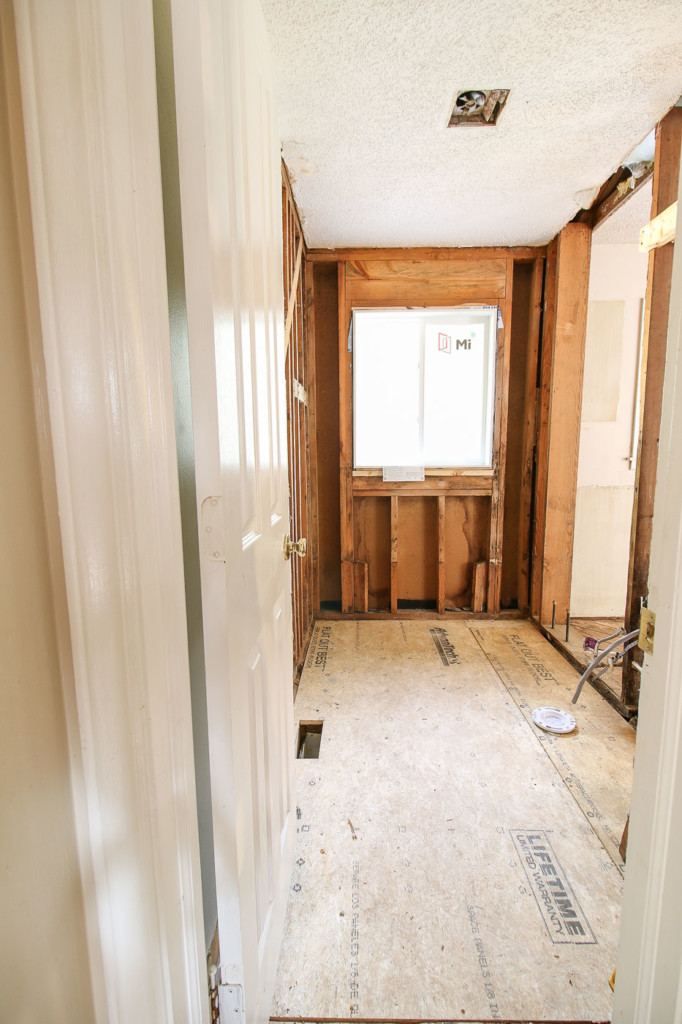
To remedy this situation, I had my masonry contractor brick up the door and we put a transom window at the top of the opening to add some natural light into the room.
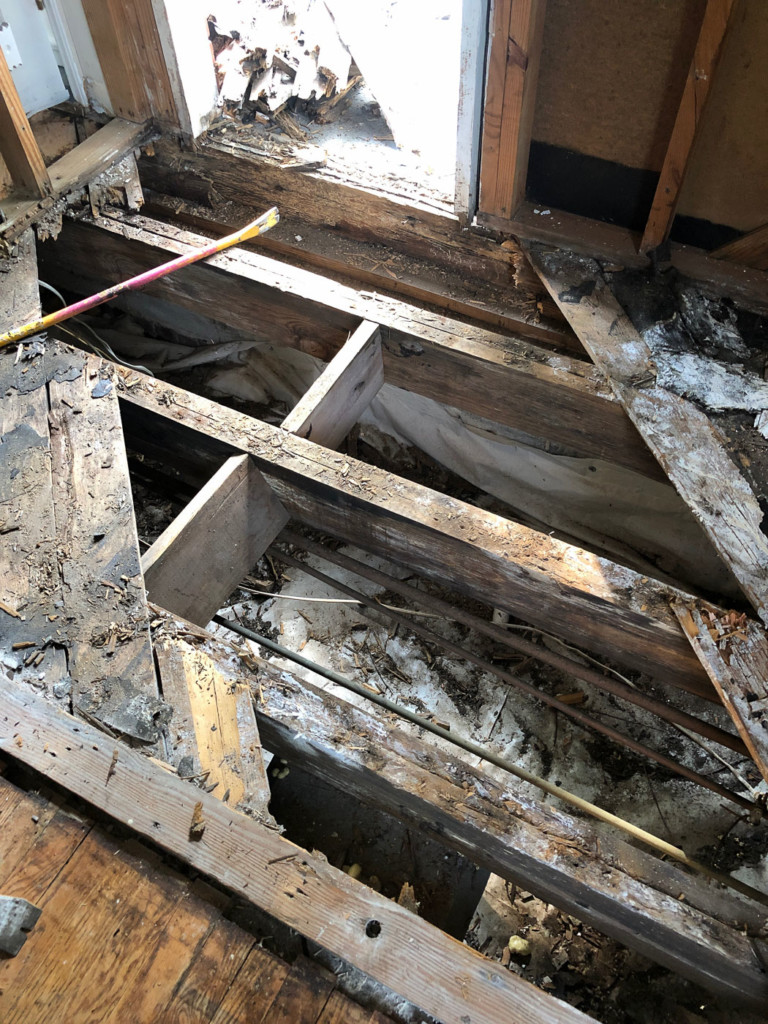
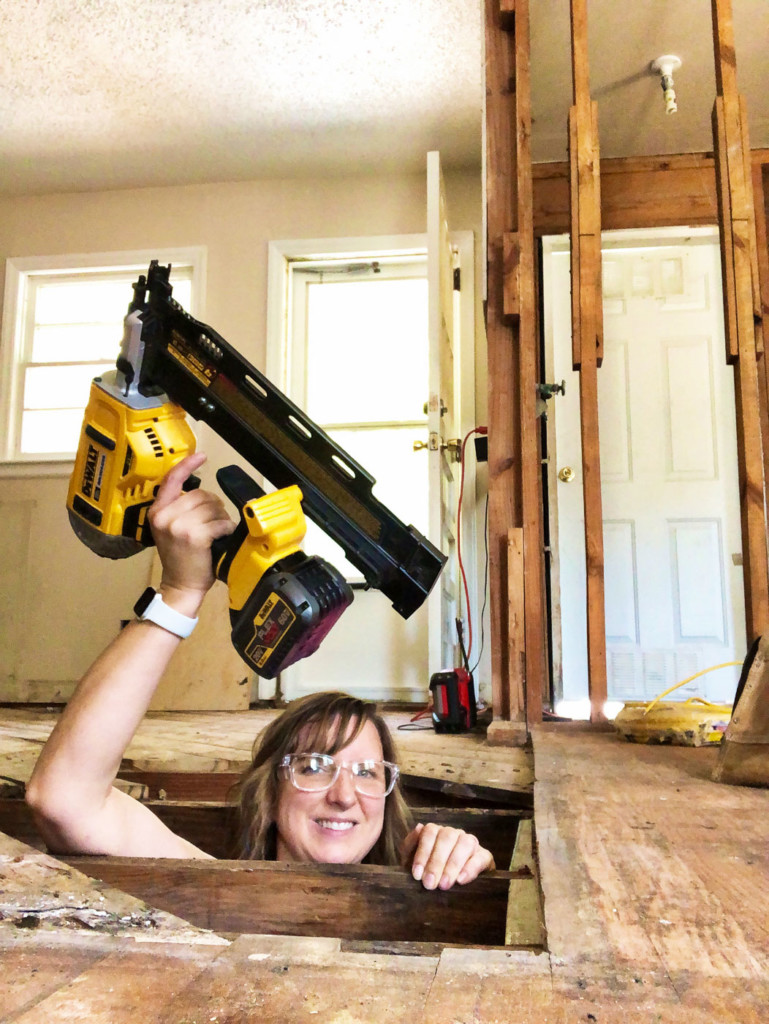
But, I got ahead of myself. Did you remember what I found under the laundry room floor and door?
ROT! Lots of wood rot and a fungus growing on the floor joists. My framers came in and replaced all the damaged joists and put down AdvanTec material for the subfloor. This is my new favorite material for subfloors. It’s moisture (and therefore mold) resistant. AdvanTec has tongue and groove edges so there’s virtually no movement or squeaking in the floor.
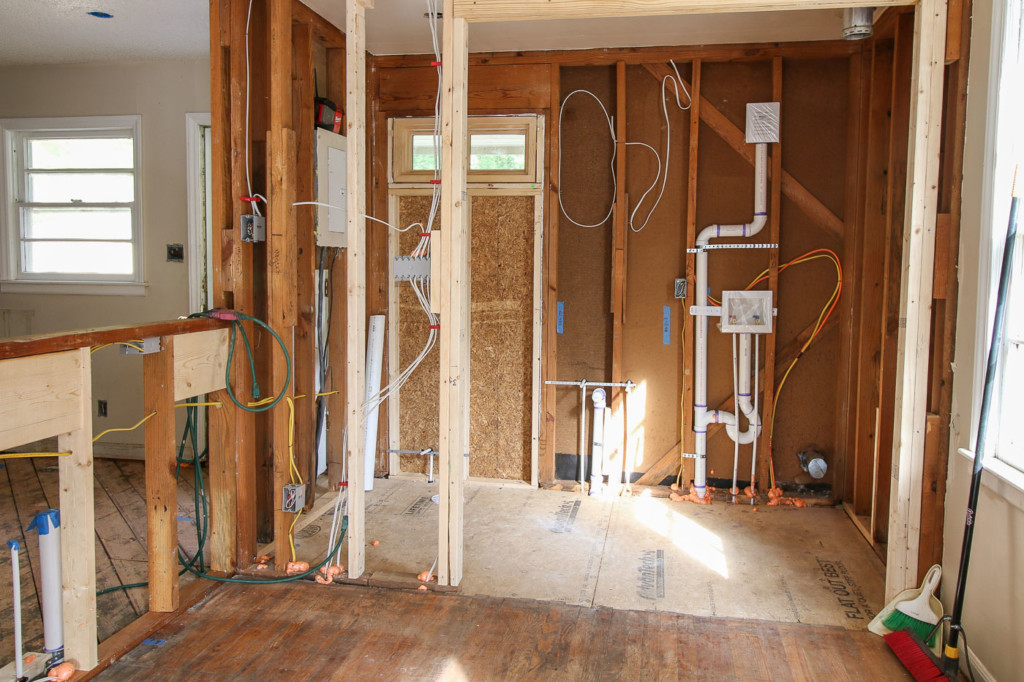
A new door opening has been framed into the house. The doorway may seem extra wide, but that’s because I still have to install the pocket door frame there.
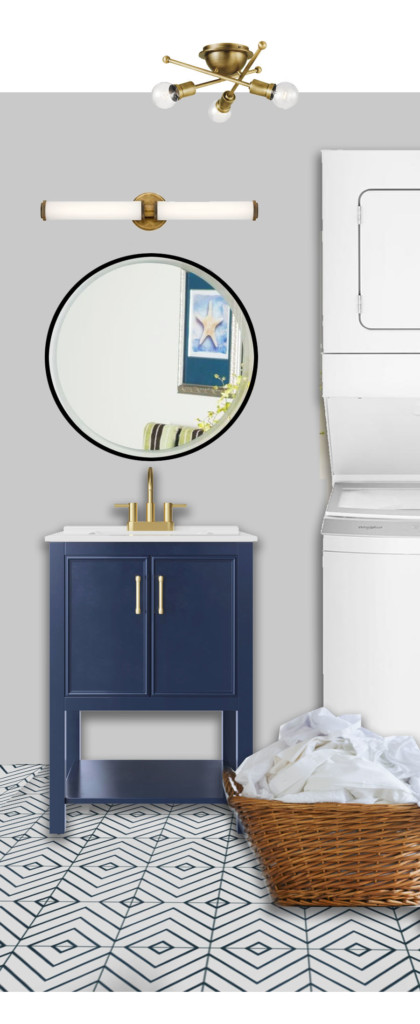
Now that the subfloor and framing is done, it’s time to focus on making this room beautiful again. Here’s my design board for the shared laundry and powder room.
(I’ve included affiliate links for your convenience. I earn a small percentage from a purchase using these links. There is no additional cost to you. You can read more about affiliate links here.)
This bathroom has to do double-duty as a laundry room and powder room. For this reason, I opted for a vanity with storage inside. I can’t wait to see all these elements installed in this room. Personally I like the classic navy and white color palette.
What about you? Do you like the design choices I made for this room?
A special thank you to the Millie’s Remodel Sponsors:
The Millie’s Remodel project sponsors have donated materials for the Millie’s Remodel project. As you know I am very particular about the brands I work with and recommend. As a general contractor, I choose the products used on my projects wisely to make sure they last a lifetime. Therefore, I have no reservations putting my name behind each and every one of these sponsors.
Millies’ Remodel has come to the point where it’s time to start building back! Hooray. But, this means I need to pick out the final finishes. Want to see Millie’s main bathroom design board?
Millie’s Remodel: Main Bathroom Design
I find the process of creating a design board very helpful. It’s the easiest way to see how everything will work together and pinpoint anything that might not fit with the desired design style.
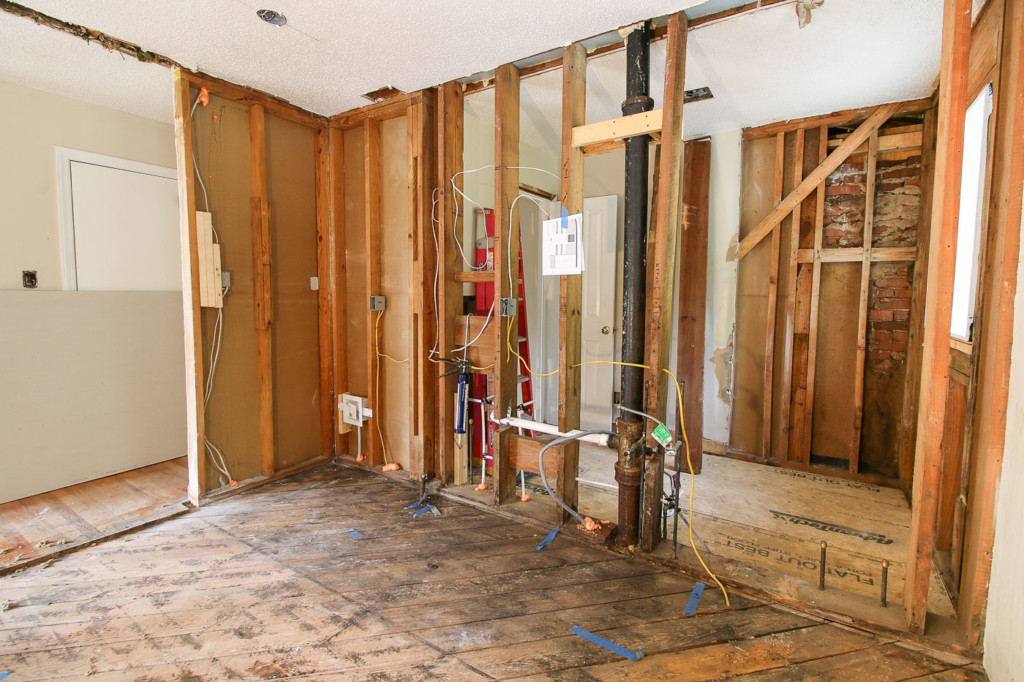
Before I show you the design board, I know I left you hanging for a month after we’d stripped everything down to the studs and installed new electrical, plumbing, and a new Trane HVAC unit. Now we have a clean slate for the bathroom.
You have to admit, it’s an improvement from the original bathroom. Especially because the toilet was ready to fall through the floor! In case you forgot what it looked like when I bought the house, here’s a reminder. How could you forget that beautiful faux blue marble vanity top? Yuck.
If you’re wondering where I was for a month, I had three trips from mid-December to mid-January. Although normally I get homesick if I travel more than once in a month, it was nice spending time with my boys, my husband, my sister, and a few friends. First, we flew across the country and beyond for a vacation trip to Hawaii over Christmas. We had a fabulous time swimming with sea turtles, whale watching, and witnessing all the beauty along the Road to Hana, and a sunset view from Haleakala in Maui. Then we flew to the big island and had our minds blown touring Volcano National Park. We capped off the trip with a stop in San Jose to see my sister, my nieces, my brother-in-law, and my mom! There’s nothing like family to make you laugh until you are crying.
After being home for a week, I took a quick trip to Hilton Head, SC to tour the HGTV Dream Home. You can see parts one and two of the tour.
Finally, I flew back west for a week to attend the International Builder Show in Las Vegas. I’ve never been to this show but it was amazing, overwhelming, and exhausting all at the same time. But enough about my travels, today I want to show you the finishes I’m contemplating for Millie’s main bathroom.
Mid-Century Style
I knew Millie deserved a mid-century modern vibe given her age (and the popularity of this design trend.) To tell you the truth, I’d never designed anything with MCM in mind. To familiarize myself with this more minimal design style, I searched “Mid-Century Modern” images in Pinterest and started creating a design file for Millie’s Remodel.
After delving deep into the Mid Century pin world, I began to put together elements for the bathroom.
(I’ve included affiliate links for your convenience. I earn a small percentage from a purchase using these links. There is no additional cost to you. You can read more about affiliate links here.)
What do you think about the finishes I picked for the bathroom? I’m loving the combination of warm colors. The light fixture and lighted mirror from Kichler will add some much needed soft light in the bathroom.
Can I tell you about those subway tiles? I couldn’t find an exact source link for those tiles because I purchased them at my local Habitat ReStore! And boy did I get a steal on them! I paid $8 per box meaning I paid 71 cents per square foot! The vanity I chose is a dresser I plan to transform into a vanity by adding a sink and modifying the drawers to fit around the plumbing. I can’t wait to show you how to transform a dresser into a vanity.
Finally, let’s talk about the star of the bathroom. Those tiles! The Vegas 3 Lili Cement Tiles can be installed in several patterns, but I liked this houndstooth style pattern. Of course, a regular doorknob wouldn’t be fitting for a mid-century modern house, so I’m excited to install those flat black Latitude door levers by Schlage.
I’m dying to know if you like the mood board for Millie’s main bathroom. Anything you’d change?
P.s. Lili Cement Tile, Schlage, and Kichler are sponsors of the Millie’s Remodel project. I am so grateful for their support of this project.
A special thank you to the Millie’s Remodel Sponsors:
The Millie’s Remodel project sponsors have donated materials for the Millie’s Remodel project. As you know I am very particular about the brands I work with and recommend. As a general contractor, I choose the products used on my projects wisely to make sure they last a lifetime. Therefore, I have no reservations putting my name behind each and every one of these sponsors.
This is the next update in the Millie’s Remodel series. Recently I had to decide whether I needed to replace the HVAC unit for Millie. Although it was an expensive proposition, the decision on brand was an easy one for me.
Millie’s Remodel: HVAC Update + How to Extend the Life of Your HVAC System
Thank you for your patience with the Millie’s Remodel series. Today I have the next update and this one could actually save you money and the dread of replacing your HVAC unit sooner than you want to.
Just so you know, TRANE is a Millie’s Remodel project sponsor. But, if you’ve been around my website for a while, you know I don’t promote just any brands. If I’m going to mention a brand, you can be sure I’d recommend them to my best friend or my own mother. Now that we’re past the legal disclosure stuff, read on to find out why I like TRANE so much and how to extend the life of your HVAC system!
Millie’s Remodel Inspection:
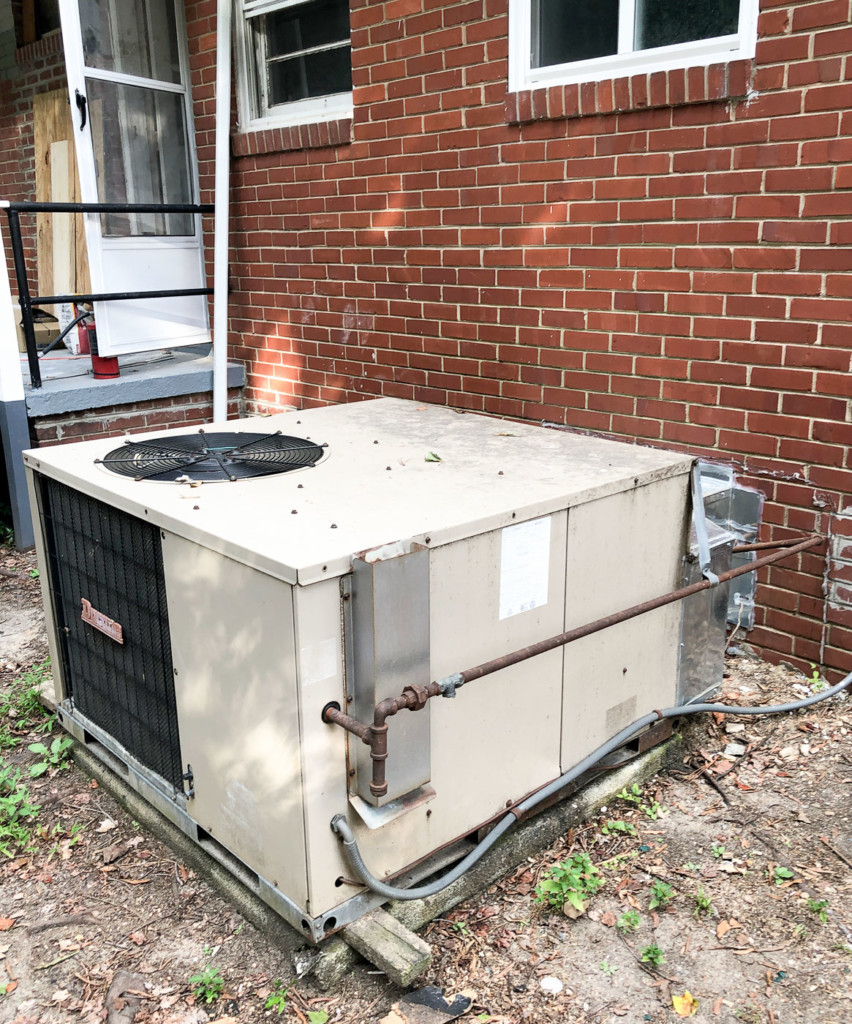
During the home inspection at Millie’s Remodel, the inspector told me the exhaust fan for the gas furnace was no longer functioning in the unit. Given the age of the HVAC, he recommended replacing it instead of fixing it. Plus, the unit was incredibly loud and sounded like a helicopter! I knew it would need to be replaced.
When TRANE contacted me about being a Millie’s Remodel sponsor, I knew it would be the perfect opportunity for me to share how we decided to purchase a TRANE in the past and how long it lasted.
Back in Time:
The year was 2001 and Pretty Handsome Guy and I had just moved to Raleigh. The Dot Com bubble had burst and we were left without full-time jobs. We had just purchased our first house—needless-to-say—money was tight. We were surviving, but money was still not flowing in. Despite our financial situation, we decided to host a party for some of our new friends. Midway through the party, I looked at our friend Jaye, who was 8 months pregnant. Sweat ran off her forehead and I suddenly realized it was a bit hot in the house. I kept turning the thermostat lower, but each time I checked it, the temperature was climbing instead of going down.
After the party, I walked outside and discovered the unit was covered in ice. I knew enough to know that was not a good sign. We called a few HVAC companies and got the news that it was probably best to replace our old HVAC.
Although we were cash-strapped, we knew we didn’t want to make a poor decision on a major system for our home. After a lot of research, we decided to purchase a TRANE unit. Little did I know that this same unit would still be pumping conditioned air almost two decades later. Our rationale for choosing a TRANE was: if we chose less than stellar HVAC equipment we could be looking at replacing it within 10 years. Whereas, if we chose a TRANE, we could expect to have the same unit for 15+ years. It made sense to spend a little more money now, and hopefully, only have to replace the HVAC twice over 30 years versus paying for three systems in the same time frame? Now doesn’t it make sense to spend a little more up front to save you money in the future?
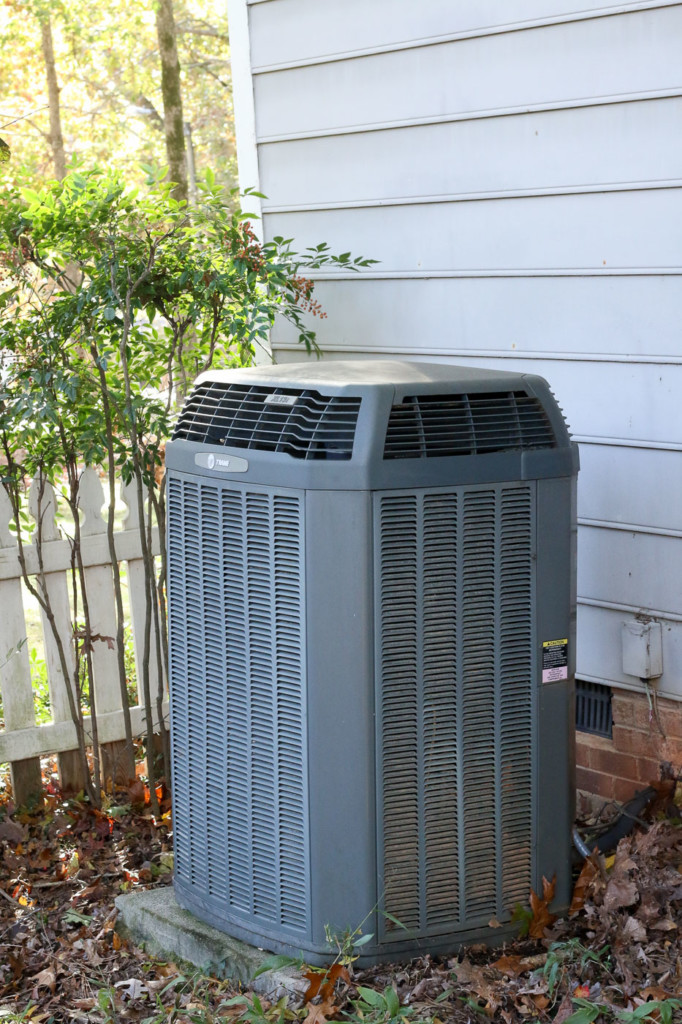
Guess what! Our rationale was correct. In case you weren’t aware, we moved in 2007 to the house across the street from our first home. Over the years we’ve watched three families move into our old house. Recently I was talking to the current owner and I asked her if she still had the TRANE unit we installed. She told me yes, she did, and it’s still working perfectly! Here it is:
Deciding what brand HVAC system to buy for Millie, is obviously an easy decision. After seeing the old TRANE we put in at our old house still pumping heat and cool air after more than 18 years, why would I choose anything else!
How to Select a New HVAC System:
Ask around. Find out from friends, family, or neighbors which system they installed and who installed it. Ask how old their system is and if they’ve had any issues with the equipment. When I mentioned I was having a TRANE installed at Millie’s Remodel I received several messages from my followers who were also happy TRANE owners:
How to Hire an HVAC contractor:
I recommend finding local TRANE contractors in your area by going to the TRANE website. Then look up the recommended contractors on Better Business Bureau and search for Google or Yelp reviews. When you call, ask for references and call the references. (Not sure what to ask? I have a great article on How to Hire Contractors with suggested questions to help you get the most information from references.)
The HVAC Installation:
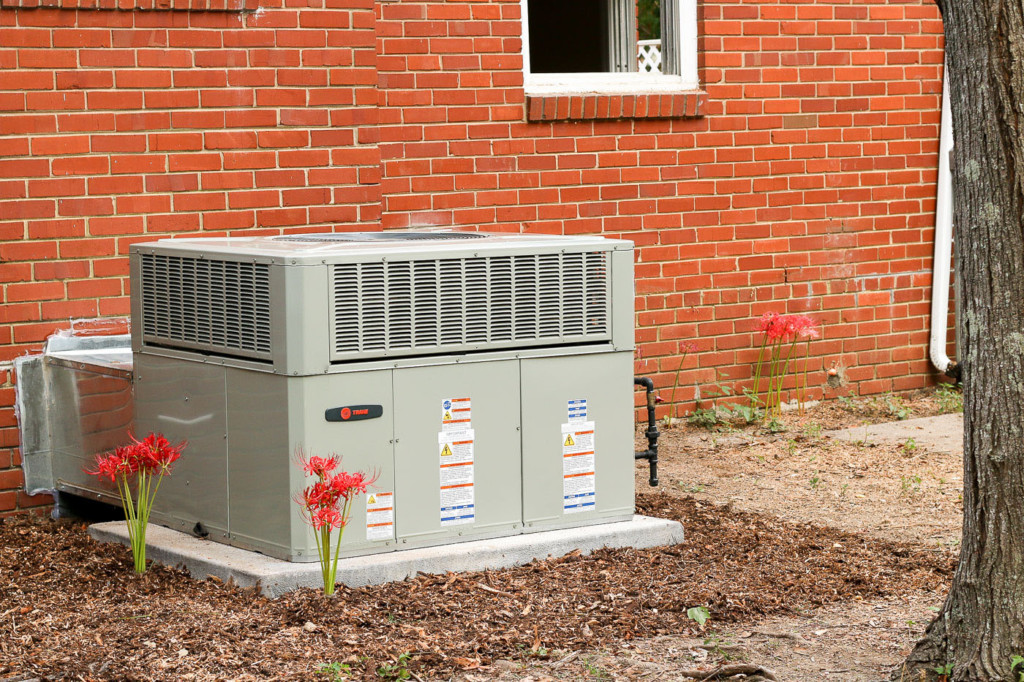
Once the day arrived to install the new HVAC system at Millie’s Remodel, the contractors removed the old unit. I was not sad to see that eyesore and earsore go! (It was incredibly loud.)
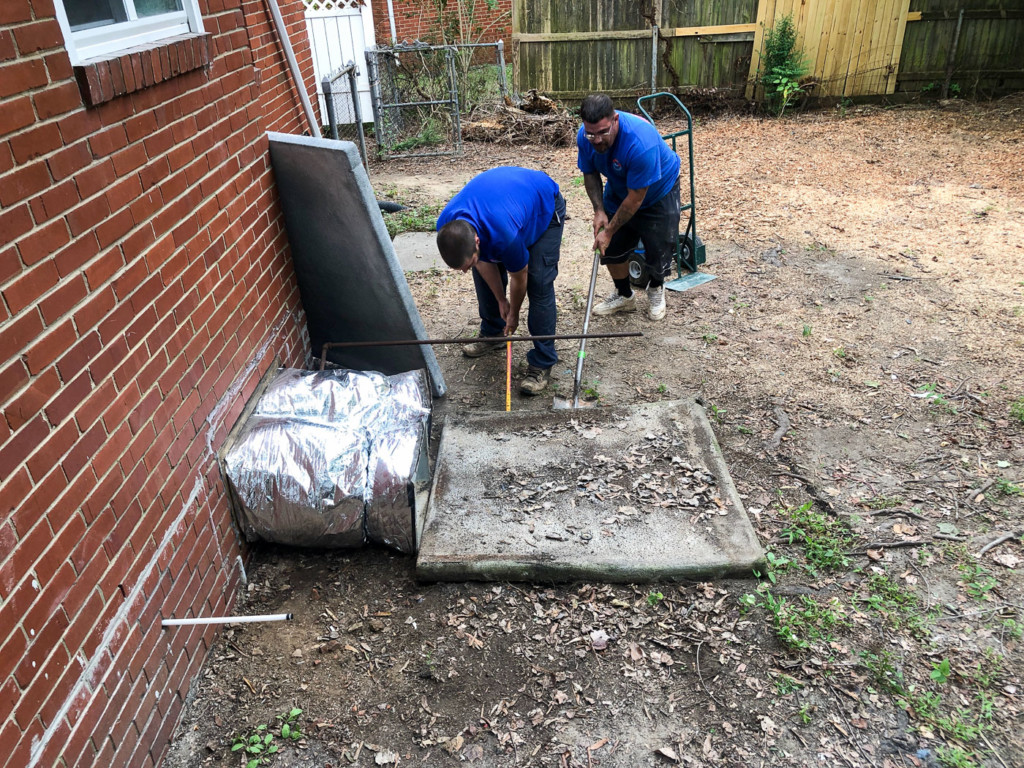
Luckily the ductwork was almost brand new, so we all agreed to keep it so I could save a little money. The contractors did remove the old pad and put down a new one.
Tip: Always make sure your contractor levels the new pad. Non-level pads can put undue stress on your unit. Do not let them throw mulch or leaves (compostable materials) under the pad to level. They need dirt or gravel or other non-composting material. If you have eagle eyes, you may have noticed a piece of lumber leveling the old unit. This is not an acceptable way to level your HVAC pad.
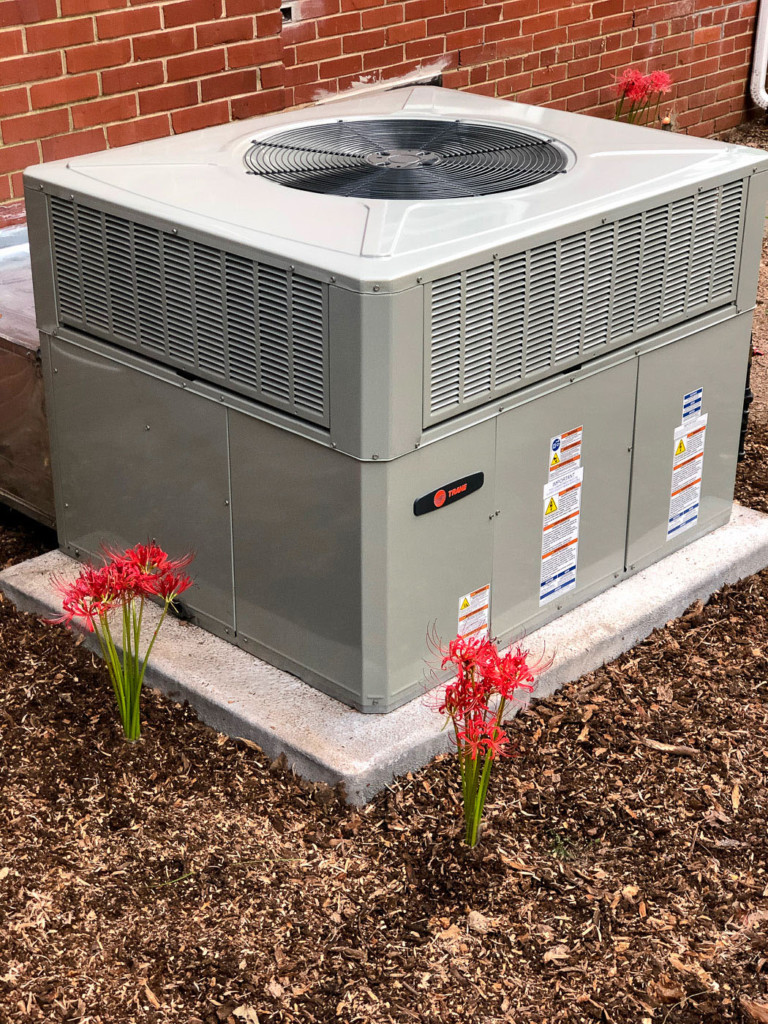
While the guys were installing the new TRANE unit (I chose the TRANE XR14c which is not a top of the line model, but is still energy-efficient and quiet.) I asked the foreman a question after he finished installing the unit. I specifically asked him what he saw in terms of age of units when removing old HVAC equipment specifically TRANE units vs. other brands. Watch the video to hear his unscripted response:
How to Keep Your HVAC System Running Smoothly:
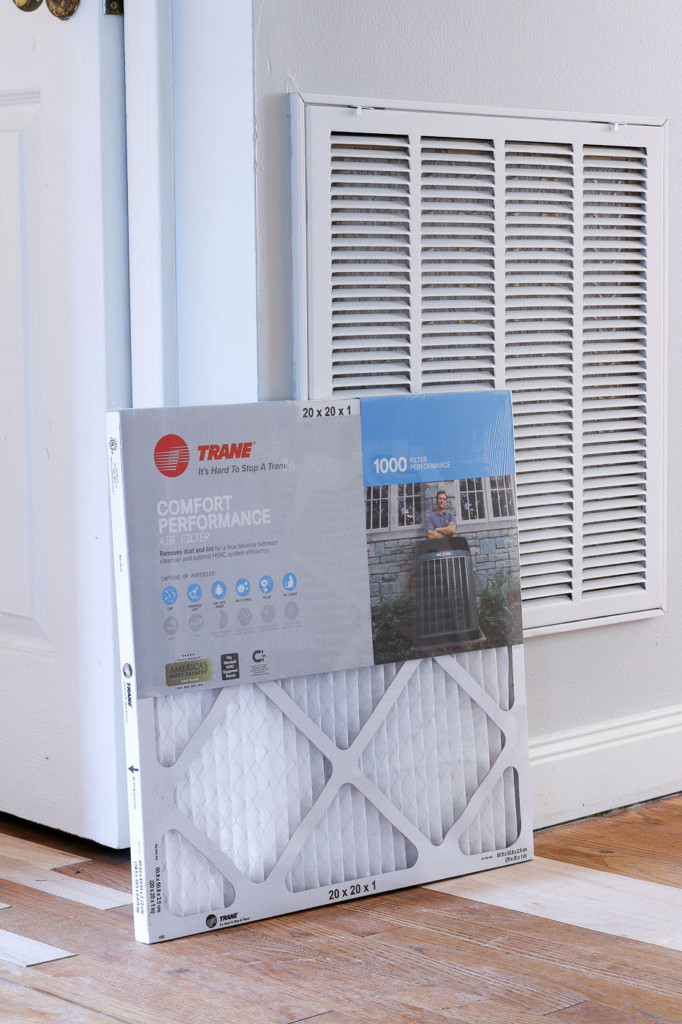
If you only do one thing to prolong the life of your HVAC unit, it would be to change the filters regularly. Whether that means monthly or up to three months will depend on your home’s dust levels (and any pets you have.) Keep an eye on your filters. If they are showing more dust and hair before three months is up, change them more regularly.
If your home is going through a renovation, it’s important to change the filters after a lot of debris has been released into the air. The day after my drywall contractors finished sanding, I replaced the filters. And immediately after the floor refinishers sanded the floors, I replaced the filter. When the renovations are complete I’ll replace them again.
Other things you can do to keep your HVAC system running smoothly is to keep vegetation and landscaping at least 18 inches away from the unit. There needs to be proper airflow around the unit for it to work efficiently.
Call for a maintenance tune-up and check on your system in the Spring and Fall. Don’t wait for temperature extremes to find out your system was stressed and you are now without heating or cooling.
For more maintenance tips and ways to keep your system running a lot longer, read these maintenance tips from TRANE. In the meantime, I’m going to enjoy this nice, quiet, and efficient new HVAC system from TRANE!
Do you have any TRANE stories? Have a system that proves the saying, “It’s hard to stop a Trane.” Please share in the comments!
Have a great holiday, I’ll be back in January with the next Millie’s Remodel update!
Disclosure: This is a sponsored post for TRANE. I was not told what to write. All opinions are my own. I am particular about the brands I represent and will always let you know when you are reading a sponsored post.
https://prettyhandygirl.com/wp-content/uploads/2019/12/DOA-old-hvac.jpg23193024Brittany Baileyhttps://prettyhandygirl.com/wp-content/uploads/2021/07/PHG-logo-tagline-2020-1030x211-R.jpgBrittany Bailey2019-12-13 10:00:002020-02-06 09:03:12Millie’s Remodel: HVAC Update + How to Extend the Life of Your HVAC System
Come take a peek into the Millie’s Remodel project house and see the progression as I start to build back after demolition. Did I say demolition is finished? I thought it was, but looks like there might be a tad more. Let’s take the tour.
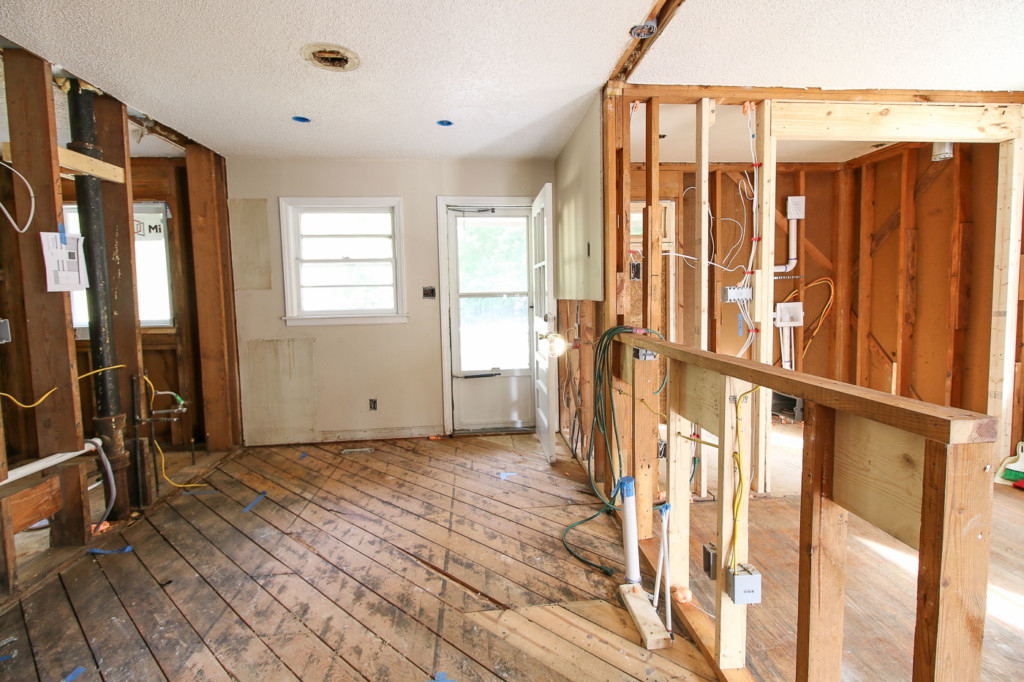
It’s been a busy few weeks since the demolition. But I want to give you a little tour and show you what’s happened at the Millie’s Remodel project. There’s a lot of change and the new plumbing and electrical is going in.
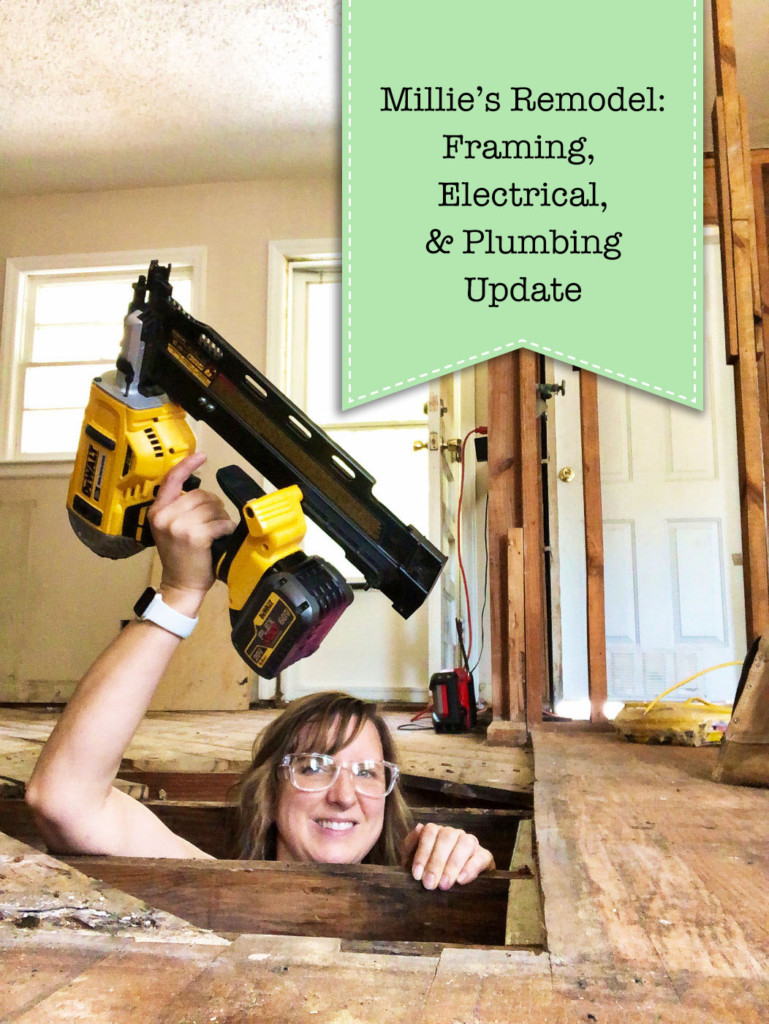
While the electrician and plumber were running the new lines, I spent my time framing the pocket doorway opening and adding blocking to weak areas under the floor. And although I thought demolition was done, I was only dreaming.
Want to see the video tour and updates? Watch my video filled with behind the scenes footage and a tip below:
You can see my plumber has been busy running the new plumbing in the shared powder room and laundry room. I still need to frame the header for the sliding door, but first let me take you on the rest of the tour.
I probably spent the better part of the day adding blocking under this section of flooring and other areas where the subfloor was weakened by water damage or where an air duct was added (without additional support for the flooring that was cut.)
My plumber has already tied into the old cast iron vent stack. We decided to leave it instead of having to patch the roof where the stack exits the house. My plumber and electrician did work together to remove the insanely heavy old cast iron tub. I don’t know what I’d do without these guys.
My siding contractors, Stephanie, and I worked together to install the new bathroom window. The old one was wooden with see-through glass. This new window has obscure glass and is made mostly of PVC.
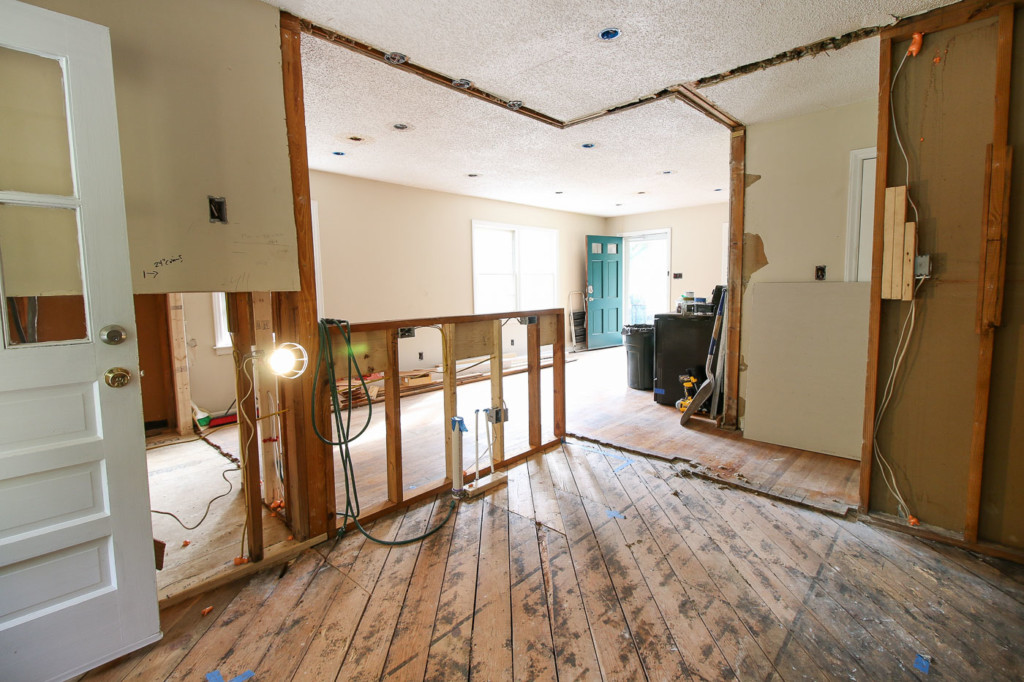
In the kitchen, after patching the subfloor, I framed up the half wall for bar seating on the other side of the kitchen. I’m definitely excited to see this new layout come together.
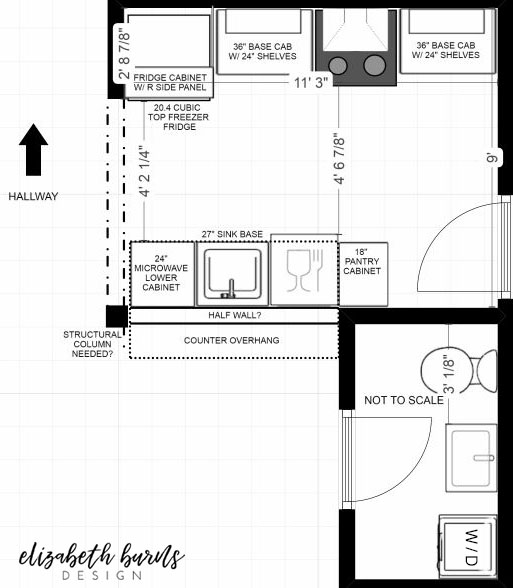
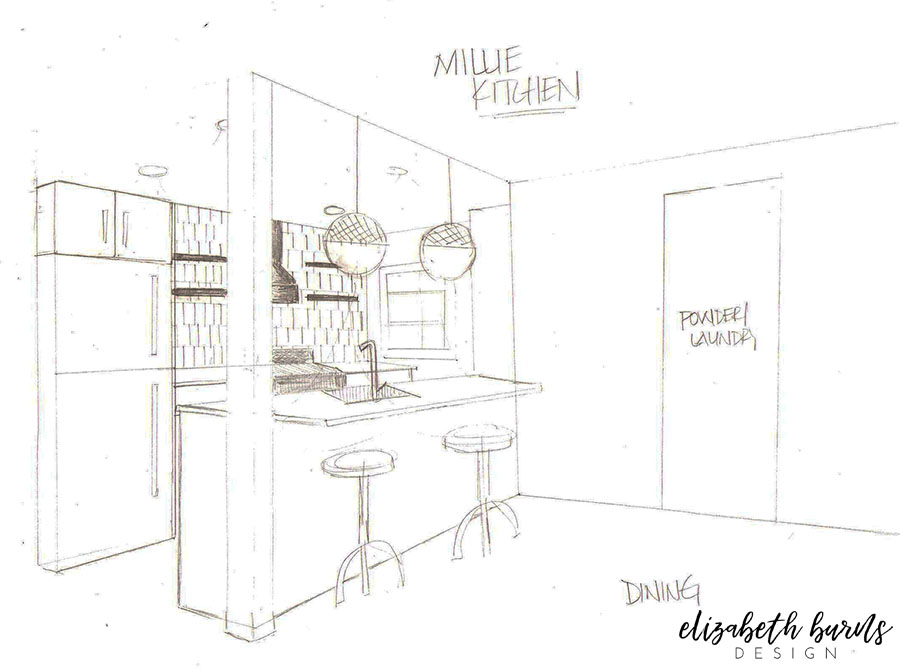
I worked with Elizabeth Burns, a local designer, to help me with kitchen floor plan ideas.
She designed a galley style kitchen and I’m thrilled with the plans. I can’t wait to see it in reality!
It’s going to be a beautiful light-filled kitchen!
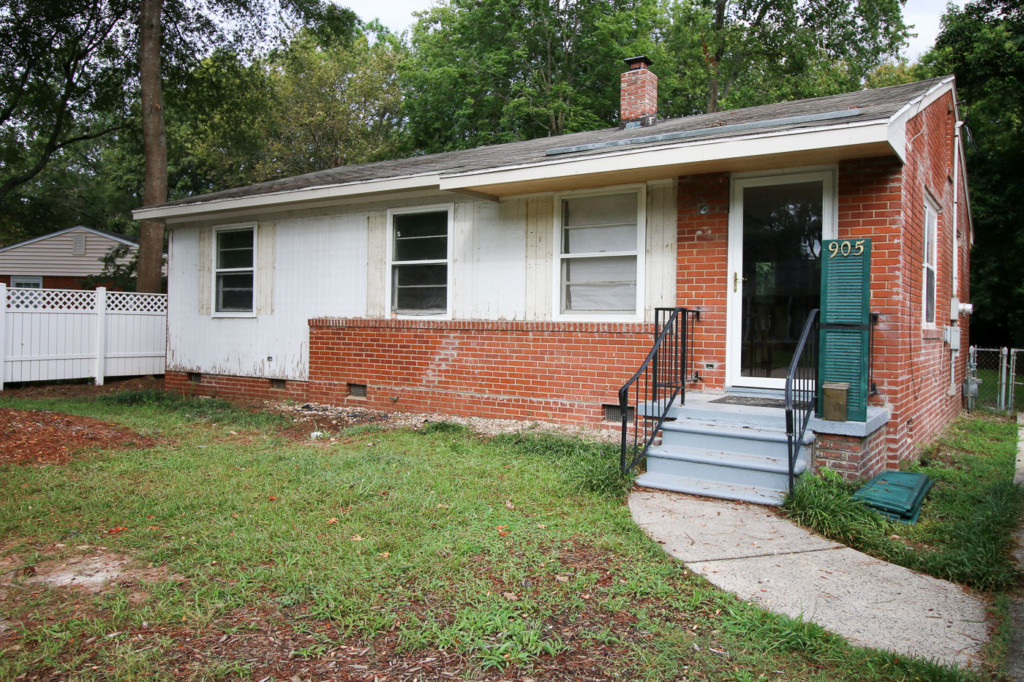
Out front, you can see the old vinyl siding has been removed and my siding contractors are adding new fascia board and soffits. Remarkably the original wood siding (that was under the vinyl) is still solid. I’m planning on cleaning off some of the flaking paint and repainting it.
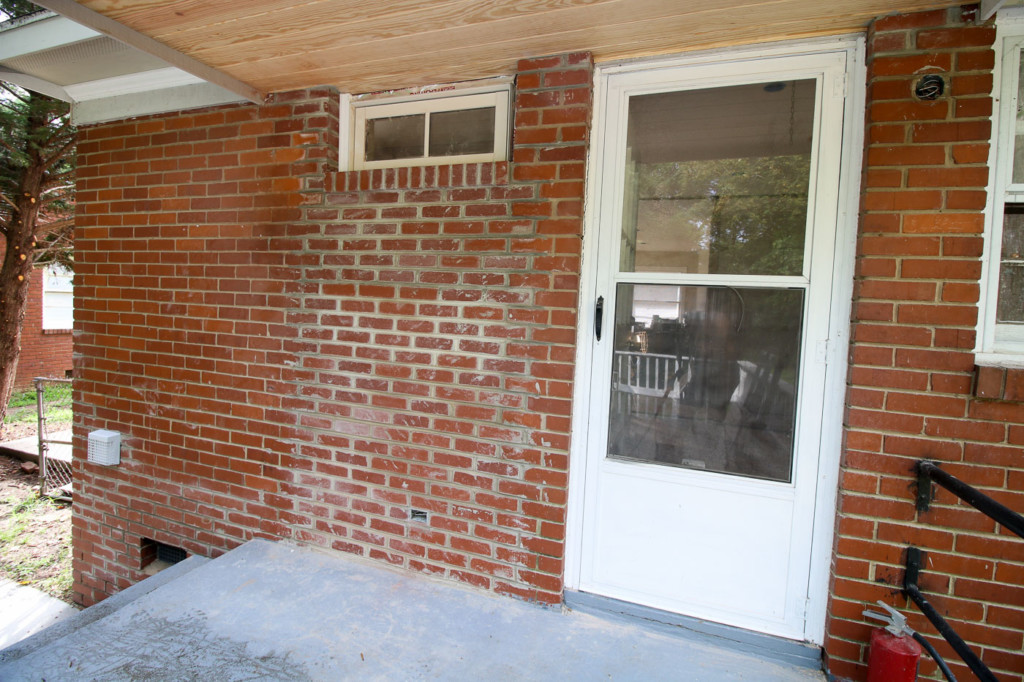
Off the back porch, you can see where my brick mason closed up the old doorway into the laundry room. We installed the transom window at the top of the old doorway and I’m excited to have a little bit of natural light coming into the powder room/laundry room.
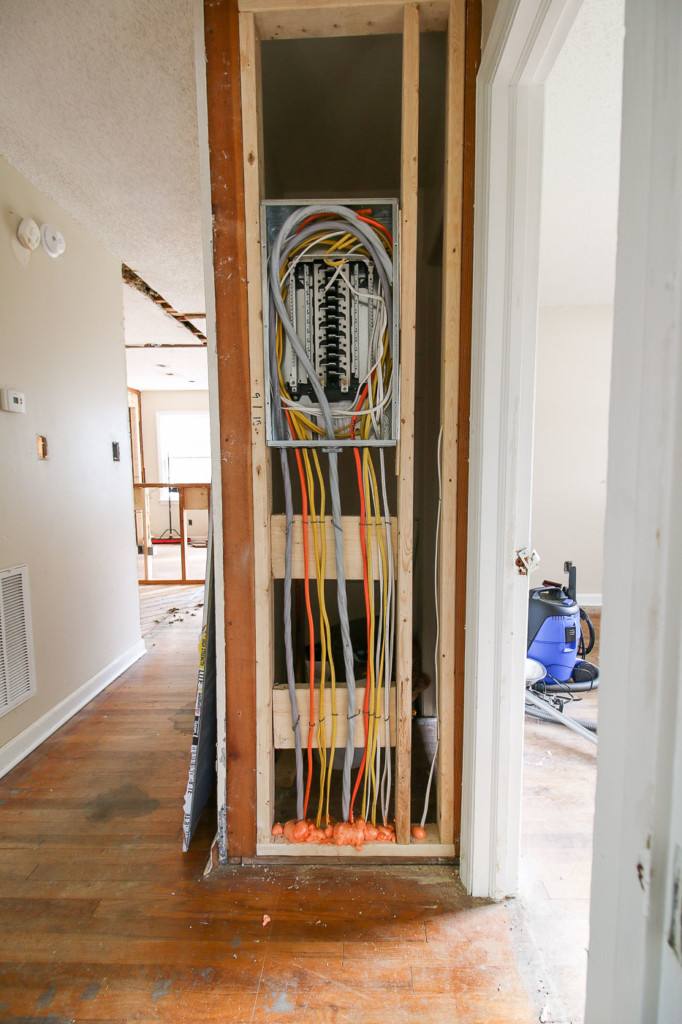
Because the old subpanel was in the room that is becoming the new powder room and laundry room, we had to move it to meet building codes. I framed up this little wall, so we could install the subpanel. The other wall had all the studs turned sideways so we didn’t have the depth we needed. But now we do. And we have a new subpanel and wiring installed. Isn’t it beautiful?
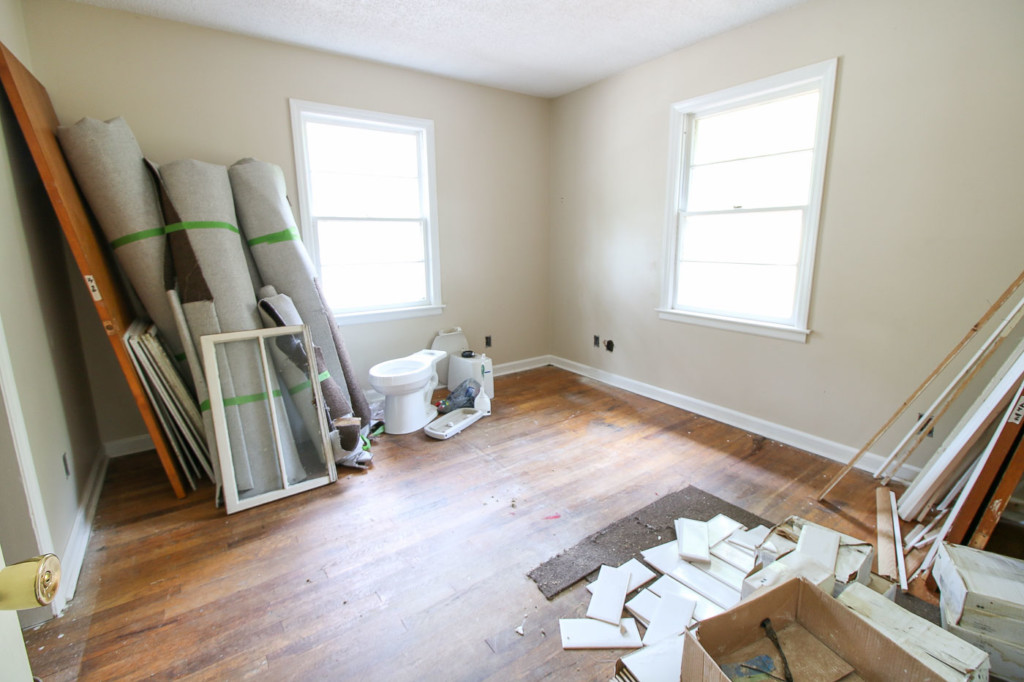
For now I’ve been using the back bedrooms to store the salvaged materials and tiles. Thank goodness I have a roof and walls in this house as opposed to the Saving Etta house. To store materials at Etta, I had to buy a storage trailer.
I hope you’re enjoying the Millie’s Remodel updates. Getting the framing, electrical, and plumbing finished is a big step forward. After we pass the rough-in inspection, I should be able to get my drywall contractor in to start putting the walls back up! Hooray!
Stay tuned for more updates soon.
A special thank you to the Millie’s Remodel Sponsors:
The Millie’s Remodel project sponsors have donated materials for the Millie’s Remodel project. As you know I am very particular about the brands I work with and recommend. As a general contractor, I choose the products used on my projects wisely to make sure they last a lifetime. Therefore, I have no reservations putting my name behind each and every one of these sponsors.
How to Protect Your House From Termites or Why I’m Canceling My Termite Treatment
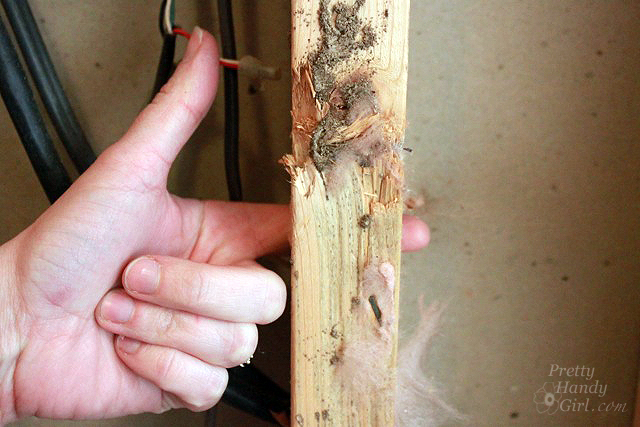
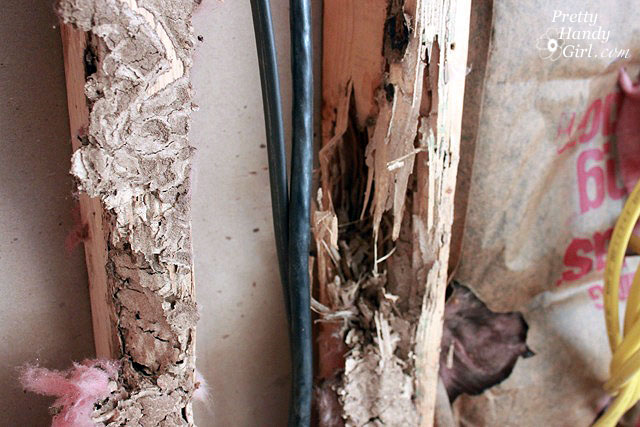
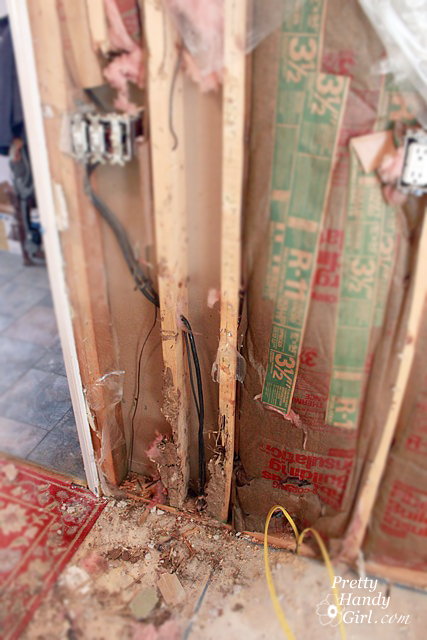
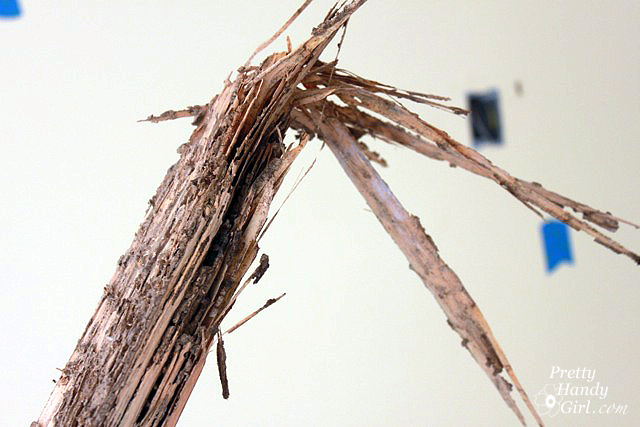
You may have seen my update at the Millie’s Remodel and how I found termite damage under the laundry room floor. I was just completing demolition and discovered the two exterior rim joists crumbled in my fingers. I quickly called my framing contractor and begged him to come out as soon as possible to repair the damage. Then I quietly cursed the former owners of the house for not properly knowing how to protect the house from termites.
Unfortunately, work on the house had come to a screeching halt until this fix could be completed. Luckily, my framers came at the end of the week and replaced the destroyed joists and subfloor. But, all this could have been avoided if the owners knew more about termites. So, today I’m here to beg you to educate yourself on termites and the costly damage they can do to your home. Learn how to protect your house from termites! If you live in the United States (with the exception of Alaska), you have termites! All you Northerners, stop shaking your head at me. I know you’ve been told termites aren’t an issue for you. Keep reading and I’ll tell you why you do need to be concerned!
As a general contractor, a real estate investor, and all around handy girl, I’ve seen my fair share of termite damaged homes (including my personal home.) Therefore, when I hear from people that they don’t believe in termite treatments, I give them a dumbfounded look.
Termites can damage your home, causing costly repairs—or worst yet—an unsafe home. Did you know there is a termite species that can cause major structural damage to a house within six months! And these termites (Formosan Termites) love warm and humid environments. If that describes your area, you are playing with fire (or little wood eating insects) if you don’t have a termite prevention plan.
Top Myths Why People Don’t Have a Termite Treatment Plan:
Termites Aren’t Common in Our Area
Currently termites have been reported in all of the United States with the exception of Alaska. Warmer temperatures have created a friendlier atmosphere for termites, even in northern states.
My House is Made of Brick
You may think because your home’s exterior is brick, you aren’t at risk of a termite infestation. But, what’s inside your walls? If your home’s framing (interior walls, floor and ceiling system) have any wood, you are at risk. Not to mention those beautiful wood floors you cherish. The only exception would be if you live in a concrete bunker (or concrete block house) with vinyl or tile floors. And even still, if you have any wood in your house, it can be at risk.
I Get an Annual Termite Inspection
Some people think they can have their home inspected on a regular basis, and if termites are discovered they can treat the infestation. Remember what I said about the aggressive termite colony that can do major structural damage in as little as six months. This is a new strategy I just heard about, but frankly I believe in prevention vs. repairs.
I’ve Never Seen Any Termites Near My Home
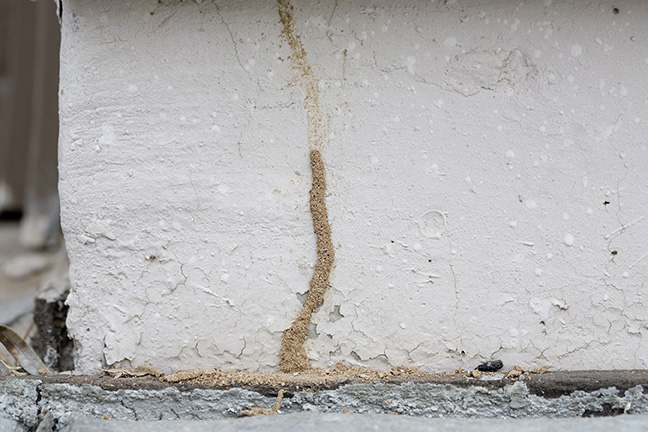
Most termites are subterranean, meaning they live underground. It’s not likely you would see them or notice an infestation until your home has sustained major damage. Termite tunnels can be detected inside a crawlspace or on the foundation walls. If your home’s foundation is close to ground level, you may not see anything at all until it’s too late. Also, if you have an enclosed crawlspace or encapsulated crawlspace, you may not see the tunnels behind a vapor barrier.
Types of Termites in the Colony:
Termites workers (the ones that do the actual damage) are small white insects approximately 1cm in size. They are actually very fragile and need moisture to live. Therefore they will bring moisture with them, which helps break down the wood fibers faster. The workers feed the colony.
Soldiers: Like their name suggests, the termite soldiers have armored heads and powerful jaws eager to defend the colony from enemies such as ants.
Swarmers: In the spring and early summer, termites will swarm. This is when they grow wings and mate. Sometimes swarming termites are mistaken for flying ants. Although similar, upon closer inspection termites do not have three distinct body segments that ants have. Termites also have four wings the same shape and size. If you see swarmers (or a collection of wings) anywhere around your home, you should contact a professional pest control company immediately!
The Queen: This Mother can reach up to four inches in length and is responsible for increasing her colony size. Her sole purpose is to mate and lay eggs. At a pace of one egg per second, she can lay up to a million eggs in her lifespan. Lest you think the colony is dead when she dies, another queen is merely waiting in the wings (so to speak.)
How Can You Tell if You Have Termites?
Swarming termites or termite wings around or inside your home.
Cracked, bubbled paint, or pin holes can be a sign of termites trying to get out of the walls to swarm.)
Wood that sounds hollow when tapped.
Mud tubes or tunnels on your home’s foundation, walls or crawlspace.
Top Ways to Protect Your Home from Termites:
Eliminate water from around your home:
Fix leaky faucets and pipes, repair or replace defective gutters or downspouts, get rid of standing water, and trim excessive vegetation from around your home.
Eliminate food sources for termites on and around your home:
Keep firewood, paper, and untreated lumber away from the exterior of your home.
Make sure your home’s siding is not touching or below the ground level. Only concrete, cinder block or brick should be in direct contact with the earth.
Keep up with all home maintenance and inspections.
Siding should be in good condition. Replace rotted siding as soon as possible.
Keep mulch and organic bed coverings at least a foot or more away from foundation walls.
Inspect your foundation and crawlspace walls for mud tunnels.
Have an annual termite inspection and termite contract with a reputable company
What to Do If You Find Termite Damage in Your Home?
Dealing with termite damage can be as easy as adding a sister board to a damaged joist or stud in your crawlspace or attic where the framing members are accessible. Worse damage may require replacing the framing member. Some damage requires removing interior finishes and drywall to replace damaged studs and wall members inside the wall. Severe damage may require a structural engineer consultation to determine how to repair, support, or replace load bearing framing, beams, or girders.
Types of Termite Treatments:
Soil-Applied Barrier Treatment – a trench is dug around the home and chemicals containing termiticides are poured into the trench.
Bait Stations – Cellulose and insect growth regulator housed in bait stations are installed in the ground around the perimeter of the structure to be protected.
Why I am Canceling My Termite Treatment:
Here’s where I want to let you know this is a sponsored post for Corteva, the manufacturers of Sentricon. I think you know by now that I don’t write sponsored posts unless I thoroughly believe in a product. Yes, I was compensated for my time, but I care more about getting the best information and advice into your hands than I do about collecting money in my account.
Now, let me tell you why I’m canceling my traditional termite treatment plan and how I’ve decided to switch to the Sentricon bait system.
Several months before I found the termite damage at Millie’s Remodel, I renewed our termite contract on our personal residence. The scheduler told me I was due for an inspection and the booster treatment. I knew this meant they had to dig a trench and create a liquid barrier around our home. But, I had no idea how much liquid (aka chemicals) had to be poured in the trench. I was shocked as I watched the technician pour a small river around the entire house. Secretly I thought to myself, “There has to be a better solution.” At the time I wasn’t convinced there was a better termite treatment available. And I certainly wasn’t going to gamble the safety of my house with termites.
A few days later I couldn’t get the images of all those chemicals being poured into the soil out of my head. As an environmentalist, I don’t like using any chemicals around my home, so why would I want massive chemicals dumped into the soil at the base of my house? I ended up doing a lot of research and came across an excellent source of information about termites and EPA approved treatment plans. One of the things I saw on the website furthered my concern about using the traditional soil-applied barrier method to protect our home from termites.
If conducted improperly, these treatments can cause contamination of the home and surrounding drinking water wells and will not protect against termites. For that reason, it is important to hire a pest management professional who is licensed and trained to take proper precautions.
I still wasn’t ready to forgo a termite treatment plan. I had seen first hand the damage termites did to our kitchen walls. The problem was our house was not treated before and after a garage addition was built. (Always talk to a termite contractor before building a home or addition. A treatment has to be applied before framing while the crawlspace or slab is open.)
Therefore when Sentricon approached me about their termite system, I was all ears. You should know I was skeptical about bait systems. I mistakenly thought they would attract more termites to a property. After asking a lot of questions, I agreed to try the Sentricon system. But, I talked to several experts at Corteva (the manufacturers of Sentricon), and after thirty minutes of me peppering them with questions, I felt at ease about trusting my investment property with their termite system.
How the Sentricon Termite Bait System is Installed:
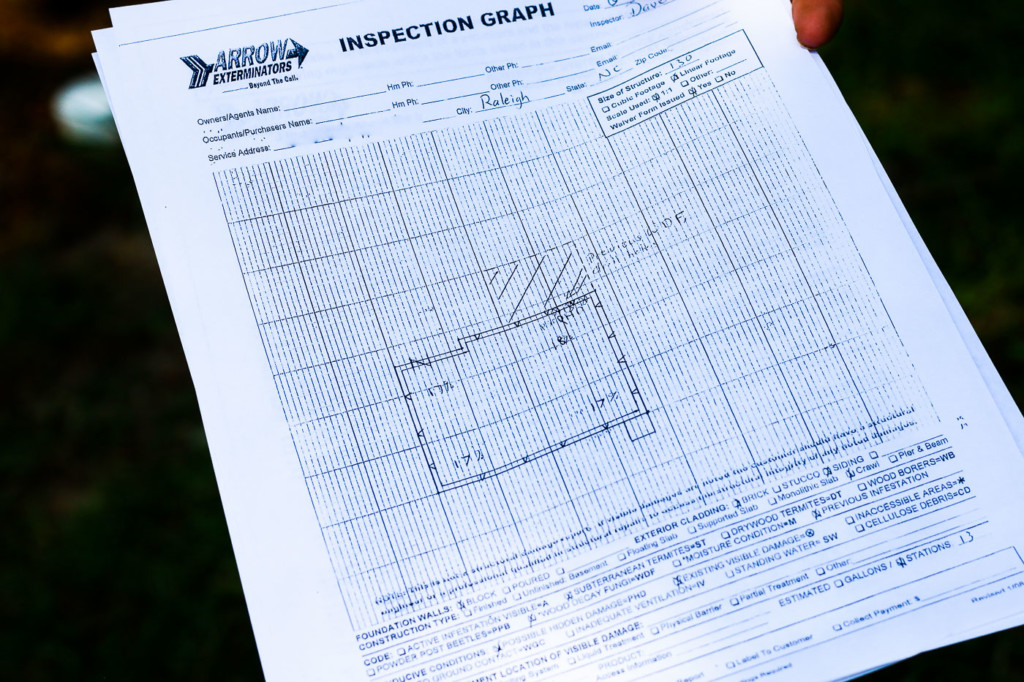
I scheduled my local Sentricon specialists to first inspect the property to see if it was a good candidate for the system. The tech came out and looked in the crawlspace and around the property. Then he drew a map with a plan for where to install the Sentricon bait stations.
Next we scheduled an installation day. Dave from Arrow Exterminators arrived promptly on install day and was polite enough to answer another list of questions I had. Instead of making you read them, you can watch my video from the Sentricon installation date.
Let me tell you, it was definitely a lot less shocking watching Dave from Arrow Exterminators installing the Sentricon system versus watching chemicals being liberally poured against the foundation.
After numbering the stations, the tech removes the cap on the bait station and scans both the cap…
…and the bait.
The information is stored and makes their job easy when they come back out to check the stations.
Small holes are drilled into the earth around the perimeter of the house.
Then the bait station is inserted into the hole.
The tech may kick dirt over the station to make it invisible to humans! But, it’s not invisible to termites. Although they are blind, they will find it.
When the termite company returns next year to check on the stations, they can use a special wand detector (like a metal detector) to locate the bait stations (after checking the map saved in the file.)
Want to learn more about termites? The Sentricon blog is full of amazing facts and good information about termites and treatment plans. If you want to find out more about the Sentricon system, you’ll find their FAQ page helpful!
Hopefully I’ve helped educate you on termite treatments. I leave you with these questions: How confident are you with your termite treatment plan? Is it worth risking your home’s health? From past experience I can tell you I’d rather have a prevention plan than a wait and see plan. How about you?
Disclosure: This is a sponsored post for Corteva, the makers of Sentricon. I was provided complimentary termite protection for a year and was compensated for my time and efforts to promote Sentricon. I was not told what to write. All opinions are my own. I am particular about the brands I represent and will always let you know when you are reading a sponsored post.
https://prettyhandygirl.com/wp-content/uploads/2013/02/finger_through_termite_damage1.jpg427640Brittany Baileyhttps://prettyhandygirl.com/wp-content/uploads/2021/07/PHG-logo-tagline-2020-1030x211-R.jpgBrittany Bailey2019-10-11 07:00:002020-07-22 17:02:25How to Protect Your House From Termites