Turning a Craig’s List Bed Frame into a Garden Bench
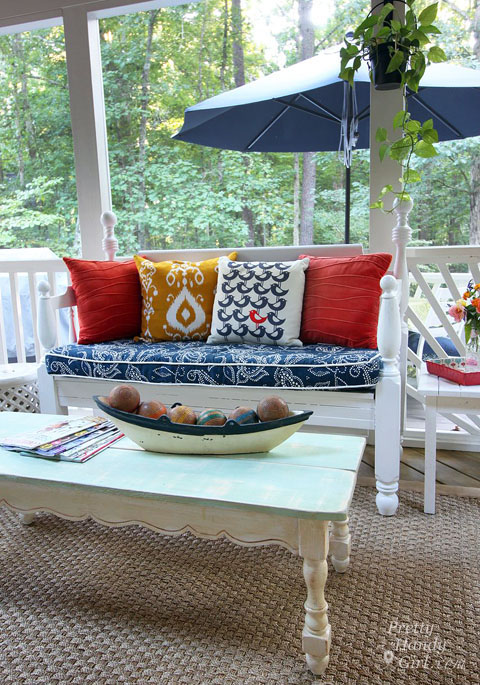 How to Turn a Craig’s List Bed Frame into a Garden Bench
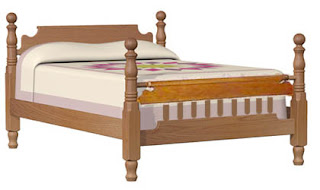
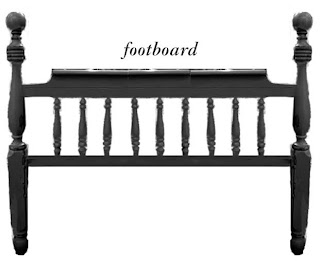
While visiting one of Raleigh’s local shabby chic boutiques, I fell in love with a sweet bench made from an old bed frame. But, the $350 price tag meant that our relationship was not meant to be. I began scouring Craig’s List for the perfect bed frame to make into a bench in our front yard. Finally, I found a full sized cannonball bed frame that looked very similar to this one:
The bed was in good shape. It was made from real wood and it had wooden side rails. Best of all, the price was $40 (and I didn’t have to drive more than 3 miles to buy it!)
After researching the web for ideas on how I wanted my bench to look, I found this site: https://www.robomargo.com/bench.html which has many photos of bed frames turned into benches.
Then I stumbled across Karla’s bed over at: https://itsthelittlethingsthatmakeahouseahome.blogspot.com
Her husband had declared the bed frame a piece of junk when she asked him to turn it into a bench. I can’t help giggling now that I’ve seen the finished project:
Here is my best effort at directing you through the transformation from a bed to bench (I neglected to photograph the process on this project since it was a pre-blog project.)
Begin with the headboard and footboard, and set the side rails aside for now.
I pre-measured another bench and determined that I preferred a 18″ seat height. Luckily the footboard worked perfectly in my plans. But, I needed to trim 3″ off the bottom of my headboard legs.
Then determine the depth of your bench. I wanted mine to be 18″. (This is a little deeper than a chair (15 – 16″), but it allowed for pillows behind our backs and a more substantial size.
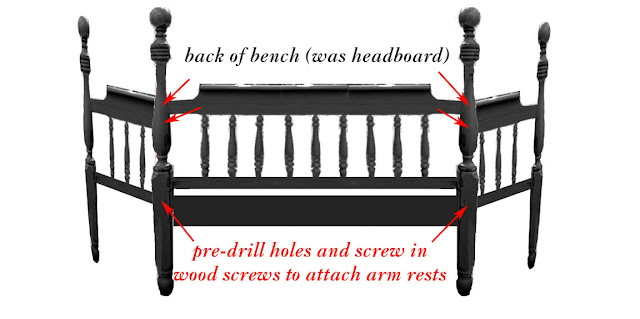
Your footboard needs to be cut in half so it can become your arm rests. You might have to trim more from the center as I did to achieve your desired bed depth.
What you are left with is two sides for your bench:
Now you need to grab one of your side rails and cut it down to size for the front skirt of your bench. Simply measure the distance of your headboard from post to post:
Then cut your side rail to this exact width. (Or if your bed frame came with metal sides, you can use a 1″ x 6″ x 8′ pine board instead.)
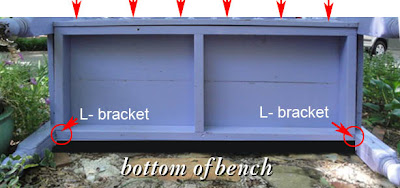
Now you will need to build a frame of 2″ x 4″ boards for stability. This frame needs to be able to fit between the front skirt piece (side rail cut to size) and the back of your bench (the headboard).
This is a picture of my bench tipped over so you can see the base support structure built of 2 x 4’s (in red).
Now you have all the components to construct your bench frame.
Attach the arm rest to the back of your bench (used to be the headboard) by pre-drilling holes through the bedposts and then screwing in 3″ long wood screws through the post and into the arm rest. Be sure that the arm rests are securely attached.
Here is a picture showing the screws from the back of my bench. and how the arm rest looks when attached.
Next you will attach your 2″ x 4″ frame to the back and sides of your bench. You can use screws, nails, and/or L-brackets to attach it.
Then, you can attach the front skirt piece (cut down side rail of bed) to the 2″ x 4″ support base using small nails or brads.
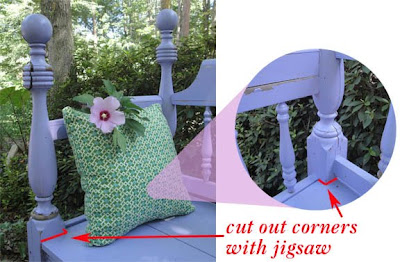
You are almost done with the construction! Time to cut some wood for the seat of your bench. I used two 1″ x 10″ boards cut down to size. Then cut out notches to fit around the corners of the bed posts.
Then use small nails or brads to nail your seat to the bench 2″ x 4″ frame.
After assembling my bench, I added wood putty to fill my nail holes and then caulked all the seams to keep water out of them.
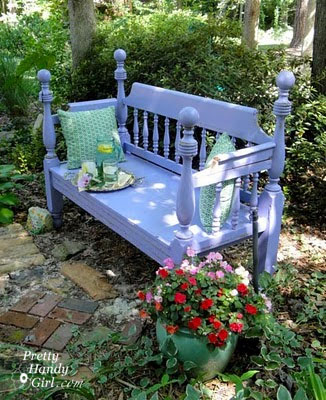
I finished off my bench with one coat of spray primer and 2 coats of Rustoleum French Lilac spray paint (the color my boys picked out!)
Unfortunately, I neglected to coat my bench with polyurethane, so you will notice that the paint has chipped in places. After a few rain storms, I realized that my bed frame was made from several layers of wood that was glued together. So, you will also see some gaps in the wood.
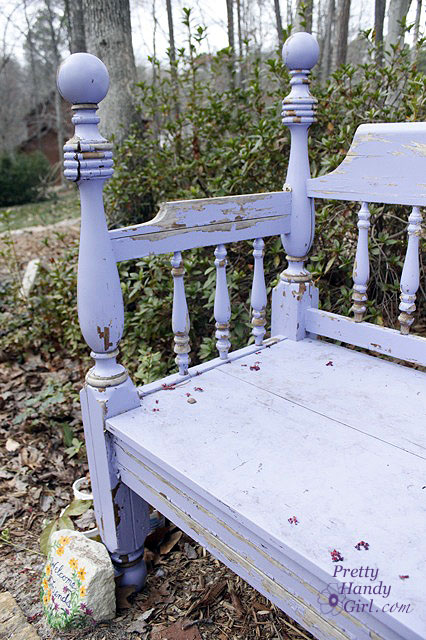
After some time, I repaired and re-painted the bench. To prevent further splitting, my bench spends its days on our screen porch.

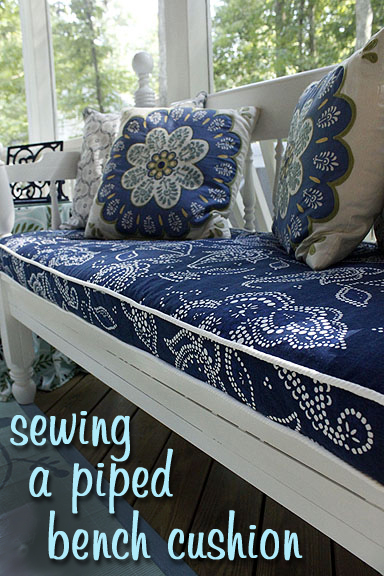
If you want to learn how to make a custom piped bench cushion, head on over to this tutorial:
But, in the meantime, won’t you come join me for some cool lemonade in the shade?












Trackbacks & Pingbacks
-
Botanic Garden Smith College Hours | Organic Garden says:
December 5, 2016 at 8:11 am
-
Get Your Own Kick in the Pants - Duluth Trading Company contest - Pretty Handy Girl says:
September 15, 2016 at 11:55 am
-
Just finished this, feeling quite smug - Page 3 says:
July 9, 2016 at 1:52 pm
-
Turning Photos Into A Book | buyerofstructuredsettlementannuity.com says:
March 28, 2016 at 7:54 pm
-
18 Impressive DIY Garden Benches says:
February 26, 2016 at 8:02 am
-
Miss Safe-T DIY 2011 - Pretty Handy Girl says:
February 25, 2016 at 8:35 am
-
The Most Awesome thirty DIY Benches for Your Backyard - Style Pab says:
August 6, 2015 at 11:04 pm
-
35 Beautiful Garden Benches Projects To Realize This Summer and Emphasize Greenery says:
July 29, 2015 at 6:46 am
-
25+ Popular DIY Garden Benches You Can Build It Yourself | XfileX.IN says:
June 17, 2015 at 1:29 pm
-
Getting Your Garden Party Ready - Christmas Tree Market Blog says:
June 15, 2015 at 11:11 am
-
28 de banci de gradina populare pe care sa le construiesti singur - HotDeco.ro says:
March 30, 2015 at 11:35 am
-
How to Turn Beds into Garden Bench | www.FabArtDIY.com says:
March 24, 2015 at 5:27 pm
-
30 Garden Bench Ideas for Your Backyard | says:
February 23, 2015 at 1:02 pm
-
35 cele mai populare gradini pe care ti le poti face singur - HotDeco.ro says:
November 13, 2014 at 2:39 pm
-
35 Popular DIY Garden Benches You Can Build It Yourself | Health Daily Artile says:
November 6, 2014 at 5:33 am
« Older CommentsNewer Comments »[…] https://prettyhandygirl.com/turning-craigs-list-bed-frame-into/ http://www.healthlane.com/ […]
[…] got his own fabulous woodland themed room. I was just about to start working on his room when the whole kitchen debacle happened. My youngest was remarkably understanding for a 6 year old. He patiently waited over a year as I […]
[…] a couple of tutorials. These aren't exactly how I made mine but it gives you an idea. Turning a Craig's List Bed Frame into a Garden Bench – Pretty Handy Girl Stenciled Bench – My Repurposed […]
[…] Turning a Craig’s List Bed Frame into a … – While visiting one of Raleigh’s local shabby chic boutiques, I fell in love with a sweet bench made from an old bed frame. But, the $350 price tag meant … […]
[…] Turn a wooden bed frame into a custom garden […]
[…] I geared up to scrape and sand my garden bench. Sadly the paint didn’t weather the year in the rain, sleet and snow. The bench is still […]
[…] Complete Tutorial: http://www.prettyhandygirl.com […]
[…] Source […]
[…] Source […]
[…] Photo from Pretty Handy Girl. […]
[…] Sursa […]
[…] Turn Bed Head into a Garden Bench Via Pretty Handy Girl […]
[…] Photo from Pretty Handy Girl […]
[…] Sursa […]
[…] Source […]
Leave a Reply
Want to join the discussion?Feel free to contribute!