Installing the Flow Wall System

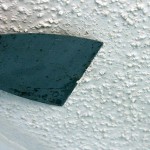
When last I left you, I was covered in dust and debris from scraping the popcorn ceiling in our laundry room. After a shower and some sleep, I was ready to start another productive day.
First I hired some cheap labor to help me paint the walls. Well, I helped ;-).

The color I used was Benjamin Moore’s Glacier Blue in the Aura Bath & Spa Line of paint (since it is a laundry room.) And every time I walk in the room the color makes me want to sing!
After the paint dried, I rehung the curtain rod and threw my fabric over it. That’s probably where it will hang for ohhhh about six months until I sew a faux roman shade with it.

I also installed a new/old yellow chandelier to add some fun color. (Be on the lookout for that tutorial in the coming weeks.)
![]()
Which basically left a big clean slate on the back wall of the laundry room.
![]()
The Flow Wall Wall Panel Packs were delivered to me via freight. It was fun watching an 18 wheeler roll down my little street. (Does anyone else like big trucks?)

The system comes with very clear instructions and there are truly only five steps involved. (I broke it out into a few more to detail the process, but that’s what I like to do for y’all.)

Materials:
(I’ve included affiliate links for your convenience. I earn a small percentage from a purchase using these links. There is no additional cost to you. You can read more about affiliate links here.)

- Level
- Safety Glasses
- Tape measure
- Pencil
- Drill
- Stud finder (and/or straight pin)
- Chalk line
- Flow Wall Wall Panel Pack
- Flow Wall screws
Difficulty: Easy (the hardest part is finding the wall studs.)
Installation Instructions:
First I measured my wall (top, bottom and middle) and took the average of the measurements. Then I transferred that measurement onto the first Flow Wall panel. (The panels come in 8′ lengths and are each 12″ tall.)
![]()
I cut the first panel on my miter saw and double checked the fit.

Then I laid that panel onto my miter saw again and set up a stop block with some scrap wood and a clamp.

This insured that all my panels would be cut at the exact same length.

The Flow Wall material can be cut with a circular saw, a jig saw or a hand saw in a pinch.
Locating a Wall Stud:
There are several ways to locate a wall stud, but the method that works best for me is to use a stud finder to locate a stud. Stud finders are not always 100% accurate, so I like to use the pin test to make certain I have found the stud. Stick a straight pin into the location marked by the stud finder. If the pin stops halfway, there is a wall stud there. If the pin sinks all the way in up to the head, there is no stud there. AND, you aren’t left with anything larger than a tiny pin hole that is less noticeable than a nail or screw.

Once you locate the first stud, measure 16 inches to either side to potentially located the next stud. Double check with the pin test again.

Once all the studs are located, hang your chalkline onto a pin inserted at the stud. Extend the chalkline down the length of the wall and let it hang loose.

With one hand, hold the chalk line dispenser at that “plumb” level. The other hand pulls the chalk line away from the wall and then release it to make a mark on the wall. Congrats, you just marked the location of the stud from top to bottom. Repeat for the other studs.

Next you want to create a level line at the top of where you want your Flow Wall to be mounted. Mark a spot 12″ down from the ceiling. Then use a level to scribe a level line across the wall.

All your stud lines have been drawn and a level top line is present. Time to start installing the panels!

Hanging the Flow Wall panels:
Orient your panel so that the profile looks like this. I have to admit that I hung the panels upside down the first time. I was rushing and a little bit distracted.

Line the first panel up with the horizontal level top line. Drive a screw into one of the grooves in the middle of the panel.

Lay the level on top of the panel and tilt the panel until it is level.

Drive a second screw into the panel and into a stud.

Here is a quick video showing you how I installed the panels:
Stagger your screws as shown:

Finish up by driving screws into every ridge along both sides (as shown in the video above.)
That’s it! I honestly am surprised at how easy it is to hang the Flow Wall panels. Even a novice can handle this.
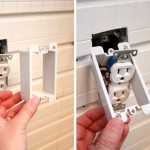
Coming up on Wednesday: How to cut an outlet hole and install an outlet extender through the Flow Wall.
Then a tutorial on how to hang cabinets and shelves on the Flow Wall!

Disclosure: This is a sponsored post. I have been compensated for my time and received the Flow Wall System compliments of Flow Wall. However, the ideas and words are all my own. I was not told what to write. I believe you have the right to know when a post is sponsored. Regardless of whether a post is sponsored or not, I believe in honesty, truthfulness, and complete transparency in my posts.
I had an electrician come in to install a new outlet for me. He used a strong magnet to find the studs; so simple, and yet I would never have thought of it. Just run the magnet kind of up and down and across the wall, and it will “stick” to the nails in the stud. No holes or expensive stud finders.
You have shared beautifully idea to install the Flow Wall System. One thing, I have noticed that you have used the s Benjamin Moore’s Glacier Blue color on wall, which I liked a lot. It makes to feel relax and looking very nice with yellow chandelier. It’s just eye catching.
I’m looking forward to seeing the finished project. One can never have too much storage. To have it look nice is an added bonus. PS: I think most DIYers have put things on upside down or backwards. Luckily, it was an easy fix and didn’t involve construction adhesive like one of my boo-boos did. {sigh}
I’m glad someone uses pins to find studs like I do!! I thought I was the only one LOL! I live in an older home with some additions so some studs are 12″ apart and some are 16″! I learned the hard way not to assume I know which are which! 🙂 Thanks for the demo you make everything look so easy!
Great tips! Love the pin stud finder trick! This is such a great idea for a laundry room! 🙂
My comment should have been under the question about the flow wall. Have no idea what it is.
That’s what I’d like to know!
Wendy, Ha, I knew what you meant ;-). It is a really ingenious wall of panels that once hung allows you to add hooks, cabinets, shelves, and more by just hanging it from special fasteners. Then they are completely moveable on a whim. Check it out here: http://www.flowwall.com/storage/Additional-Info/What-Is-FLOW-WALL/About-Flow.html
Great how to and yes that color is nice!
That tip with the pin and stud made my day! Looking forward to the Flow Wall and maybe it’s something I’ll want to use in my garage.
What is a flow wall?
Karen, It is a really ingenious wall of panels that once hung allows you to add hooks, cabinets, shelves, and more by just hanging it from special fasteners. Then they are completely moveable on a whim. Check it out here: http://www.flowwall.com/storage/Additional-Info/What-Is-FLOW-WALL/About-Flow.html