The next step in my extreme rattan chair makeover is the upholstery. Time to give your tushie a new cushy!


Re-Upholstering the Chair Seat:

I removed the seat from the chair before I started any of the paint stripping and painting. Removing the seat on a cushioned chair is really simple. Flip your chair over, look for four holes where the mounting screws are located (see red arrows below.)

Re-Upholstering the Chair Seat

Tools You Will Need:

Cordless Drill or Phillips head screwdriver
Flat head screwdriver
Needle-nosed pliers
Scissors
Batting
Fabric
New Foam Cushion (if your foam is in bad shape)
Sharpie Marker
Staple gun w/ staples (I used 5/16″ staples)
Hammer

Grab a screwdriver or cordless drill with a phillips head attachment and unscrew the mounting screws. Be sure to save the screws as you will need them to re-attach the seat later.

If the fabric on your cushion is in good shape and you are using a fabric that is thick enough to cover the old fabric, you can leave the seat intact. In my case, the fabric was very old and stained. Not exactly something I wanted to be sitting on….ewwww!

So, I began the demolition phase of this makeover.

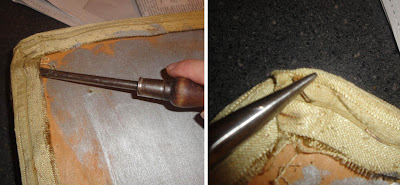
Grab a flat head screwdriver and needle-nose pliers. Wiggle the screwdriver underneath the staples and then use the pliers to pull them out.

Re-Upholstering the Chair Seat
Once the fabric has been removed and all the loose staples have been pulled, take a look at your foam cushion. If it is stained, crumbling, or smelly, you will want to replace it with new foam. Luckily the foam seat was still in good condition and no stains or odors, so I kept it.
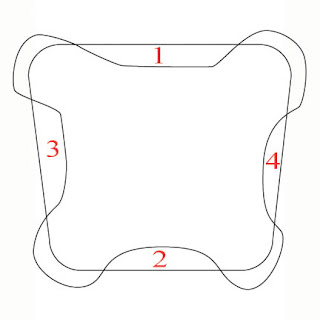
I laid my fabric on top of the seat and played with the pattern until I liked the layout on my chair. Then I took my sharpie pen and drew an outline about 3 inches out from the edge of the seat.

Re-Upholstering the Chair Seat

Next, pull out your new batting. I like my seats to be nice and cushy, so I chose two layers of batting.


Next, I laid out my fabric, then the two layers of batting and finally the seat. Make sure that the batting will wrap around to the underside of your seat. Then cut your batting. Usually my batting is about an inch smaller than the fabric on all sides.

Now it is time to get your staple gun and hammer. Start by pulling your fabric up and wrap it over onto the bottom of the seat. Use your staple gun to put in one staple. Hammer in the staple if it is sticking up.

Next you will pull the fabric across from your first staple and affix that side. Repeat this step as shown below:
Re-Upholstering the Chair Seat
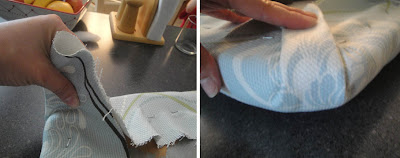
Now you can finish stapling the sides and hammering the raised staples. Leave about an inch to two inches from the corners. Pinch the corner fabric together as shown at the left. Then neatly fold it over onto the seat and staple a few staples to secure it.
Re-Upholstering the Chair Seat

Voila! You are done with the seat. Go ahead and set it on your chair and admire your work.

Be sure to join me here as I add the back and the finishing touches!


Today I’ll show you the painting technique I used on the chair I stripped yesterday.

Here is a list of suggested materials:
Tarp or drop cloth
Brush
Primer
Rubber gloves
Sandpaper (Fine & Medium grits)
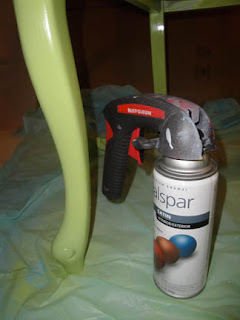
Spray paint (optional handle adapter to prevent hand cramps and spray on your fingers)
Dust mask
White paint
Brown acrylic paint or craft paint
Rag
Polyurethane
Floor protectors (chair glides)

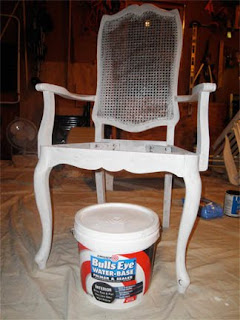
Because I stripped and sanded the chair down to bare wood, I needed to prime the wood so it would accept the paint. If you don’t prime bare wood, then the paint will be absorbed into the wood and won’t leave a clean all over finished look. The primer is also a base that makes the paint stick to it easier. Primer is very good at adhering to lots of surfaces, including your skin. So, be sure to wear gloves or you may look like a reverse dalmatian for a few days.

I’ve used many different primers. Sometimes I use a spray primer and sometimes a liquid primer. Did you know that primer comes in different colors? And it can be tinted? Be sure to ask the paint department next time you are drastically changing the color of a room. They might be able to tint your primer close to the color you are painting so it cuts down on the number of coats you have to use.

For this project I used Bulls Eye water based primer that you paint on. You do not need much, we only had a big bucket left over from painting some rooms in our home.

Primer dries quickly, so work fast. It isn’t necessary to make it look perfect, just get a thin coating on all the wood surfaces and be careful to wipe off any drips.

After the primer dries (I used my box fan to speed the process,) you should lightly sand the chair to remove any burrs or drips. This also gives the primer a little scuffing so that the paint has something to grip to. Don’t sand so much that you go through the primer coat.

At this point you will need to “tent” off an area where you will be working. Spray paint will get everywhere if you let it. The good news is that usually the particles will dry in the air, but they will coat everything in the vicinity and will need to be wiped off. If you can spray outside, it will be better for your lungs, but be sure your drop cloth extends at least 4 feet out in all directions from the piece you are spraying.

Now comes the fun part! Grab your paint can in the color you have painstakingly chosen. I used Valspar Pistachio Satin finish in a spray can. I used to use Rustoleum, but it seems that my local Lowe’s has eliminated most of the Rustoleum brand spray paints and replaced them with Valspar. My suspicions tell me that it might still be the same paint but branded for Lowe’s.

I use light coats of spray paint about 8-10 inches away from the surface. The trick with spray paint is to use several light coats instead of trying to cover all at once. This will insure an even finish. You also don’t want to end or stop on the piece you are spraying. I use a smooth consistent sweep across the chair and then release the trigger after my spray has left the chair. If you stop on the chair, you will either get a shiny spot or drips where the extra paint has collected. Here is a graphic to show you how to spray your paint:

I used three light coats to cover this chair. I did sand VERY lightly between coats (using a fine grit 200 grit or higher) to make sure there were no rough spots and to add something for the next coat to adhere to. I also wipe off the chair after sanding with a damp rag. Just be sure to take your time to work up to your final color. This is the point where you may stop and say that you like the final results of your painting job. If you stop now, be sure to finish your painting job off with two coats of polyurethane.
I choose to add some more interest to my chair.
Milk Painting – Adding Depth and Interest
 
After the green spray paint layer has completely dried, I took the fine grit sandpaper (200 or higher) and gently roughed up the surface. Then I wiped off the whole chair with a damp rag and let the chair dry.
For this step I used some left over white latex trim paint we had lying around. I used a semi-gloss finish because that is what we had, but you can use any white paint you have left over. I dipped the edge of my brush into the paint and then wiped most of it off on the can. Then I lightly ran the brush over the chair in the direction that the wood grain would go. The green paint should show through your strokes. Only go over the area once, unless you really ran out of paint on your brush. If you put too much on the chair, or have areas with too much (see the left edge of the picture on the right below),  you can take a wet rag or baby wipe to clean it off and try it again.

Once the whole chair has the milk paint technique, I let her dry. Once again, this may be the point where you stop painting. But, I really had more distressing in mind for this girl.

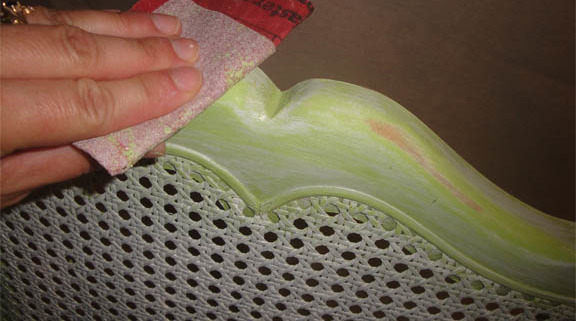
I wanted to let some of her age show through, so I grabbed some medium grit sandpaper (100 – 150 grit) and sanded some edges down to the bare wood. Think about any place on the chair that sticks out and might be rubbed and worn on an antique.

Unfortunately for me, the bare wood on my chair was a little too peachy colored next to the pistachio color paint, and I really liked the look of this leg that was sanded and had a darker brown area showing through. So, I decided to fake the darker brown wood look.

I wiped off the chair again with a damp rag and then ran up to grab some acrylic paint out of my art supplies. I chose the Raw Umber brown and squeezed a quarter size dollop onto my palette. Then I grabbed a clean rag and wrapped it around my finger. I dabbed my rag into the paint and made sure I didn’t have any globs on the cloth. Then I lightly ran the edge of my clothed finger over the edges of the chair where I had sanded.

Uh oh, don’t peek at the fabric on my chair! That is the next step we will go over tomorrow. Plus, it wasn’t a good idea to paint with the fabric on my chair. Too many opportunities to drip or rub paint onto the seat.
Once I was done adding the brown paint, I let the chair dry. Next I took my fine grit sandpaper and sanded the whole chair lightly being careful not to sand off any paint. Wiped the chair down and let it dry.
I really liked the aged beautiful look that my chair had achieved, so I was ready to seal her with 2 coats of polyurethane. I used a water based poly and lightly sanded between coats. At this point you are probably sick of the sanding, but I am a sucker for smooth finishes. I love to caress finished wood and feel the baby softness under my fingers. Plus, this is the chair that I will spend many hours sitting in and working.
After the poly has dried, I do add floor protective legs to my chair. It protects our wood floors from damage. I’m really into protecting our wood (as you can probably guess.) Furniture glides or floor protectors are super easy to add. They go on just like nailing a nail. Be sure you have your glide centered on the leg and that you aren’t nailing it into any metal. Then gently tap it into the leg of your chair.

Extreme Makeover for a Wooden Rattan Backed Chair

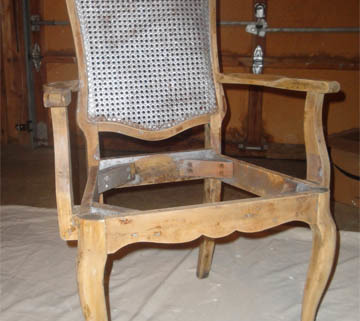
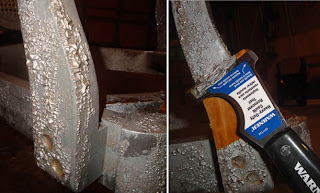
This week I finally got around to giving my $5 yard sale chair a face-lift. My poor chair was covered in silver paint and a horribly stained green velvet seat. I won’t even mention the glass beads that were epoxied on her. Luckily, I rescued her and offered her a new life as my desk chair.

The makeover was a bit more involved than I initially anticipated, but the results were well worth the work. Because there were different procedures for each step, I will break this transformation into a few posts. Care to see the transformation? Then read on…

1. Takin’ It All Off! aka paint stripping

Normally if furniture is painted and the paint is in good condition, (the paint is well adhered to the furniture and CAN’T be scratched off with a fingernail) I leave it! If it was in good shape, I would scuff up the surface with some sandpaper and maybe use primer if I’m not sure why type of paint was used. But, for this baby, I could scratch the paint off easily with my fingernails.

My preferred paint stripper has been the less toxic Citri-strip. Purchase it in your local hardware store. There are a few other brands that make these less-toxic products. So, feel free to substitute. (More tips on paint stripping at CentsationalGirl.com.)

Materials:

– Rubber gloves (I said less-toxic, you still need to protect your skin)
– Face mask (if you aren’t working in a well ventilated area)
– Small wire brush for detail work
– Multi-edge scraper (also called caulk removal tool)
– Sandpaper or sanding block
– Brillo pad or steel wool
– Plastic throw-away tarp (Dollar store plastic table covers work great for this!)
– Bucket with a little dish soap, water and a sponge for clean up

Instructions:

Coat the areas that you want to strip with the foamy Citri-Strip spray and let it sit for 30 minutes. As soon as the paint is bubbled up, you can start to scrape and strip. This is such a satisfying step as you easily clear away the abusive paint.

The scraper tool I have works well for about 90% of the surfaces on the chair. For the other 10% you’ll need to use your small wire brush. You may need to re-coat any areas that won’t come off easily with the Citri-strip.

Next you need to wash off the chemicals left on the chair. Use the soap, water and sponge to wash the chair. Let your chair dry. (I sped up this process by aiming a fan at the chair.)

Now it is time to smooth your chair. Use the Brillo pad to get any small spots left and to prep for sanding. Then you can take your sandpaper and/or sanding block and make that chair as smooth as a baby’s bottom! The wood on this old chair was so beautiful with age that I almost grabbed the polyurethane and applied two coats. But, I had bigger plans for this chair. You will notice that I left the paint on the rattan back of the chair. This will all be covered up by the upholstery. I hope you will stick with me for the next step in this chair makeover.
Thank you for visiting PrettyHandyGirl.com. This blog is for anyone who wishes they were handy and could make their own repairs, upgrades or become a true DIY-er at home.

I have always enjoyed beautifying things, especially my home. My idea of a relaxing day is working in my garage (aka workshop) and building something. The smell of freshly cut wood tends to ease away the tension of the week. Also being able to have the gratification of completing something tangible really makes my day! (Maybe this is because it is so hard to complete a task when you have children un-doing your work behind you.)

The other days of my week are spent entertaining my two little charges (two little energizer boys); housekeeping; and running my other two businesses. A graphic design/web design/illustration business and a web-based baby carrier business I started when my children were babies to sell comfortable baby carriers to caregivers.

I hope this blog will inspire you to try something on your own. My mantra is that if someone can do it, then there is a 95% chance that I can do it too! As a woman, I refuse to bow to the stereotypes that women aren’t handy. From a young age, my father and mother taught me and my two sisters that we could do anything a man could do (and sometimes better!)

Please join me on my DIY journey as I show you some of the accomplishments and pitfalls of doing it yourself!

If you like my blog, please share the empowerment by displaying my button on your website (see the side bar to grab the button.)

Pretty Handy Girl Blog