How to Remove a Soffit – Kitchen Renovation Update

How are y’all doing this week? Getting ready for the holidays? Instead of decorating, we did some demolition in the kitchen this past weekend. And it involved buying myself an early Christmas present:

I snatched up this DEWALT 10–Amp Keyless Variable Speed Corded Reciprocating Saw that was on sale at Lowe’s. I actually held each and every reciprocating saw in the tool department. Those saws are not lightweight by any means. And since I had to hold this over my head and make repeated cuts, I wanted to make sure I bought the lightest one I could find. However, I had one other factor to contend with. Battery life! The lightest weight saw was a Ni-Cad battery saw and I didn’t want to deal with losing power in the middle of the job and waiting for the battery to charge up again. So, I chose this mid-weight fighter because it has a cord and it won’t run out of power…ever…well unless your power goes out. I’m thrilled with its performance, this prize winning middle weight really knows how to throw a knock down punch to soffits.
AND, in a pinch, it works great as a turkey carver (LOL!)

I also took advantage of those fabulous Black Friday sales at Lowe’s and bought two of these
Werner Aluminum Work Platforms:
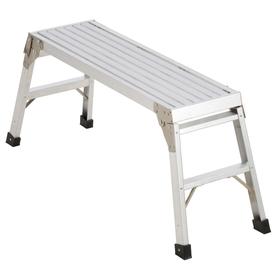
They were invaluable because we didn’t have to climb ladders or use the saw over our heads (not a good idea.) And now we are using one of those platforms as a stand in bench where I want to build a window seat. 😉
Here’s how we tackled those ceiling hugger – space waster – height crowding – good for nuthin’ – you get the picture soffits:
Materials:

- Reciprocating saw
- Platform stand
- Hand saw
- Hammer
- Flashlight
- Skinny pry bar
- Larger pry bar
- Dust mask
- Ear muffs
- Eye goggles
- Utility knife
- Voltage tester
- Sledge hammer
- Work gloves
- Trash can with heavy duty black plastic bags
Instructions:
The number one priority is to turn off the power to any and all circuits that are live in the kitchen.

And, double check them with a voltage detector.

The Greenlee Non-Contact Volt Detector I bought tests current even through the coating on the wire. Thank goodness I used this because we actually found one wire that was still live after all the kitchen circuits were turned off.
Knock a head sized hole in the end of your soffit. Shine a flashlight inside to see what you have to work with. Our soffit has a few wires, an angled plumbing stack and a recessed light fixture.

In the next soffit, we knew there was an exhaust pipe inside.

We carefully marked the locations of anything to avoid before proceeding, to minimize damage to them (and us.)

Removing the crown molding:
To preserve the crown molding for future use, score the top and bottom of the molding to cut through the caulk.

Use a skinny flat pry bar and gently hammer it under the base of the crown molding (the molding will usually only be nailed to the soffit not the ceiling.) Continue working from one side to the other prying up the molding.

Demolition of the Soffits:
Remove any cabinets that are touching the soffit. Usually cabinets are nailed or screwed to studs through the back. Inspect your cabinets to determine how they are fastened.

(Yup, that is all one cabinet…14 feet long! When we donated it to our local Habitat ReStore they told us that’s the longest single cabinet they’d ever seen.)
Remove any light fixtures, cap off the wires and gently tuck the wires out of harm’s way.
Put on your safety gear (ear muffs, dust mask, and eye goggles) because things are about to get messy! Use a hammer to break up the drywall (sometimes referred to as sheetrock.) Continually check for more wires or plumbing pipes. Check all wires as you uncover them to make sure they aren’t live.
Then you could let the kids go to town with hammers. (Our boys did most of the drywall removal for us. It was a perfect task for them to do with a lot of supervision.)

We wheeled the trashcan right into the kitchen and filled up 3 bags of sheetrock (drywall)!

By removing the drywall, we could see the skeleton of the soffit and any obstacles that needed to be avoided when using the reciprocating saw. Plus, the weight of the soffit is drastically reduced without that extra weight.
Our plan of attack involved cutting through the vertical 2×4 studs. Then make one cut about 4-5 feet along the soffit.

First Handsome Guy cut through the vertical members.

Then he cut down through the horizontal board to section the soffit into a manageable chunk.

At this point I was getting jealous that he was spending too much time with my new power tool. My turn!

Cutting was pretty easy. Just be sure to have a wide stance when the stud finally gives way to the saw.
There was one spot that required a handsaw because I didn’t want to risk cutting the electrical wire.

Then we yanked and pulled with all our might. We used a pry bar and hammer to loosen the soffit further from the wall. Eventually the soffit gives up and let’s go of its grip on the wall. It’s a good idea to have your helper nearby to catch the soffit (or you! Careful you don’t fall off the platform.)

Once the exhaust pipe was exposed, I pulled it out easily (it wasn’t screwed to anything and slipped off like an old man’s stretched out sock.)

The center soffit was removed by Pretty Handsome Guy with the help of a sledgehammer and a cheering crowd of young boys watching:

Our boys think Dad is a rock star now! “Go Daddy Go! Hit it again, Dad!”
The center soffit came down remarkably easily, teasing us into thinking the rest would be a cinch.

The other two soffits were supported by the wall behind it. We used the hammer and pry bar to pry the top and back boards off the wall and ceiling. Keeping the pry bar in line with studs and floor joists gave us the leverage needed to pull it off.

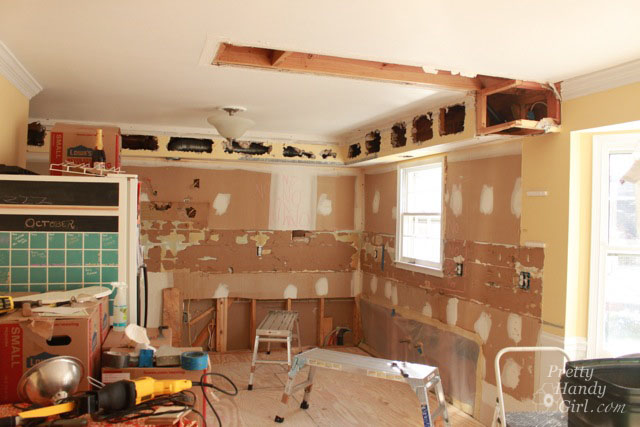
And now for the drastic before and after shots:
Before
 After
After
It’s a beautiful piece of work isn’t it? Having the soffits removed is a great feeling. I love that the ceilings feel taller already. Never mind that our walls and ceiling look like swiss cheese.
In the immortal words of Bing Crosby: “You gotta ACK-cent-tchuate the positive. E-lim-inate the Negative…Latch on to the affirmative and don’t mess with Mr. InBetween!”
We’ll be doing a lot of not messing with Mr. InBetween while we wait for the next phase to begin. Adios!

You can read more about our kitchen disaster and renovation in these updates:
- Polybutylene Pipe Leak turns into Moldy Mess
- My World Upended, Asbestos Discovery and Removal -All You Ever Wanted to Know About Asbestos
- Planning New Kitchen Layout and more
- Planning Colors and Materials for the New Kitchen
- Let the Demolition Begin
- Move Back in the Kitchen Temporarily and Throw a New Year’s Party
- Termite Damage and Kitchen Update
- How and When You Should File for a Permit during a Kitchen Renovation – Your Questions Answered
- Everything You Should Know about Termites and Termite Damage
- Structural Engineer Plans and another Kitchen Update
- How to Survive without a Kitchen During Renovation
Disclosure: Some of the links above are affiliate links for your convenience. I do receive a very small percentage if you chose to purchase any of the DIY tools that I link to.

Amazing blog if anyone looking for grate tips to Popcorn Ceiling Removal then check out here http://removepopcornhouston.com/
You forgot to mention something very important and that is removing the blown- in insulation (if there is any) in the soffit, first. I cut holes in my soffits and used my shop vac to remove all of the insulation. I put my shop vac outside my kitchen window on the patio and used a 20 foot vac hose through my window in the kitchen. If you tear down the soffits with the insulation you will have one
heck of a mess! And keeping the vac outside will eliminate the vac from blowing exhaust particles inside your home.
Even with a good filter some dust particles will get through.
That was cute and all but where’s the info on electrical? Did I miss That? Most important of all when doing this is plumbing and electrical.
We only have a soffit on on wall ( ugly) is procedure the same? We still need venting for oven! Does that mean we cannot remove ??
What did you do with the exhaust pipes and plumbing and electrical pipe that were inside of the soffit?
Fabulous step by step account of this demolition. I have it coming up in my home and this gives me confidence. Great quality pictures too. Next time have the guys keep still while taking action shots, nothing wrong with posing still for a moment. Also love each person’s nick name in the family. 🙂
All well and good , what did you do to relocate the vent? You don’t bother to mention that nor illustrate, and no one is smart enough to ask . You are also dealing with Romex and not thin wall conduit which makes for more difficult relocation.
Northman, the vent pipe was cut inside the wall after ripping off some sheetrock. And in the ceiling. Then we cut a hole in the top plate and installed a 90 degree elbow just above the top plate. I also added a metal strap to act as a nail plate and additional support. Regarding the wiring, we were able to eliminate some because we didn’t have lights over the bar anymore. But, we also had an electrician help re-locate wires and install recessed can lights: https://prettyhandygirl.com/2013/02/how-to-install-recessed-lights.html
Thank you for taking your time to make this post. It was very helpful!
Oh my gosh this is a great post! I’ve been looking for detailed information on removing a soffit. Everyone glosses over the demolition in projects and that is what I actually find very intimidating so I love how you spelled it out and showed pictures. I have a much better idea of what is hiding in my soffits now and what it will be like when I try to take them down.
Thank you so much for the tutorial. We just got out contract on our very first home and are so excited. Our first renovation will be our kitchen which has the soffits and I want to remove them. But what did you do with all of the wires, and pipes that the soffits were covering? And do you have a tutorial for how you fixed the drywall and ceiling? Thank you so much.
Alisha, you are so welcome. Most of the wires were long enough that we could tuck them into the wall and re-use them for lighting, etc. There was one that my electrician had to re-run a longer wire. And the one pipe was turned into a 90 degree angle and routed through the top plate of the wall (and then protected with nail plates.) A friend who was a plumber helped me with that one 😉 Here is the tutorial for finishing drywall: https://prettyhandygirl.com/2013/04/how-to-finish-drywall-spackling-or-mudding-sheetrock-joints.html And you can see the link for installing drywall in that post. We did the walls ourself, but I hired a professional to do the ceiling because it would have killed my neck AND I know he would do a much better job.
Hi! I’m planning a similar project when we move into our new house. How long did the soffit removal take you? Thanks!
I think about a day and a half, but we took breaks. It’s the patching the ceiling and putting everything back that takes the most time 😉
It’s looking so good Brittany! (Only I would say that mid-demo. lol) I have that saw and freaking love it. It’s come in handy more times than I can count this year.
Ha, yup, only you would say that. I do like the saw and used it for my log pillar candles. BUT, I was wishing I had the cordless version when I found the fallen tree in the woods. Oh well. I need to put my big girl pants on and try out the chain saw next.
SOOOO AWESOME!!! Glad you did this before we did, so now we know what we’re in for!!! hopefully our center one will come down in the next year, but the remaining soffit on the sink and stove wall will have to stay a few more years :(.
Great tutorial! We removed our soffits too and it was a huge improvement when the renovation was finished.
Great tutorial!
Thanks Brittany for this tutorial. You threatening the Turkey with the saw cracked me up.
Good tip on scoring the molding and checking the electric for live wires. Voltage detectors are a must have tool for any homeowner. In fact, I need to buy a new one 🙂 so your link is helpful!!
Very helpful! I am planning a similar adventure over Christmas break.
An excellent tutorial! I removed the soffits in our kitchen, and was so relieved to find they’d been installed AFTER the walls and ceiling were finished. I even found a tool up there, left behind about fifty years ago!
Peggy, ha, that’s awesome! Handsome Guy was hoping to find a wad of cash to pay for the kitchen remodel…it didn’t happen. Thanks for your comment. I was wondering if anyone read this post today ;-D.