Covering Unsightly Window Views – Guest Post from Sawdust and Paper Scraps
I hope you’ve enjoyed the posts on “Falling in Love with Your Home” in February. We’re in the home stretch (yes, pun intended) now. Today I have my roomie from Blissdom, Sandra from Sawdust and Paper Scraps. She and I love our power tools, and LOVE to build things. I think it would be a blast to work on a collaborative project one day. She’s definitely my soul sister.
Please welcome the lovely Sandra from Sawdust and Paper Scraps who is going to show you how to disguise an ugly view!
![]() Good morning Pretty Handy Girl fans! I’m Sandra from Sawdust and Paper Scraps, here to share an easy and inexpensive project to transform and beautify a window with a less-than-stellar-view!
Good morning Pretty Handy Girl fans! I’m Sandra from Sawdust and Paper Scraps, here to share an easy and inexpensive project to transform and beautify a window with a less-than-stellar-view!
(Or a window where you want privacy without blinds or drapes like a bathroom or shower.)
We have a basement and even after I added casing, trim and paint to the inside of my window… it was still really unattractive- outside!
So I went to Lowe’s and bought a $14 roll of frosted glass vinyl window cling!
Before installing, I made sure my window was as clean as possible. I had to clean AND scrape off some paint because SOMEONE was a little sloppy! (uhem-me)
I installed it on one window by myself and it was something like a scene from an I Love Lucy rerun. Vinyl flopping down over my head, sliding off one side while I was trying to smooth out the other…
Definitely easier to install with 2 people. But do-able with only one!
The instructions for the stuff I bought said to spray the window and the sticky side of the vinyl (with a liquid that you can purchase separately. But, you can also use a soapy water mixture in a spray bottle). You have to peel off the backing which I did just a little at a time while person 2 sprayed and then stick it to the window.
After you put the vinyl on the window, use a utility knife to trim off the excess and a credit card or little squeegie to smooth out the wrinkles and push the extra liquid out from under the vinyl. While it’s wet, you can pull it off and reposition it- so keep it all wet until you have it placed just right. Then let it dry. That’s it!
Easy.
I think it’s a big improvement for relatively little cost or effort.
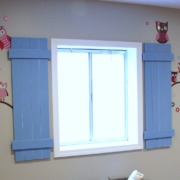
This particular room is my daughter’s playroom so I also built some shutters,
and a playhouse. If you’re looking for another project to whip up!
But it all started with the window-well.
Thanks for having me Brittany! And thanks for letting me share with you all one thing I did to help me “Fall in Love with My HOME!”
![]() Thank you Sandra! Great tutorial. I love how easy and quick that solution was. If you haven’t been to Sandra’s blog, you need to zoom over there now. She is the Queen of built-ins and decorative mouldings. Plus, she has just enough crafts to keep you creative!
Thank you Sandra! Great tutorial. I love how easy and quick that solution was. If you haven’t been to Sandra’s blog, you need to zoom over there now. She is the Queen of built-ins and decorative mouldings. Plus, she has just enough crafts to keep you creative!


Neat idea! I also love that it wouldn’t cut out *all* natural light!
OOh, I love how on WordPress you can leave a smiley face in your comment!
Sandra, well that should be reason enough for you to transfer! LOL!
Sandra, you crack me up. And inspire me. Which is an odd combination, but it works!
😀 thanks…i think
Just found you through Sawdust and Paper Scraps. Wonderful house!
I am not a follower to help you get to that 200 mark. Please join me, I just started with my blog and would love to have you there.
Love the solution to a less-than-stellar view! Actually, I love how the entire room turned out 🙂