Hey, you came back! So glad you weren’t scared off by my toilet repair post. Well, congratulations to you for sticking with me and wanting to learn how to fix your toilet.

In Part 1 we learned how to replace the flush lever. If you found it easy, I know you won’t find today’s tutorial too difficult. And then, you will certainly be able to replace the overflow tube and flapper in my next post.

In review, here is what your toilet tank parts are:

Here is the kit I recommend you purchase (costs about $20):

And here are the tools you will need:

  • Plumber’s Wrench (must have a wide mouth opening. The Irwin pliers shown have just enough of an opening to work)
  • Adjustable Crescent Wrench
  • Handsaw (drywall, coping or hack saw will work. Needs to cut through PVC)
  • Flat head screwdriver
  • Level
  • Scissors
  • Bucket or basin
  • Sponge
  • Rags or Towels
  • Rubber Gloves

Disclaimer: This tutorial is a general overview of replacing a fill valve in your toilet tank. Be sure to follow the directions that come with your toilet parts as there may be changes or additional steps.

If you haven’t done so already, start by turning off the water. There should be a water shut off valve in the wall behind your toilet. Gently turn the knob clockwise to shut the valve.

Next, flush your toilet to drain the water from the tank. If your tank re-fills the water is not completely shut off.

Remove the lid to your tank. Set it in a safe place where it can’t get dropped and broken.

If there is still a lot of water in the bottom of the tank. Lift the flapper chain to drain the tank to the top of the flapper.

Use a sponge to completely soak up all the water remaining in the tank.

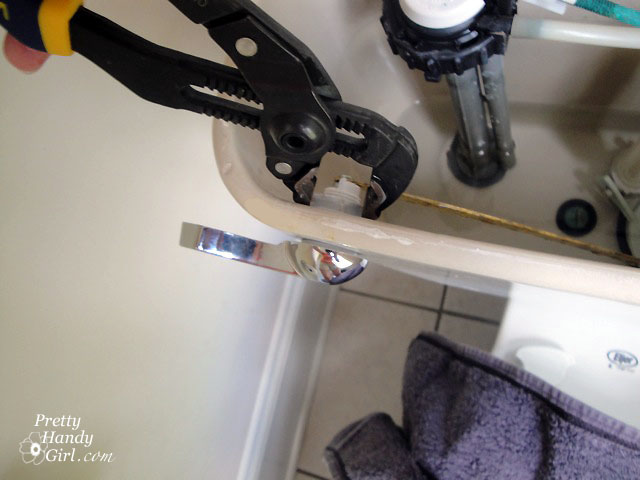
Once the tank is completely empty we can start to remove the fill valve. Look underneath the tank to see where the water line feeds into the tank. Using pliers, loosen and then remove the coupling nut from the supply line.

One quick note about supply lines: If your toilet has a plastic or rubber supply line, you should consider replacing it with a braided metal supply line that is less prone to breaking or leaks (in other words they can cause a major flood!) The same advice applies to the water lines under your sink and definitely your clothes washer.

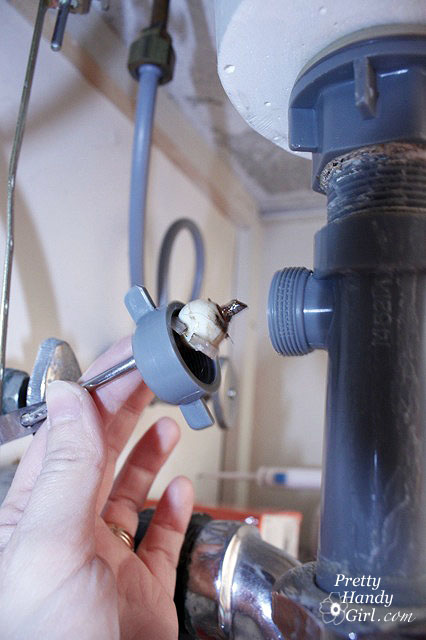
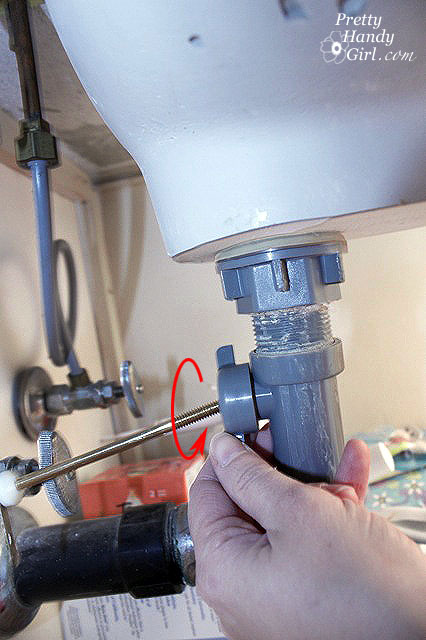
Place the basin or bucket underneath the supply line and gently remove the line from the bottom of the fill valve (gray threaded stem shown below.)

Remove the washer holding the fill valve to the tank.

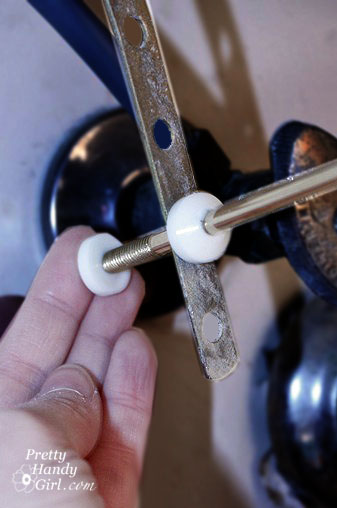
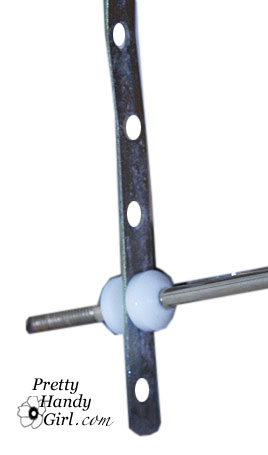
Inside the tank, locate the small rubber hose that attaches the fill valve to the overflow tube. Then disconnect the hose as shown below.

Now you should be able to lift the fill valve up and out of the tank.

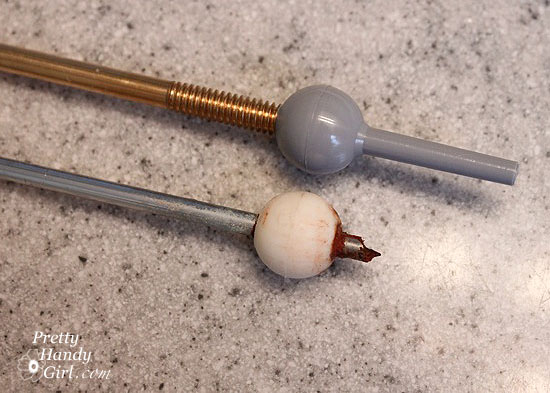
Place the new fill valve into the tank where the old one was. Notice the sleek new design, No Float Ball!

Side Note: You may need to adjust the height of the fill valve to fit in your tank.  If so, twist the top portion of the valve independent of the bottom half. (After you fill the tank, you can raise or lower the valve the same way if you need to adjust the height of the fill valve.)

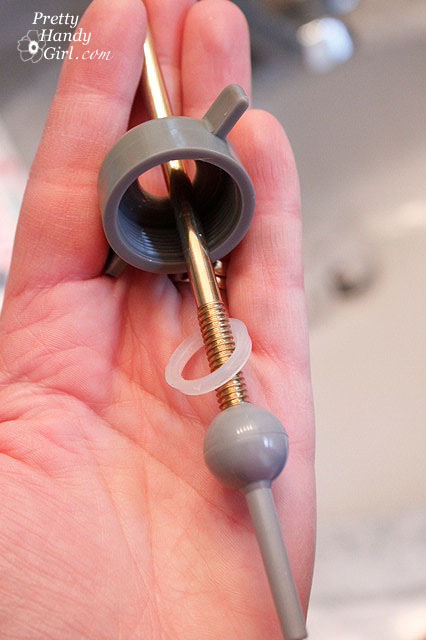
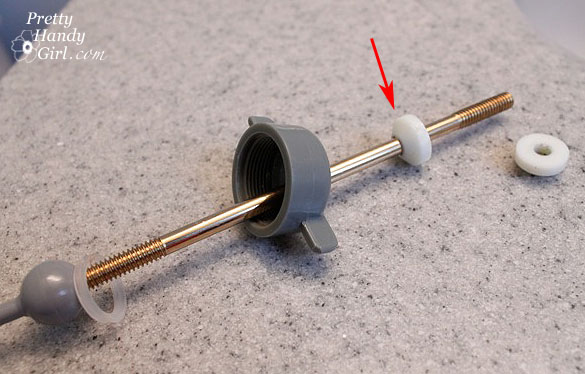
Thread the new washer onto the bottom of the fill valve where it extends out the bottom of the tank.


Gently tighten the washer, but be careful not to overtighten, or you might break the tank.


Next thread the coupling nut back onto the bottom of the fill valve to secure the water line.


Add the fill valve water hose onto the side of the fill valve. Then measure the distance to the top of the flush valve. Leave an extra inch, and trim any excess hose.


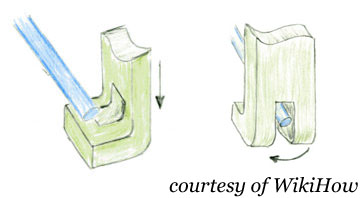
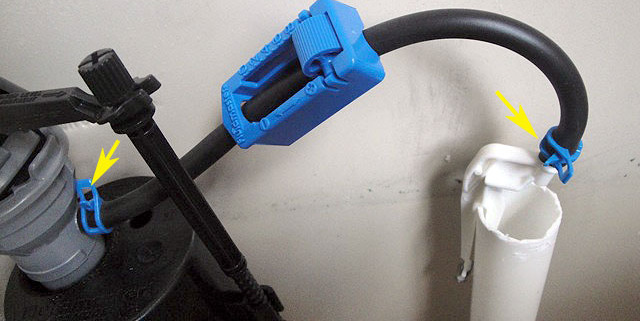
Find the  anchor clip that attaches the hose to the overflow tube.


Slide the hose onto the clip and attach it with a hose clamp (if included with your kit).


Attach another hose clamp to the end of the hose where it meets the fill valve. Slide the anchor clip onto the top of the overflow tube. The hose should be free of kinks and should arch up as shown.


Before you turn the water back on, you need to flush the fill valve to rid it of any foreign matter. Twist the top of the fill valve counter clockwise and lift up to release it.


Place a bucket or cup directly over the top of the fill valve. This will re-direct the water that is going to spray straight up out of the fill valve.


Gently turn on the water supply while holding the bucket. Let it run for a few seconds, then turn it off again.


Replace the cap of the fill valve by setting the cap back on top and then twist the cap clockwise. Make sure it is on securely. Then turn the water supply back on.

While the tank is filling, press down on the float cup until it is submerged under water for 30 seconds. Then release. Now you can adjust the water level adjustment screw until the water in the tank is about 1″ lower than the top of the overflow tube.

Test your toilet by flushing it a few times. Does it work?! Hooray! You’ve now replaced 2/3 of your toilet tank parts. Next up, how to replace the overflow tube and flapper assembly.

Today, I have Part 1 in a 3 Part Series on Toilet Repairs! Today we’ll learn How To Replace the Lever!

When visiting Scotland, we took a tour of Mary King’s Close we learned about life in Edinburgh before the toilet was invented. It was definitely not a pretty time in the city’s history. People literally dumped their pails of waste into the streets of Edinburgh and the sludge ran down the streets and into the loch (lake). They were only allowed to dump the pails early or late in the day after the street vendors were gone and the streets were less crowded. Then they opened their doors or window and threw out the sludge yelling, “gardyloo” loosely translated as “watch out for the water!” How thoughtful of them. But, people would still slip and fall in the muck coated walkways.

Back then the saying about Edinburgh was that you could smell it before you could see it.

Thank goodness the toilet was invented! Go now and hug your porcelain bowls. Okay, well you don’t have to, but be thankful for your loo.

Did you know that a leaky or malfunctioning toilet can waste as much as 200 gallons of water per day, that is over 70,000 gallons of water in a year! Yikes!

If you have a leaking toilet or one that doesn’t shut off I encourage you to fix it yourself! Yes, you can do this, no need to hire a plumber.

First, for anyone concerned about putting their hands in “crap water”, let me reassure you that all the repairs I am going to show you are in the tank and the tank holds clean water that is then used to flush the toilet. So, no need to worry about contaminated water. That isn’t to say that the tank won’t have mineral deposits or black residue in it. This is a result of the break down of the rubber gasket or hard water deposits, so you may want to don some rubber gloves.

Over the next few days I will show you how to replace everything in your tank. I HIGHLY recommend purchasing an entire tank repair kit and replace all the parts at once. It will save you time and money, because if one part of your tank is going bad, the others are likely to follow close behind.

Complete Toilet Repair Kits cost about $20

Today we will get your feet wet (no pun intended) by replacing the handle also known as the flush lever. Then I will show you how to replace the fill valve and finally how to replace the overflow tube and flapper assembly.

But, before we begin, you will need a few tools (tools shown are for a full repair job.)

  • Plumber’s Wrench (must have a wide mouth opening)
  • Adjustable Crescent Wrench
  • Handsaw (drywall, coping or hack saw will work. Needs to cut through PVC)
  • Flat head screwdriver
  • Level
  • Scissors
  • Bucket or basin
  • Sponge
  • Rags or Towels
  • Rubber Gloves

Ready? Well, let’s begin! Start by turning off the water. There should be a water shut off valve in the wall behind your toilet. Gently turn the knob clockwise to shut the valve.

Next, flush your toilet to drain the water from the tank. If your tank re-fills the water is not completely shut off.

Remove the lid to your tank. Set the lid in a safe place where it can’t be dropped or broken.

Inside the tank, opposite the lever, is a lock nut that holds the lever in place.


Using your pliers, gently loosen the nut and then remove the lock nut by hand. Just a little note: the nut may turn in the opposite direction than you would expect.

Remove the flapper chain from the end of the rod attached to the lever.


Remove the old flush lever and replace it with the new one.

Thread the lock nut back onto the new lever. Gently tighten the lock nut, but not too much. Over tightening could result in a cracked tank.


Replace the flapper chain on the new lever rod (picture below shows two chains, but you may only have one.) Adjust the chain so there is a slight amount of slack in the chain. Remove any excess chain that could get caught in the flapper (but leave an inch or two on the chain for adjustments).


Turn the water back on and let the tank fill.


Test the lever by depressing it. Replace the tank lid and test it again making sure that the flush lever rod doesn’t hit the top of the tank lid before lifting the flapper. Once it flushes properly, you are done!
That wasn’t hard, was it? Stay tuned as I show you how to replace the fill valve and finally how to replace the overflow tube and flapper assembly!

PHGFancySign

Our downstair’s bathroom is a little retreat for me from the boys. It is a great place to catch up on my Country Living magazines and if I bring my iPhone with me I can check email. Best of all the boys know to respect my privacy (well, most of the time.)

When we first moved in Pretty Handsome Guy accidentally leaned against the TP holder and pushed it through the wall. I patched it and painted the brush stroke texture on the walls trying to hide the poor condition of the walls.

Unfortunately, spending that much time in that bathroom gave me lots of time to focus on all the imperfections. The uneven paint where the trim meets the wall, the dinged, scratched and pocked wall, the beech veneer vanity, and the NASTY RUSTY ESCUTCHEON.

Es-car-go what? An escutcheon is the metal collar that covers the hole in the wall where a plumbing pipe extends out of the wall.

So, in a spur of the moment decision, I decided to give the whole room a facelift. I know, from one little escutcheon to an entire room refresh, that’s how I roll.

First things first, I told that rusty eyesore that he was coming out TODAY!

I’ve replace the escutcheons on several of our shower heads. They are really easy to replace. Simply unscrew the shower head, slip off the old U-G-L-Y escutcheon and slip on the new one, then screw the shower head back on. Easy peasy!!! So, I figured replacing the toilet’s water supply line escutcheon would be just as easy.

First, I turned off the water to the whole house. Then I drained all the faucets (if you don’t drain the upstairs faucets as well as the downstairs, then you will have a lot of water being pulled down by gravity when you open up your supply line.

When the faucets ran dry, I placed a bucket under the water supply line (some water will still drip out), then removed the braided line going to the toilet.

Next l grabbed my super strength Irwin groove lock plyers. With the long handles and adjustable grip, these are my new “go to” pliers. I began to turn the water supply line, lefty loosey. I turned, and turned, and turned, and turned.

Finally, I realized that it wasn’t unscrewing. Ooops! I guess it wasn’t a threaded nut. (I will be checking that nut for the next few months to make sure that it isn’t leaking now that I loosened it.)

Okay, on to Plan B (because I am good to my word and I promise that escutchen that he was gone, TODAY!) I went back to my tool stash and I grabbed these suckas! That’s right escutcheon, quake in your boots!

These are my tin snips (okay they really need a more macho name like Tin Destroyer!) Escutcheon, say your goodbyes! And within one easy snip, that rusty, nasty ring was HISTORY!

To put the new one on I made a cut through the new ring and then rotated the two edges in opposite directions.

I slipped it over the supply line and bent it back into shape. By positioning the cut section on the bottom, you don’t even notice it!

AND WOW, look at how that new escutcheon just brightens up that little corner under the toilet. It even distracts your eye from the uneven trim paint and the dark purple walls! Ha, ha, yes, this is a true after pictures. I’ll be sharing with you more this week on “How to Prep a Room for Painting”; “How to Paint a Room Like a Professional”; “How to Paint Doors, the Right Way”; and maybe more.

Okay, gotta go, I have a few more finishing touches to put on my retreat half bathroom. Check back soon to see the progress.

How to Retrieve Items from the Drain

While I was working on my Goodwill sweater, I accidentally dropped one of the pins down the drain.

Now, I could have just left it there, but my “Ms. Fix-It” brain knew that I couldn’t do that. If I left it, I would be dealing with a clogged drain in a month since it would trap all kinds of hair and unmentionable gunk. So, I did the “right” thing and set about retrieving it myself. (And, blogging about it so you know what to do as well.)

Here’s How to Retrieve a Item Dropped Down the Drain

IMPORTANT! If you do happen to drop anything down the drain, turn off the water IMMEDIATELY! You don’t want the water to wash the item beyond the drain, because then it is gone forever (unless you want to explore your city sewer lines.)

Tools:
(contains affiliate links)

 Instructions:

1. Put on your rubber gloves (who knows what’s hiding in your drain!)

2. Set the basin under your sink’s P-trap.

3. Then grab some channel lock type pliers. Irwin recently sent me this quick release Irwin GrooveLock Pliers
that are a snap to open and close the jaws. Just push the button, slide the handle up or down and release. Super quick and easy!

4. Loosen the lower slip nut ring.

Then slide it up to release one end of the P-trap.

5. Loosen the upper /upper slip nut ring (pay no attention to the slip nut I’m loosening, I actually had to loosen the one above it to free my P-trap.)

6. Then pull down on the P-trap to remove it (you will see in this picture that I had loosened the slip nut higher up to release the drain assembly.) Ewww, gross, don’t look at that string of hair hanging from the drain.


7. (Here comes the next disgusting part.) Turn your P-trap upside down to empty the contents into the basin. Oh and be sure you are wearing your rubber gloves (do as I say, not as I do!)

8. Remove your object. Luckily my pin fell out immediately. If your drain is really gunked up, you may need to run some water or use an old bottle brush to clean out the P-trap and release your object from the yuckiness. In fact, it’s probably a good idea to clean it out anyway while you have it off (if you can stomach it.)

9. Reverse the steps to re-assemble the P-trap. With plumbing I usually hand tighten the nuts and then use the pliers to give it an extra 1/4 turn (but I’m a weakling. If you battle me in arm wrestling YOU WILL WIN!)

10. When your spouse comes home, brag about how you retrieved something from the drain all by yourself!

PHGFancySign

We just got back from a short trip to Vienna, Virginia to visit my family for the holidays. When we arrived, my mom had left me a note in the bathroom we were using.

Here it is:

Repairing a Pop Up Sink Drain

My mom, she’s so cute, doesn’t she know that this sign taunted me the whole visit?

Repairing a Pop Up Sink Drain

Besides, what kind of daughter would I be if I left this minor repair to a plumber? Puh-lease!

So, here was the deal with the hair clip in the sink. It was her way of holding the stopper up because the rod inside the sink had rusted and broken off. (Pretty creative in my opinion.)

Repairing a Pop Up Sink Drain

But not the real fix for a sink stopper that would not stay up.

Repairing a Pop Up Sink Drain

Let’s back up before I show you how to repair the stopper. Thank you to Dvorty Girl for the excellent illustration above that she posted on WikiHow.com.

Sink parts:

  1. Drain Down Rod
  2. Joint Clamp Clip
  3. Horizontal Rod
  4. Nut
  5. Ball, Rod, Nut & Gasket
  6. Stopper Notch
  7. Pop Up Drain Stopper

Materials:

(I’ve included affiliate links for your convenience. I earn a small percentage from a purchase using these links. There is no additional cost to you. You can read more about affiliate links here.)

Universal Pivot Ball Replacement Kit
Pliers (maybe)

Repairing a Pop Up Sink Drain

Repairing a Pop Up Sink Drain Instructions:

1. Clear out enough room so you can work under the sink. (Okay, my mom is going to kill me for showing you her cluttered sink vanity. But, who’s sink vanity doesn’t look like this?! Please leave a comment and tell her that she’s not the only one!)

Repairing a Pop Up Sink Drain

2. Lay down some towels to cushion the edge of the vanity (or your back, rib cage or hips will be in screaming pain.)

Repairing a Pop Up Sink Drain

3. Locate the (3)horizontal rod and (5) nut at the back of your drain that holds the (5) ball, rod & gasket.

4.  Unscrew the (5) nut with your fingers or use pliers if it is really tight. Pull out the ball and gasket.
Repairing a Pop Up Sink Drain
5. To release the (3) horizontal rod from the (1) down rod, squeeze the (2) joint clamp clip between your fingers and slide it off the end of the horizontal rod.
Repairing a Pop Up Sink Drain
6. Lay out your old pieces to assess the damage. You may or may not need a new gasket (which is sold separately.) This one was broken and needed replacing.
Repairing a Pop Up Sink Drain
7. Match the old pivot ball with the new ones in the kit. Be sure to choose the one that is exactly the same size. Thread the (5) new ball onto the new (3) horizontal rod.
Repairing a Pop Up Sink Drain
8. Next thread the new gasket onto the horizontal rod and then the nut.
Repairing a Pop Up Sink Drain
9. Next feed one end of the (2) joint clip clamp (the kit I bought contained two white stoppers instead of a joint clip clamp). Only add one side or one stopper at this point.)
Repairing a Pop Up Sink Drain
10. Feed the (3) horizontal rod into the (1) down rod.
Repairing a Pop Up Sink Drain
11. Line the other end of the (3) horizontal bar up and slip the ball joint into the hole at the back of the drain. Ideally the horizontal bar will be parallel to the floor, but you may have to make some minor adjustments at the end.
Repairing a Pop Up Sink Drain
12. Screw the nut back onto the drain making sure the ball joint and gasket are lined up properly.
Repairing a Pop Up Sink Drain
13. Now add the second stopper or the other end of the (2) joint clamp clip to the back of the (3) horizontal rod.
Repairing a Pop Up Sink Drain
14. Look inside the drain, and notice the post end of the (5) ball joint inside the drain.
Repairing a Pop Up Sink Drain
Pull up on the (1) down drain rod and make sure that it moves up and down freely and the post in the drain moves as well.
Repairing a Pop Up Sink Drain
15. This next step requires a little patience, so put your patience cap on. Feed the drain stopper back into the drain. You want the end of the stopper to be at a 90 degree angle from the ball joint post as show below.
Repairing a Pop Up Sink Drain
Gently rotate the stopper 90 degrees until the end of the stopper hooks the post.
Repairing a Pop Up Sink Drain
16. Once the stopper has been properly rotated and hooked onto the ball joint post, test your sink by pulling up and own on the (1) drain down rod.
And you are done!
Pretty Handsome Guy thought it would be funny to re-arrange the letters in the sign.
Repairing a Pop Up Sink Drain
And just to prove to you that my Mom can also be handy, this is a photo I found of her from the 1970’s when my parents were building my childhood home.
Repairing a Pop Up Sink Drain
Next time your drain stopper is broken, I hope you will put off calling a plumber and fix it yourself!