How to Build a Rolling Storage Seat
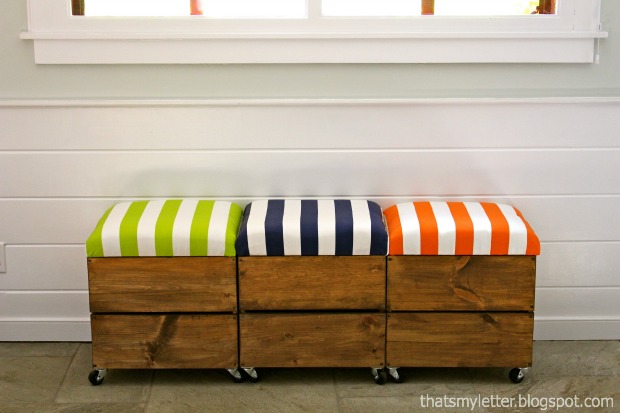
Everyone can always use more hidden storage! What’s better than getting organized with more storage? How about combining it with additional seating! Jaime here from That’s My Letter sharing with you this easy tutorial for how to build a rolling storage seat.

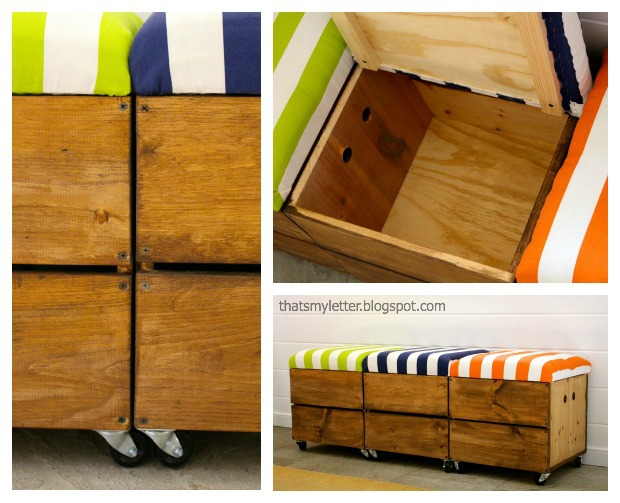
Of course I couldn’t stop myself at just one seat, I had to make three – they’re just that fast and easy! The finished size is a generous stool at 19″w x 18″ d x 20″h.
Lift up that cushioned top and you’ve got tons of storage space:
To make the rolling storage stool you’ll need the following supplies:
- circular saw
- tape measure
- pencil
- sandpaper
- stain
- drill
- #8 countersink bit
- 1 1/2″ spade bit
- #8 – 2″ wood screws, #8 – 1 1/4″ wood screws
- wood glue
- 4 – 2″ swivel casters
- 1/2 yard 3″ upholstery foam (18″ x 19″ piece)
- home dec fabric (27″ x 27″ piece)
- quilt batting (27″ x 27″ piece)
- staple gun
- staples
- scissors
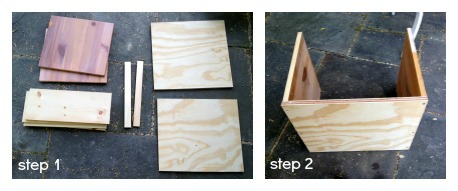
Lumber cuts for the rolling storage stool:
- 1 – 3/4″ plywood 16 1/2″ x 19″ (base)
- 2 – 3/4″ plywood 14 1/4″ x 16 1/2″ (short ends)
- 4 – 1 x 8 @ 19″ (side panels)
- 1 – 3/4″ plywood 18″ x 19″ (top)
- 2 – 1 x 2 @ 16 1/4″ (guides)
Instructions:
Step 1: Make all lumber cuts as indicated above.
Step 2: Attach the 2 short ends to the base using 2″ screws and glue:
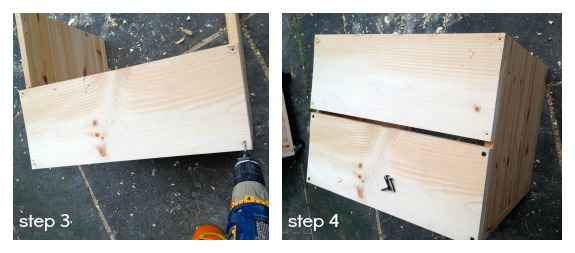
Step 3: Place bottom side panel flush with base and short ends, pre-drill four corners and attach with 1 1/4″ screws and wood glue.
Step 4: Repeat the process for the top side panel keeping it flush to the top edge of short ends. There should be a 3/4″ gap between the two boards. Attach side panels to other side. The box portion is complete.
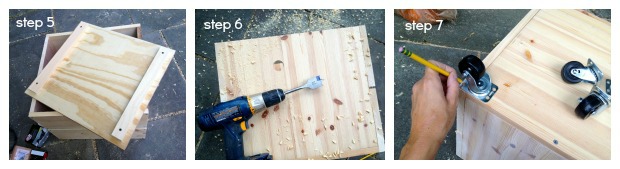
Step 5: For the top, position the two 1 x 2″ guides about 1″ inset from the 18″ edges, pre-drill, glue and screw using 1 1/4″ screws.
Step 6: Using a 1 1/4″ spade bit make 2 finger holes in the short ends for moving the stool around.
Step 7: Attach 2″ swivel casters to the base at the four corners. Apply Minwax provincial stain and set aside to dry.
Step 8: To make the cushioned top, place home décor fabric face down, layer the quilt batting, the foam and place the wood lid on top.
Step 9: Using a staple gun pull up one side of fabric & batting and staple to the edge of the lid. Set about 3 staples and then repeat process on opposite side pulling fabric/batting taught. Keep repeating process on all four sides.

Step 10: To make corners, simply fold in one side and pull other side up and over, staple securely.
Step 11: Cut off excess fabric and batting with scissors for a smooth finish.
 Place your cushioned top on the base and you’ve got a rolling storage seat. Versatile, mobile and provides storage space. Now which room needs a little extra storage?


This is so awesome! I have slowly but surely been working on this. I am in college and have to save lots of money but we did not have much furniture and so I decided to make these! While mine is not done yet (no wheels and no cushion yet), it is wonderful. It’s so much fun to make these and while I don’t have the exact tools. Home depot cut the wood for me and I was able to put it all together. I love these! Thanks so much for sharing!
Seriously so cute Jaime!! I am pinning to build later, you are amazing!!
This is amazing! I’ll have to force my partner in bulding one for me 🙂 Thank’s for sharing! Daniela
I do not recommend using glass jars to store your dry goods if you live in an earthquake prone area.
oooh! I rescued 2 plywood pallets from my neighbor earlier this week and was looking for something awesome and useful to do with them… I think this is it!
These are great! I could so use some of these in my house and my wife would love them. Thanks for the great tutorial!
These are cool. Somehow I don’t think mine would end up looking like that when I’m done, but that doesn’t mean I can’t try!
These are awesome!!! I love them and can’t wait to make some rolling storage seats for our home!
Very cute! We had something like these at work. They doubled as a little filing cabinet and an extra seat we could pull out for a visitor to our cute if we needed it. It was really handy and now that I think about it, I should make one for my home office too!
Great tutorial, love the bright colors and versatility of the rolling storage seats. Will definitely be sharing this post on Facebook.