How to Make a Gear Bracelet – Junk Warrior Jewelry

Did you pass your Junk Warrior testing? Congratulations if you did! And now I assume you want one of these highly coveted gear bracelets that will identify you as a Junk Warrior. Get set to follow this easy tutorial to make your own!

Materials:

Materials:
- 2 Pkg. 5/16″ lock washers (12 of the interior spoke and 12 exterior spoke washers)
- Grosgrain ribbon (3/16″ width)
- Hair band (preferably the same color as the ribbon)
- Scissors
- Clear nail polish (or fray check)
- Ruler
Instructions:


If the directions seem a little confusing, I made this brief video to help show how to thread the locking washers onto the ribbon:

Continue feeding the next pair of washers onto your ribbon and follow the instructions above.

When you have at least 5 pairs of washers on your bracelet (or enough to cover the top and sides of your wrist) set it aside and knot the ends of your hair band.

Feed the ribbon through one end of the knotted hair band and tie a double knot.

Wrap the bracelet around your wrist and feed the other end of the ribbon through the other end of the hair band. Adjust the ribbon until it is comfortably loose (but not too loose to slip off) around your wrist. Tie the other end of the ribbon onto the hair band with a double knot.

Slip the bracelet off your wrist. Trim the excess ribbon off the bracelet (leave the two sides tied and ignore the single-tied bracelet below.) Then coat the raw edges of the ribbon with clear nail polish to keep it from fraying.

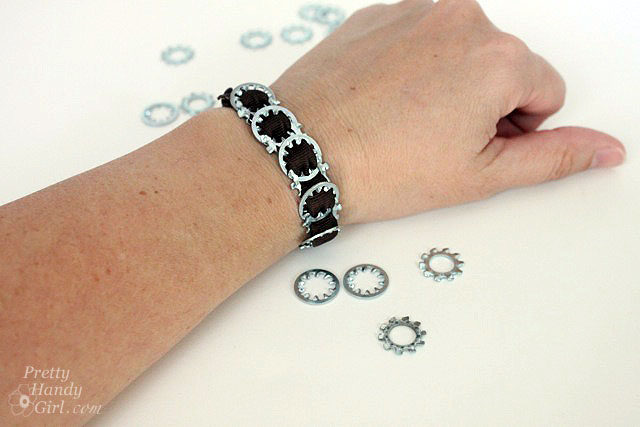
And now you have your own junk warrior gear bracelet!

Did you notice that it is reversible? Wear the interior spokes out one day:
And wear the exterior spokes out the next:

Now when you see other junk warriors walking around you can identify yourselves by these cool gear bracelets! “Hooyah Rust-yah Warrior” is what you can yell! Or not.

Hoo-yah. I am gonna make a lot of these with a special color of ribbon and hand them out to all my junky bloggy friends. I will be able to recognize my tribe by the color of the ribbon. I might even try to use some leather or pleather. I wonder if you can soak these in vinegar, or ammonia or something to get different colors. How about earrings? If you make a slit in the circle, they just might stay on by themselves. Thanks!
LOVE the tutorial. LOVE your leather wrap bracelet too! {{wink}}
awesome, and soooo cool, great tute you’ve made, thank you for the sharing. Love it.!!!
Thanks Jet! Glad the tutorial was easy to follow. I honestly had to stop and think about it a few times. LOL.
you are the Queen of junk! Anyone who can make something beautiful out of something so mundane is a legend! Go girl!x
Love this! Just did a new diy bracelet too!
Rachel, DIY bracelets are the best!!!
Cannot wait to make one or two or three! Always looking for a statement piece of jewelry, and this definitely makes a statement!!
I’d love to see different color combos if you make some ;-).
Cute and very creative!
This looks really neat and easy to make. Thanks for posting. I want to run out to the store and get the stuff to make one right now! 🙂
So resourceful! That is pretty cool.