The 10 Minute Tooth Fairy Pouch

Things happen fast in my family. So fast that I can barely keep up. If you follow me on Twitter or Facebook, you probably saw that I spent Tuesday and Wednesday in the hospital with my youngest son. I looked away for an instant and he managed to climb 6 feet up the outside of the slide. As I turned my gaze back to him I watched as his body fell to the ground. There was no doubt that he was broken and in severe pain. Hours later confirmed that he had broken three bones in his arm (one at his elbow, and both forearm bones at his wrist.) He ended up having surgery, five pins inserted into his arm, and an overnight stay at the hospital. Needless to say, my week has been fraught with worry and concern for him and his pain level. I think for Christmas I’m going to make him a bubble wrap suit!

Just last night my seven year old lost his first tooth! Yup, it has taken him a while to push that little baby tooth loose. But, low and behold he lost it last night in his sleep. Pretty Handsome Guy tracked the runaway tooth down this morning only to have it go missing again tonight when we needed to present it to the tooth fairy. We searched high and low but can’t find it. Do you think the tooth fairy came early to our home?
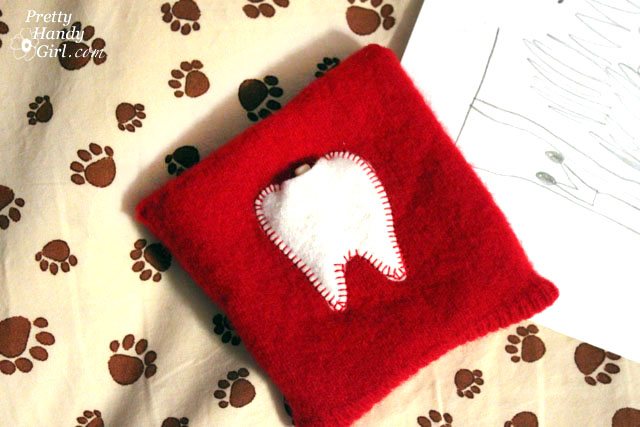
My son informed me 30 minutes before bedtime that I needed to sew a pouch for the tooth (and the money that comes with a lost tooth.) I said “okay”(because Mom always has to deliver when a little one has a request.) Then I asked how big and what color. He showed me with his hands and said that the pouch should be red.
After a quick scan of my craft supplies I grabbed a red sweater that I had already felted in the dryer, a piece of white craft felt and a red button. Then I whipped up a little tooth fairy pouch in 10 minutes!

Materials:
- Felted red sweater
- White craft felt
- Red thread
- Red button
- Scissors
Cut the sleeve off the sweater at about 7″.

Turn the sleeve wrong side out and stitch the bottom of the sleeve together.

Turn it right side out and cut a “U” shaped notch out of the sleeve on one side.

Flip the sleeve over and round the corners of the longer side of the sleeve.
Cut a tooth shape out of the white felt.

Pin the felt tooth onto the center of the sleeve (on the long side.)
Carefully move the short side out of the way and stitch the tooth onto the sleeve using a blanket stitch or another decorative stitch. Leave a small opening at the top of the tooth.

Hand stitch a button onto the other side of the pouch.

Cut a small slit into the rounded flap of the long side and slip it over the button.

Slip your child’s tooth into the tooth pocket on the front.

The tooth fairy will dutifully leave money (and maybe a note) inside the red pouch while your child sleeps.

My son told me that he heard the tooth fairy leaves more money if you draw her a picture. I’m not sure how much she leaves for non-existant teeth though. I hope we find that tooth!

Sharing with:


The coffee set is too cute. I’m glad to see the MS paint roller in action. I’ve used acrylics for years and was skeptical about her paint and the roller, so glad it got your approval. Now I have no fear in buying one of these dandy items! Thanks for all you do.
How perfect is that! I’ve been looking for tooth fairy pouches, as I had one when I was little, but they are expensive. Duh, why don’t I just make one! Thanks for the easy tutorial, Brittany. I know what a week you’ve had. I hope things are going better now and you can enjoy the next few days. Are you staying home or headed out of town?
Jenna
What an adorable pillow!! I’ll have to remember this when my girls are a little older. Your poor little boy. My youngest loves to climb too. It’s amazing how high they can climb when your not looking. I love your blog. I’m your newest follower.
Would love to see you DIY Home Sweet home.
Jamie
http://diyhshp.blogspot.com/
P.S. I have a linky every Monday. Would love for you to stop by and link up.
I love that simple idea for such a sentimental event! I’m inspired!!! I have a little guy that sounds quite similar to your little guy!!! We took him to the children’s hospital twice in three months…both times needing major stitches from something “cool” he was doing! No fear!!! Thanks for stopping by earlier! I’m your newest follower and am so glad to know about your place!!! I’ll visit again soon!
Aimee @ ItsOverflowing.com
I am so sorry for your son’s pain and yours as a mother. We all hurt when our little ones get hurt. Will keep you and your family in my prayers.WOW! the Tooth Fairy has been so updated since the days of slipping the tooth under the edge of the pillow. I love the little pouch.You are so clever at making things.
Oh, good grief! I hope he gets better soon! I bet it’s like watching in slow motion when that happens!
Just a tip: we’ve had to call the tooth fairy hot-line a few times when the tooth fairy was sick and the substitute didn’t get the message or just had a busy night and needed a quick reminder in the morning:)
You’re a good mom! This was the sweetest post of yours I’ve read. That pouch could become a family heirloom. And the kid art should be framed.
Sending get well wishes to your little guy.
Aaww, I’m so sorry about your little guy, he looks so pitiful in that picture 🙁 I pray he heals quickly.
(my little guy has those same bedsheets 🙂
Praying for your sanity this week.
Oy! So sorry for your son’s injury and pain and your worry! I hope he heals quickly and you have a peaceful, happy Thanksgiving.
Sorry to hear of your youngest injury! Glad he is on the road to recovery now! That tooth fairy pocket is adorable! You rock!
I am so sorry for your son. Poor little guy. Hope he heals quickly!
Wow! Looks like a really scary experience. Hope he gets better soon.