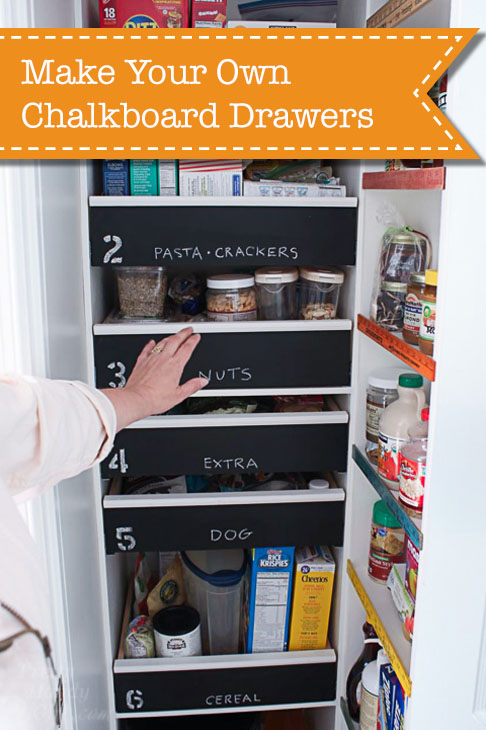
Pull Out Drawers with Chalkboard Fronts
Did you enjoy that sneak peek of the pantry renovation project? I’m sure you are dying to see what lies behind that closet door. Well, you’re in luck because today you get to see the reveal and learn how I made these Pull Out Drawers with Chalkboard Fronts.

Recently I’ve been putting the finishing touches on the big pantry renovation. Although the space wasn’t that big to start with, I’ve created more usable spots to store our food and pantry items. Part of the renovation involved putting up a wall to create a closet with pull out shelving. This area is 1/3 of the original pantry. But, it holds about 2/3 of the original food items. Amazing!
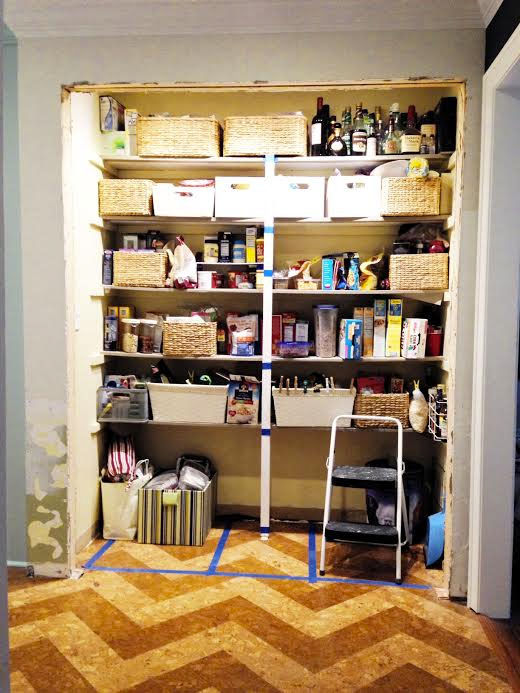
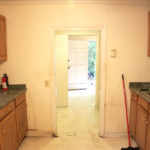
I started with your standard 6′ wide by 3′ deep closet with bi-fold doors. It may sound like a fair amount of storage space, but the shelves were only 12″ deep and there were only five shelves. Trust me when I say there was a lot of wasted space.

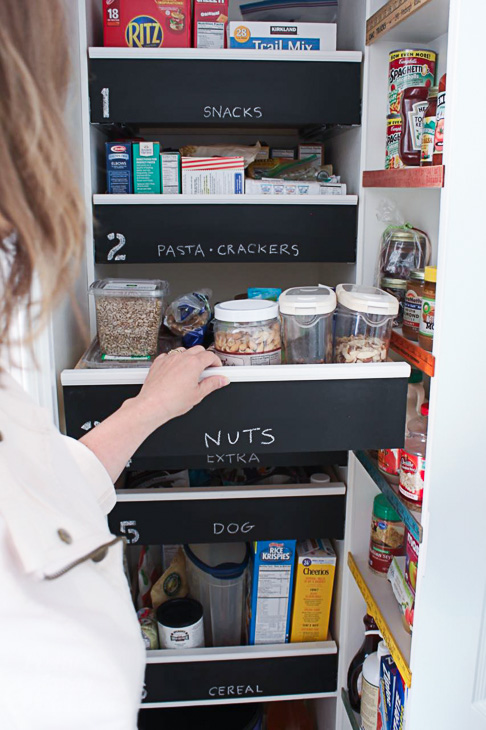
Ready to see the new closet portion of the pantry? Let’s throw open that door and let you see the organization I have in there now!
Hark, I think I hear singing angels! Keep in mind this is only 1/3 of the pantry renovation. The other two thirds will have more storage than you can shake a stick at.
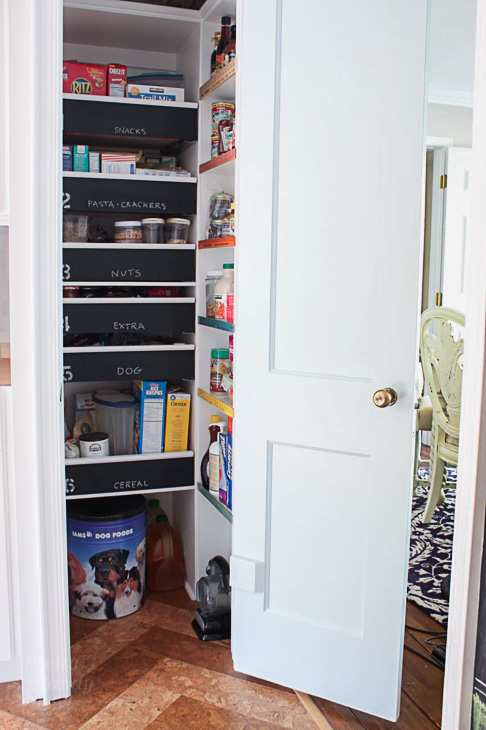
A drastic improvement from the before:
Enough of the ugly, I’m sure you’re really here to find out how to create these fun Pull Out Drawers with Chalkboard Fronts.
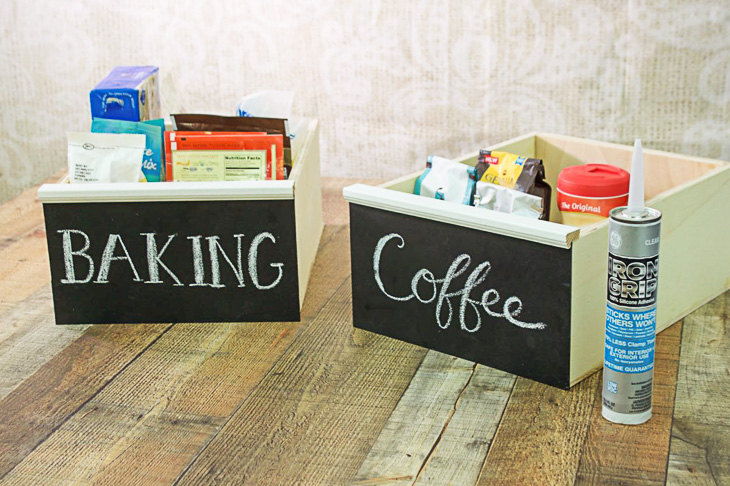
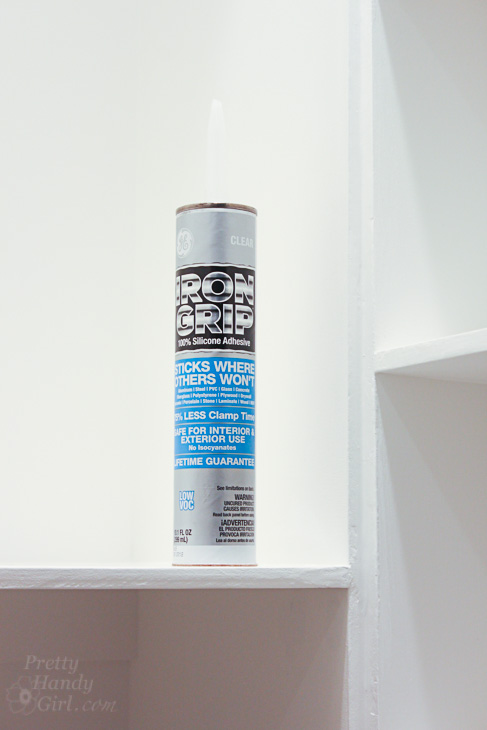
Before we begin, I want to thank my sponsor for providing me with GE Iron Grip* 100% silicone adhesive for this project and for the giveaway. Just to be clear, I have partnered with the manufacturer of GE-branded sealants and adhesives to bring you this post, and have been compensated for my honest opinions.
Since receiving this product, I have put it to the test. So far I give it a top score. The curing time is much faster than some other adhesives I’ve worked with. What really sets it apart for me is the clear color, so it blends in with any project: wood, metal, masonry, tile, glass, you name it.
Ready to get building? Great! Let’s get busy making these fun organizational chalkboard front drawers.
Building Chalkboard Front Drawers:
This is an easy build project. You don’t have to use a nail gun if you don’t have one. The brad nails simply hold the box structure in place while the adhesive cures. If you do choose to not use the nail gun, be sure to secure the box with clamps for the required clamp time.
Materials:
(I’ve included affiliate links for your convenience. I earn a small percentage from a purchase using these links. There is no additional cost to you. You can read more about affiliate links here.)
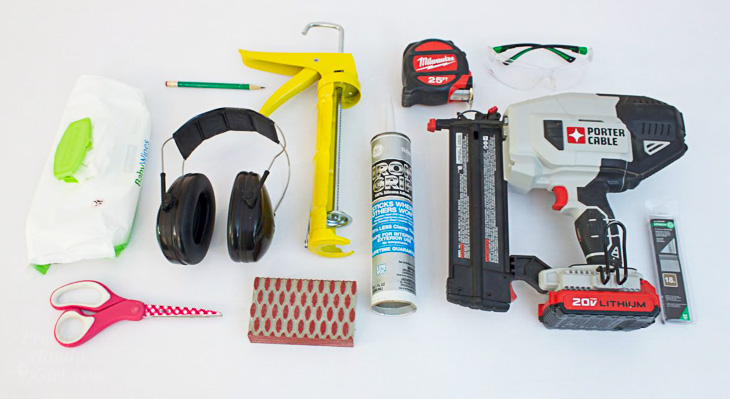
- GE Iron Grip* 100% Silicone Adhesive
- Caulk gun
- Masonite material
- Chalkboard paint
- Chalk
- Pencil
- Nail gun
- Brad nails
- Saw
- Eye protection
- Hearing protection
- Baby wipes
- Backer band moulding
- 1/2″ plywood
- 1/4″ plywood
Optional: Painter’s tape
Cut List:
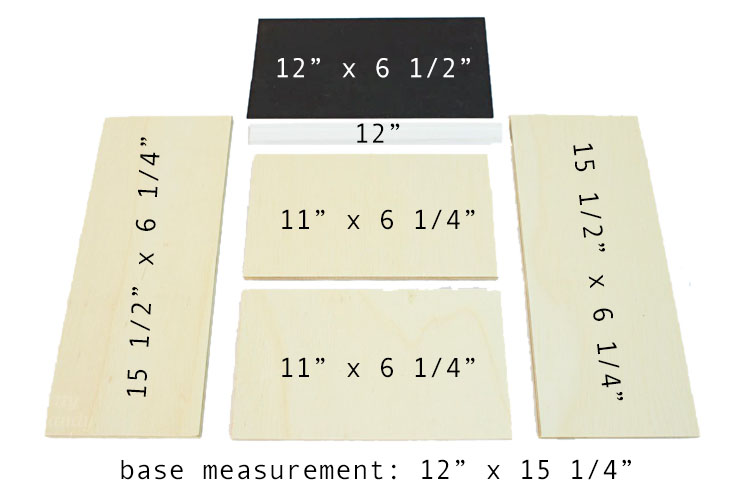
1/2″ Plywood cut list:
- 2 – 15 ½” x 6 ¼”
- 2 – 11″ x 6¼”
1/4″ Plywood cut list:
- 12″ x 15 ¼”
Masonite panel:
- 12″ x 6 ½”
Backer band moulding:
- 12″
Note: If you are using the drawers in an existing cabinet box, measure your opening and create the drawer to your specifications. You’ll also want to follow the guidelines and measurements provided by the drawer slide manufacturer*.
*For this project I used the Blum Tandem full extension soft close drawer slides.
To make things simple for you, I put together this brief video to show you how to build the chalkboard front boxes:
Instructions:
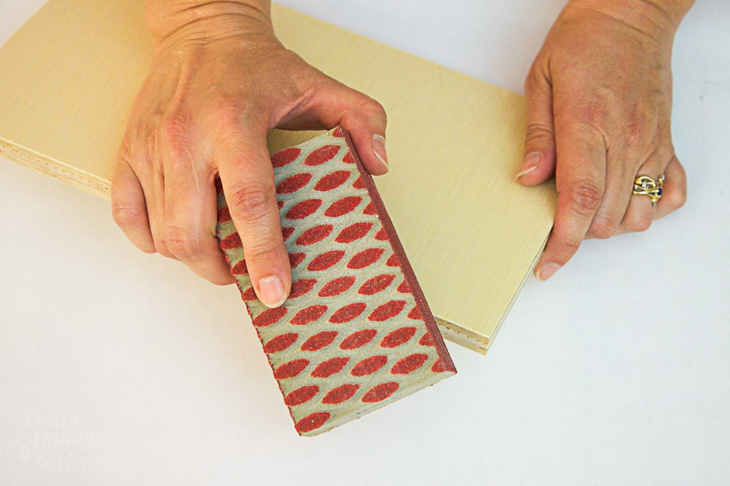
Sand the edges of your plywood pieces to knock off any splinters.
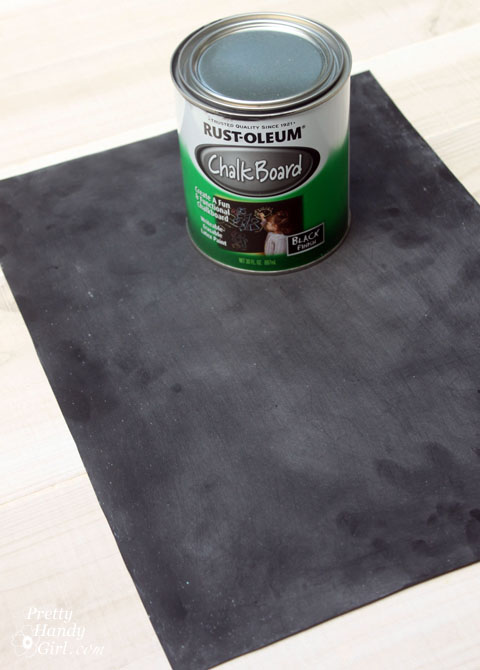
Paint one side of the masonite panel with two coats of chalkboard paint (sand between coats.)
Dry fit your plywood drawer pieces together.
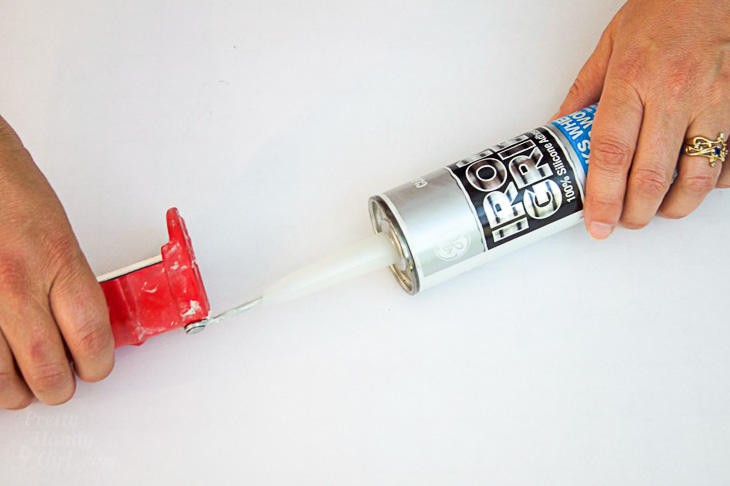
Cut off the tip of your GE Iron Grip* adhesive tube.

Use the stick on your caulk gun to puncture the inner seal.
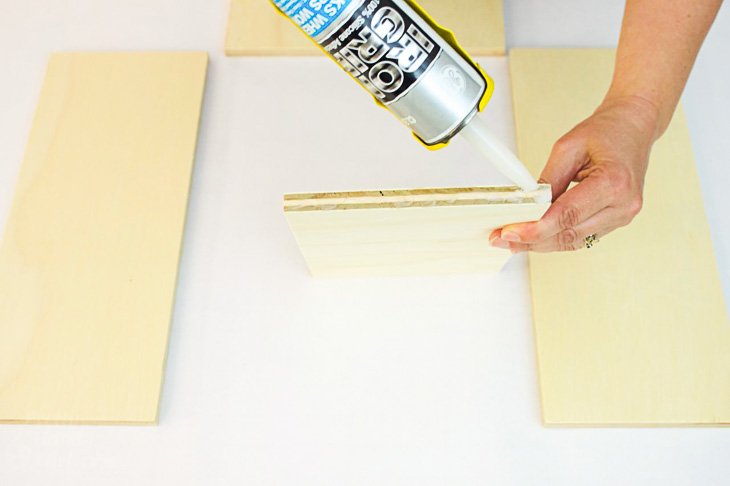
Run a line of adhesive along the sides of your front and back pieces.
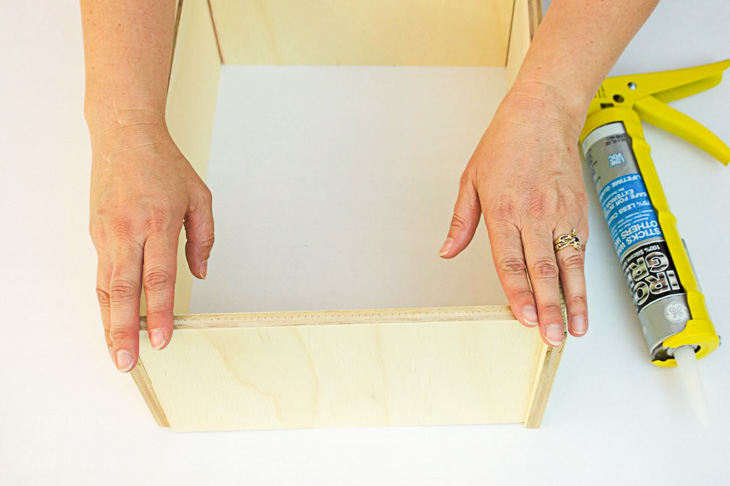
Sandwich the front and back pieces between the side pieces.
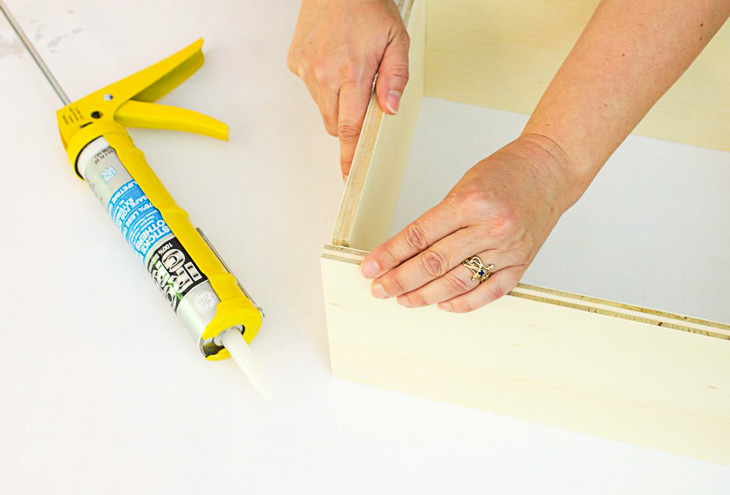
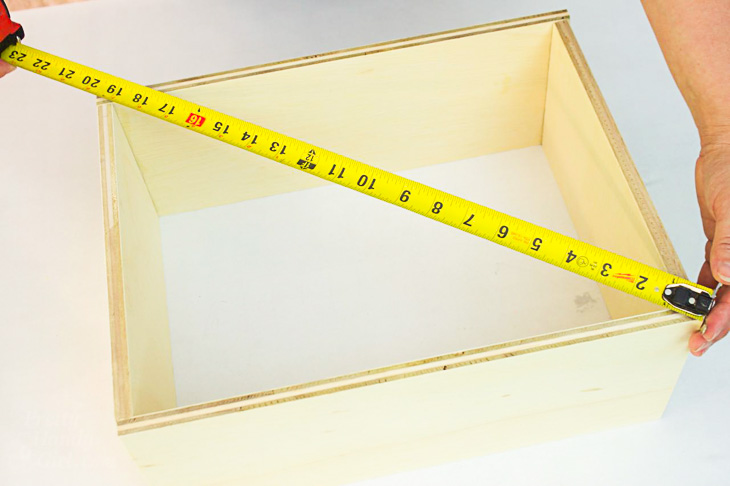
Check the box to see if it is square by measuring both diagonals and making adjustments until they are the same length.
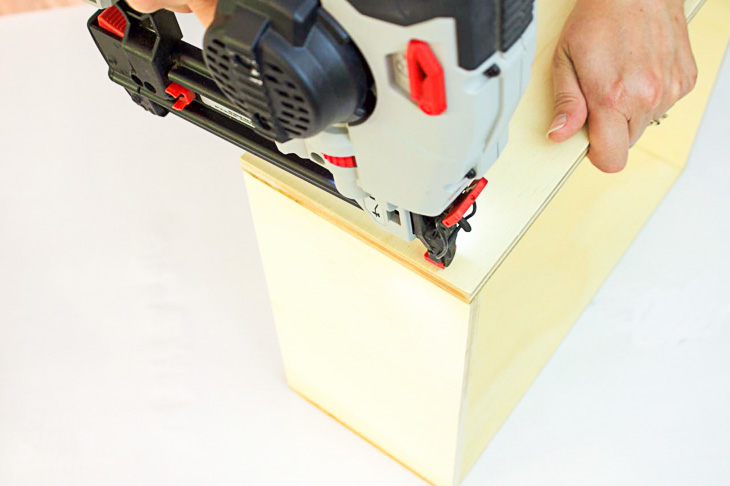
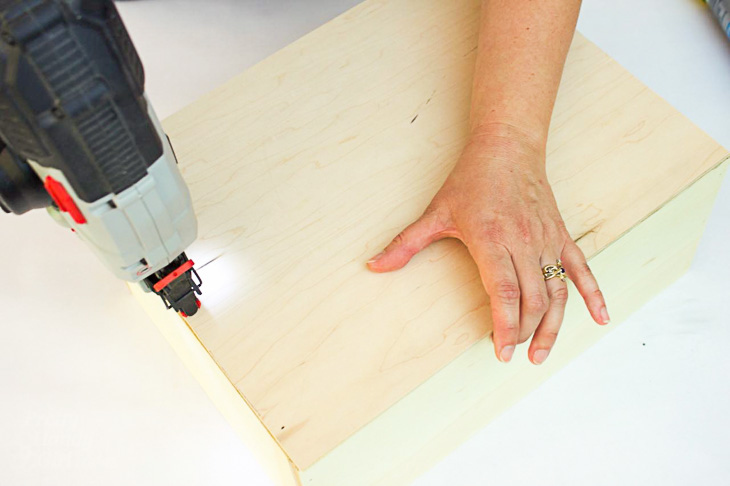
Add 2-3 brad nails into the side pieces to secure the box while the adhesive cures.
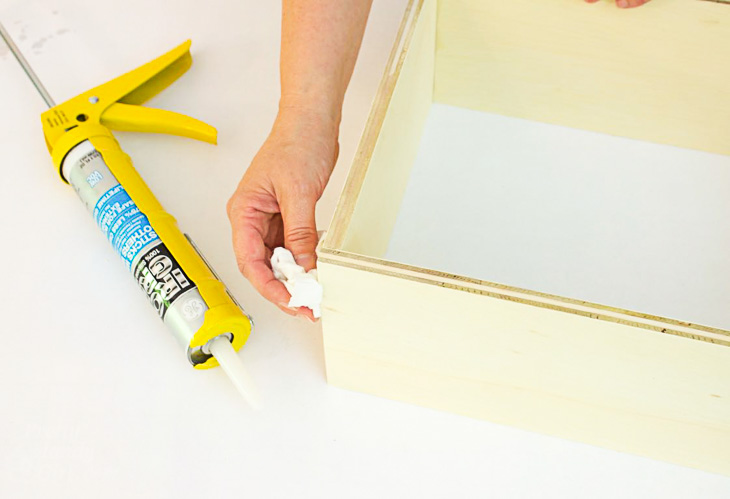
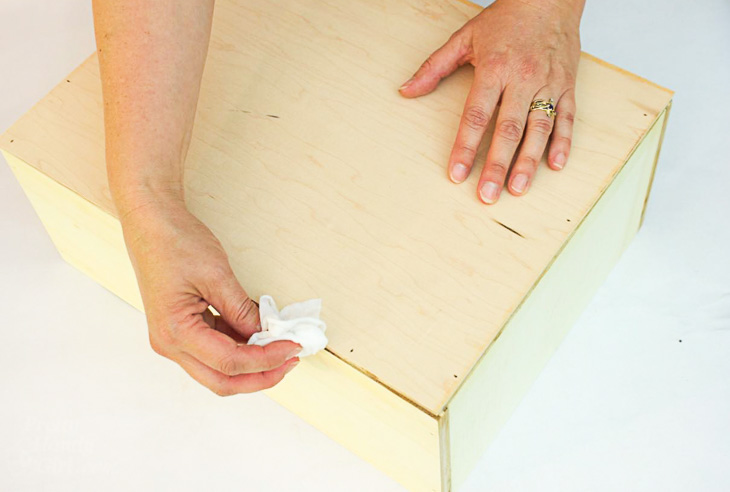
Wipe off any excess adhesive with a baby wipe or damp paper towel.
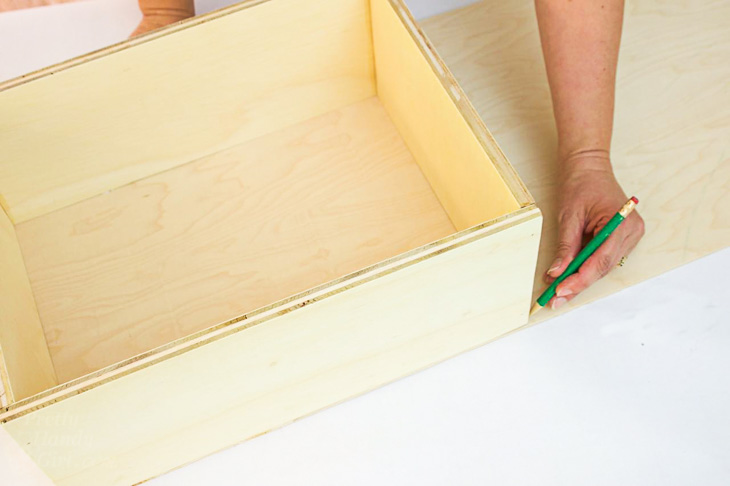
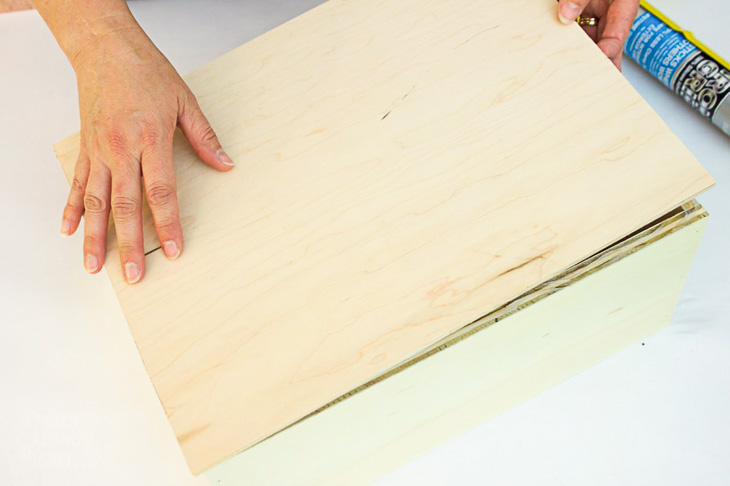
If you haven’t cut your 1/4″ plywood base yet, that’s fine. I prefer to cut the base after building the drawer box to insure an accurate fit. Lay the box on top of the 1/4″ plywood and mark the perimeter onto the base.
Cut the plywood base and sand any rough edges.
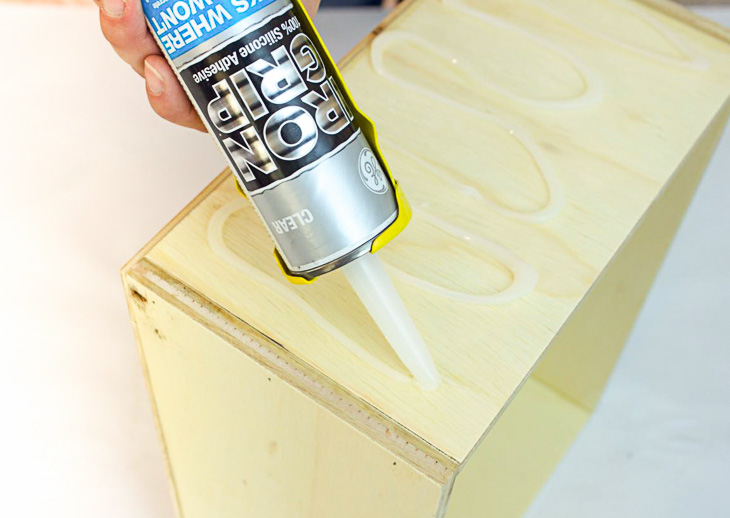
Run a line of adhesive along the bottom edges of your drawer box.

Line up the base and press it onto the drawer box.
Secure the base with a few nails to hold it in place while the GE Iron Grip* adhesive cures.
Wipe off any excess adhesive that may have squeezed out.
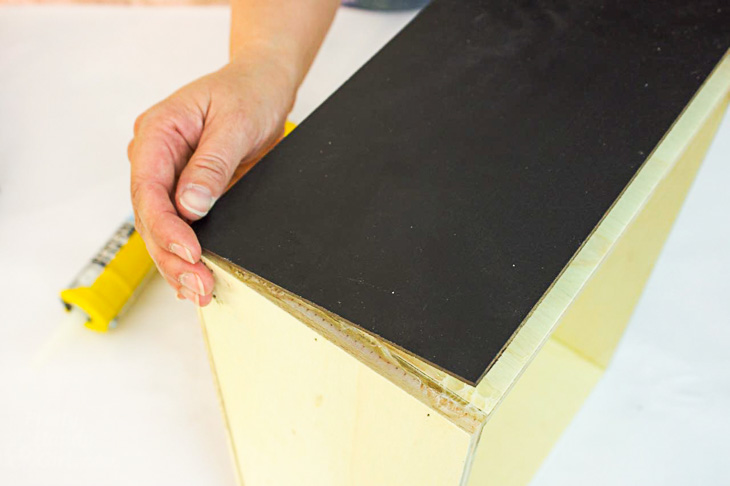
Time to add the chalkboard face. Add a liberal amount of GE Iron Grip* adhesive to the front panel of your drawer.
Center the chalkboard panel on your drawer front. Press firmly on the chalkboard panel to set in place. Let the drawer sit face up until the adhesive has cured.
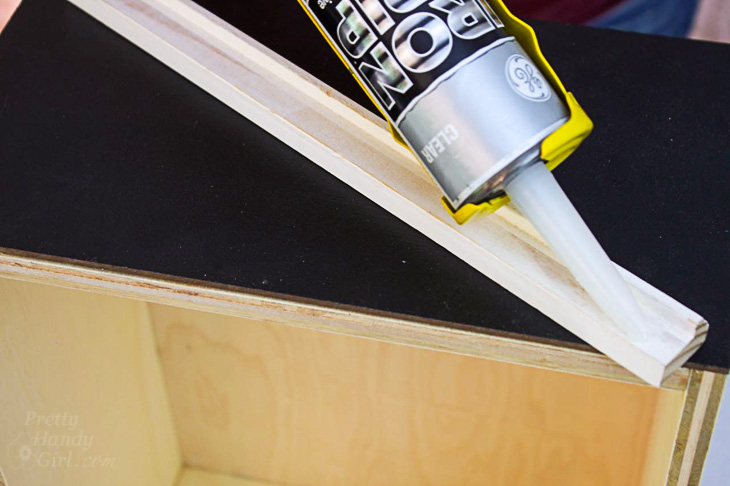
For a finishing touch, add your backer band piece to act as a handle. Run a line of GE Iron Grip* adhesive along the inside edge of the backer band moulding.
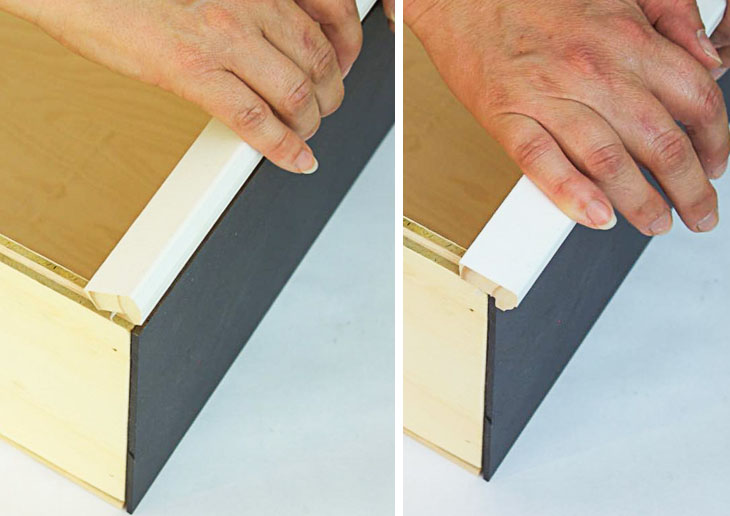
Press the backer band over the front edge of the plywood drawer and chalkboard panel.
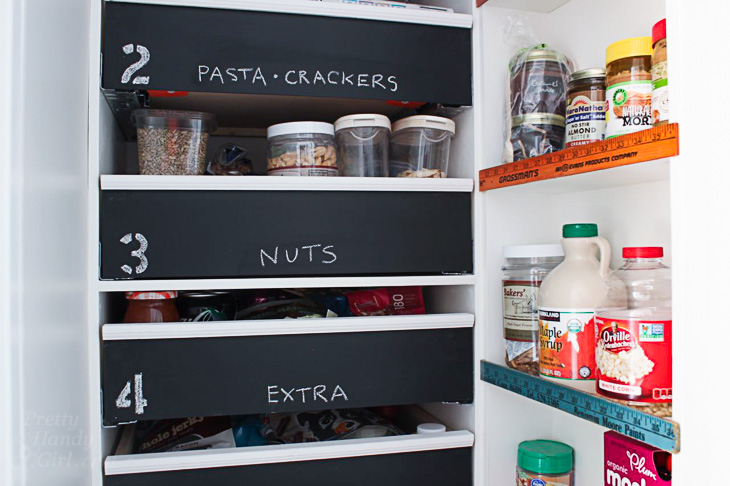
Insert your drawers into any cabinet box using the drawer slides of your choice or simply slide the drawer box onto a shelf for better organization of smaller items.
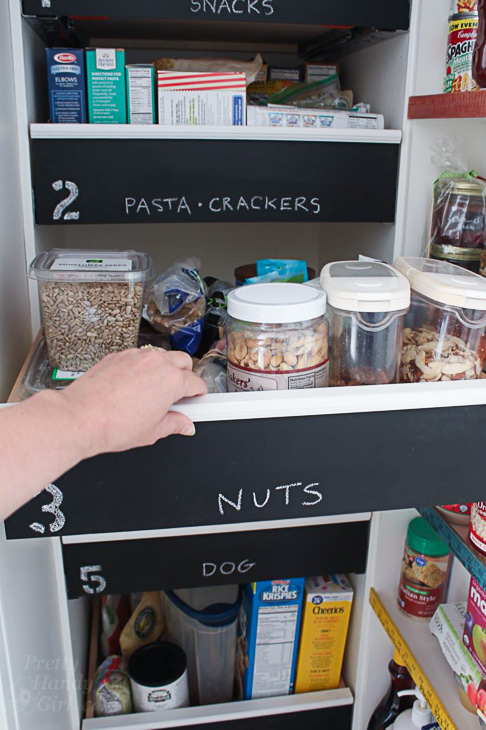
I’m loving my new full extension chalkboard front drawers. It helps the kids (and me) find all our pantry items and keep them organized.
![]()
Disclosure: This is a sponsored post for GE –branded sealants and adhesives.
*Iron Grip is a trademark of Momentive Performance Materials Inc.

Great idea for the kitchen, neat and quick!
#Entry My bathroom cabinets are builder grade white laminate with a strip of oak at the top and bottom or each door and drawer. I will use GE Iron Grip* Adhesive to attach some vinyl trim strips to the cabinet fronts to give them a more modern look before painting them.
P.S. Love the new beverage center and pantry!
Great use of extra plywood! I have some trim I need to attach to my countertop.
I’ve been avoiding building drawers in my studio because it seemed too difficult. You make it look easy! I would use the adhesive to make a couple drawers. Thanks for the great tutorial! #entry
I need to fix some drawers! #Entry
Those drawers are great! Those would be great in a bigger size with some wheels under my guest bed for all of the storage I have under there! #entry
We have antique dining chairs with wobbly legs. they need some Iron Grip!! #entry
#entry
As a writer, I would love to create a message center in my office to list stories in progress. The chalk paint looks like it would be the perfect solution. I love reading your emails and visiting your facebook page. Good luck with Etta.
I would use it to build storage in my new Laundry room and Basement bathroom. #Entry
Thanks for sharing this project. I’ll use the adhesive to securely attach house numbers to my home’s cedar siding. I can think of so many more uses! #Entry
I have SO many DIY projects I could use the GE Iron Grip adhesive on! For starters, I have a console table I want to refinish and add some wood slats to the top and GE Iron Grip adhesive would be perfect! Thank you for the chance to win! #Entry
I am redoing our ugly 70s cabinets by attaching mdf to all the doors to make them look like shaker style! I would use Iron Grip to attach the 120 pieces of mdf I need to attach!! #Entry
I would love to use this to make pull out drawers for some deep lower cabinets I have! #entry
I would use the GE Iron Grip to reattach some wall panels that were supposed to stay up with liquid nails, but just are not. #Entry
I would use the ashesive on the narrow trim on the mud room shelving bins/clothes hooks which is my first project. I was concerned that using nails on the trim may split it and the adhesive is the perfect solution. Love your blog!
You have inspired me! I love this idea for the pantry. As for the adhesive? We are knee-deep in bringing our 1950’s Cape back to life! Baseboards, shelving, moulding, and possibly to keep my sanity from leaking out of my ears. 🙂
Oops! I forgot #ENTRY
I could use the GE Iron Grip for so many projects since we are remodeling our house, but could really use it on the thin trim in the kids room that keeps coming down. All the pieces except one went up and stayed up fine. #Entry
Love this project! I think I’d do something similar to store samples and client info in my workspace. Thanks so much for sharing! #entry
So many projects, so little glue ; ) Lately I’ve been working with tin and wood- most glues wo’t hold the tin in place. This would be great! #Entry
I would use the GE adhesive for the exact same thing that you did with your pantry closet. my pantry closet is a hot mess. I want to make the spice rack for the door and organize the shelving as drawers for so much more space in my tiny kitchen I have to buy some today so I can get started on this project for my son the chef as a surprise for his birthday on Friday June 9th #entry
Thanks for the tutorial. Can’t wait to try something like this.
#Entry
I would use this in so many ways. For starters I love this chalkboard front drawers for my pantry. Or use it on my dining room table that a piece fell off of and needs replaced (haven’t decided if i want to refinish yet or not. Its old). #entry
I have some cinder blocks waiting to become a bench. A good adhesive would help. #entry.
I have loooong been wanting to build a “simple” potting bench and have scoured the internet looking for an easy plan to make one. Have found a few (sure would love a tutorial from YOU “Oh Master Builder”!) plans , but think with this adhesive will be able to make drawers from your tutorial for sure!!! Thanks for all you do!
I would figure out a way to mouse-proof my kitchen drawers. #entry
I would figure out a way to mouse-proof my kitchen drawers.
I would use the GE Iron Grip Adhesive to secure the foam pad on my printer–nothing else is working.
The pantry looks FANTASTIC!!! ?
I would use the GE Iron Grip Adhesive to secure a new backing onto a super cute wardrobe that I’m redoing, it would be fantastic for that!
#Entry
I’d use this on my laundry room remodel #entry
I would try it on my own hall closet remodel! I have deep cabinets that soooo need pull out drawers. #entry
I would use this product I need on an organization project in my laundry room!! #Entry
#entry I would use this to repair the legs on my kitchen table – they are wobbly!!
GE Iron Grip would work great for my garden projects. I need a super strong adhesive to hold plates,bowls, candle holders,etc to create flowers & garden art.#entry
We are rehabbing an old camper and this would come in handy for the backsplash (that awful paper has to go! ) #entry
I am planning to convert a closet into much needed pantry space and this gave me ideas to create storage boxes. Also I might be able to repair a blanket chest a family member gave me. #Entry
# Entry
I would adhere wooden ball feet to a wooden tray!
This is perfect for the closet that I turned into a pantry! #Entry
(Got so excited about the drawers I didn’t read the whole post, just the building plans)
Well alrighty then, you just added to my reno project list! Awesome idea, thanks!
#Entry
I’d use the GE Iron Grip adhesive to help me make new window boxes. When we moved in they were showing wear, but four years later they are falling apart. Time for new ones.
I would use this to make drawers for my walk in closet. #entry
I would use it for my mosaics. #Entry
#ENTRY I have a side table that needs a leg repaired. Looks like Iron Grip would be pretty handy to have around!
For the recycled butterfly/dragonfly (spindle, fan blades, post cap) I’m working on right now! #ENTRY
my kitchen cabinet drawer fronts, they’ve been replaced multiple times, put on with screws that keep breaking. Time to move on to the Iron Grip for one last fix!! #ENTRY
I would use the GE Iron Grip Adhesive to fix a broken chair that I haven’t been able to use in a while. #Entry”
We ARE ABOUT TO TACKLE the project of replacing carpet on the stairs with oak treads. I could use this underneath stair treads before nailing. #entry
Here’s my #Entry! Redoing a pantry has been on my wish list forever….making drawers was definitely a weak spot for me. But this demo gives me the confidence that I can do this so this post is saved for when I’m ready! Thanks for sharing!!!
I’m looking at bulking up my doors with trim pieces to make them look paneled. This product would be perfect! #Entry
#entry
I’m not sure what I would make yet; but I’m thinking about it!
I’m planning a kitchen island from old cabinets; the Iron Grip would be great for chalkboard drawer fronts! #Entry
I’ll be putting in three new bath vanities next week and GE Iron Grip* Adhesive would be perfect for installing the vanity tops. #Entry
Your tutorials are so well done. Steps are complete and you provide a complete list of tools for every project. thank you. I would use this adhesive for any number of projects I have going on right now. specifically I am repurposing an old child’s chair into several farmhouse style signs. #entry.
I would use the product to help fix the legs on an old table that I’m going to use in my craft room. I love the drawers in your pantry! I might also use it to make some drawers for my pantry, too!
It just so happens, my kitchen is without a pantry and I have been wanting to fix that. After watching your video and reading your post I think maybe I can built it myself. Thank you for sharing. #entry
What a great tutorial. I’ve got my eye on a set of drawers for my laundry room shelves. #entry
My daughter leaves for college this fall and I am dying to redo her closet into something functional. With shelves and drawers. She hasn’t let me touch it in 8 years. #entry
I have a cabinet pullout that pulled off 2 years ago and stripped the screws holding it. This would work great for that.
#entry
I’m making a 3 tiered stand using old picture frames and wooden candle holders so this product would be perfect to keep it nice and strong
#Entry
Thanks for the chance to enter! It looks like a pretty amazing product- I would use GE Iron Grip Adhesive for my tile backsplash in my planned kitchen renovation. Thank you for sharing your projects and stories! I did my first woodworking project a few months ago and you are the reason I learned how to use power tools. You inspire me! ?
Ack! I forgot to put #Entry on my entry! Sorry! Should I post another comment? I would love your thoughts on this. Thank you!
Going to try making a drawer. Love the chalkboard front. #entry
I would try this new adhesive on some drawers for a repurposed dresser I am doing over. #Entry
Making some new bulletin and chalkboards for my sewing room.
Great Ideas i Am Going to try some of them