How to Use a Jig Saw
Welcome back for another Tool Tutorial Friday – How to use a jig saw. Today I have two lessons for you. The first will cover the basics of using a Jig Saw. THEN….I’ll show you a professional trick for cutting a hole inside a piece of wood without sawing from the edge!
Let’s get this party started…well, this tutorial at least.
(This post contains affiliate links. To learn more about affiliate links, you can read my disclosure page.)
A jigsaw is a good introductory power saw to own. Being small and handheld, makes it a bit less intimidating than the bigger power saws. The jig saw can cut straight lines (when pushed up against a guide like a long level or board.) But, it really excels at cutting curves, profiles and circle cuts.
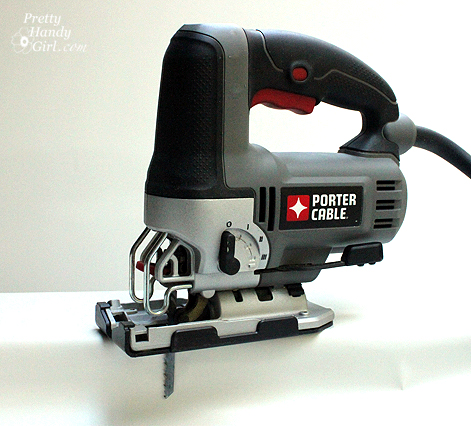
Below is a picture of my jig saw (a Porter Cable orbital jigsaw that I highly recommend) and its parts. Not every jig saw will look the same or have the same features, but this gives you a good idea.

I have used a jig saw to cut curved handles into a crate, cut profiles in panels to fit around an outlet or the baseboards and a few other craft type projects. Jig saws are modestly priced starting at $25 up to over $150. When buying a jig saw, look for strong and solid construction. One of the features that I really like on a jigsaw is an LED light that automatically comes on when the trigger is depressed. My first jig saw was a cheap model. I regretted that purchase because it really did a poor job when cutting through anything thick or hard. Learn from my mistake and invest in at least a middle of the road model and save yourself the need to buy a new one when the cheap one doesn’t cut very well.
Most jigsaws have a speed control. Sometimes it might only be a high – low switch. The speed control is located on top of my jig saw, but this will vary depending on the jig saw you buy.

The jig saw has a straight blade that moves up and down to cut. The teeth of the blade always face forward to cut into the wood as you press it into the cut.
Most modern jig saws have a quick release blade. This is how to remove the blade on the Porter Cable jig saw:

I have not needed to replace this blade yet, and I’ve been using it for 2 years.
Before we watch the video, a little reminder:
DISCLAIMER
The viewer assumes all responsibility and liability associated with the hazards of woodworking. Pretty Handy Girl is not responsible for any errors or omissions that may be present in this tutorial. She also assumes no liability for any action or inaction of a viewer.
Please use extreme caution when using power tools. Read your tool manual thoroughly and wear protective safety gear. Take your time familiarizing yourself with a tool before using it. (If you are missing the manual, you can easily find it online by going to the manufacturer’s website or google your saw’s make and model + manual.)
Please recognize that I have tried to put together a basic jig saw usage tutorial to get you started. I have tried my best to show the safest way to use a jig saw. That being said, I am not a professional (I only play one on this blog ![]() .)
.)
And now, the basics of using a jig saw!
Here is the video:
![]()
Now for my professional tip. Let’s imagine that you want to cut a large hole in the middle of a piece of wood. For example, a curved handle hole in a crate or an outlet opening in a sheet of beadboard. Obviously you don’t want to cut in from the side. That wouldn’t look very professional, now would it? But, how do you do it? I’m going to use the outlet hole as an example today.
You’ll need a few tools first:

- Jig saw
- Drill with a spade bit slightly wider than your jig saw blade
- Pencil
- Dark lipstick (bear with me)
- Outlet cover
Cut your beadboard to size (make any adjustments and profile cuts before proceeding.)
Instead of measuring where the hole is and then transferring those measurements onto the board, you can use this trick instead! (1) Rub the lipstick around the outer edge of the outlet sockets. (2) Press your bead board up against the outlet. Gently pound your fist onto the outlet through the bead board. When you remove the beadboard, you will see the location of the outlet. (3) Lay your outlet cover in line with the socket impressions. (4) Trace around the outlet cover.

Draw a second line about 1/8″ inside the first. This will be your cut line.

Insert the spade bit into your drill. Position the spade bit inside one corner, and drill a hole.

Repeat for the other three corners.

Position your jig saw blade inside one hole, move the blade to the back of the hole before you start your saw up. Otherwise, the teeth will grab at the front edge and could cause the saw to jerk out of your hands.

Cut from hole to hole along the cut line until the square hole for the outlet is completely cut. Here is a quickie video showing exactly how to cut the hole:
Hope this tutorial helps you get jiggy with it!


My Jigsaw machine is new. When I cut quarter inch plywood, instead of blade moving up & down, machine moves up & down and blade remains stuck in the wood.
Hence I have to put whole body pressure over the machine to stop moving it & let the blade move.
I have changed the blade to Bosch. Still same thing happening.
Kindly suggest.
You can also directly reply me on my emailaddress
[email protected]
Hmmm, that’s crazy. Did you try a smaller toothed blade? What kind of jigsaw do you have?
So, how can I convert the old screw clamp for the blade to the newer quick release type?
Someone must have a conversion kit or part. It’s a B&D Jigsaw
Ric, I have no idea. Sorry wish I could help.
Hello…Just wanted to say I’m really enjoying your website and tutorials. I wanted to ask you if your jig saw model is the PC600JS AMP Porter Cable?
Would you also say this would be a good “FIRST” piece of power equipment for a “DIY” newbie? I would like to invest in tools as I learn more but just want to choose a good first time piece.
I’m looking for something that can be a good all purpose tool for things like creating curves in plywood, cutting plywood/wood etc. I was thinking about the Dremel Saw Max but from what I can tell and from what I’ve read elsewhere it probably isn’t deep enough for anything beyond 1/2 – 3/4 inches.
Thank you in advance and once again thank you for such a informative blog.
L
Louise, yes, that is the model I have and I LOVE IT!!! I had a cheap Black & Decker before, but I had a hard time cutting through plywood with it. This jigsaw cuts through wood like it was butter. Enjoy and it is a great tool for your workshop.
i enjoyed the tutorial on the jigsaw very much. i think this week i will give it try, you gave me the confidence i needed, to actually see it in use, and know the saftey features. thank you so much, i will do the bird houses. thank you
i love the pink tools:)
I love your tool tips. I hope you get to routers at some point.
My son has wandered off with most of my hammers over the past few years, so it would be great to win one.
My husband gave me all power tools a few years ago for Christmas. I think it was the best Christmas ever (but I’m still hoping for a router and some instruction!)
I love the pink hammer. I am like Tonia, usually can’t find my husband’s hammer so it would be nice to have my own, stored in a secret place of course. I’m Canadian, am I eligible for the draw?
Thanks for another great tutorial, my power tool wish list just keeps on growing thanks to you! 🙂
Two more great videos, Brittany. I learned the lipstick trick from a friend when I helped him drywall his house. I had a more complicated, but just as accurate way (learned on one of the old PBS DIY series). Since neither of us were math whizzes, the lipstick worked great. I definitely need to upgrade my OLD jigsaw, though I still use it. I love Porter Cable & Makita tools! Another tip for those just getting started: always work on a level surface and make sure your weight is as evenly distributed as possible (and the floor around you is free of dogs, kids & other entanglements). 😉
Love your blog. Thanks for taking the time to do all this for us that dont know how yet! I need my own hammer because my husband can never find his!!! I like the pink color too….tooooo cute!
I love this! Thank you. I have always wanted to learn how to use a jigsaw. This is so helpful!
Thanks for the tutorial! I look forward to getting jiggy with a jigsaw soon.
I love your tutorials. Hey the captions went by so fast I missed seeing if you listed what kind of clamps those were. Mine are still those old ancient rusty pipe clamps picked up at some garage sale. If your ears were burning tonight it’s because I gave you some lovin over on my blog post tonight before I came to read your blog. I didn’t realize that my post tonight could actually be used here, go figure! Anyway, it’s at http://craftroomtransformation.blogspot.com/2011/10/how-to-turn-big-screen-tv-screen-in-to.html
and shows how I converted a big screen tv cover in to a desk protector using my little Dremel. It’s not anywhere close to the professional look all your projects have, but it works for me and gave me an excuse to use the Dremel for something besides my dogs’ nails! 🙂
Sharon, thanks for your comment. I used the Irwin clamp and a cheap no-name one. But, that is just temporary until I get a 2nd Irwin clamp. LOVE IT!!! Super strong and easy to use.
Thanks Brittany. Adding that Irwin clamp to my wish list now, actually adding two clamps!
I am so glad I followed the DIY Tips and Tricks blog hop!! You are amazing, I rate you right up there with my lumber goddess Sawdust and Paper Scraps! You actually make me feel like I can do these things again! LONG story, haven’t done woodworking by myself in 12+ years. Thanks for all the wonderful tips and tricks, I lool forward to your blog in my inbox daily!
Good tutorial!
Hooray! I have never used a jigsaw, and am currently getting up the nerve to build a bed, which has extensive jigsaw cutting involved. This is just what I needed to feel (a bit more) confident! Thank you!
Thank you so much for this tip and video. You make using the jig saw look so easy. I haven’t really used one but will definately give it a try now.
Thanks for the great tips on using a jigsaw. I was given one as a Christmas gift (at my request) but I have used it very much. Now I will!!!
I am loving your blog. I am not the handiest person around but I am working on it. Looking forward to finding some great tips!
-Shelley
Thanks for another great demo! That is one tool that scares me, but you made it look so easy! I am so glad that I stumbled onto your blog bc your information is helping me have the confidence to create on my own!
When using pre-finished paneling, do your cutting from the back side of the panel. That way, the ‘shoe’ of your power tool won’t scratch or mar the finished surface. Also, don’t forget your safety glasses/goggles.
Excellent point Tom. I actually pointed out you need to wear eye and ear protection in the first video, but I should have included it in the second. Thanks for your comment and tip on flipping the board over 😉
Brittany
I LOVED seeing the video of you actually using the tool! Seeing the tool in action really helps to demystify the process for those of us that are power tool challenged!
lol love the “power tool challenged” name 🙂
Brittany, how have you managed to keep the same blade for 2 years? I don’t know what sort of wood you would normally use your jigsaw with, but I have never had a blade last quite that long but then again I guess it would depend on how much work you do, what type of wood you cut and so on.
Still a great post, thanks for all the time it must have taken you to put this post (and the videos) together 🙂