How to Build a Custom Wood Range Hood
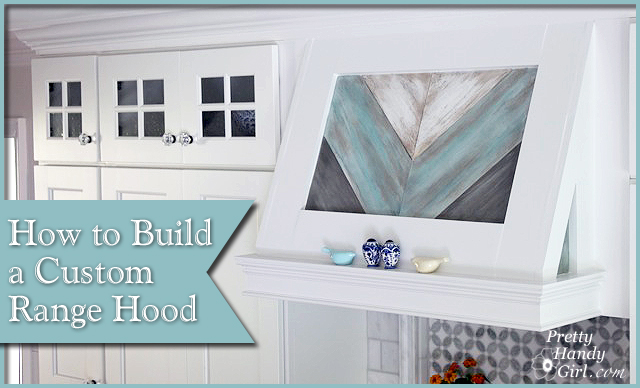
Have you seen the beautiful custom range hoods on my Pinterest board? From the beginning of our kitchen planning sessions, I knew I wanted to put in a custom wood range hood. But, finding a tutorial to build one was tough. The one that helped me the most was Cristina’s how to build a range hood tutorial.
I knew when I built our hood that I’d need to take detailed notes and photos to help you accomplish your own project. I hope this tutorial helps you build your own range hood!
Build Custom Range Hood Materials:
- Insert liner for range hood
- Cabinet screws
- Drill
- Finish nailgun
- Finish nails
- U-staples for finish nailgun
- Wood glue
- Luan plywood (1/8 or 3/16″ thickness)
- 2″ x 4″ boards for blocking
- 1″ x 2″ boards (pre-finished square edge)
- 1″ x 4″ boards (pre-finished square edge)
- 1″ x 6″ board (pre-finished square edge)
- Howe Casing
- Wood Putty
- Putty knife
- Sandpaper
- Caulk
- Primer
- Paint
- Clamps (or extra set of hands)
- Miter Saw
- Table Saw
Side Note: The lumber I used was the best fit for our cabinetry and 8′ ceiling height. You may need to experiment with your own kitchen and range hood and use different sizes. But, this should give you a good baseline to work from. As always, I’m available to answer your questions via email.
Instructions for Building a Custom Wood Range Hood:
You must purchase a liner insert for your wooden hood. The liner is basically a range hood, with the controls underneath and a port to attach to your home’s existing ductwork. But, no fancy exterior since it will be covered up with your own hood. I purchased the Vent-a-Hood single blower wall-mounted liner in white.
Check the installation instructions to insure proper installation of your liner insert. Also follow the electrical hook up instructions.
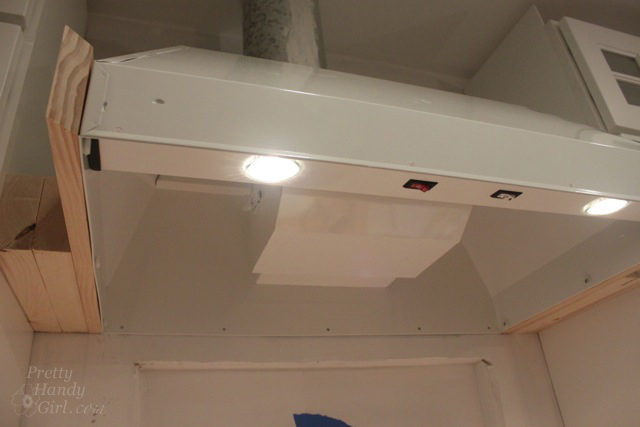
Begin by installing blocking for the liner insert. I used 2×4 blocking cut to fit next to the upper cabinets. Then cut a 1×4″ board that extended out to the front of the liner. The ends of the 1×4″ were mitered to create clean corner joints when attaching the front of the support frame.
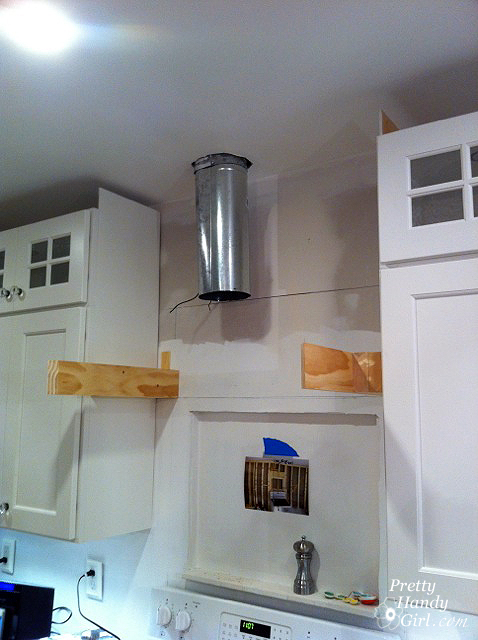
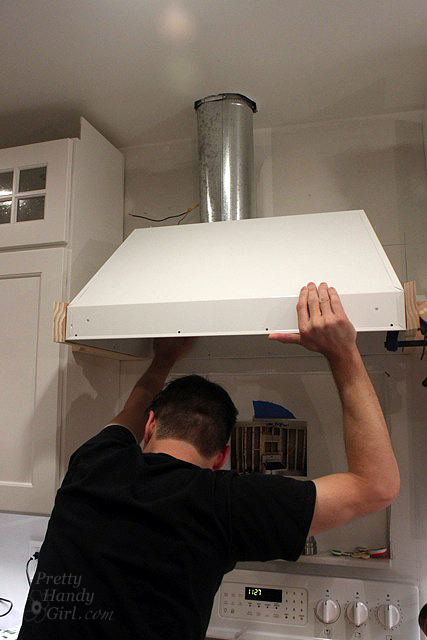
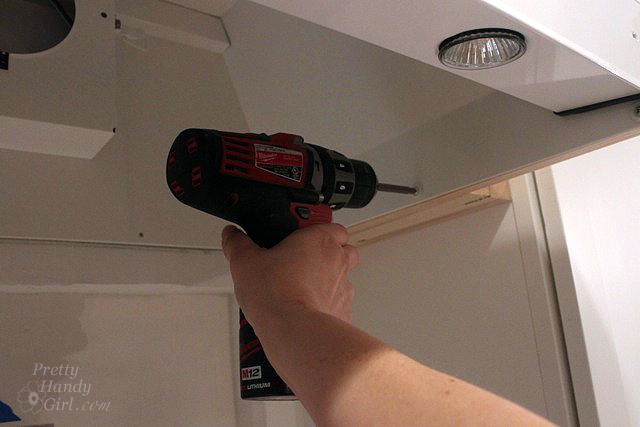
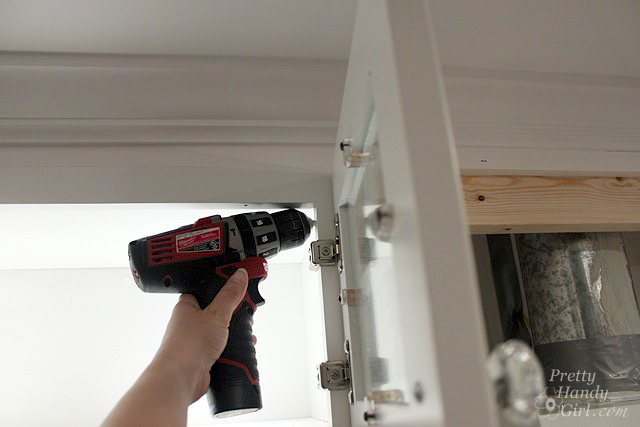
Get an anxious assistant to help hold the liner to make sure it fits. (You can see our house wiring above the liner. Make sure your power to the range hood is turned off during the liner installation. No need to accidentally electrify your metal liner insert!)
Connect the duct work to the liner. Drive a few mounting screws to secure the liner while you work on the electrical connections.
Cnnect the house wiring to the liner insert as per the manufacturer’s instructions. Make sure your wire connections are contained inside the metal liner hood or a junction box. Do not leave wire connections loose or unprotected (per electrical code.) Turn on the power to the range hood and check lights and exhaust fan before proceeding. If everything is working, drive the rest of the mounting screws through the liner insert into the supports and the wall.
Per our county’s HVAC code, I had to paint mastic on the ductwork to eliminate any air gaps. Now is the time to make any final connections or adjustments to your liner and ductwork because it will be inaccessible after you build the hood.
Cut a 1″ x 4″ to fit across the front of the hood. Miter the corners. Attach the front of the support frame with glue and small cabinet screws. (Pre-drilling holes for the screws is a good idea.)
Measure and cut a 2″ x 4″ to fit between the cabinets. This will be blocking and support for the range hood face frame.

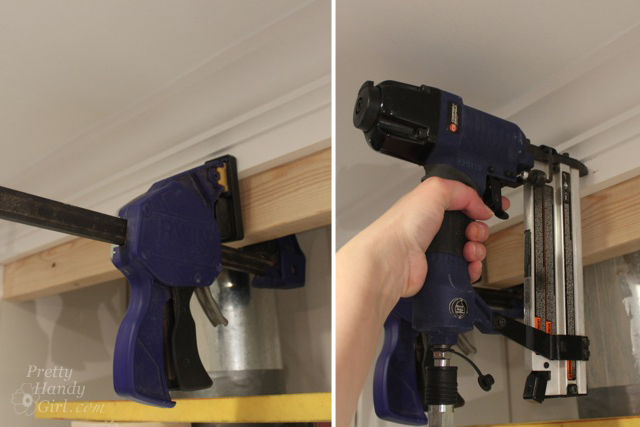
Raise the 2×4″ support up so the crown molding overlaps it (or so your crown can overlap it in the future.) Secure the crown molding to the 2×4″ with finish nails.
Drive cabinet screws from inside the upper cabinets into the ends of the 2×4″ support board.
Measure the distance between the bottom of the crown molding (where it meets the blocking) and the front of the frame around the insert liner (where it meets the liner.) Cut two 1×4″ boards to fit, miter the bottom edge to fit behind the frame. (I think I cut the ends at a 60 degree angle.)
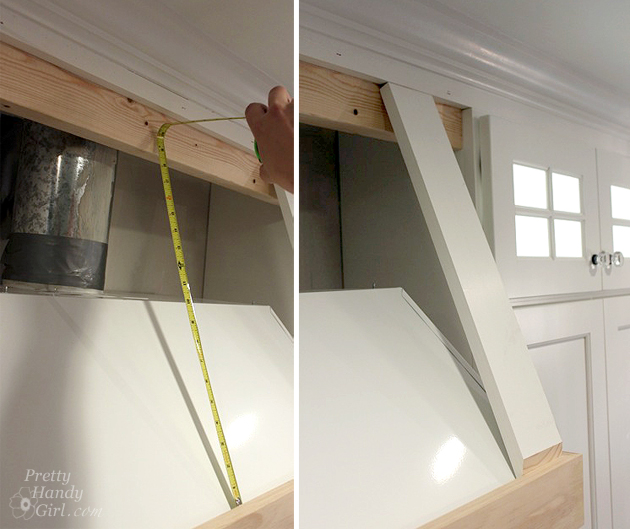
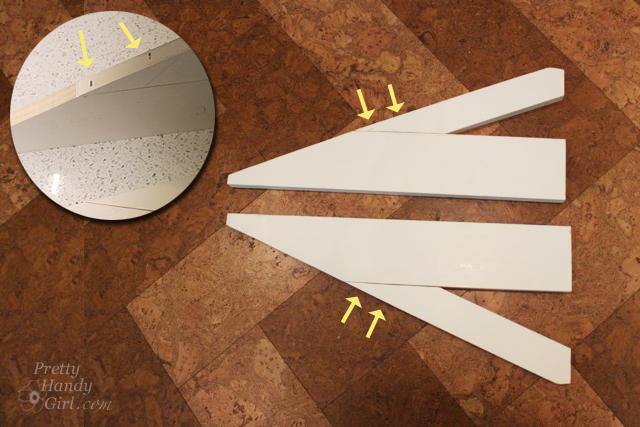
At this point, you want to fill in the gap between the cabinets and the vertical framing. I purchased extra stop pieces when ordering the cabinets. Rip the stops down to size. Secure the stop piece with finish nails. Allow room for another 1″ x 4″ that will make the side frame.
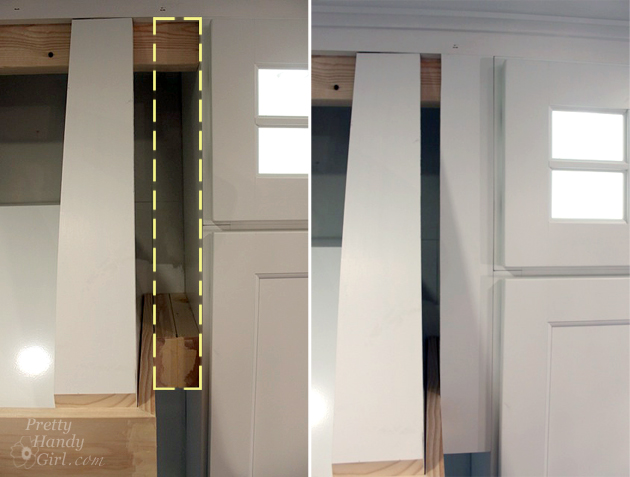
Set the two vertical frame boards in place (set another 1×4″ board between the stop and the vertical frame to hold the width. Not shown here.) Check for fit. Then measure the horizontal space between the vertical boards (both top and bottom.)
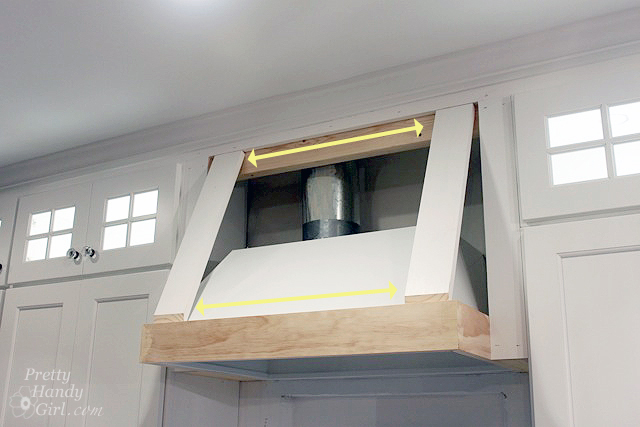
Cut another 1×4″ board for the top piece of the frame. For the bottom piece, you’ll need to rip a 1×6″ board at the same angle that you mitered the ends of the vertical frame pieces. Then cut it to fit at the bottom of the frame.
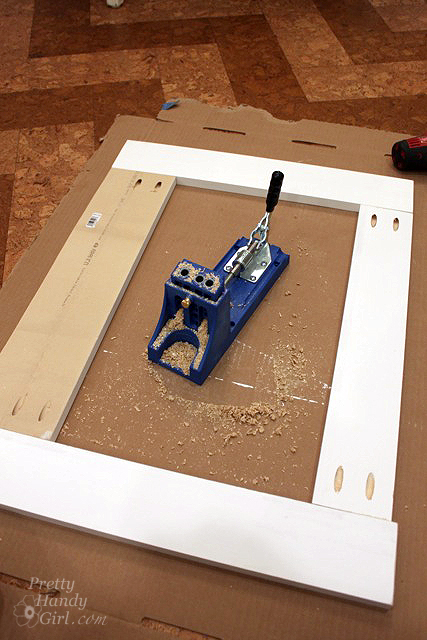
Use the Kreg jig to create pocket hole joinery on the back of the frame. (Read this tutorial to quickly learn how to use a Kreg Jig.)
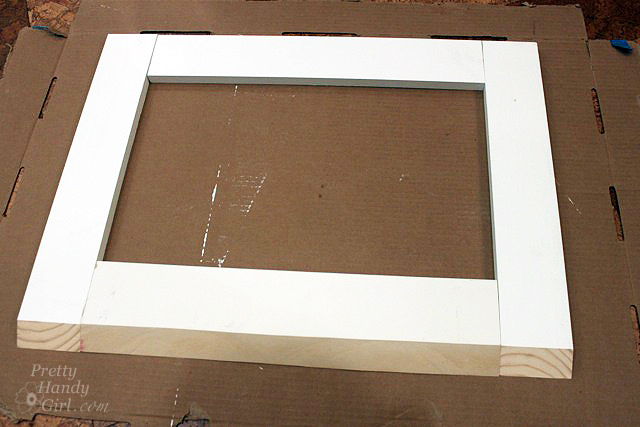
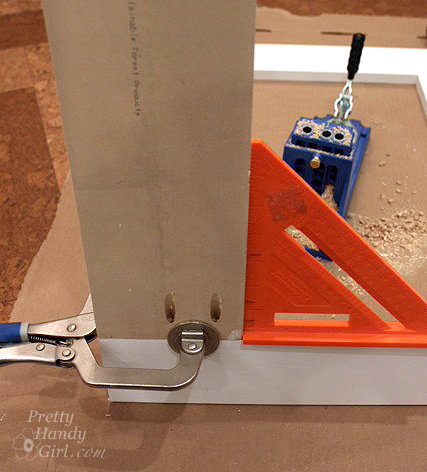
Square the corners and clamp the frame. Drive the pocket screws into the holes to complete the frame.
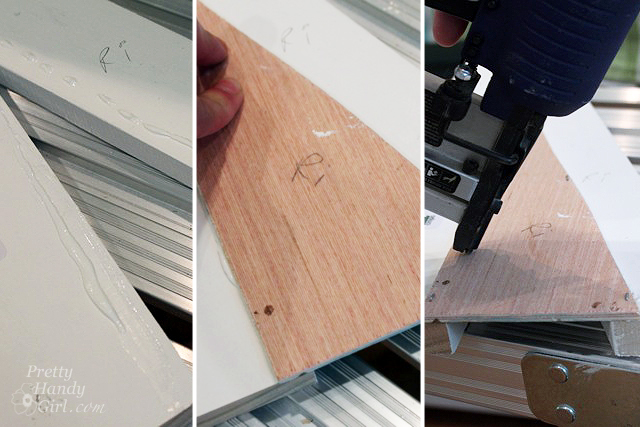
Cut the luan plywood board to fit behind the frame. Cut your board 1″ bigger than your frame hole. This will allow for a 1/2″ overlap onto the back of the frame. Secure with glue and finish nails. (I angled u-staples to avoid nailing through the front of the frame.)
Check the frame to make sure it fits snuggly between the liner support frame and the crown molding.
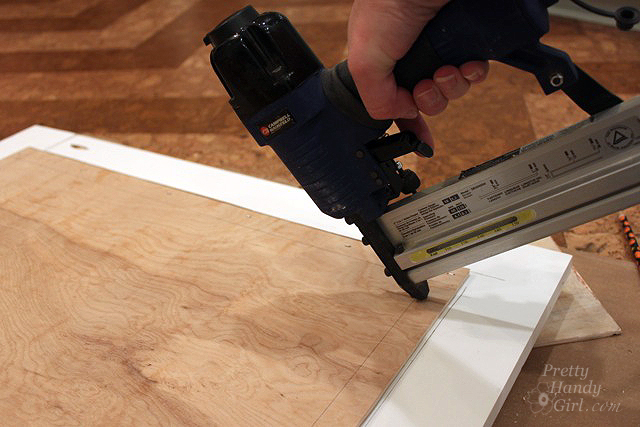
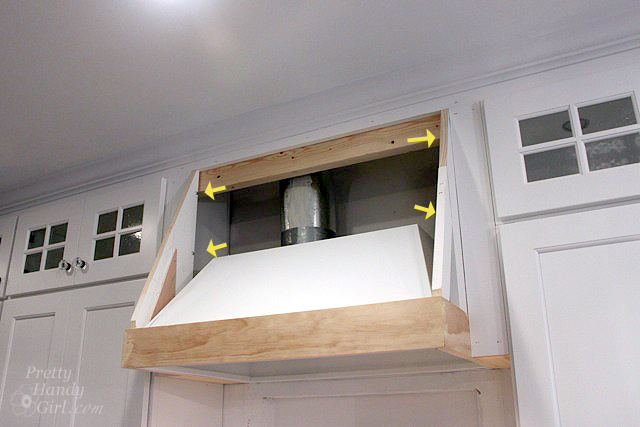
To build the side frames, you’ll need to measure and cut one 1×2″ board (shown as yellow below) and one 1×4″ board (shown as peach below) to fit the size and angle of your range hood.
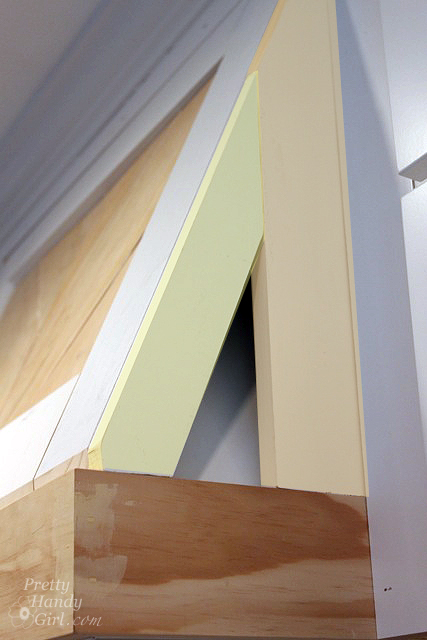
Add wood glue where the two boards meet and secure with two finish nails through the side of the 1×2″ board into the 1×4″ board as shown below.
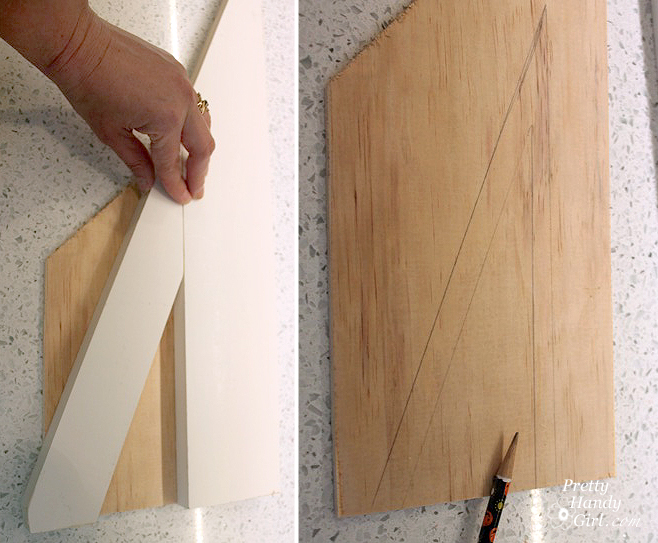
Trace the opening of the side frame onto a scrap of luan plywood. Cut out the insert 1″ bigger than the opening to allow for a 1/2″ overlap.
Paint your side frame insert BEFORE securing it. (You’ll thank me when you realize what a pain it would have been to paint inside that little opening.)

Glue and secure the luan backing to the back side of the side frames.
Pre-drill holes through the side frames into the stops you installed earlier.
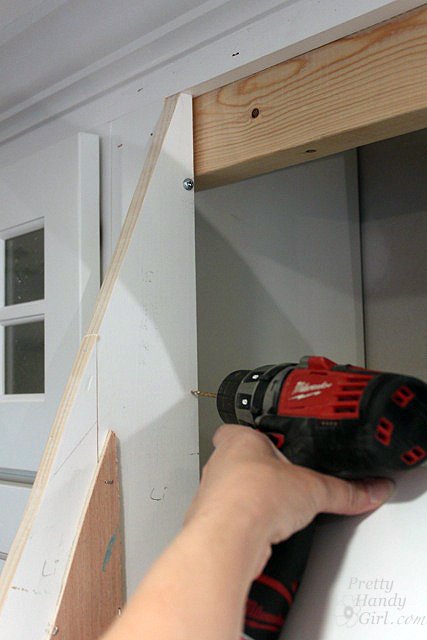
Secure the side panels with two screws on each side.
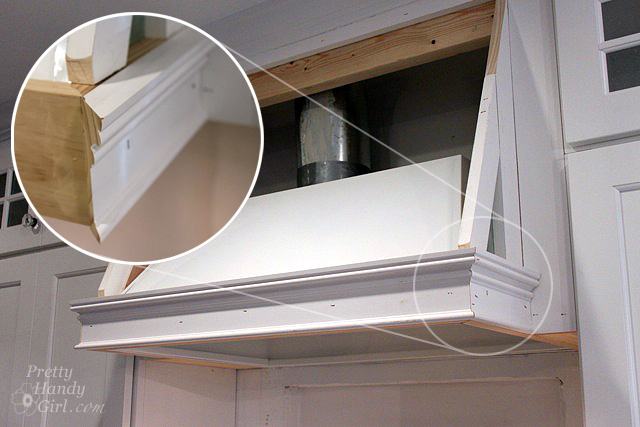
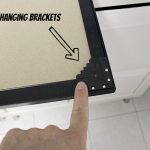
Finish nail decorative molding to the support frame. I used Howe casing mitered at the corners:
Back to the front frame: Cut angled luann pieces to fit inside the frame. You can follow this tutorial for creating the painted and distressed chevron plank boards.
![]()
Paint your luan and glue the pieces inside the frame.
![]()
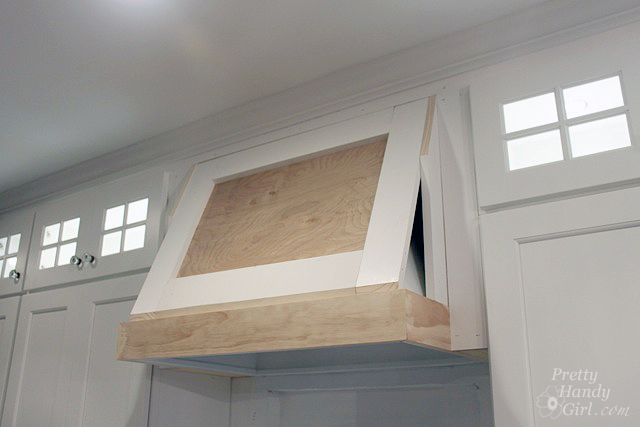
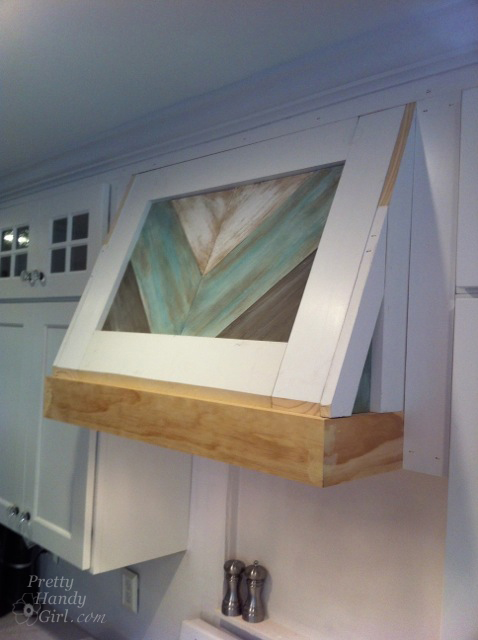
Set the frame in place. The angled bottom should fit behind the support frame. Secure the frame with finish nails into the 2×4″ support board and then attach the side frames to the face frame.
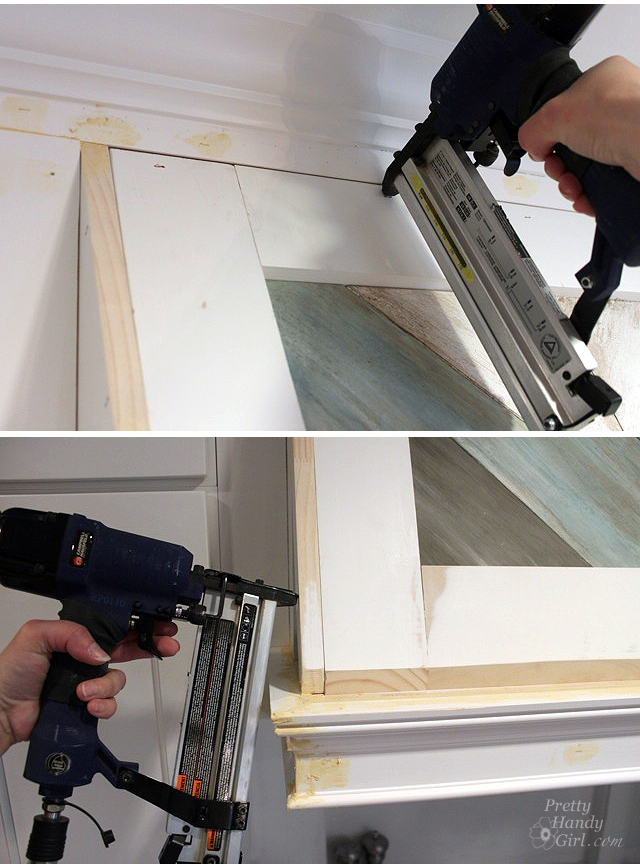
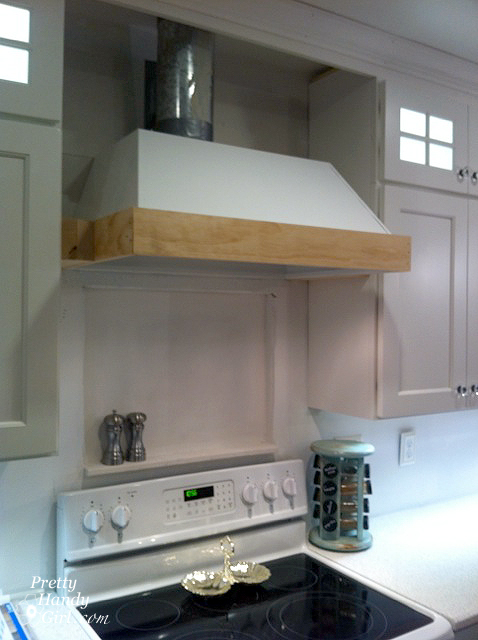
This picture was taken right before I added the Howe casing, but you can see the finished construction.
Use wood putty to cover all nail holes. I also like to use wood putty for any sharp angle seams. Use caulk to fill in seams between the panels and stops.
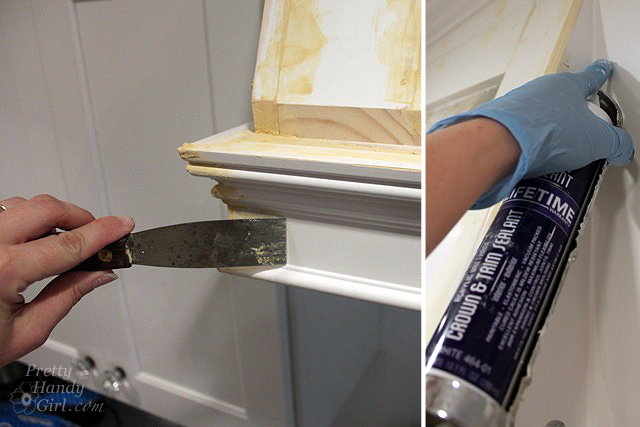
After the wood putty has dried, sand it smooth. Prime any bare wood, wood putty or caulk lines.

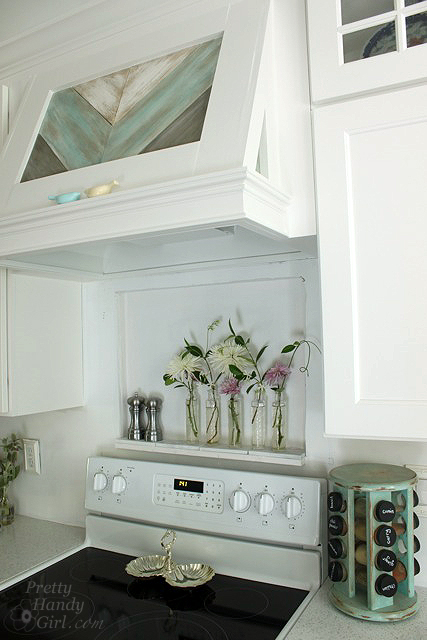
Paint your range hood and then do a big victory dance because you just built yourself a custom range hood!
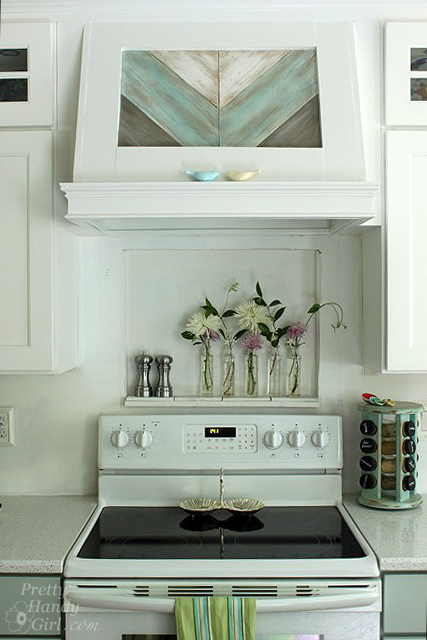
Because you have been so awesome, patient and encouraging me through this monster of a kitchen renovation. I figured you’d like to see a few of the finished kitchen pictures.
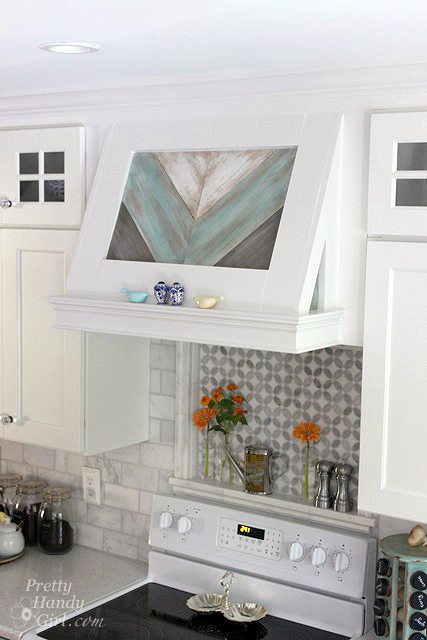
I finished the tile recently and it truly is the finishing touches the kitchen needed. The tiles are from TheBuilderDepot.com. I’ll be posting tutorials on installing and cutting tiles as soon as I can ;-).
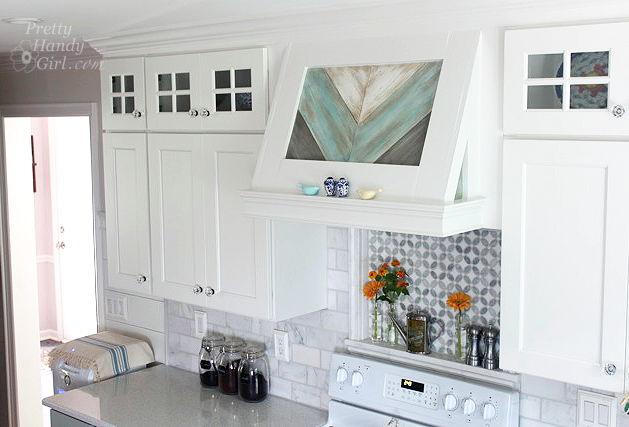
The kitchen is 99% done. I have two more crucial pieces to install. I’m not going to tell you what they are, but here’s a hint.
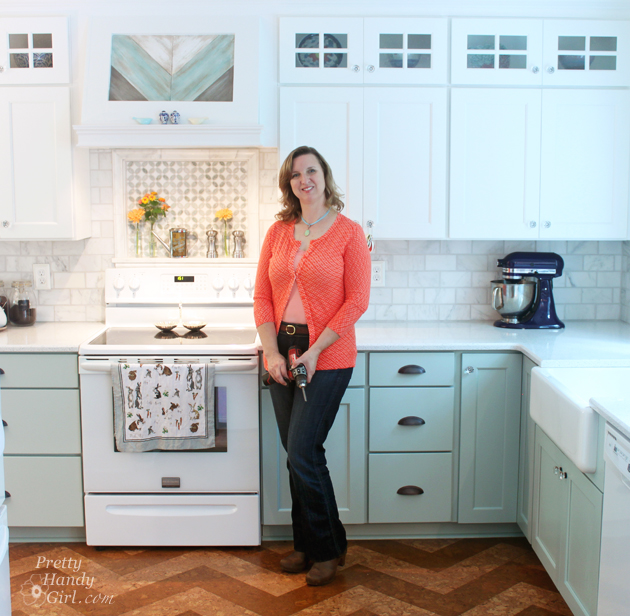
If you live in the Raleigh/Durham or surrounding areas of North Carolina, you might recognize a certain handy girl who will be in the News & Observer’s Home & Garden section this Saturday (tomorrow.) I’m a little nervous because I’m not exactly sure what was written about me and the blog. I really hope she leaves out the disaster that was my kids’ bedrooms as we were on our last week of summer vacation. Who knew two boys can destroy their bedrooms in a few hours while I was blogging.

Pin for later!
Sharing with:
Thank you!
Brittany, I see that I’m discovering this YEARS after you’ve posted it, but I hope to ask a question….
I am IN LOVE with this hood and was ecstatic to find that it’s a TUTORIAL! I am ready for the challenge! My question is: do you think it can be built to itself and installed at a later date? I don’t plan on starting my reno until next year, but could start on this hood this year. Is it possible? Or does it need to be built on the wall?
I’d recommend at least having the range hood insert on hand so you can build to the hood to surround the insert perfectly. Allow 30″ in width, since that’s the normal width of a standard range. Have fun!
Where did you get your cabinets at? What are the name brand of your cabinets?
They are Kith Cabinets. I purchased them through Ferguson Kitchen & Bath supplies. But, I’m not sure if they still carry Kith.
Could you please tell me what the paint color of the cabinets are?
Brittany, they are Copen Blue and Oxford White. All my home’s paint colors are listed here if you want any more 😉 https://prettyhandygirl.com/paint-colors-home/
I am looking to do a wood range hood, and, I’m worried about how to seal it, in order to prevent (and remove) grease stains. Did you deal yours? How has it held up? How do you clean it? Thanks so much!!
hi I was “thinking/hoping” to be able to use a cabinet as surround. will have the height with vertical cabinets. Or do I need to build a cabinet?
Sarah, it’s hard for me to answer. It depends if you have the ventilation in your cabinet already. And it will also depend on the insert you purchase. But, if it fits and you can hook up to existing ventilation, you should be fine.
Wow. Just wow! I’ve been searching and searching online for a way to build my own range hood cover like this and have failed in finding something that I may be able to tackle myself. This is an awesome tutorial. Thank you; thank you, thank you!
I love your kitchen; it’s gorgeous and the DIY hood really makes it looks so put together.
Can this be done with an under the cabinet range hood? I don’t have exterior ventilation but a microwave with a fan currently but want to do this. What do you think?
Amy, are you asking if you can cover a regular vent hood with wood? You can, but you need to be able to access the controls which are normally on the front of a regular range hood. Also, you really need to look into installing a duct to exhaust the fan outside.
Beautiful! How far above counter did you install the liner and fan?
Our’s is on the high side, 32″. Just be sure you have a strong fan to pull the cooking heat and exhaust.
This is gorgeous and truly inspiring. We are also currently working on a kitchen reno and could you tell me please how you achieved the painting technique of the gorgeous inlaid planks in the hood. Do you think this look can be achieved on a flat laminate kitchen cupboard door? Right now all I have on them is a primer.
thanks for any advice.
I love,Love, L O V E THIS! I have been looking for a solution for my range that sits under a small window.
this is perfect a perfect design to cover a much needed hood! and it will be a beautiful accent to my kitchen!
Thank you for a wonderful idea!
You never cease to amaze me. Pretty handy indeed! Another beautiful project.
A question: my remodel does not include upper cabinets so I won’t have anything on the sides to fasten the hood to. Do you think it will be possible to build and mount a hood such as this without side cabinets?
Thanks, Brittany.
Bonnie, you’d need to attach it to the back wall instead. I’d get some opinions from the manufacturer first.
Where did you purchase your vent hood from? We are looking for one with the controls underneath so we can add our decorative cover to one. So I would love to know where you purchased yours from?!
Ferguson. It’s a Vent-a-Hood
Thank you for sharing this….do you know how much it cost you or how much you saved by doing this yourselves?
Lizanne, just the lumber would probably cost around $50-60. I had lots of scrap lumber from other kitchen projects. The rest would depend on if you have the tools, paint, etc. The liner was $500 I think. If we had bought some fancy hood, it probably would have been about $2,000. Just estimating.
LOVE your kitchen , your custom hood and your site! Can you please tell me the name of the tile backsplash you used? It’s so pretty and am hoping to use that or similar in our kitchen.
Thanks!
Allie
Ming Thassos Flower was the name of the tile.
This is beautiful! I have been wanting to create our own custom hood for a while now, and never thought to add some more dolor to it other then my cabinet color. I am going to be saving this for later inspiration when we get to making our own hood. I just discovered you and am excited to stalk your blog and see all of your creations! 🙂
I have recently found your site. I’m thankful to Ana White for reposting your custom wood range hood on her site. Very creative and talented! Thank you for sharing. BTW, we have the same range. We’re getting ready to remodel our kitchen. I just selected the same cabinet fronts as your’s…different color, but the same style. Again….great appreciation for what you post!
I love, love, love this tutorial. I am totally doing this in our new place. We have just bought a run down, older home that needs lots of TLC.
You are a very talented woman.
Thank you so much for taking the time to post the tutorial!
wow, that is amazing. I love how it ties in with the chevron floor-and what IS that floor? cork and hard wood? i’m going to have to scour!
The flooring is cork glue down tiles: https://prettyhandygirl.com/2013/04/installing-cork-tile-flooring-in-the-kitchen.html
Brittany, your wood range ROCKS! I love the added distressed boards, beautiful! Thanks so much for the shout out 😉
Hi Brittany,
What would you estimate the total cost of building this hood? I am having a hard time finding someone to build it for me and not certain if I’m ready for the challenge but I just love what you’ve done! Great work!
Heather
Heather it’s hard to say because I used a lot of lumber we had lying around and had purchased for other things. The insert itself was about $500. The wood, lumber and paint, maybe under $100?
Wow! That is really incredible! Thanks you for posting. Pretty handy indeed. Your kitchen is my dream!
Thanks Nina 😉
I absolutely love your range hood. Perfect as is the side of your little desk. Great job!
Jake’s a Girl
Awwww, thank you Jake.
Brittany, the range hood is beautiful!! Your kitchen is a dream, simply gorgeous! I know I could do the building, repairing & renos, because you make it look easy, and your tutorials are wonderfully written, but I still wait for my husband to get home.
Debbie 🙂
Debbie, thanks, but I covered my ears at that last bit. What? What did you say? You can do it without your husband ;-).
Wow! Love this diy idea will have to implement it when I officially buy a home.
This couldn’t come at a better time. Our house is gutted and I’m trying to gather ideas of what I want. This is so spectacular! Much better than the out of the box vent hood! Thanks for sharing. I even sent the link to my Sweet Hubby to get him all educated for making ours when the time comes.
It looks fabulous! I love the detail you gave it. It turned something that is normally kind of odd, into a furniture feature. Love it!
Thanks Laurie. I hadn’t thought of it as furniture, but I guess you’re right!
What kind of vent hood and liner did you use? Or did you use a regular stainless range hood but leave an inch of space to slide your fingers up and in to feel for the buttons. I know I should get the hood and liner with controls under but those are so expensive. Looking for this look on the cheap.
Betsy, I bought it from Ferguson Kitchen & Bath. It is a liner. I think it was around $600. Ferguson. Made by Vent-a-Hood
Ugh! I was hoping to avoid the hefty pricetag for something that isnt even seen. Could it be done with a standard vent hood thats usually around $250 with the buttons on the front or would that be hard to access if something is broken?
I don’t think I’d advise that. Maybe you can search online for a cheaper insert or find a scratch and dent one? Or look at a Habitat ReStore or other surplus stores?
I love your range hood! It looks so great! The whole kitchen has turned out beautifully.
xo,
Shannon
GIRL! Your kitchen looks amazing… and you’re simply adorable. 🙂
Also… great minds think alike, because look at what we recently did to our dining room buffet!
http://www.sawdustandembryos.com/2013/08/a-facelift-for-credenza.html
I love love LOVE your custom wood range hood, Brittany!
Having just found your blog not too long ago, it’s posts like these that have made it a top favorite to check on at least once a day.
If you don’t mind me asking, how do you keep up with posting such exhaustive articles like this? I can definitely tell where your passion lies….thank you again for a great post!
This looks BEAUTIFUL! WOW!!!