How to Create Rope Light Word Wall Art

I really appreciate all your kind comments about my arts and craft studio. Don’t forget to enter to win the Flow Wall organizational system, the giveaway ends Wednesday, Nov. 21st at midnight EST.
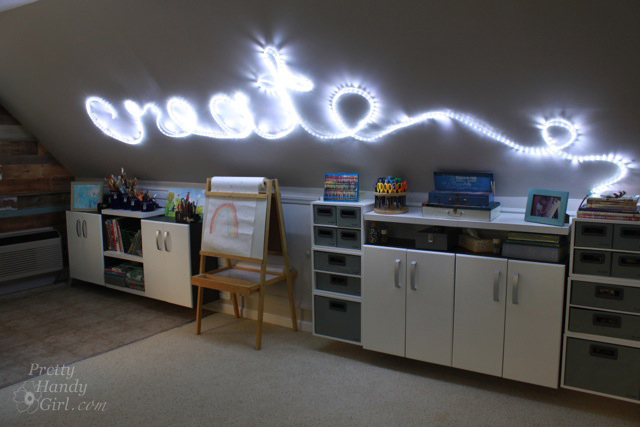
The boys and I christened the art & craft studio yesterday by creating ornaments. We had creative clutter strewn everywhere! It was wonderful to be able to spread out and not stress too much about the mess (although I did end up cleaning up and vacuuming last night.) But enough about that, what you really want to know is how to create your own rope light art sign. The possibilities of words are endless. I bet your child would love to have their own name in lights!
The germination of the light sign came from this installation I did at the Habitat house I worked on with GMC.
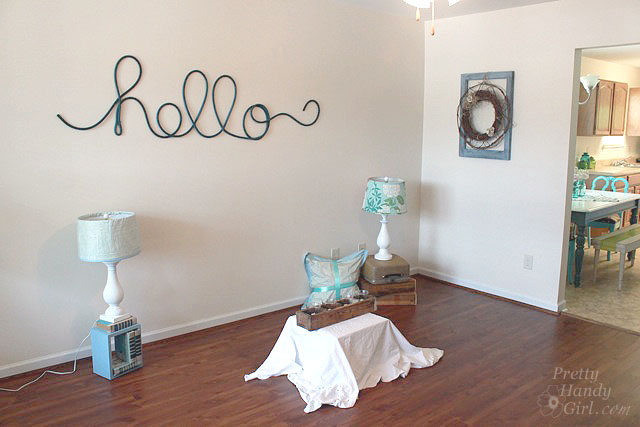 I installed air hose on the wall in their living room. Ever since that success, I’d been dreaming of having my own wall sign art. I looked for inexpensive air hose, but couldn’t find any locally. That’s when I decided to use LED rope lighting instead. It wasn’t cheap, but I’m so glad I went for it because this unique art installation is bright, cheery and really gets our creative light bulbs primed.

Creating a rope light sign is a relatively easy process, but you must have a helper (or have four arms).
Materials:

- Cool White 50 Feet LED Rope Light
- Rope cap (usually included with rope light)
- Hanging clips for rope light (also usually included with the rope light)
- Hand weights/sand bags or anything to weigh down the rope light
- Velcro indoor/outdoor multi-clips
- Drill with philips screwdriver bit
- Painter’s tape
- Level and/or laser level
- Chalk
- Scissors
- Helper

A quick note about rope lights. I bought 50′ of rope light, and ended up using about 45′. The word “Create” takes up 10′ and 13′ to the end of the squiggly line. This is the rope light I bought. I chose the LED version because it won’t get hot and it doesn’t use up much energy. As a side note, the rope light I used on the back of my son’s bookcase really stunk from the heat for a while. I didn’t want to have to smell that smell again for several months. After a while it will stop giving off an odor. I also knew from that previous experience that I wanted a truer white light. The regular rope lights have a yellow cast. The LED is a brighter whiter color, although it does have a slight bluish cast, I prefer it to the other. Finally, the LED rope light I bought can be cut down at certain spots, making it more flexible for my project.
Instructions:
Open up the LED rope light box. Plug the rope light in to make sure it works properly. Also check the box to make sure that installation clips are included. If not, you may have to purchase some separately.

Attach the laser level to the wall and create a level baseline for your word.

Sketch out the word using chalk on the wall. Make sure you don’t have tight angles in your word. The rope light will curve and bend, but can’t make sharp angles.

Configure the rope light on the floor in front of your wall. Place weights onto the rope to keep the letters in line. Make any adjustments to the sign.

Measure the excess lighting not needed. Measure that amount from the side that the plug ISN’T on. Look closely at the rope light and find the closest cut mark (shown with the scissors sign.) Cut the excess off the rope.

Cap off the end of the rope with the end cap provided. For exterior application, use a weather tight glue. For interior use, you can just slide the cap on.

Transfer your rope straight up from the floor to the wall. Have your helper form the first letter on the wall (using the chalk sketch as a guideline.) Stand back and make any adjustments to the position.

Attach one clip to the wall. (We used the provided screw in clips for most of the installation.)

Work out one letter at a time. Use painter’s tape to help hold the letters in place while you attach the clips.

When two ropes ran next to each other (like in the letter “t”), we used the velcro multi-clips which have two notches for the rope lights.

Continue on until you reach the end of your word.

Stand back and admire your inspiring art installation. Give your helper a high five and celebratory hug. (Thank you Holly for all your help!)

Plan how you want to finish off your word. For my installation, it seemed fitting to end with a flourish! But, you can run a straight line. I also thought about hiding any excess with white tape painted the same color as the wall, but I didn’t need to do that since my rope light runs down behind the Flow Wall cabinets to a plug.
I really appreciate the extra light our new sign brings into the space. It truly cheers me up whenever I plug it in.
And it doesn’t take long for the little artists to be drawn to the art and craft room like moths to a flame. (Ha, ha. Pun intended.)

Isn’t my little guy a budding Picasso? I’m so proud of his creativity and his visual accuracy at age six. I think he gets it from his Momma. 😉

I hope you have a fabulous week! Don’t forget to take some time off and get creative.

Thank you for writing it up in details. I’m about to write ‘ Dreamz ‘ in my patio and got lights from Ikea yesterday night. Can’t wait to see how it turns out.. and yes cant go enough with lights 🙂
Ooo, I bet that will be beautiful!
LED rope lights are so cool. Thanks for posting this thoughtful and well executed guide for creating words with them. Having worked with rope lights many times before I thought that I had seen most techniques and projects, but this was really unique. Now that more than 4 years has passed I was wondering if your rope lights are still working or if you even still have them. I have purchased from many vendors, but Birddog Lighting is my favorite place for LED rope lights. Thanks for posting. I look forward to reading more of your projects.
Thank you for another excellent post. Where else may anybody get that type of info in such a perfect method of writing?
I have a presentation next week, and I’m on the search for
such info.
Thiis type of configuration works extremely well iin machinmes destined for graphic design,
where usually 3-4 applications aare run simultaneously.
“We always try and stay ahead of what’s new and that we focus on exactly what is the finest in gaming technology. The laptop keyboard is flat as well as the may have not been flatter than this. The very first important component could be the graphics.
Great tutorial! This looks like a fun idea and now I want to try it! I also love the pictures you put with the detailed instructions, thank you for giving such a detailed tutorial I will use this in the future!
thank you so much for such a clear and well-written tutorial! 🙂
If i will figure out to do mine, i will send you some pics!
best
e.
This is amazing Brittany!!! I totally want to make my own rope light word wall art now!
Gorgeous. I think I found a new project for my husband (lucky him). My daughter’s walls are hot pink, and my son’s are lime green… white LED rope light lettering would stand out quite nicely, don’t you think?
I just LOVE this light how creative
Great idea. Well executed too. I hope the kids are enjoying it.
Oooh, I like it! That crafty space of yours just keeps on getting better and better!
Thinking of doing this on a thin painted plywood and hanging on a wall in front of the house for Christmas. Thanks for another great idea.
AWESOME! I adore this! I want one too. 🙂
What a great idea! I think my daughter would love this in her room!
Love it! You can never have enough light. Cheers.