
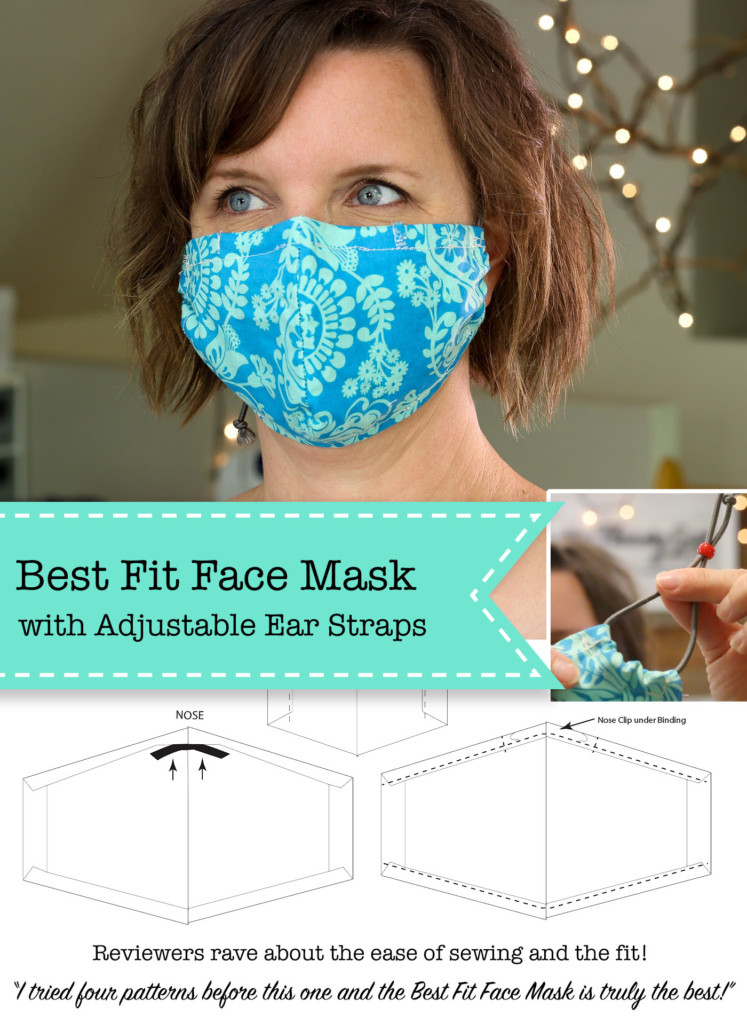
During the coronavirus outbreak I started making DIY Face Masks using some of the patterns I found online, but I really didn’t like the fit, especially because I was used to my more form-fitting and comfortable masks used for carpentry or demolition. So I designed what I’m calling the “Best Fit Facemask” tutorial. It’s more form-fitted onto the face and it has adjustable elastic ties around the ears to fit a wider variety of faces.

Best Fit Face Mask Tutorial
As a general contractor and woodworker, I had searched for form-fitting and comfortable masks to protect my lungs from dust and debris and had my favorites. For that reason, I knew there were better options than most of the sewing mask patterns I found. After a weekend, I designed this easy sew Best Fit Face Mask Tutorial for use by the public and medical professionals trying to protect N95 and surgical masks while also staying safe during the COVID crisis. (These are not a replacement for N95 or surgical masks. These masks are designed to add an additional layer of protection.) Looking for a simple, stylish, and better fitting face mask? Look no further.
Face Mask Template Sizes:
After many requests, I finally have a variety of sizes. From a child size (fits approximately toddler to 5 year old) and then Small (fits youth and petite adult faces), Medium (fits most women or small men), Large (fits most men or larger women’s faces) and X-Large (fits long faces and men with beards.)
Even though you should pre-wash your fabric, the masks can still shrink slightly after the first post-construction wash. Therefore, check sizing after washing the finished mask.
Resizing: If you find the child size is too big, try printing at a 95%. Likewise, if the X-Large is still too small, try printing the pattern at 105%.
Does this mask have a filter pocket?
Filter Pockets or No Pocket, your choice! Instructions for sewing a mask with or without a filter pocket are included. In fact, it’s only one step difference. (Personally, I don’t use a filter pocket because it is harder to breathe through three or more layers.)
In addition to this pattern being easier to sew, it also uses less fabric to allow you to make more masks with the fabric you have on hand. Speaking of fabric, these are some sources for fabric in your home so you don’t have to buy anything!
Materials:
(I’ve included affiliate links for your convenience. I earn a small percentage from a purchase using these links. There is no additional cost to you. You can read more about affiliate links here.)
- Fabric (see below for suggestions)
- Scissors
- Thread
- Iron
- Elastic Strap material (see below for ideas)
- Nose clip materials (see below for suggestions)
- Craft bead (or buttons)
- Sewing Machine
Better Face Mask Fabric Materials:
There is some science behind the materials used for face masks. Although the tighter woven (more thread count) fabrics offer more protection, they do pose the issue of being harder to breathe through. If you want to choose the best materials for both, here is a list of best materials for making your DIY face mask when trying to prevent virus transmission.
Sources for Mask Materials in Your Home:
- Quilter’s Cotton Fabric
- Cotton Blend Fabric
- Sheets or Pillowcases
- Tea Towels (not terrycloth)
- Fabric Napkins
- Scarfs or Bandanas
- Flannel
- Dress Shirts
- Other Cotton Fabrics
- T-shirts (although the stretchiness makes them harder to sew.)
Nose Clip Materials:
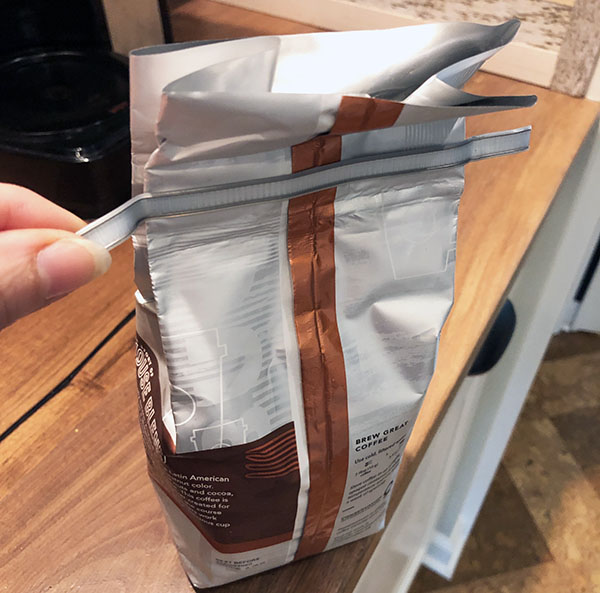
My favorite nose clip material is the foam padded aluminum nose strip, but they are a little trickier to sew around. Second favorite are coffee bag ties (you can purchase them on Amazon or reclaim ones from coffee or donut bags.) An Instagram friend had suggested the coffee bag ties and I couldn’t be happier with the idea (thanks Nickolett!) But, despite our love of coffee, we didn’t have an endless supply of bags. And I could only make two nose clips from each bag tie.
If you don’t want to purchase nose clips you may have these materials laying around:
- Electrical tape
- 18 gauge wire (or straightened paper clips)
Simple cut a piece of electrical tape 3 inches long. Lay two 2.5″ pieces of wire onto half the tape and fold over the other half to seal the wire inside the tape. Trim off the ends, leaving a small amount of tape to cover the wires. Yes, these will wash fine since the tape protects the wire. But any wire clips will eventually snap when bent back and forth too many times.
Less Successful Nose Clip Materials:
These items will work, but they either didn’t have enough of a “memory” in the bend, or they weren’t as comfortable. But, if it’s all you have, use it!
- Doubled Twisty Ties (not stong enough to hold shape.)
- Pipe Cleaners (tend to rust and break easier)
- Floral Wire
- Electrical Wire
- Triple-Layered cut-outs from foil take out containers
Adjustable Strap Materials:
I know the other materials that are hard to find are elastic, so here are a few acceptable alternatives.
- 1/8″ round shock or paracord (cut two 12 inch lengths per mask)
- Standard 55 (7 strand core) paracord (cut two 12 inch lengths per mask)
- 1″ cut strips of t-shirt material (cut 6-8 inch lengths and stretch to 12 inches long)
- Elastic Shoelaces (cut two 12 inch lengths per mask)
The key to the Best Fit Face Mask fitting so well is the adjustable straps. Using a craft bead on the straps allows the user to adjust the mask to their face. The paracord is the hardest to thread, but I found a great way to thread the strap material through the beads. Use fishing line folded in half. Thread the loop through the bead. Thread the strap material through the loop. Then pull the fishing line back through the bead.
The t-shirt material and elastic shoelace is much easier to thread through (especially when using the fishing line technique.) If you don’t have any of the above-mentioned strap material, you can use any cord or straps, but it’s crucial that the material can move freely in the sides so the side can gather at the back of your cheek. Stationary sewn straps will cause the material to push out away from your face.
No matter what material you use for the straps, be sure to tie the ends of your straps to prevent the bead from coming off. (And melt the ends with a lighter to prevent unraveling.)
If you don’t have craft beads, a button with some craft twine can work well as a strap adjuster. Or tie a slip knot following this video tutorial.
New Strap Design for The Most Comfortable Best Fit Face Mask!
With some schools opening back up and people going back to work, I made one change to the straps of the Best Fit Face Mask turning into my favorite mask and the Most Comfortable Best Fit Face Mask! Watch the video below for more information.
My Source for Flat Foldover Elastic to Make the Most Comfortable Best Fit Face Mask: Amazon or Etsy
Face Mask Templates:
The downloadable instructions contain the templates for both a medium and large size mask. Download by clicking on the images below which will take you to the full-size templates. Make sure your printer window is set to print actual size. Do not fit to paper size. Double-check your print out by measuring the one inch box on the template.
👉 Downloadable Instructions & Medium or Large Templates Here!👈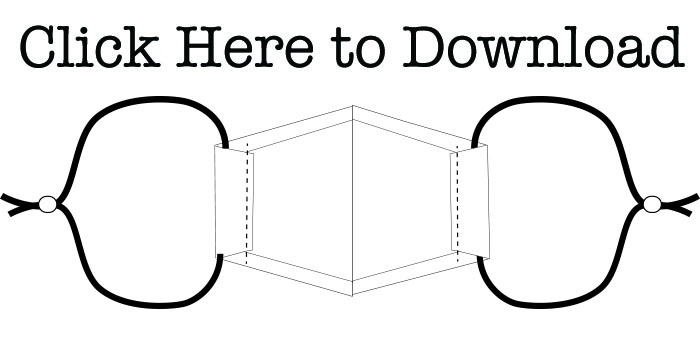
Looking for other size patterns? Download Patterns for other sizes below:
Don’t have a printer? Click on the links to see the dimensions of the Medium Best Fit Face Mask , Large Best Fit Face Mask, or Child, Small, and XLarge Face Mask.
Now, let’s get busy making the Best Fit Face Mask and be sure to share this tutorial with your friends and family so we can kick Coronavirus’s butt!
Video Tutorial:
Watching the video tutorial is the easiest way to learn how to make the Best Fit Facemask. Enjoy!
Instructions:
(Download Printable Instructions and Medium & Large Templates Here)
Print these instructions with the templates at the end. Make sure to print at actual size and check the size with the one inch box on the template.
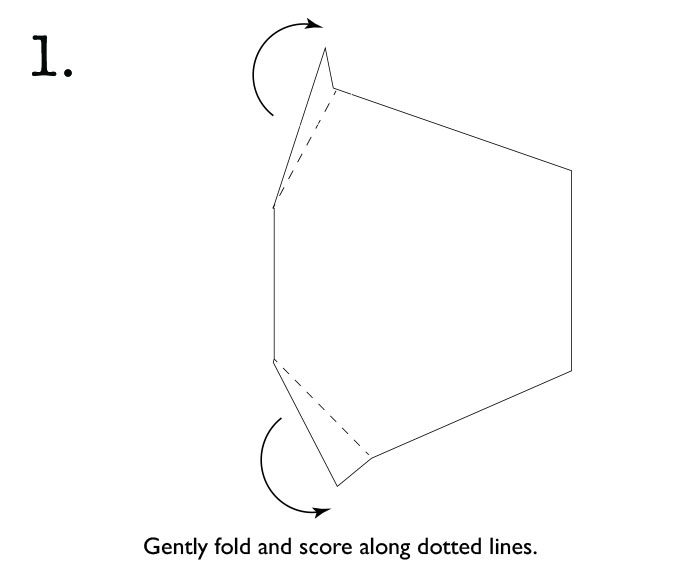
1. Cut out the templates. Gently score along the dotted lines and fold.
2. Trace the outside face mask template on your fabric. I designed the templates so you can get maximum use out of your fabric when making multiple masks. It helps to fold over the fabric and cut with the long sides of the template on the fold. But, you can rotate the template to fit more cuts out of the fabric. You’ll just have to seam together the pieces on the long side.
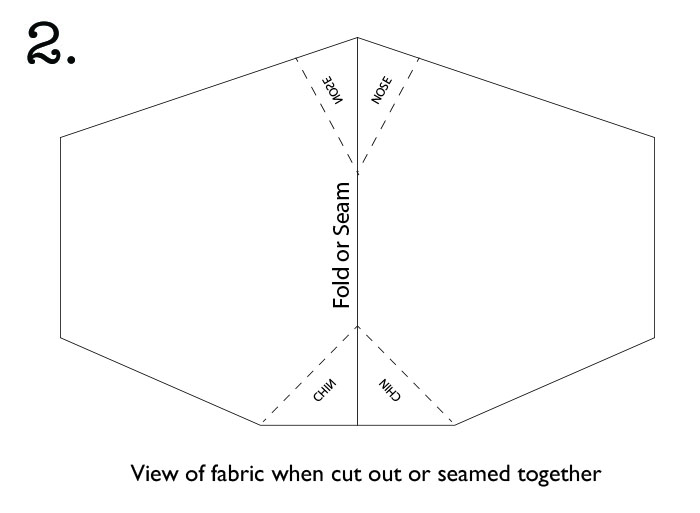
Lay your inside liner template onto your liner material. Trace and cut out fabric. (Important note: Hospitals are asking for masks with different fabrics for the outside and liner so they can visually see a difference.)
If you are making a filter pocket, you’ll need two liners (but only one outside piece.) If you need to connect two pieces of fabric together on the long side, do that now making sure right sides are together. I used a very small seam allowance.
3. Fold the corners of your template and mark a line onto your fabric at the fold. Repeat this on all pieces you cut out. Stitch along all the marked corners. If your fabric is printed, be sure your right sides are together. Now trim off the excess material at the corners making sure to cut close to the stitching.

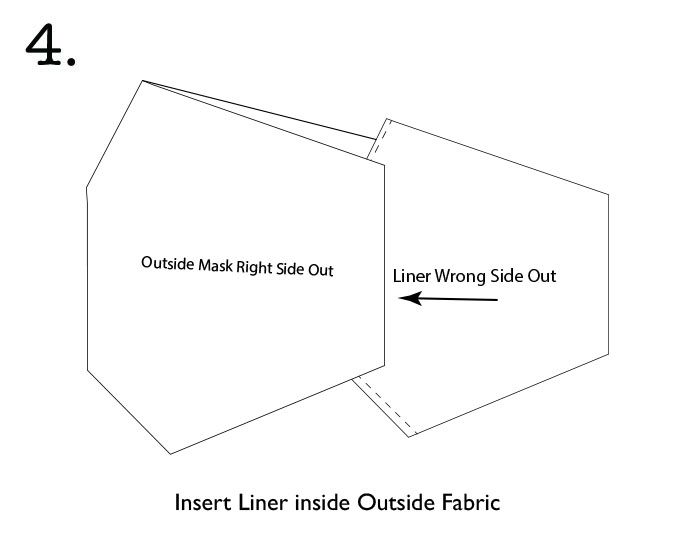
4. Turn your outside mask material right sides out and press it with the iron. Lay the liner on top of the mask making sure the angled corners match for the nose and chin. Insert the liner fabric into the outside material and align the points and angles.
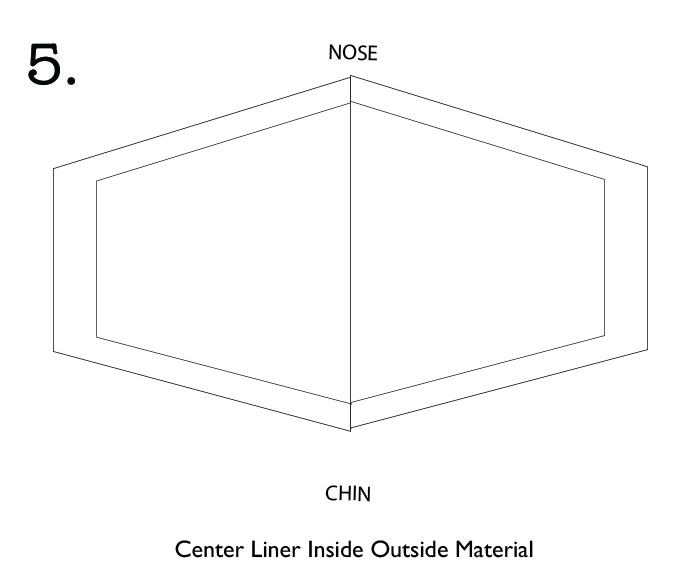
5. Then center the liner so there is an equal border of outside material around it.
6. Fold over the outside material 1/2 inch to slightly overlap the edge of the liner. Press and then fold over the material a second time this time over the liner.

OPTIONAL:
Adding the Filter Pocket
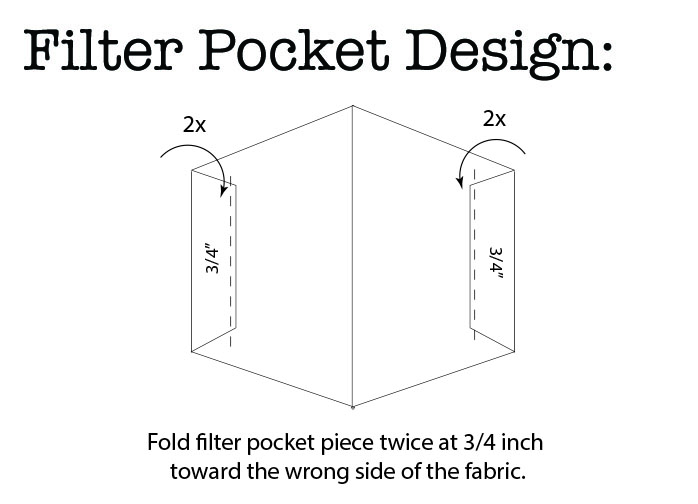
This next step is only for those wanting to add a filter pocket. Just know that the more fabric you add, the harder the mask is to breathe through. Fold over ¾ an inch of the material twice at the ends of the second liner. Press it with the iron. Now stitch over both sides along this the edge to tack the fold-over in place. After stitching, insert the filter pocket on top of the liner (right side up), matching all the corner points. Then tuck it under the pre-ironed edges. If you need to, iron the edges again.
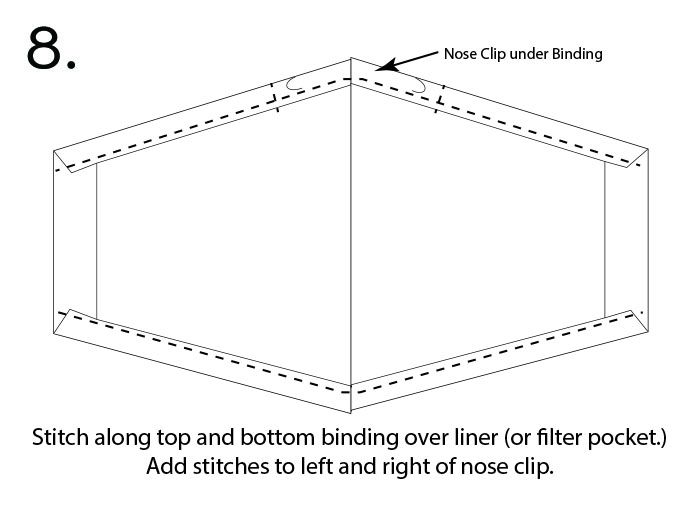
7. Locate the nose portion of the mask. Remember this is where you’ll be inserting the nose clip. Flatten the nose clip and tuck it under the binding of the nose. Use a clip or pin to hold the clip in place, but be careful not to put the pin all the way through the outside fabric layer so as not to add any large holes in the mask.

8. Stitch along the edge of the fold, being careful to avoid stitching onto the nose clip. Rotate the mask and stitch along the chin side of the mask.
Flip the mask over and feel for the nose clip. Sew a few stitches to the left and right of the nose clip to keep it from sliding around in the mask.
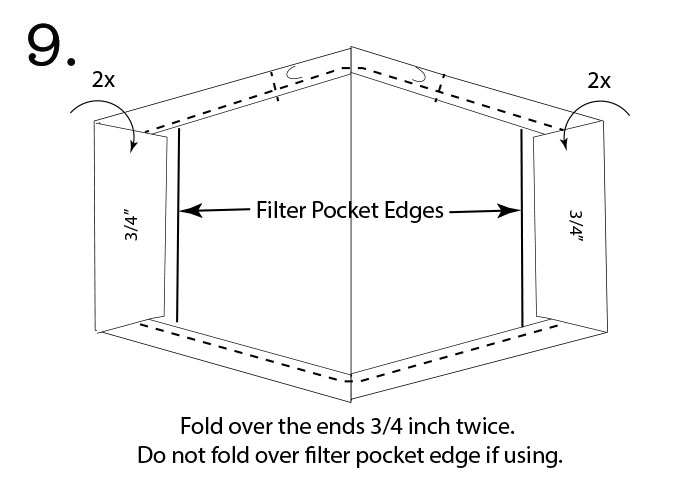
9. Double fold the ends of your mask about 3/4” twice to create a pocket for the ear straps. Be sure to avoid the filter pocket if you have one.
10. Time to grab the adjustable straps you made earlier. Take one strap and tuck it under the fold on the end. Stitch along the edge of the fold taking care not to stitch over the elastic. Repeat for the other side.
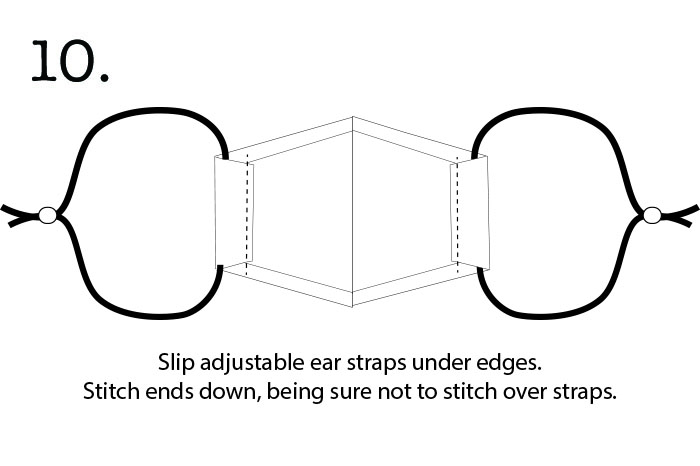
Make sure your straps still move freely in the fold. This allows the mask to cinch behind your cheek and not pucker.
This concludes your tutorial to make the Best Fit Face Mask.
UPDATE: I created a new video showing you some time-saving tips when making the Best Fit Face Mask. Plus, I answered a lot of questions! Watch this video to save time:
Everyone, please share this tutorial! Pin it, Tweet it, Facebook Share it, or Email it! Everyone should have a good fitting face mask for protection. After the Coronavirus is gone, these masks are great for woodworking or protection from seasonal pollen and allergens.
Stay kind, stay safe!
FAQs:
I appreciate all the comments, but I’m spending two hours a day replying to comments and emails. PLEASE READ THESE FAQs and check the COMMENTS below for answers to most asked questions before asking.
I also hope others can help answer questions if you see one. Thank you and take care.
• Where is the template? All the instructions and templates are on this page. If you can’t find it, please check again it’s linked under the Instruction section.
• Need Dimensions? They are included on this page. Look for the “Don’t have a printer?” link under Instructions.
• Who is selling them? This is an updated list of people who have contacted me and are selling face masks using my design.
• What size are the craft beads I used? The hole on my beads is 4mm.
• If I don’t have a bead, what can I use? Use a button and feed twine through the holes then tie them around your ear straps tight enough to hold the strap, but loose enough to be able to move the button. Or tie a slip knot (see the time saver video to learn how to tie a slip knot.)
• Can I skip the liner if using a filter pocket? At your own risk. I like to have two layers of fabric between me and the world. The filter pocket doesn’t extend all the way to the sides of the mask.
• What filter material should I use? Do your own research. Here’s a good article on options for filters.
• What material did you use for the liner? I used sheet material or a cotton curtain.
• Don’t have a particular material for this mask? I listed a variety of alternative materials on this page. There are plenty of other substitutes, but these are the ones I tried and can recommend.
• Are these washable? Absolutely. I wash mine before donating. The electric tape protects the wire from water. Frankly, the wire will break from repeated bending before it will rust.
• Is there a small or child size template? Do you have an X-Large size? YES!!! See the downloads and information for the child size, small, and X-Large above. (A child-size fits a four-year-old well but was a little too big for a two-year-old. You’ll have to play with printing the templates smaller or larger if these sizes don’t fit your needs. Or see the Time Saver Video to learn how to resize your template.
• Can’t thread your straps through the bead? Try using fishing line folded in half and feed through the bead loop first. Put strap material through the fishing line loop and pull it back through the bead. You can see a video of this process in my Time Saver Video.
• Video too fast? Don’t like the music? Keep your thoughts to yourself and download the instructions on this page. (Then you can play your own music and you can read it at your own pace.)

P.s. If you got to the end of this tutorial and still have questions, please read the comment section as many questions have been answered. I am receiving numerous questions and comments via email, YouTube, and the blog. It is impossible for me to answer all of them.
Pin this Tutorial for future use (or to share with others!)
Is it possible to get the template information with dimensions. I don’t have a printer.
Mitch Regal
It’s right there in on this page. Look under instructions to download the scan with dimensions.
I have very little sewing experience, but I was able to use your templates and make masks for my family. Thank you so much! I even gave my neighbor and extended family some because they are a great, comfortable and necessary design.
I’m curious how the adjustable strap is with men since many have short hair or no hair to cover the excess strap material.
Really? I seriously doubt anyone is concerned about the ear straps when there is a big face mask on their face.
Hi, Joyce. Co-workers and I just finished making several masks for fellow workers. You could make fabric straps (or use bias tape) or use shoe laces. If you want to sew them at the corners you will need 4 pieces each 18″ long. Fabric or bias would require sewing along the edge and on the ends not sewn into the seams. Flat athletic shoe laces are a time saver. If you are able to get the 36″ laces, cut each in half and sew cut end into seams at corners.
If you sew the side “channels” like Brittany demonstrated, 36″ long ties should work well. But the challenge would be figuring out how to keep them from pulling out when you are tying them. Making ties or using shoe laces may make them too thick for fitting in a craft bead so you may have to devise a different system so you don’t pull them out of the channels when you tie them – top first, then bottom ties. It might work better to find the halfway mark of each side and tack the ties in place with a bar tack or a line of stitching through the channel and tie to keep them from pulling through.
Good luck!
HI, Joyce! Co-workers and I just finished sewing a bunch of pleated masks for my place of work. (Wish I saw this one first.) Stores here were sold out of elastic, so we made ties for some of them using bias tape or cutting strips of fabric. If you sew them into the corners, 18″ lengths for each one works well. If you use bias tape, you need stitch the edges before you sew them to the mask.
What worked best for our project were flat shoe laces. Users are saying the shoe laces don’t slip as much as fabric or bias tape ties. If you get the 36″ long laces and cut them in half so you have 4 pieces 18″ long – one to sew into each corner of the mask – you have a nice length for tying bows.
Or you can leave the 36″ laces intact and slip one through each channel after you sew them to the mask.
For the same price as the 36″ laces, I picked up some 54″ laces knowing that they will make ties for one mask and leave me with 2 ties without tips that I can pair with leftover portions from another set of laces. I just have to remember to finish the one end on each of them with a little sewing so they don’t fray.
Can’t wait to use the shoe laces on this pattern. I like the way these look like they fit. And my husband and I both wear glasses…the nose wire should help the masks fit better under the glasses. Starting that tonight!
I need the actual
Measurement of the template I have no printer
Read under the instructions section. There’s a downloadable scan with measurements there.
Thank you so much for putting this together. I want to start making these this weekend. Approximately how much fabric do I need per mask? Thanks!
Less than a fat quarter.
I like this design and especially the tips on nose guards. The measurements for the liner seem inconsistent: in the text you advise folding the fabric 1/2″, and in the drawing the same fold seems to be 3/4″. Could you clarify?
Use the directions in the downloadable instructions. They are more refined.
Thank you so much 🙏🏻
Hi! Can you please tell me… How did the electrical tape stand up in hand washing the mask? Thank you.
Gale, it washes fine. When adhered to itself it provides a decent water-resistant seal. Frankly the wire will break before it breaks down in the wash.
This is nice! No one seems to address the nose thing. I made us pretty nice no-sew masks but if your glasses are fogging, it’s not good enough. I cut a sponge approx 1″ square by 4″ long, put it over the bridge of my nose and tied the mask on tight. It’s from a big soft sponge, one sold to wash your car. So now, I put that piece and coffee filter inside a bandanna. Working.
Suggestions for using straps instead of elastic to tie at back of head and neck? Sew at each corner or thread through the sides? Length of straps?
awesome idea
Hi, I made two masks today with a few modifications. Using the medium liner pattern, I added a quarter inch seam allowance to the edge so it would easier to sew the outer piece and the lining piece right sides together and then turn out. The lining piece is overlocked on the outer edge near the casing. I can then turn the ends of the outer piece to the inside, stitch a casing and insert t-shirt knit tie. Great pattern, I like the fact that the center seam is on the fold .
My masks have been donated to a local senior care center and the local food bank.Thanks
So,- I was only able to find paracord – which has no stretch – but still worked out fine. A helpful hint for anyone trying to get cording or whatever through the bead , try folding a pipe cleaner in half and using the same way you would a needle threader . It worked for this 4 mm paracord! Thanks for the mask pattern and tutorial !