
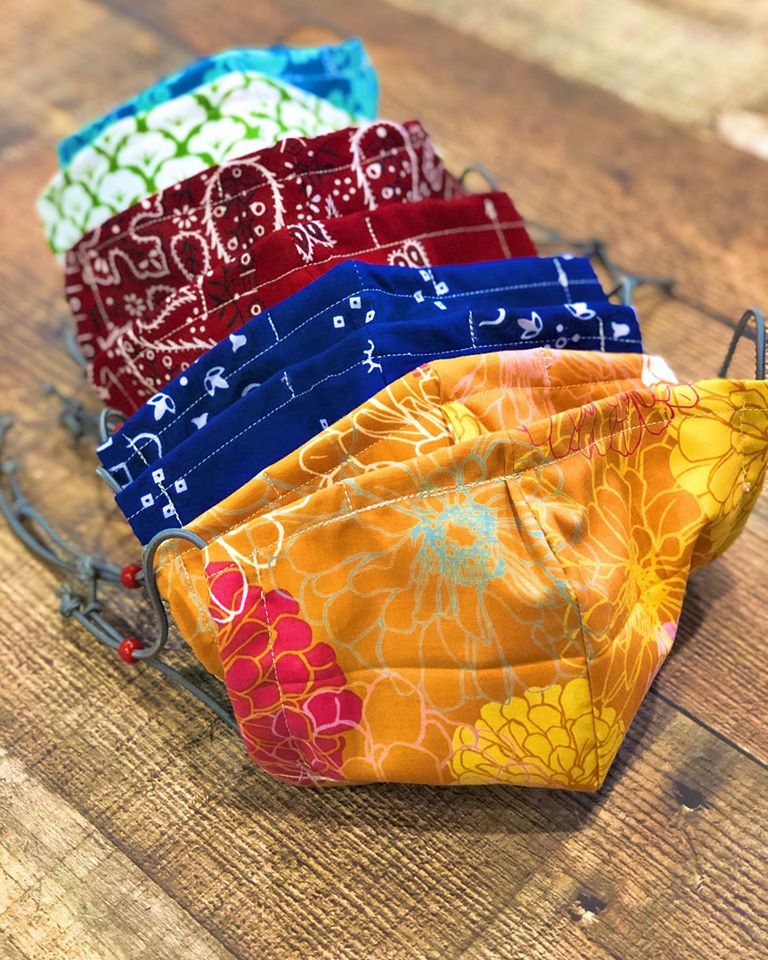
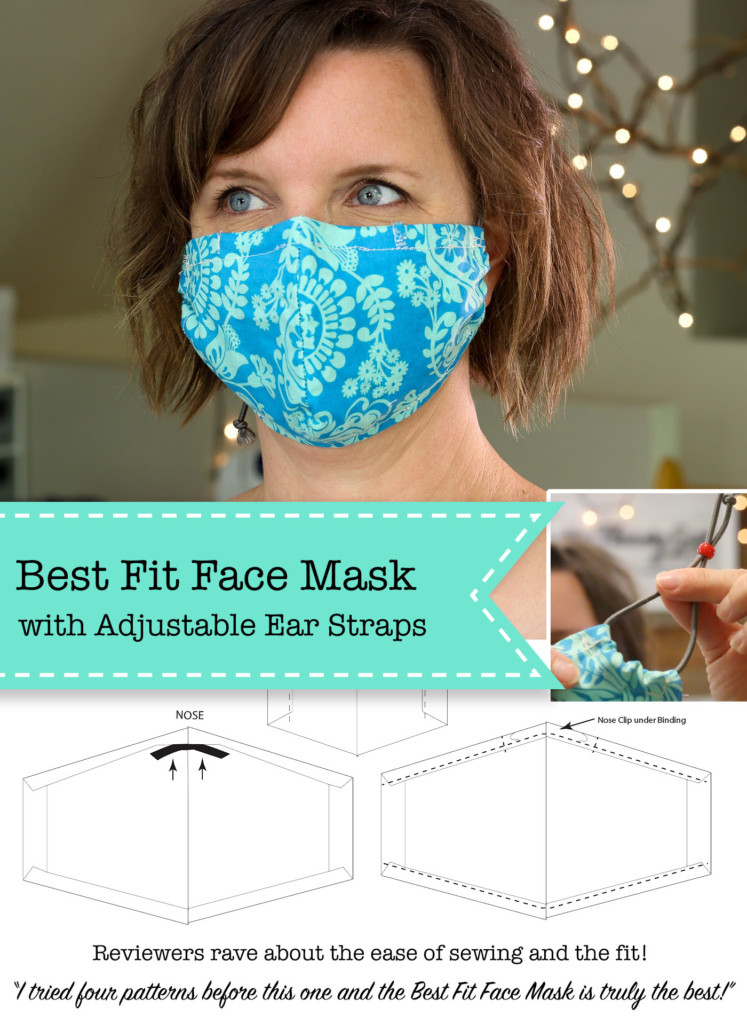
During the coronavirus outbreak I started making DIY Face Masks using some of the patterns I found online, but I really didn’t like the fit, especially because I was used to my more form-fitting and comfortable masks used for carpentry or demolition. So I designed what I’m calling the “Best Fit Facemask” tutorial. It’s more form-fitted onto the face and it has adjustable elastic ties around the ears to fit a wider variety of faces.

Best Fit Face Mask Tutorial
As a general contractor and woodworker, I had searched for form-fitting and comfortable masks to protect my lungs from dust and debris and had my favorites. For that reason, I knew there were better options than most of the sewing mask patterns I found. After a weekend, I designed this easy sew Best Fit Face Mask Tutorial for use by the public and medical professionals trying to protect N95 and surgical masks while also staying safe during the COVID crisis. (These are not a replacement for N95 or surgical masks. These masks are designed to add an additional layer of protection.) Looking for a simple, stylish, and better fitting face mask? Look no further.
Face Mask Template Sizes:
After many requests, I finally have a variety of sizes. From a child size (fits approximately toddler to 5 year old) and then Small (fits youth and petite adult faces), Medium (fits most women or small men), Large (fits most men or larger women’s faces) and X-Large (fits long faces and men with beards.)
Even though you should pre-wash your fabric, the masks can still shrink slightly after the first post-construction wash. Therefore, check sizing after washing the finished mask.
Resizing: If you find the child size is too big, try printing at a 95%. Likewise, if the X-Large is still too small, try printing the pattern at 105%.
Does this mask have a filter pocket?
Filter Pockets or No Pocket, your choice! Instructions for sewing a mask with or without a filter pocket are included. In fact, it’s only one step difference. (Personally, I don’t use a filter pocket because it is harder to breathe through three or more layers.)
In addition to this pattern being easier to sew, it also uses less fabric to allow you to make more masks with the fabric you have on hand. Speaking of fabric, these are some sources for fabric in your home so you don’t have to buy anything!
Materials:
(I’ve included affiliate links for your convenience. I earn a small percentage from a purchase using these links. There is no additional cost to you. You can read more about affiliate links here.)
- Fabric (see below for suggestions)
- Scissors
- Thread
- Iron
- Elastic Strap material (see below for ideas)
- Nose clip materials (see below for suggestions)
- Craft bead (or buttons)
- Sewing Machine
Better Face Mask Fabric Materials:
There is some science behind the materials used for face masks. Although the tighter woven (more thread count) fabrics offer more protection, they do pose the issue of being harder to breathe through. If you want to choose the best materials for both, here is a list of best materials for making your DIY face mask when trying to prevent virus transmission.
Sources for Mask Materials in Your Home:
- Quilter’s Cotton Fabric
- Cotton Blend Fabric
- Sheets or Pillowcases
- Tea Towels (not terrycloth)
- Fabric Napkins
- Scarfs or Bandanas
- Flannel
- Dress Shirts
- Other Cotton Fabrics
- T-shirts (although the stretchiness makes them harder to sew.)
Nose Clip Materials:
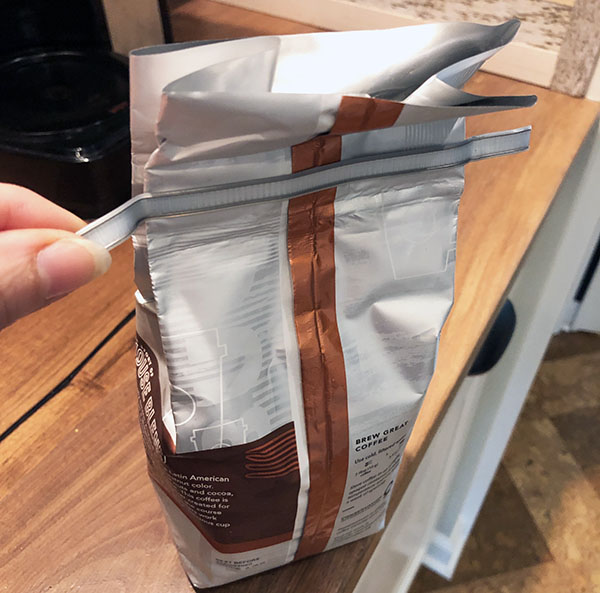
My favorite nose clip material is the foam padded aluminum nose strip, but they are a little trickier to sew around. Second favorite are coffee bag ties (you can purchase them on Amazon or reclaim ones from coffee or donut bags.) An Instagram friend had suggested the coffee bag ties and I couldn’t be happier with the idea (thanks Nickolett!) But, despite our love of coffee, we didn’t have an endless supply of bags. And I could only make two nose clips from each bag tie.
If you don’t want to purchase nose clips you may have these materials laying around:
- Electrical tape
- 18 gauge wire (or straightened paper clips)
Simple cut a piece of electrical tape 3 inches long. Lay two 2.5″ pieces of wire onto half the tape and fold over the other half to seal the wire inside the tape. Trim off the ends, leaving a small amount of tape to cover the wires. Yes, these will wash fine since the tape protects the wire. But any wire clips will eventually snap when bent back and forth too many times.
Less Successful Nose Clip Materials:
These items will work, but they either didn’t have enough of a “memory” in the bend, or they weren’t as comfortable. But, if it’s all you have, use it!
- Doubled Twisty Ties (not stong enough to hold shape.)
- Pipe Cleaners (tend to rust and break easier)
- Floral Wire
- Electrical Wire
- Triple-Layered cut-outs from foil take out containers
Adjustable Strap Materials:
I know the other materials that are hard to find are elastic, so here are a few acceptable alternatives.
- 1/8″ round shock or paracord (cut two 12 inch lengths per mask)
- Standard 55 (7 strand core) paracord (cut two 12 inch lengths per mask)
- 1″ cut strips of t-shirt material (cut 6-8 inch lengths and stretch to 12 inches long)
- Elastic Shoelaces (cut two 12 inch lengths per mask)
The key to the Best Fit Face Mask fitting so well is the adjustable straps. Using a craft bead on the straps allows the user to adjust the mask to their face. The paracord is the hardest to thread, but I found a great way to thread the strap material through the beads. Use fishing line folded in half. Thread the loop through the bead. Thread the strap material through the loop. Then pull the fishing line back through the bead.
The t-shirt material and elastic shoelace is much easier to thread through (especially when using the fishing line technique.) If you don’t have any of the above-mentioned strap material, you can use any cord or straps, but it’s crucial that the material can move freely in the sides so the side can gather at the back of your cheek. Stationary sewn straps will cause the material to push out away from your face.
No matter what material you use for the straps, be sure to tie the ends of your straps to prevent the bead from coming off. (And melt the ends with a lighter to prevent unraveling.)
If you don’t have craft beads, a button with some craft twine can work well as a strap adjuster. Or tie a slip knot following this video tutorial.
New Strap Design for The Most Comfortable Best Fit Face Mask!
With some schools opening back up and people going back to work, I made one change to the straps of the Best Fit Face Mask turning into my favorite mask and the Most Comfortable Best Fit Face Mask! Watch the video below for more information.
My Source for Flat Foldover Elastic to Make the Most Comfortable Best Fit Face Mask: Amazon or Etsy
Face Mask Templates:
The downloadable instructions contain the templates for both a medium and large size mask. Download by clicking on the images below which will take you to the full-size templates. Make sure your printer window is set to print actual size. Do not fit to paper size. Double-check your print out by measuring the one inch box on the template.
👉 Downloadable Instructions & Medium or Large Templates Here!👈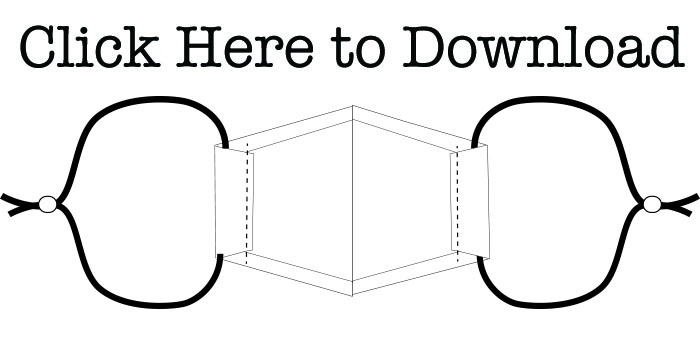
Looking for other size patterns? Download Patterns for other sizes below:
Don’t have a printer? Click on the links to see the dimensions of the Medium Best Fit Face Mask , Large Best Fit Face Mask, or Child, Small, and XLarge Face Mask.
Now, let’s get busy making the Best Fit Face Mask and be sure to share this tutorial with your friends and family so we can kick Coronavirus’s butt!
Video Tutorial:
Watching the video tutorial is the easiest way to learn how to make the Best Fit Facemask. Enjoy!
Instructions:
(Download Printable Instructions and Medium & Large Templates Here)
Print these instructions with the templates at the end. Make sure to print at actual size and check the size with the one inch box on the template.
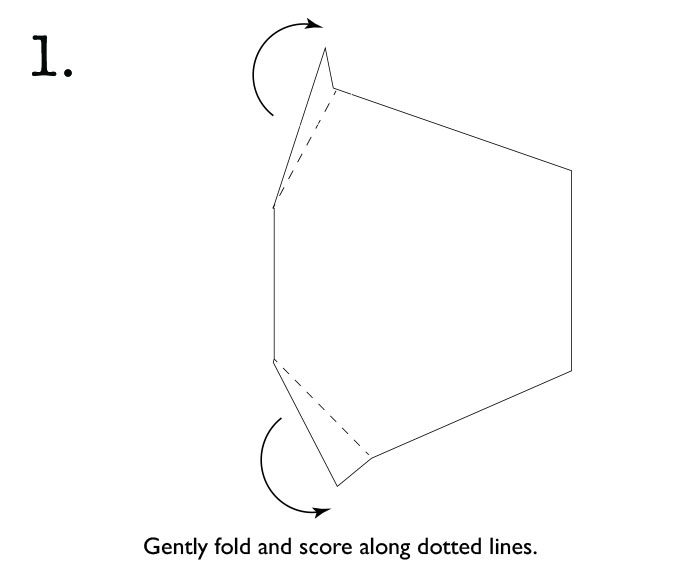
1. Cut out the templates. Gently score along the dotted lines and fold.
2. Trace the outside face mask template on your fabric. I designed the templates so you can get maximum use out of your fabric when making multiple masks. It helps to fold over the fabric and cut with the long sides of the template on the fold. But, you can rotate the template to fit more cuts out of the fabric. You’ll just have to seam together the pieces on the long side.
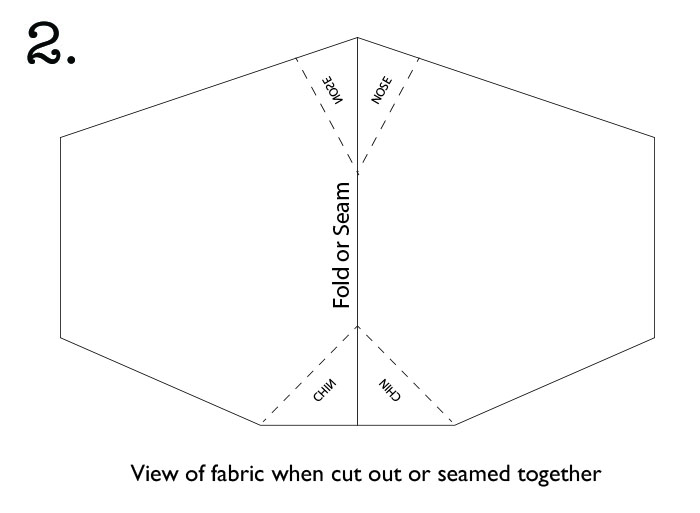
Lay your inside liner template onto your liner material. Trace and cut out fabric. (Important note: Hospitals are asking for masks with different fabrics for the outside and liner so they can visually see a difference.)
If you are making a filter pocket, you’ll need two liners (but only one outside piece.) If you need to connect two pieces of fabric together on the long side, do that now making sure right sides are together. I used a very small seam allowance.
3. Fold the corners of your template and mark a line onto your fabric at the fold. Repeat this on all pieces you cut out. Stitch along all the marked corners. If your fabric is printed, be sure your right sides are together. Now trim off the excess material at the corners making sure to cut close to the stitching.

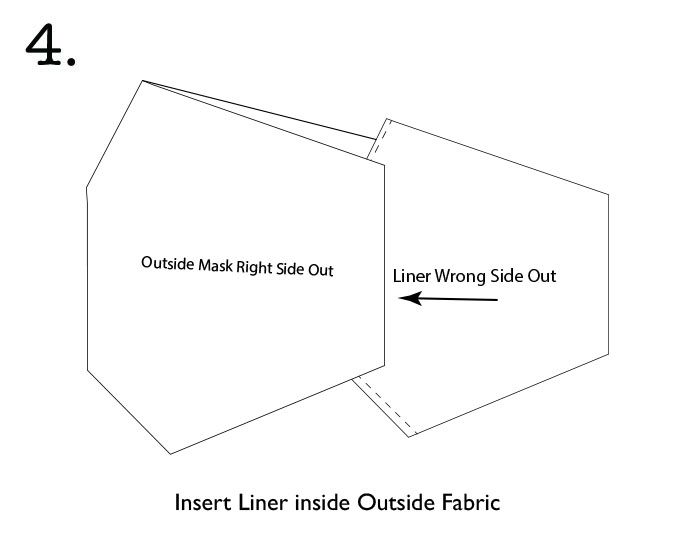
4. Turn your outside mask material right sides out and press it with the iron. Lay the liner on top of the mask making sure the angled corners match for the nose and chin. Insert the liner fabric into the outside material and align the points and angles.
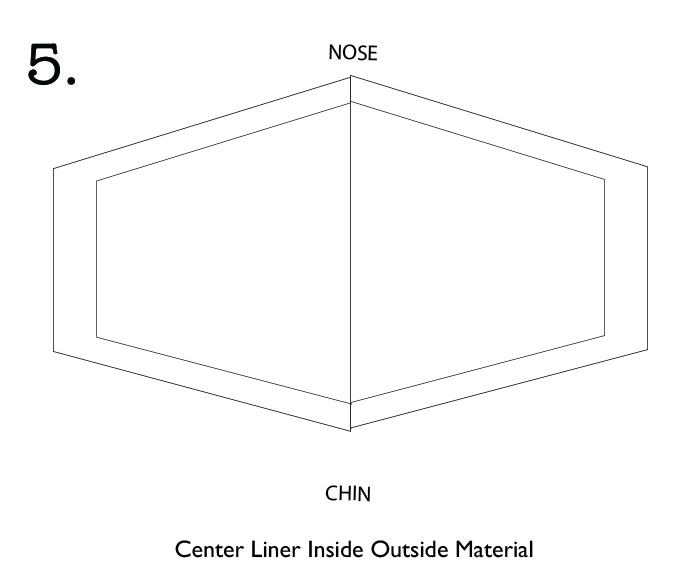
5. Then center the liner so there is an equal border of outside material around it.
6. Fold over the outside material 1/2 inch to slightly overlap the edge of the liner. Press and then fold over the material a second time this time over the liner.

OPTIONAL:
Adding the Filter Pocket
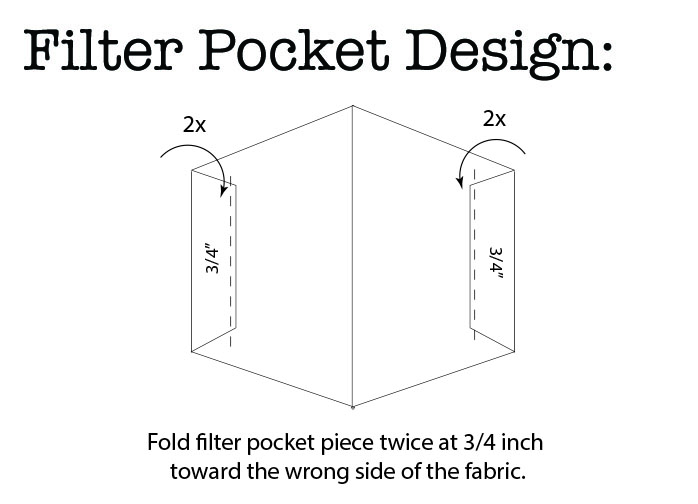
This next step is only for those wanting to add a filter pocket. Just know that the more fabric you add, the harder the mask is to breathe through. Fold over ¾ an inch of the material twice at the ends of the second liner. Press it with the iron. Now stitch over both sides along this the edge to tack the fold-over in place. After stitching, insert the filter pocket on top of the liner (right side up), matching all the corner points. Then tuck it under the pre-ironed edges. If you need to, iron the edges again.
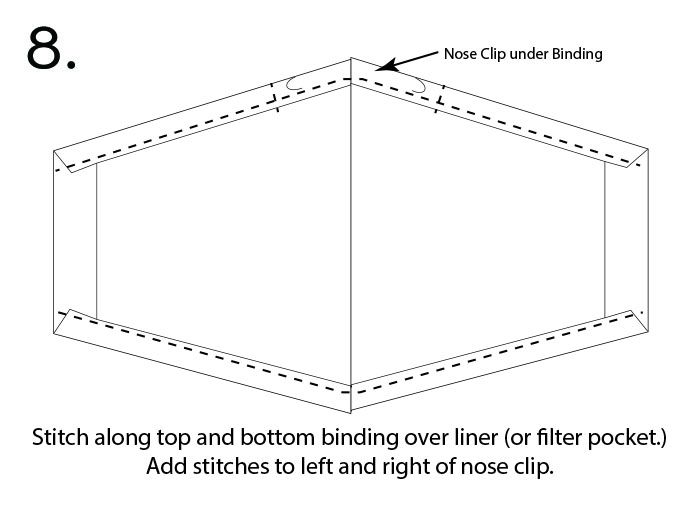
7. Locate the nose portion of the mask. Remember this is where you’ll be inserting the nose clip. Flatten the nose clip and tuck it under the binding of the nose. Use a clip or pin to hold the clip in place, but be careful not to put the pin all the way through the outside fabric layer so as not to add any large holes in the mask.

8. Stitch along the edge of the fold, being careful to avoid stitching onto the nose clip. Rotate the mask and stitch along the chin side of the mask.
Flip the mask over and feel for the nose clip. Sew a few stitches to the left and right of the nose clip to keep it from sliding around in the mask.
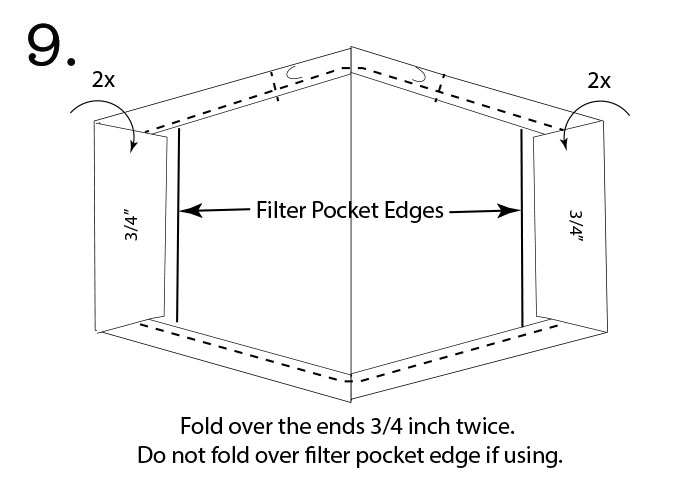
9. Double fold the ends of your mask about 3/4” twice to create a pocket for the ear straps. Be sure to avoid the filter pocket if you have one.
10. Time to grab the adjustable straps you made earlier. Take one strap and tuck it under the fold on the end. Stitch along the edge of the fold taking care not to stitch over the elastic. Repeat for the other side.
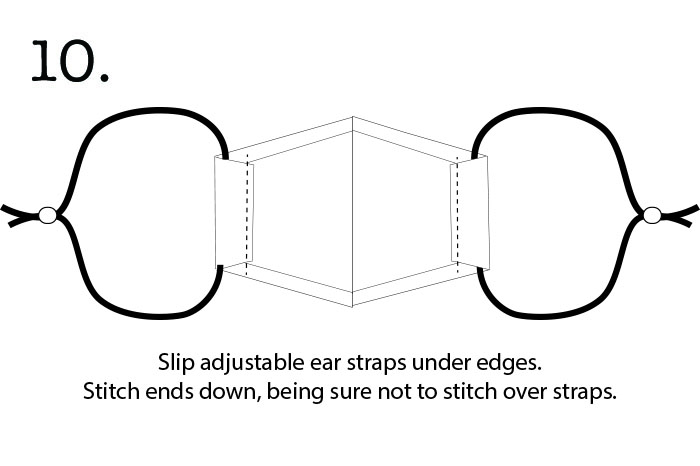
Make sure your straps still move freely in the fold. This allows the mask to cinch behind your cheek and not pucker.
This concludes your tutorial to make the Best Fit Face Mask.
UPDATE: I created a new video showing you some time-saving tips when making the Best Fit Face Mask. Plus, I answered a lot of questions! Watch this video to save time:
Everyone, please share this tutorial! Pin it, Tweet it, Facebook Share it, or Email it! Everyone should have a good fitting face mask for protection. After the Coronavirus is gone, these masks are great for woodworking or protection from seasonal pollen and allergens.
Stay kind, stay safe!
FAQs:
I appreciate all the comments, but I’m spending two hours a day replying to comments and emails. PLEASE READ THESE FAQs and check the COMMENTS below for answers to most asked questions before asking.
I also hope others can help answer questions if you see one. Thank you and take care.
• Where is the template? All the instructions and templates are on this page. If you can’t find it, please check again it’s linked under the Instruction section.
• Need Dimensions? They are included on this page. Look for the “Don’t have a printer?” link under Instructions.
• Who is selling them? This is an updated list of people who have contacted me and are selling face masks using my design.
• What size are the craft beads I used? The hole on my beads is 4mm.
• If I don’t have a bead, what can I use? Use a button and feed twine through the holes then tie them around your ear straps tight enough to hold the strap, but loose enough to be able to move the button. Or tie a slip knot (see the time saver video to learn how to tie a slip knot.)
• Can I skip the liner if using a filter pocket? At your own risk. I like to have two layers of fabric between me and the world. The filter pocket doesn’t extend all the way to the sides of the mask.
• What filter material should I use? Do your own research. Here’s a good article on options for filters.
• What material did you use for the liner? I used sheet material or a cotton curtain.
• Don’t have a particular material for this mask? I listed a variety of alternative materials on this page. There are plenty of other substitutes, but these are the ones I tried and can recommend.
• Are these washable? Absolutely. I wash mine before donating. The electric tape protects the wire from water. Frankly, the wire will break from repeated bending before it will rust.
• Is there a small or child size template? Do you have an X-Large size? YES!!! See the downloads and information for the child size, small, and X-Large above. (A child-size fits a four-year-old well but was a little too big for a two-year-old. You’ll have to play with printing the templates smaller or larger if these sizes don’t fit your needs. Or see the Time Saver Video to learn how to resize your template.
• Can’t thread your straps through the bead? Try using fishing line folded in half and feed through the bead loop first. Put strap material through the fishing line loop and pull it back through the bead. You can see a video of this process in my Time Saver Video.
• Video too fast? Don’t like the music? Keep your thoughts to yourself and download the instructions on this page. (Then you can play your own music and you can read it at your own pace.)

P.s. If you got to the end of this tutorial and still have questions, please read the comment section as many questions have been answered. I am receiving numerous questions and comments via email, YouTube, and the blog. It is impossible for me to answer all of them.
Pin this Tutorial for future use (or to share with others!)
I use your mask pattern for friends and family. They love the fit and the fabrics I use🥰Please share where you shop for your cool fabric♥️
I just wanted to say how much I love this mask pattern! After experimenting with a few designs last year, I came across this pattern and haven’t looked back. I have made loads for family, friends and friends of friends, and have received so many comments about how good the fit is. I’m so grateful for the pattern and I certainly intend to continue using it in the future!
I use paper clips encased in sellotape for the wire nose clip, which works well (cut with pliers according to desired length). Sticking to 100% cotton fabrics for both the outer layer and liner also results in a more breathable mask. I have really enjoyed experimenting with different patterns and complementary liner fabrics – what started as a personal sewing project for my family has now become a skill that I intend to refine in the future.
Thank you, Pretty Handy Girl!
I have made many of these especially at the beginning of the pandemic when I was making them for essential workers. Everyone calls me back and asks for more because they love the fit. Thank you for sharing your expertise. You are inspiring.
I’ve been making your masks for family and a few friends for the past year. Excellent fit, comfortable, stays on nose! Whenever someone comes to the house with a poor fitting face mask (e.g. keeps falling down), I give them one of mine! So easy to make and yes, the coffee bag bag ties are the best! Thank you so much!
Tried the anti-fog spray was no different, but the mask itself does a better job than most just by itself. I may experiment with other formulas of the spray though.
I just want to say thanks. I tried three different style masks, and yours, by far, was the easiest to make and the best fitting. I loved the simplicity of the pattern. I should be able to crank out enough masks to get myself, my children, and my colleagues through to the end of this.
I found that picture hanging wire works well too! It is flexible but keeps its shape. I used it on child masks.
Hi – I really like your mask design – thank you! Can I make these reversable masks, by using 2 of the outside patterns instead?
You’re welcome to experiment with the design, but I don’t see why not.
Made over 30 of these for our multi-generational family trip to Orlando and here is what we learned from this endeavor. For adults, the large fit more comfortably than the medium with no gaps, the medium for teens and the small for a 9yo child. This may have been due to my sewing skills, so I recommend doing a couple test fits.
We also found that using just 2 layers (one was for the filter pocket that did extend all the way to the sides was easier to breathe, but at 70° it was still a bit warm, maybe don’t use the same material for the liner and instead go with an old bed sheet liner.
Helpful Tip: Do make enough for every day of your trip like we did, so there is no reuse and no time spent washing and drying masks.
What length of elastic do you use for the child sized mask?
Try using 30″ for around the head and neck. But you might use a shorter length. Or for the behind the ear kind, I’d try taking off an inch or two.
How well do these prevent fogging? I often wear sunglasses and it’s the biggest pain to not be able to see while wearing a mask.
It helps, but you might want to use an anti-fog spray on your glasses.
I have been using your pattern and making masks for family and friends for many months now. The pattern is great and I’ve shared it many times. I use a nice quality white pillowcase as the lining, lingerie elastic and a Perler bead (threaded with a straight pin with a small head) and the wire in electrical tape for the nose piece. I was given some lovely material from my elderly mom and am really enjoying blessing family and friends with safety. Would love to send some photos of my masks but don’t see that option in the comments. Thank you so much for the time you spent creating this website, answering questions, and sharing you knowledge! You are the best!
You can email me: [email protected]
I too love your masks. Since I don’t care for looping behind my ears, I simply run one 36″ string all the way across the bottom of the mask (that goes behind my neck) and then out the top corners of the mask and tie it above and behind my head. That works great, and when I lift the upper string it hangs on my chest until I need it later that day. My wife and I made and use a couple dozen, washing them between each use. Thanks a lot.
Brian, sounds like my most comfortable best fit design, but without the super comfy flat elastic: https://prettyhandygirl.com/most-comfortable-best-fit-face-mask/
I am trying to download a child size face mask. I’ve downloaded other sizes before, but I’m getting a message to add Web Navigator. That never happened before. Is this something you have added? I’m not familiar with that and I am not comfortable adding that to my computer. I could print the medium and large patterns without this coming up. Actually, I don’t think is from you website. How do I print a child pattern. Thanks for your help. Please don’t print my reply for all to read. I don’t want to be embarrassed if it’s something I’m doing wrong.
Irene
Irene, no, you shouldn’t need to download anything other than the pdf pattern. The pattern for the child size link is directly below the big graphic of the mask that says Click Here to Download and a drawing of the mask. When you click the type “Child Size Mask” it should open the pdf in a separate tab. From there you can print it.
Hi All, here’s a tip for the ear strap. You all know of the pot holder loom we used as kids to make pot holders, well I use the loops for this. Works great.
Deb from Michigan
But, are they adjustable?
Hi Brittany,
Thanks to you and this awesome pattern, I now have a little sweatshop in ny living room and friends and family regularly show up with fabric in hand. Every single person who puts one if these masks on gets the big eyes, raves about the comfort, and says he or she can breathe!! Thank you so very much for sharing this pattern, instructions, and tutorials so generously.
I tried the timesaver tips and got overly excited. After making a couple that way, I realized it would save even more time to sew the darts of all three layers together. Please tell people DON’T DO THAT!!! It is a problem for the nose wire AND for the filter. Maybe I am the only person who would try that because I do not sew except for masks and so I could not foresee the consequences.
Thank you again for your talent and generosity. I tried ALL the patterns and this really is the BEST FIT and the MOST COMFORTABLE.
Best,
Mary Freema
Raleigh (also!)
I can not find the link to the graph paper for measurments
It’s on the same page under “don’t have a printer?”
Hi, Brittany. Love your masks! I particularly love how people all look so surprised when they first put one on and exclaim, “It’s so comfortable!” Every single time. So gratifying.
Am making masks in Egypt and raising funds for medical personnel in my native Venezuela. So far, I’ve raised 500 dollars!
Thanks for putting this out there, and making the videos and everything.
Josianne
P.S. At some point soon, I’ll be posting about my mask making on my Spanish language blog, fitzianita.blogspot.com. I’m going to link to these instructions, but if you allow me to, I can translate them to Spanish as well.
Email me about this idea. I can’t allow you to republish the tutorial (even in Spanish) on your site. But, if you wanted to translate it, I’m happy to include the Spanish directions for download on my site.
Thanks. Do you sell these?? I’m new to your blog.
There’s a link to the database of sellerss at the end of the tutorial.
Hello! I am a senior I would really like to make this mask but my downloads are not working could you send me the actual measurement for making the complete mask. Sorry for any inconvenience this may cause but I really like the style. Thank you
There is a link to the measurements on graph paper, please look closely again.
Thank you for you work on this pattern! It truly is a comfortable mask! I’ve made TONS for my family… others and my whole salon with this pattern. All agree its a comfortable breathable mask! I do use the pipe cleaner though. Have had no issues with it rusting or breaking. Sometimes I double it for mens masks
The pony beads (genius!!) make it the best fitting mask ever…for everyone! Thanks again!
This was such a fun mask to make. Thank you for the how-to video and the design idea. I made several for my son, husband and myself using old T-shirts. They were a hit.
Thanks so much Brittany for sharing. I’ve made 100 masks to give away now using this pattern. Now I can source aluminium nose clips, I am no longer putting the nose clip under the top hem. I’m making a channel with binding tape so it can be removed for washing. It’s working a treat and I find it easier to sew. I simply put it in place on the fabric before sewing, and then sew into place. I end up with two sewing lines at the top of the mask that look very neat. Thanks again. You are so inspiring.
Thank you for your tutorial, my mask came out great! I was making reversible masks and the pattern was quite complicated, this one is easier and fits perfectly. I have a small face and used the small size pattern. I was using jewelry wire for the nose pieces, but have found coffee bag type ties to be much more comfortable and easier to work with. Two suggestions for the original style earpieces – round ponytail elastic hair ties (The kind with the silver metal clip holding them together, they are very stretchy and can be used as is without any adjustment) and Goody Total Texture extra thick elastic (which is used for hair wrapping). That one can be cut to fit and sewn together. Both are easy to find at a drugstore with hair accessories.
Thank you so much for your amazing pattern!! I have made so many masks using it! Everyone in my family seems to like a different variation. One kid likes hers made out of old tie-dye t-shirts with straps made from t-shirt strips. My other kid likes hers made out of fashionable 100% cotton fabrics. My husband has to have his either be black or match his Army uniform, so I cut up an extra of his uniform t-shirts to make him a bunch of masks that are very comfortable and look great with his uniform. Thank you so much for the pattern, video, and time-saving tips!! My entire family prefers this style of mask over any other!!
You’re welcome.
Are there measurements for each size of your face mask? I am hoping to provide for people so they can tell me what size would best fit them depending on their measurements. Thank you!
I only have the measurements for the fabric template. You could probably do the math and subtract for the seam allowance and a little more since they shrink a tiny bit after washing again.
The measurements for the template can be downloaded from this page: https://prettyhandygirl.com/best-fit-facemask/
I sewed a line under the nose to make it easily recognized as the nose, not the chin.
Great idea.
I made a couple of modifications:
1. 18 gauge stainless steel wire 5 ” long folded placed under folded top when sewing down.
2. Elastic sewn into top and bottom hems, one on each side vertically. This enables slipping a disposable surgical mask underneath these straps instead of creating a ( 3rd layer ) pocket.
I also sewed the liner to the outside piece when sewing the nose and chin angles , cut open the fold and lay the hems flat. Since I am putting a disposable surgical mask inside, these raw hems don’t bother me.
what is total length of eleastic for around the head and neck? Watched video, but 18″ doesn’t make sense to me.
It was an error. 36″, sorry for the confusion.
Thank you so much for sharing. Keep Safe!
What are the recommended washing instructions for the mask? I use the electrical tape/wire nose piece. Is it OK to put this in the dryer?
Yes, you can wash and dry it. See the FAQs on this same page where you left a comment.
fantastic mask design, having been making them for charity. every one loves them. Thank you
I made the child size for a 4 year old and I now have to remake them because they are huge. The size fits my face and im 24. Will try and print it at a smaller size but not sure why the original print is so big. I even made sure the 1 inch box was indeed 1 inch
That is odd, I haven’t had this complaint from the millions of others who have made them.
I’m having a hard time telling top from bottom and know it would be even worse for a child. Does it make that much difference? Mine look so close to being alike, thinking of just making them the same – how would this work out?
You should be using a nose clip on the nose side. That would make a difference. Also, feel free to label the Nose side with an N if you like before sewing.
I absolutely love your mall design and have made them for everyone. You show a picture of a guy with a beard, that mask seems longer and gathered at the bottom. Do you have another pattern for men with beards beside just making the XL mask?
His mask was an XL. There were no modifications to his mask, other than I made his a Most Comfortable Best Fit: https://prettyhandygirl.com/most-comfortable-best-fit-face-mask/
Having trouble sleeping, it’s 4AM and I be finally got my machine working again so I’m looking at the best patterns and saw your suggestion of using all those wire ties. I did make a few before my machine went down back in June. I was using flashing from the hardware store. It’s easy to cut and it’s super cheap. I got enough for dozens for a little more than $2. Tin snips are needed unless you have an old paper cutter you don’t care about dulling the blade. I used a newer one and after cutting a few dozen it still cut paper and they stayed uniform in size. I use a file to soften the sharp edges so it wouldn’t push through, but I’m sure it’s fine without. They work like a dream! Sorry if somone else suggested, I’m too lazy to read through all the comments! 😁
Thank you for this excellent tutorial and templates. I have been making your masks for a few months now and have had many people tell me they are the best fitting ones yet and have less fog-up on their glasses due to the nose wire. So happy for the new sizes!
Yours is one of the best patterns, Brittany, because it can be on the fold, so there is no seam centre front. Stitching leaves holes, defeating the purpose of a mask.
How long do you make the ribbon for a child’s mask? I know it’s 38 inches for an adult but I’m not sure what to use for a child & the child I’m making the mask for isn’t here right now. Thanks!
It’s best to use at least 32″ and cut to size after they put it on.
How do I determine what size pattern template I need to make. For example, if the measurement I have is 3.5 inches from bridge of nose to just under the chin. Where do I look on the dimension patterns to find this figure. There are a lot of number on these patterns and I have completed several calculations looking for this 3.5 and I can only find it in sizes that would definitely be to large for her. Thank you for your assistance.
Thank you so very much for providing this pattern & the instructions. I just made a bunch of these for my family. I used the small, medium & large patterns. They fit great and are so comfortable, much better than the previous masks I was wearing. Thank you!!!!
Great ideas!!
I would try taking 1/4 to 1/2 off all of the sides of the pattern and creating a smaller mask.
There are several sizes now from Child on up to XL.
Love this!! I have made other masks and this is the best. Plus, I took the idea of the coffee tie for a nose clip and added a clip to some other masks I have that were good but kept slipping. Excellent solution! I could not find the paracord clip thing. I used a bead and t-shirt. It works perfectly. I have had to wear a mask for a few hours. I had one with elastic straps that start to bother me after about 45 minutes. However, the t-shirt material worked wonderfully – no sore ears but the mask is snug. Yay!!
Have you seen my most comfortable best fit mask? https://prettyhandygirl.com/most-comfortable-best-fit-face-mask/
I saved the downloaded patterns, and info, but when I try to open it, I get some type of warning. So I’ve just printed and will have to scan the pages to be able to save into a PDF. Going to try out this new-for-me pattern. Thanks!
The coffee tin ties can be purchased on Amazon 100 for about $20.
This is a really quick mask to make, and I like it – thank you for sharing. I made one for my daughter, and the way it fit her face leaves it looking like she has a “beak”. Is there a way to make that angle so that it isn’t as pointy? Thank you for considering my question.
Don’t poke the corners out like you do a pillow. Also, washing it helps soften the points.
I found your pattern early in March and made several. I then decided to try some new styles, but it was very difficult to insert nose piece. After making many masks, I came back to yours, using a lighter lining. It is the only mask that stays put when talking. Thanks for your new ways of assembling. I use shock cord which is so comfortable and easy to thread through a bead.
Is this the template that is available on etsy? It looks different, but I would like to try it.
I have not approved or created any templates on Etsy, I’m aware someone is selling them, but I did not give permission.
I have made over 100 masks and people ask me for more of these because they fit best.
thanks
So good to hear! 😉
Can you share the new nose piece your using in the new video? It looks to be adhesive.
Here’s a link to them: https://amzn.to/31YXAHV
I don’t have a Cricut, but have a Silhouette. I would choose, file open, go to where I saved the .pdf, and import the file. Use the “trace” feature and choose “cut edge” only. Otherwise, it tries to cut our all the words on the pattern. Then delete the .pdf design. That way, I am only left with cut lines. Hopefully, Cricut works along the same lines.
I am confused with the nose and chin..I didn’t mark it and I think I put the nose piece in the chin area..is there any way to know the difference..once the pattern is off it’s hard to tell..I know I should have marked it..but just asking
If you are struggling to see the difference, you might want to mark the fabric before cutting. I just look at the angle and can tell the nose is less of an angle, while the chin is 45 degrees.
Is there a way to make these with elastic ear loops but not adjustable. It would be easier for my younger grand children.
Have you seen this newer design? Kids love it! And you don’t need to adjust it as much: https://prettyhandygirl.com/most-comfortable-best-fit-face-mask/
I don’t recommend stationary straps because it’s too hard to get a good fit.
Thank you for these patterns! I have tried a few, and these are by far the easiest and most comfortable. The coffee bag closure noseclip is a brilliant idea! Thank you for adding the smaller sizes as well. I use paracord and craft beads, or a shoelace for folks who like to keep the mask around their necks when they don’t have to use it. I’ve been making these for my family and neighbors, and have gotten nothing but compliments.
One photo shows the ties going around you head rather than around your ears. What length did you use and did you use a pony bead for adjustment? Thank you!
Cheryl, the details for the most comfortable mask can be found here: https://prettyhandygirl.com/most-comfortable-best-fit-face-mask/
I had a try with your template a few days ago and it was really comfy and stayed on my face when I talked! I’ve since made 6 more for family and friends. Thanks for the excellent design and instructions.
The directions under “Adding the Filter Pocket”, in the first paragraph, second sentence says to turn under 1/2′, however, the picture says 3/4″ – Which is correct?
Nice catch! Just changed the directions. It’s 3/4 of an inch.
Great design! Going to try this today. Dental Floss threaders would also be great for feeding the elastic/straps through craft beads.
Ha! I discovered the same trick!
Thank you for the templates and the video guide. I will be making them for family and friends.
Suggestion for easily obtainable ear strap sliders: Hard rubber washers that are sold to replace the damaged seats in faucets. They have an inside diameter of 3/16″ and a variety of outside diameters around 1/2″.
Thank you to you both!!!
Hello, thank you for sharing your mask pattern, I wanted to make the small mask but your template for the small gives only the outside twice, no inside liner. Any chance you could fix this please. Thanks again
It’s not the same size, your printer is likely set to fit to page or similar. You must print at actual size or 100%. Check your 1 inch square box to make sure your print outs are correct.
I had thought of doing that, but the holes in my beads are smaller than the ones you are using, and the bias tape would never fit through if it were doubled up. It’s a tight fit just threading the ends through one at a time, but now that I’ve got the hang of it, it goes quickly. The beads sure don’t slip though!
Found you through Marie Bostwick. Can’t wait to try your “easy” facemask. Thank you.
I have made quite a few of your Masks. Love them! I did make one adjustment to the instructions for the ties. My daughter wanted to be able to slide the mask down her face instead of on the ears. So I started with two strands of cording until I found the Plastic Cord Locks for drawstring clothing and instructions for using them in masks. I use a 54″ of the 1/8″ cording and sew the cording so both ends are in the top of the mask, so you have the cord go around the back of the neck, adjust cord to get the cord over your face and tighten to fit. Everyone loves them that way, and had to redo the few over the ears . One very good thing about them is your glasses do not fog up while wearing the mask. It fits tight around the sides of your face.I have probably made over 40 for family and friends of family. Now my daughter’s teaching friends are asking for them, which I will do for a little over cost, so I do not get overwhelmed with requests. If you have long hair, you can hide the cording under the hair and you can hardly tell how it is attached. Thanks again. I have sent the .com website to a few sewing friends. Gwen Bascom
I seen where someone wrote you and suggested ung a coffee bag closure, I use the closure from a mini donuts bag of Nickles Bakery or Hostess Bakery. They are long and I can get 3-4 nose tabs depending on the size you cut. Plus you get to have donuts with you coffee…lol
LOL, right, donuts always go great with coffee!
Thank you for this awesome, easy to follow design! Well done!
Hello. Thank you for the pattern and video. I just made a mask but I had a bit of a hiccup on step #6. There was not enough seam allowance on the outside material to fold over twice onto the liner . I overlapped the template pieces and there is a difference of about 3/4″. The template square printed at 1″ X 1″. I continued but it was difficult to sew , especially around the darts. Maybe I can just enlarge the outside material by 1/4″ on the long sides. Please let me know what you think. I will appreciate it very much.
Did you follow the instructions to fold over 1/2″ twice? It doesn’t matter if you fold over the liner. Follow the downloadable directions, I had one mistake in the video vocals.
I made several of these out of old tee shirts for 9th grade girls to tie dye. They loved doing and masks turned out very well. Thank you for the pattern & great tutorial.
I think these masks fit great, and they’re really easy to sew! They also don’t fog up my glasses. My safety glasses get fogged up (have to wear them at work), but they do that anyway.
I use 1/4″ double fold bias tape for the straps (no stretch, so I use 14″ for the medium and 16″ for large. Twelve inches will give you sore Dumbo ears). For the nose clip I use 12 gauge aluminum wire from the jewelry section at Michaels. I use 3.5″ lengths and use needle nose pliers to bend the ends around. It’s easy to cut with a pair of nippers and easy to bend, but stiff enough it holds it’s shape (just don’t hit it with the needle!). It’s also cheap and you can get a lot of masks with one package.
Getting the bias tape through the beads can be tricky (I use wooden craft beads), but I’ve figured out the trick (it took me about 10 masks and a gouged thumb). You do need fine nose tweezers and a pair of pliers. Cut the ends of the bias tape in a sharp diagonal. The first end is easy to pull through with the tweezers, the second is more fiddly. You have to shove it in the hole with the tweezers as best you can, but it should pull through if you pull on the end you’ve already threaded. Use the pliers to pull it all the way, because it is a snug fit. Of course, your mileage may vary depending on the size of the hole in the bead, or the thickness of the bias tape.
Thanks for the great patterns, and thanks for adding smaller sizes!
Thanks for your feedback Sarah, did you see my follow up video on threading the beads? https://www.youtube.com/watch?v=DPrKpm507EU
Kenya, did you figure out a solution to this? I want to use the various sizes and to cut them out on my Cricut, but since the dimensions are only available for the Medium and Large templates, I’m a little stuck on how to move forward with the other sizes (we don’t have a printer at home).
Tess, my apologies, I’m juggling many balls right now and haven’t had a chance to get dimensions drawn for the other sizes. Will try to add that to my list this week.
Tess, my sweet sixteen-year-old son created the dimensions for the other sizes last night. You can download them here: https://prettyhandygirl.com/wp-content/uploads/2020/07/Child-Small-XLarge-Face-Mask-Dimensions.pdf (each square is 1/4 inch.)
Thank you. I just finished the large size and now doing the other two sizes. Do you fold over the 1/2 inch twice on each side of the mask on all sizes. Sorry to be picky but I am making masks to send to family and need to do the three sizes.
Follow the directions on the downloadable instructions. 1/2″ foldover twice on top and bottom. 3/4″ twice on the sides.
Hi Rosemarie, I love this idea as I always find the folding tricky! How do you handle the darts when doing it this way? Thank you!
Joelle
I do not have a printer. Do you have a template with measurements for the small mask that I can put into graph paper?
Elaine, my apologies, not yet but will try to get that done this week.
Elaine, my sweet sixteen year old son created the dimensions for the other sizes last night. You can download them here: https://prettyhandygirl.com/wp-content/uploads/2020/07/Child-Small-XLarge-Face-Mask-Dimensions.pdf (each square is 1/4 inch.)
I love this patten and have made several lovely masks from it. Thank you!
I don’t super love the elastic hugging the backs of my ears, so one adjustment I made for a couple of them that worked well for me was to swap the behind-the-ear elastics for a loop of cord with big button on one side and just an open loop on the other side. The button sits near the base of your skull when you’re wearing it. It’s less convenient to adjust this way (you have to knot the cord so it doesn’t loosen; I also just trimmed the knot ends and then hid the knots back in the cord sleeve of the mask), but if there’s only one person wearing it, it’s not a big deal, and it don’t have to be quite as tight to be secure.
Hi! Thank you so much for this tutorial! Everyone I’ve made masks for loves them! Unfortunately, I don’t have a printer and the new sizes aren’t available in that section. Will you be adding them soon?
Thanks!
Will try to get this done this week. I’m juggling a lot of balls behind the scenes ;-).
Di, my sweet sixteen-year-old son created the dimensions for the other sizes last night. You can download them here: https://prettyhandygirl.com/wp-content/uploads/2020/07/Child-Small-XLarge-Face-Mask-Dimensions.pdf (each square is 1/4 inch.)
I am confused. It says after you center the liner to fold over the outside material 1/2 inch to touch the edge of the liner and then fold over the material a second time this time over the liner. It then say to fold over 1/2 inch to meet liner fabric on chin side then folder over again to cover liner. Does this mean that you end you folding over an inch on each side of the mask.
Yes, approximately an inch.
Hi Brittany – Thank you for the tutorials and the dimensions. I do a lot of sewing and this is by far the best fitting and easiest to use template I have come across. I do not sell them, but rather making them for family and friends. Love your contractor background….since I grew up in a family of contractors, I always know you guys have the “inside scoop” on the best tricks to use. Good luck and stay safe.
My family did not think 12 inches was long enough, so I have been making my 16 inches long.
Hi! I’m preparing to make this mask for my mother, and I just discovered that on my HP printer, the large pattern coordinates with the medium dimensions. Glad I checked before cutting! Thanks for providing both. 😊
Definitely need to double-check that 1″ box for size.
Thank you for the pattern & videos. The short cut tips are great. I’ve been using a kirby grip to thread my elastic through the sides.
Thanks for the tip Sheila.
Hi!
Thank you so much for this pattern it is amazing. One question…When I print the new chid size face mask at actual size the box measures at 3/4″x 3/4″. Is this correct or do I need to print it at 133% so that it is the correct size for a 2-5 year old. I’m making these for my niece and nephew whole across the country so I can’t test fit it on them…
Thank you!
I just checked the file and printed it on my end and it prints fine at exactly 1 inch. Do you have a setting on your printer to print actual or do not scale?
Hi, I’m 85 and have made more then 500 masks since the 7th of March. After using 5 other patterns you shared yours, Love, Love, Love your pattern and thanks for the new sizes. For nose pieces I use 8″ aluminum flashing cut on my paper cutter to less then !/4 Inch, then cut in half, wraped in duct tape, this was my son-in-laws idea, They dont rust and have had no complaints. I also make a removable filter from Oly Fun. Thanks Again!!! Sarah Smith
Will do!! Thank you so much!
Thank you for this pattern and tutorial. I’ve tried a number of patterns and this is pretty much the only one I use!
I am using 2-18 gauge wires wrapped in electrical tape for the nose piece, but they keep breaking when laundered. Any suggestions? Washing machine only? washing machine with no other clothes? Dryer with no other clothes? I tried using a lingerie bag, but they ended up crumpled balls of mask. Thank you in advance for your help. And thank you, thank you, thank you, for this amazing mask tutorial that even a newbie like me can manage to use and provide excellent facemasks for family, friends, and nurses at the VA.
You should probably try to get some coffee bag ties instead then. Ask your friends and neighbors. Those of us coffee drinkers can always scrounge some up.
This sounds like a wonderful idea! Does that mean you just sew the nose and chin diagonals right at the beginning?
Yes, here’s the video on the time-savers showing how I do that: https://youtu.be/DPrKpm507EU
Thank you so much for your response. I greatly appreciate it. Enjoy your day and be safe!
Those coffee bag strips are called tin ties and you can order them on Amazon for about $15/100. I’ve been using them and they work great!!
I have an adjustment to the sewing instructions to make this even easier. Cut two of the outer pieces instead of of two different sizes. Sew, right sides together with a 5/8 seam allowance. Trim half away, turn right sides out, press. Center nose clip on inside, as close to the seam as possible. Top stitch a 1/4 inch seam to hold it in place, then top stitch the bottom to match. Follow the original instructions to complete..
Oh, thank you! I got tired of all the pleating on the first hundred masks and now it seems we’ll need 25 or so more for the kids, if they head back to school somehow this year. These are quick to make and I love the adjustable elastic…pure genius!
Thank you for providing this mask tutorial. You truly are generous in your talents.
Love this pattern. Made a bunch for the hospital I work at, a bunch for family and a bunch for the army covid camps. Everyone loves how comfortable and easy to breath in and wear.
I have used this pattern to make over 475 masks. Thank you so much for sharing.
I need to do this so I would really be interested in how you did it – did you just alter the angle and keep the line straight or did you add a curve? This is exactly what happens to me, it cuts into the skin just under my eyes and is definitely hitting my glasses.
The fish wire method of threading the paracord through the craft bead is brilliant!Thanks
Hi! Thank you for the tutorial! I was just wondering if the inner liner material had to be a specific type of fabric or if it could be cotton like the outer material? I was going to donate the masks I made so I just wanted to be extra sure of the materials that go into them! Thank you for the help!
Inner lining can be any cotton fabric.
Thanks so much for the pattern.. It’s really the best fit mask. I have made so many of them for my family and friends.
I have had rave reviews from people I have given my masks to. They enjoy how it fits on their face. The darts are perfect. I didn’t know you had child sizes so I adapted the medium. I’ll try your new sizes. Especially the extra long. I have made close to 300 masks and donated most of them. Sold 5! I could have made a lot of money selling them. Maybe I will start selling somehow. Glad I found your site. The video is great and your directions are clear. I ordered some metal nose pieces that have a little hole on each end and you tack that on. I insert them like you do but they are meant to go on the outside of the mask.
Thanks, Jerris
Hi TB, how are you? Thank you for sharing. I will be trying this pattern for the first time this evening. I actually use non-woven interfacing for other patterns that I have tried. Can you please share the steps you took to line the mask with the non-woven material as a filter? I’d like to see how it’s done before I try it. Feel free to reach out to me directly at [email protected]. Thank you so much for your assistance. I greatly appreciate it.
Francine
i just wanted to share that i’m using 3m filtrete purple label 1500 grade furnace filter fabric in face masks. this grade filters virus, soft and easy to work with material.
3M specifically doesn’t recommend using their filters for inside face masks:
Can we use the Filtrete™ Air Filter material/media to create handmade masks?
Our filters are designed to be used in HVAC systems, and the filter media has not been tested to be used as a face mask for respiratory protection. Altering any of our 3M Filtrete™ Air Filters is not recommended or supported by 3M or the Filtrete™ Brand. Customer safety is our number one priority.
Love this pattern . I’ve made about 50-60 mask. All say it’s comfortable. Some say nose and chin are pointy but After a wash or 2 pointiness subsides. I think the angle helps hold the mask away from nose and mouth and makes it easier to breath! Here are some photos of masks I’ve made….
Linda, the washing definitely softens the points. Thank you for your efforts to keep people safe!
Thank you so much for this pattern, it is the best I have found. I don’t use the liner method, I simply cut two of the outside piece & line with non-woven interfacing. After making several, I actually made a modification of my own to the top edge of the mask, and cut down along the cheeks, as the top edge was hitting the glasses and lower eyelids of some of my family members. That made it even better!!
Out of the 5 different patterns I’ve tried so far, this one is easily the most comfortable. I made a couple different styles for ties: the first was a single long piece of contrasting bias tape (made with a bias tape maker), theaded through so that it made a loop around my neck and tied further up on my head. This one is great because the mask can just hang around my neck when not in use. The second is the adjustable ear loops with paracord and craft beads. Hard to thread through the beads (we melted the ends of the cord and squished them into a point while warm), but REALLY comfortable. For both styles, I love how adjustable they are! I made 2-layer masks (the 3-layer are just too hot outside) but I might try fusible interfacing next.
The only changes I made: I added a nose wire pocket to the inside of the mask instead of sewing in the wire – I wanted to be able to remove the wire before washing. And for the next one I make, I might curve the seam on the chin. It’s a bit pointy!
I just made this mask with the beads (and paracord) – easily the most comfortable mask I’ve made so far (maybe 5 different patterns now?) … SO much better than elastic! The beads do sit behind the ears but because they are on the outside of the loops made by the cord, they don’t actually touch your ears.
Enjoyed. Made one-will try more. Looking for the t-shitrts
I purchased parachute cord and it does not stretch. Should I cut straps longer than 12 inches?
No, 12 inches is fine.
Your instructions are very good—easy to read and follow–Great Job!! Have a Good day!!
This mask is, BY FAR, the best, easiest, most complete DIY face mask pattern and instructions I’ve seen, and I’ve researched a lot of them! I have made this one with the filter pocket and without and in both large and medium sizes. The instructions are clear and concise, easy to follow, and the mask is a breeze to construct. I am thrilled that I ran into this site and I can’t thank Jennifer enough for her time and effort in putting this on the web. Oh, and I had to figure out how to thread the elastic through the beads I purchased and patted myself on the back for being inventive; however, I just read Brittany’s FAQ where she addressed this issue by suggesting fishing line. Guess I’m not as much of a genius as I thought!
I was having problems getting the lining to fit into the outer mask as well, until I did a simple trick. After I cut up all of my material I lay the pattern on top of the fabric and draw the nose and chin darts on the fabric (on the wrong side). Then I take my smaller fabric lining and lay it on top of the outside fabric, wrong sides out. I then line up the “dart” lines. Once they are lined up I take them to my sewing machine and sew both pieces together along the dart line. Then I cut off the excess fabric and turn the fabric so the good side is visible on the front and back.
I rarely add the filter pocket, mostly because I have such a hard time breathing through 3+ layers of fabric. But when I do, I first hem the sides, then add the filter pocket fabric on top of my other two pieces of fabric and sew all three together along the dart lines. Everything lines up beautifully when you turn it over, but this method does make the inside area of your filter pocket smaller.
I hope this helps.
Irene Hayes, regarding use with hearing aids… Sally Jacobson Plumb says
May 24, 2020 at 12:45 am
I wear hearing aids also, and have made many of these great masks. I have found the ties work best. But I make 1 long tie, thread it first from the top down then loop it back up thru the other side…it makes a U shape at the bottom of the mask. When I put the mask on, I put it on sort of like a necklace with the mask hanging in front. When I get to a store, I snug up the mask to my face & pull the ties up at the back of my head & tie them. Hope this makes sense.
You are ahead of me. Will be coming out with a new design for the straps soon. Stay tuned!
Oh. And I scaled down the medium 12 percent if that wasn’t clear.
So sorry you’ve had so much trouble with the fit of titrations mask. I use the medium size pattern for myself, have no problem with the fit, also I wear progress lens glasses, no fog problem. Perhaps you should try the medium size pattern, and make sure the mask is not upside down.
After making several mask this pattern is by far the best fitting.
As a serial diy-er, your site is a great find. But this mask… Thank you so much! I have tried so many templates and this is the only one that is universally comfortable. Donating these to the Navajo, who have been really hard-hit. They need kid-sized masks and this scales down nicely, too at 12 percent.
Thanks Linda for your work to protect others and for letting me know about scaling the pattern.
Thanks so much for the time and effort you put into making the pattern for this mask. I agree this is the “best- fit” mask. I absolutely love this mask.
If I may reply to M.H. Freeman’s comment on June 4, 2020. I find it easier to put both pieces together when marking the “nose” area with a marking pen or chalk. Once the chin and nose area is cut after sewing, it can be a bit confusing to match the sides. Hope this helps… happy sewing
In reply to Loretta G questions on June 7, 2020, I most use fat quarters for making mask. They usually size 18″ x 21-24″. Usually cut 3-4 outside pieces for the medium mask, about 3 large mask. The same if using only for liners as well. When purchasing fabric to cut, 1/4 yd wi get about the same as the fat quarters, 1/2 yds, will get you more. Hopes this helps…
How is the electrical tape holding together in the washer and dryer over time? I’m just about to follow your instructions.
See the FAQs. Holds up fine!
Hi, I’ve now made about 8 of these. I’m thinking of trying one with the large pattern enlarged slightly so husband can fit his beard a little better! , Other than that, we really are liking the fit.
I thought I’d submit my own adventures in McGyvering.
First–coffee bag ties are a brilliant idea! So much so I went back and replaced the wires in the pleated masks I made before finding this pattern. I found pipe cleaners and wire ties from electrical cords or packaging, even doubled in electrical tape, don’t hold up too well in the wash–and we change out and wash masks daily here. I bought extra coffee and pulled old ties off my potting soil bags to use for masks–those things are really useful!
Second–as I was determined to use supplies I had around the house and the hair elastics I had were too short, I ended up going with “t-shirt yarn” for the straps, Problem: I had a some pony beads, but the holes weren’t big enough. I had been making pleated masks with longer straps that tied around the head, so I did that with a couple and it worked all right. I’d also used a single long cord that laced in one side and out the other on one of my pleated masks and really liked the fit, so I made a couple with those. I like that option as I have long hair and the fewer places I have to tie the mask, the less painful it is. On some masks I’ve made I’ve used spring-loaded toggles (these are used on some scrubby soap sacks and as those wore out I’d been throwing the toggles into my sewing basket for a few years) I’ve been determined to try the ear loops, however, and finally got an idea that worked for me. I cut 1/2″ pieces of some 1/4″ flexible tubing (leftover from an aquarium setup, or used as handles on some gift bags if you save those) and was able to make fitted ear loops with the t-shirt yarn. It works very well, and the thin tubing is comfortable behind the ears. I had to make a run to a craft shop today and picked up some oval-shaped large-hole beads (good for kids’ crafts), so on my next attempt I will give them a try.
I am interested in knowing how the bead works. Does it sit behind your ears? Wouldn’t this be uncomfortable.
Or does it hide in fold ?
If anyone can answer this that would be great, I can’t look thru over 14 pages of comments to find that the question is not answered.
Anyone know how much fabric is needed to make one mask? I have a couple fat quarters and just a bunch of other scrap fabric but if I buy fabric approx how much should I get? I know say a yard will make multiples but would it be best to buy say a yard and ???? 1/4 , 1/3, 1/8, etc. Any help I can get would be great. Thanks and thank you for this pattern!
I bought a bunch of fat quarters. Each fat quarter allowed me to cut 3 outside mask templates. (But, not the liners.) Hope that helps.
I have been making these masks for members of Makersmiths (www.makersmiths.org- a nonprofit maker space in Loudoun, VA), family members and friends. The CDC now recommends 3 layers for face masks and your masks have four if a pocket is added and a filter is used! I added your link to our Events/Classes page on our organization’s webpage so members can find it. I know people are using your tutorial since I hear from them and they are very grateful to have the resources. On another note, I teach for Shenandoah University (I am a teacher educator) and last week the university sent Makersmiths two Physical Therapy (PT) students from Shenandoah University to Makersmiths to help us assemble face shields that we are making for health professionals. One PT student had a paper mask on that was way too big for her face. I gave her one of the masks I made from your design and that one had a great fit for her. I was thinking that PT students are doing a lot of bending when doing therapy. I think she will find it very handy to wear during her clinical rotations later this summer! Thank you so much for making this tutorial available.
Thanks for letting me know Diane! That’s wonderful.
thank you. so easy for me to make . changed by using two fronts together . my friends love them they can breath . especially we are over 70 also use ponytail bands and cut and put one on each end so they can tie them to fit. husband likes that,
If anyone can help me it would be awesome. We LOVE this mask best of all. I am not accomplished with sewing machine. I have 2 things I need help with. (1) Brittany easily fits the linings into the outer mask. I have trouble getting my linings in straight and lined up. Is there a trick to this? (2) Brittany easily turns the edges over the lining then inserts the pocket and easily fits that in. Even though I cut lining and pocket perfectly there does not seem to be enough outer fabric to turn and cover as much as hers. Is anyone cutting linings smaller? Thanks so much. SUCH A GREAT PATTERN AND TECHNIQUE!
Hello Thank you so much for this tutorial. I made one mask from another tutorial didn’t like how it came out. I did yours and at first because I haven’t sown in a while I became a little frustrated…but I did it! Not only did I make the one for myself I made a second one for me my husband and for my two girls…my older daughter received one from a store she shops with.
I am grateful for your direction and appreciate you for it. Also I am an RN so I know the importance of this whole situation. I was going to buy some masks but the question of price and quality came into play…thanks to you I no longer have to worry about that. God Bless you and stay safe!
Do you have a picture of how you looped the sides?
No, but there’s a link in the FAQs on this page to my Instagram stories showing it.
Your design is ingenious. Thank you for sharing your savvy.
May your generosity open many new ventures for you. Ann
Hello! I am making this mask for the first time and I noticed that for the filter pocket, it says 2 different things. In the directions on the left it says to Fold over 1/2 an inch but under the picture on the right it says 3/4. Which is correct? I try to follow patterns exactly the first time I make them so want to be sure I’m doing it correctly, thank you!
Follow the instructions on the downloadable instructions. I changed it to 3/4″ to give more room on the sides.
Thank you for creating this pattern and instructions!
I keep touching the download pattern, but it just takes me back to instructions with no pattern. Can you help me
There are some sneaky ads saying Download Here. You should be clicking on the text under Instructions to download it. Then you have to find your download folder to retrieve them.
Thank you so much for this! I have been making these for friends and family heading back to work outside of their homes. One of my friends gave one to her mom who let me know she had tried 4 other styles and this was the first one that was comfortable, breathable and didn’t fog up her glasses. (In New Brunswick, Canada)
I wear hearing aids also, and have made many of these great masks. I have found the ties work best. But I make 1 long tie, thread it first from the top down then loop it back up thru the other side…it makes a U shape at the bottom of the mask. When I put the mask on, I put it on sort of like a necklace with the mask hanging in front. When I get to a store, I snug up the mask to my face & pull the ties up at the back of my head & tie them. Hope this makes sense.
This is the fourth different pattern I have tried–& yours is the BEST! Quickest! Easiest! Best fitting! Those coffee ties for the nose piece is the best–but I can’t buy any more coffee!!! Thank you SO MUCH for making this pattern and instructions available to everyone!!!
Hi Brittany,
I was googling how to make a face mask and came across your video on youTube. I’m not sure how you saw a mask in a pentagon shape. You’re very clever …. and recreative with the simple design. And yup, you are pretty handy. Thanks so much for showing how to adapt and make-due with everyday materials … ingenious. Thanks for caring and sharing the pattern and instructions. Keep safe and keep creating. Luv it!!!
Hi there! I prefer using head ties instead of ear ties. I run one piece of elastic through the “ear loops” and secure with a bead or button at the top. Hope that makes since!
Thanks Annalee! I partially used your idea with the filter pocket option. I sewed the 2 liner layers together as you described, but then proceeded with the original plans of matching the wrong sides of the outer and combined liners together to still have a smooth, seam-free inner mask area. You saved me the difficult task of getting 3 layers lined up correctly. With your idea, I essentially only had to line up 2 instead – very helpful.
Eventually, I ditched the filter pocket option all together over concerns about breathability through 3 layers and a coffee filter. I was afraid it would be reduced to the point of drawing air around the mask instead of through it, which seems less effective to me. I still used 2 inner layers with the outer, but left the second liner flat/un-pocketed. Your idea saved me extra challenges either way. Thanks!
And definitely thanks to you too, Brittany for sharing your much-needed talent in this design and the lengths you went to in communicating the plans well.
Hi I am a captain of a volunteer ambulance corps in Westchester County NY and i have been making your masks for all of our members for about a month now. Thank you very much for a very simple and thorough tutorial on how to make these cool looking masks!
Thanks for letting me know Greg! You’re welcome.
I was looking through comments for one addressing my husband’s issue – hearing aids. The elastic behind the ears plays all kinds of problems with those. My guess is to make the straps tie behind the head?
I discovered the coffee ties work great and have used them on regular masks. Thank you for this pattern. I’ve been looking for a good form fitting one!
Hi there Pretty Handy Girl.
I searched for ages for the right pattern for a mask. I made one of yours a few weeks ago and it’s brilliant! I’m about to make 2 more. I want thank you so much for sharing your pattern. I’m very grateful.
FYI – I couldn’t access any of your wire suggestions but I used three lengths of plastic coated garden wire, twisted together. It worked really, really well!
Thank you again. Keep safe. Keep well.
Liana, Scotland, UK.
Thank you! This was very easy to follow, and the large size fits my wide face. Used some pieces from an old pair of pantyhose for the ear straps. Works great!
I’ve made a bunch of these, they are great. One note, if you make the chin part longer by an inch or more it will accommodate a man’s beard better. I did this for my son and a carpenter friend, covers more. The t-shirt strips work well also, although sometimes hard to get that sending piece through the bead. Great pattern.
Hi Allison,
Thanks for your comment about the size. I also wear progressives and have a small face. I’ll reduce the medium pattern a bit and see how it goes. Also, N95 masks come in 5 different sizes, according to my son, who is a nurse in a Covid-19 unit. It sounds like yours are too large for you.
Thank you, you’re amazing! Much appreciated!
THANKS FOR THE AMZING PATTERN AND VISEO INSTRUCTIONS!
You can buy the wire ties from craft supply places
https://www.clearbags.com/4-5-16-white-adhesive-tin-ties-100-pieces.html
Would love to sew this, but what are the seam allowances on all sides? Hope that this pattern fits. I’ve used other patterns women’s size similar in style, and they didn’t fit, too big. Looking forward for your reply!
Can you show us pictures of the final project and how you altered the loops please?
Thank you! I was wondering if that would work. And thank you for this excellent pattern! I have tried many, and this is the best by far!
Thanks for the great pattern! This is the easiest and best fitting of the 4 patterns that I have tried. I enlarged the large by adding .75″ to the top, bottom, and edge, sewing the nose and chin corners the same as in the large. My husband is finally happy! I made these from old 100% cotton sheets and inserted a filter cut from a HEPA vacuum bag. I used a pipe cleaner in my first washable mask and, after 1 washing, it’s poking through. The coffee bag tie works so much better. And the straps from a t-shirt are a great idea, given the scarcity of elastic. I made them long enough to go through both sides and loop around the back of the head. I happened to have a few of the thingies that are used on parkas and hats to fasten the drawstrings.
With the plastic coating surrounding the coffee bag twist tie, is it safe to put these madks through the dryer after being washed?
Yes, mine have been fine, but you can put it on medium heat or air dry if you like.
I have tried a few different mask patterns and always have issues. I’m new to sewing and I’ve looked at a ton of mask tutorials amd then I came across yours. This was super easy to follow and came out great. It is super comfortable and covers my whole face. I’ve made 3 for myself and 2 for my daughter so far. Thank you for making this easy to follow!
Thanks for sharing your pattern and templates. I’ve been making the rectangular masks for family and friends which are not as well fitting and if you wear glasses they fog up. I have several family members that work in the hospitals and were asking for this type of mask. Going to try and make several today.
Love your masks best pattered ever. Do you have a small template for children?
l apologize for not being able to directly answer your question. Look at the top of the comment thread on the YouTube video (https://youtu.be/-t_Gz3lGwF8) for my FAQ comment which answers your question. You can also get answer directly on this page which was linked in the video description, but here it is again: https://prettyhandygirl.com/best-fit-facemask/
Best pattern so far, I modified it slightly, hope you don’t mind?, instead of elastic around both ears, just one piece that goes around the back of the head. I find elastic at the ears uncomfortable and my husband has hearing aids, so he won’t use a mask like that.
Thank you for the template, I would appreciate it if you could sort a small template for my grand children they are 12 to 14 yrs. I will try to improvise though. I am going to start making the asap, as i am going to donate them to NHS etc, and schools in my area
l apologize for not being able to directly answer your question. Look at the top of the comment thread on the YouTube video (https://youtu.be/-t_Gz3lGwF8) for my FAQ comment which answers your question. You can also get answer directly on this page which was linked in the video description, but here it is again: https://prettyhandygirl.com/best-fit-facemask/
On other patterns that I have made, they call for interfacing against the material that faces outward. Interfacing is available as iron-on or stitch-in-place. It is a non-woven fabric, washable, that will provide a bit of structure to the mask and another filtration layer. Love the idea of using loopers (loom-weaving) for ears.
I love the fast video, most videos are so long and boring
I just made 2. Definitely the most comfortable diy mask I’ve worn and my glasses do NOT fog up! Thanks so much for sharing your pattern and insight. Now I either need to buy more coffee, or some electrical tape.
Definitely the “ best fit mask” of the several patterns I have tried. Thanks for providing templates! I have been making and donating to neighbours, relatives, friends, friends of friends : upwards of 12 dozen to date and this is my go to now!
Thank you for the measurements Maria. Your family seems to be the same sizes as mine.
I came by sone 1/4 inch wide braided elastic today as well. The beads with 4mm diameter holes (aka Pony Beads) are bit too large for this elastic. I suspect beads with 3mm diameter holes might work.
I made six masks with your tutorial! This speaks volumes for you because I do not know how to sew and had to use my machine’s manual just to figure out how to load the bobbin and a few other things too 🙂 Once I got the machine sorted out, I watched your video and read the instructions more than a few times but was able to follow along and successfully completed a mask. Thank you for helping me provide my family with masks and for helping me to look like a rock star to my family!
I actually lucked into finding some 1/4 elastic. Can I use these with the ties and a bead or button?
Definitely try it!
This is a fantastic mask! I know my way around a sewing machine, but am by no means very experienced. It was a little confusing at first, considering i had never made a mask before, but once i got the hang of it, it was extremely easy. My husband has a larger face and so i had to enlarge the large template by 10% (110%). It fit him perfectly. My face fits perfectly in the medium template. I have two children, 8 and 6 and, and i reduced the medium to 90% for them. Works great
Thanks for the sizing tips!
Do I have to use the nose piece wire
You can do what you like, but that’s one of the ways it is the Best Fit.
I have a pretty full face. Would you recommended the large or the medium?
Probably a large.
I was so looking forward to making this mask. Unfortunately the huge ridge pointing out just looks silly. What did I do wrong?
Don’t poke the corners out. Just let them be. Also, when you wash them they will soften.
I love your pattern! It goes together quickly and has become my husband’s favorite. Thank you for putting it out to the universre for us.
Awesome pattern! For the paper clips, did you try the small ones or the large ones? I’m not savy on wire sizes.
I didn’t try either. I know they are the same gauge wire as what I was using. Just cut it to 3″.
Thank you so much everyone I give it to loves this mask. I am making them for older people that are at risk and have to go to the hospital. One lady has to have her pace maker changed in a few weeks.. I lined them with non-woven interfacing. I will make her a few. My sister works in a grocery store and she was so excited when I mailed her some.
Your Kindness and caring is appreciated
Sheila Baggaley Ontario Canada
I have made the large mask and it ended up having big gaps at the side. I am not a sewist and found it really difficult. Can I send pictures of the mask, so you can see and maybe figure out where I went wrong. Also, I used 12 inches of elastic for each side, but it seemed a little short.
Does your ear straps move freely on the sides? It should so the fabric can gather when you pull the ear straps. Try pulling the straps so the fabric gathers on the side before adjusting the bead.
Thank you for the free pattern, easy to sew and directions and tutorial is great. I am having a problem through. My chin area is very pointy. I have made both sizes and they keep coming out that way. Unfortunately on it doesn’t look anything like yours. What am I doing wrong??
Don’t be so diligent about poking the corners out like you would with pillows. IT will also soften when you wash it.
Copper wire won’t rust but it will oxidize (when it turns that bluish green color) and that color might transfer to your mask material.
It shouldn’t transfer to the mask if it’s encased in electrical tape as I instructed.
Love this pattern. Takes longer than other patterns, but I like the “completeness” of this. I’ve made several for my coworkers. 🙂
I have yet to make this mask but have been sewing the pleated pattern with a tuck under the chin. Thank you for the clear instructions and template. Your site is very easy to access. ~Quindi
Would love to have children’s patterns ASAP
l apologize for not being able to directly answer your question. Look at the top of the comment thread on the YouTube video (https://youtu.be/-t_Gz3lGwF8) for my FAQ comment which answers your question. You can also get answer directly on this page which was linked in the video description, but here it is again: https://prettyhandygirl.com/best-fit-facemask/
Barbara Caralis, how are you making a pocket for the nose wire?
Thank you so much Lewis! This is very helpful!
I found some 6×9 mm craft beads on Amazon that have a 4mm diameter hole (B076NL4V3Z). These work well with shoe laces (no-tie elastic oval or flat braided, plain cotton , polyester [Kiwi]). They are a bit small for 5/32 inch (4mm) military spec paracord unless you remove the core fibers. They should be about right for commercial 1/8 inch (3mm) paracord. Avoid beads intended for stringing (bracelets, necklaces, etc). They typically have holes that are 1 to 2 mm in diameter.
I can not comment on “1/4 inch flat braided elastic” as that has been unobtainable for weeks.
Image:
http://www.keywild.com/facemask/Bead_on_shoe_lace.jpg
What is the size of the bead opening? 7mm? The 9mm beads used to braid hair are too large. I love the design of this mask and the adjustable elastic ear loops are great! Can it work with 1/4″ flat braided elastic as well? Thank you!
l apologize for not being able to directly answer your question. Look at the top of the comment thread on the YouTube video (https://youtu.be/-t_Gz3lGwF8) for my FAQ comment which answers your question. You can also get answer directly on this page which was linked in the video description, but here it is again: https://prettyhandygirl.com/best-fit-facemask/
Does the pattern include the seam allowance or do you add it on? also my son and husband have big heads. Will the large fit ?
Yes, the pattern includes seam allowances. I have no idea if the large will fit your family. It’s best to make one to see. If it doesn’t you can print your template a little larger.
I have reproduced the patterns on pages 6, 7, 8 and 9 in vector based DWG, PDF and SVG formats. This includes full size flat patterns but those are formatted for legal size (8.5 x 14 pages). You can download a ZIP archive of these files from:
http://www.keywild.com/facemask/Better-Fit-Face-Mask(DWG-PDF-SVG).zip
“Envelope? of fabric in the front that holds the nose thing. ”
I put a small button hole (3/8 to 1/2 inch) in the face of the mask. The nose piece can be inserted and or removed via the button hole.
I have had a few bend in the washing machine. May have had something to do with the denim jeans in the same load. I now make a button hole to insert and remove the nose piece as needed.
This is a GREAT tutorial!! Thank you so much for this design! I feel it is so much of a better fit, coverage, and adjustability! I’ve passed this on to other women so they can make some for their family and friends.
I am wondering if you, or any others have washed these and if there has been any issues with the wire? How does it wash and dry over time? I was concerned my wire would poke through even folded over. I wrapped it, and made an enclosed cloth sleeve for it, before tucking it in the seam. I’ve washed and dried once, and so far so good.
If anyone could share their washing technic and experience, Id appreciate it. Thanks again for the great mask making lesson! Stay safe, stay well.
I’ve thrown mine in the washing machine at least 7 times now. No problems. I do dry it on medium heat just in case.
This was a really great tutorial and pattern. I’ve made several masks and this is by far the best. I’ll be making more! Thank you!
Thanks for sharing I have made many of these now for family and to donate they are excellent masks and I’ve received many compliments on them for fit and style. The pattern was easy to follow and the size is excellent for most people. IT IS EASY TO ADAPT TO ELASTIC OR USE TIES. AGAIN THANK YOU SO MUCH. ROBIN
I’ve been sewing pleated masks with ties because my husband, a retired surgeon, hates the masks with elastic. But I just tried your pattern and really like it. It does fit tighter to the face and is easier to breath through. I’m using 18 gauge copper wire because it’s bendable and won’t rust after many washings. I just curl both ends under and sew it into a pocket at the nose. Once it’s been fitted to the nose, it keeps it’s shape so you don’t have to keep bending it. I’m using sport shoe laces for the ties, sometimes described as oval laces. They are just a little stretchy and more comfortable than elastic. And they fit perfectly in pony beads which I already had a bag of. Thanks for the tutorial. I wish you would offer some patterns for smaller faces because my printer doesn’t reduce.
Working on a small shortly. I finally have feedback from other makers who fit them on children.
I plan on making some masks to donate.
I just made my first mask using this pattern. My previous ones were more like fabric surgical masks, hard to breathe. This one is so much more comfortable. I love the adjustable elastic ties, great idea. Thanks for the video, pattern, and detailed instructions! Who knew we would be so excited about face masks??
good idea. I always tend to make things harder than they need to be. I was thinking applique but that seems like it might be hard to add. Again…thanks for posting the pattern/video and all.
I just wanted to say thank you. So far I’ve made 12 masks for my family and friends and have enough material for at least another 12. I’ve been recycling old blue jeans and t-shirt for the projects. For the nose piece I used plastic covered large paper clips (cut to lenght) covered in duck tape. You’re right, they fit perfect. I’m still waiting for my elastic cord to come in to make the ear loops, but hopefully if Amazon is nice I’ll get it soon. My daughter did the flame test on them and they passed with flying colours. So she was very happy. Again thank you, great work.
Thank you for your efforts. Best mask design I have found. I get many comments when I wear it. Made two small changes. We clip the corners of the coffee tie to prevent it from poking your cheek at the ends. This may depend on the weight of the material used.
We had a hard time finding beads the correct size for the ear loops. (ear loops made of 4mm (3/16″) bungee cord) I tied a reef knot (square knot) to join the two ends and then slid the knot inside the pocket. (this makes them adjustable). Found the bead was not that comfortable and kept sliding.
I’ve sewn several different patterns since I now have to wear a mask everyday. And your pattern is the best. Now after making some, I would like to make some fun ones with animal noses/mouths on them. Any suggestions?
Use fabric paint! And please send me pictures. Sounds like a cute idea.
Do you have a pattern for a child? Age 10 years old. Would the medium be too large?
l apologize for not being able to directly answer your question. Look at the top of the comment thread on the YouTube video (https://youtu.be/-t_Gz3lGwF8) for my FAQ comment which answers your question. You can also get answer directly on this page which was linked in the video description, but here it is again: https://prettyhandygirl.com/best-fit-facemask/
Wonderful, thank you for your quick reply and helpful recommendations! Best wishes to you.
Thank you so much. I’ve tried several patterns and ideas. This was my favorite !!!
How do they work for people with glasses?
Mixed reviews on glasses. It’s hard to wear a mask without glasses fogging. The wearer may have to try to adjust glasses on top of or not on the mask. But, I’ve had good luck when wearing safety glasses and a mask by rubbing dish soap on my glasses. Then buff off with a dry rag. Instant Anti-Fog!
Hi there. I got interested in sewing years ago but didn’t have time for it. When there was a need to make face masks I figured it was a great opportunity to pick it up again. I made a few of the ‘pleated’ face masks with a material that wasn’t great, and then I went searching for a better pattern because I knew some smarty had come up with one. This is it. In my opinion, this is it. This mask is shaped but VERY easy to make. This was the first thing that I have sewn that I was pretty fricking proud of. I’ve ordered materials to make more for my family so thank you soooo much for this pattern and tutorial (in three formats no less!). You really couldn’t have made it easier. I printed the PDF and had your video playing in front of me also. I might make some modifications in future masks for straps/elastic, but I’ll absolutely be using your pattern as a base. Anyway, I just wanted to tell you that you inspired me to get excited about sewing again (and woodworking since that’s something I’ve wanted to get into for a long time).
Thanks!
So glad to hear this Brittany! And thank your parents for spelling your name the “right way!” 😉
Thank you for your excellent pattern, which really fits well. I have been cutting the inner pattern from both the woven cotton fabric and non woven interfacing, to make a non removable “filter” layer, sandwiched between inner and outer pieces. I make bias tape/nylon cord ties, instead of ear loop, but to keep from having to re-tie, I make sliding knots (midshipman’s hitch knot) using the right side ties held together knotted around the left side ties also held together. This makes two long v shapes that meet in the back of head, and each left side tie can be pulled to adjust. Stitch one line horizontal across the center of the tie casing to anchor tie but allow for the gathers along cheek. Nylon cord, slightly smaller in diameter than paracord 550 can be used as ties, and wire garden ties covered In foam tubing can be used as nose bridge, which I hope holds up to washing better than pipe cleaners as they are made for outdoor use. (Ran out of coffee ties)
For the person worried about raw edges by the nose bridge, this design also works well cutting both inner and outer fabric out of the outer pattern only. After sewing the darts, place right sides together and sew along top and bottom edges, turn inside out,and slip nose wire in place, topstitch below the wire.
Again great pattern and will do better than other masks at protecting because there is less gapping.
To make the earloops adjustable, if you don’t have craft beads you can just tie a sliding knot, as here: https://www.youtube.com/watch?v=yo8U-P54iDc.\ The person who made this video used yarn for her ties, but I do it with ties made from strips of old tee-chirts. Great pattern–truly the best fit.
I have two questions: if using the electrical tape and wire method for the nose clip, are there concerns as to how well the tape will hold up after multiple washings? Also, if wanting to include a filter pocket: could the liner be omitted and the filter pocket serve as both the filter pocket and the liner? That way there would only be two layers of fabric in addition to a filter. Your adjustable ear straps are GENIUS! Thank you for sharing your amazing hack! Thank you so much for your tutorial, I look forward to reading more of your blog!
Yes, the electrical tape and wire washes fine. Frankly the wires will snap after multiple bending before the washing will do any damage. I think it’s best to have at least two layers between you and the world. Since the filter pocket has gaps on the side I’m not comfortable recommending only two layers.
Just a note, for us beginners or visual people, it would be nice if the video showing how to put it all together didn’t run at top speed. I’ve printed the directions, but still need visuals of the real thing. Talking is fine, but the instructions way to fast unless you are an experienced sewer. I was sure this would be the ONE, but with limited fabric, I may have to give up.
The video is purely to give you more visual assistance. You can slow down the video by selecting the gear symbol. But, you really need to download and print the instructions on this page. That’s the appropriate tutorial to use.
I love this tip, Annalee, but wondering about something…. doesn’t matching them up as described, sewing, and trimming, leave a raw edge on the inside of the face at the nose and chin area? If so, do you do anything with it? If not, what step am I missing? 🙂 And I totally agree… I have tried many designs and this is the BEST! Thanks, Brittany!
I’ve tried several patterns and this is the only one that doesn’t slip off my nose when I talk (or breath). I found that you can eliminate the liner layer and just use the filter holder as the liner. That way you don’t have 3 layers of fabric plus a filter. I have one tweak that I’m going to try – I saw a designer’s mask that had a tube? Envelope? of fabric in the front that holds the nose thing. This way you can use whatever you want (they use a twist tie) and remove it to wash the mask. It will make it easier so I don’t hold my breath every time I’m sewing around the wire, worried about breaking a needle. I also want to try one with elastic around the head rather than the ears. I’ll let you know how these work!
Id love to buy in Uk iam 3 weeks still recovering and not a good sewer have machine ext wish could buy one like this in UK cant seem to find any , thanks iam going to attempt now out of organic white pillow case I have , Thank you for this tips and hope to get people well with them again , thank you just hope I can do this .
With the www bringing us all closer I have found your mask to be the best fit ever, and even I (a rank beginner) can make them with your brilliant explanation and notes. Thank you from Cape Town!!!
Just a quick tip for anyone having trouble finding wire that won’t hurt. An N95 mask leaves deep ridges on my face and bruises my nose bone. I can’t wear underwire bras because they irritate my ribs (I’m pretty thin), so I took an old one and cut the underwire off to 2 1/2″. Then I wrapped it well in a soft cotton fabric which I kept from unraveling by winding thread around it. It was fat enough that it just barely fit in the space allotted and was so wedged in there that I didn’t need to sew the vertical lines to hold it in place. Anyway, it works well and doesn’t hurt my nose. Nice mask, works well.
Perfect explanation!!! Thank you, Annalee.
Hi Joyce,
Sew the channels on the left and right side of the mask as described in step 9. Then take your piece of tie material and put a safety pin on the end or paperclip or something to push it through easier. Thread the tie down through the channel on one side, then up through the the other channel on the other side. You should now have a loop of the tie material on the bottom (chin) side of the mask and two free ends on the top (nose) side of the mask. To put it on, put the loop over your head like a necklace with the lining facing towards you and the top (nose) side of the mask facing down towards the ground. Then pull the ties up towards your face so the mask rests against your face snugly. Tie the two free ends of the tie on the top of your head and press the nose piece to conform to your face. To remove the mask, untie the tie at the top of your head, loosen the loop at the back of your neck, and pull it over your head. This way you don’t have to touch your face when you take it off. I hope that helps!
Annalee, please, please explain how to do the single tie that loops through the mask and ties at the top of the head. I just can’t visualize it.
I would like to try it as I do wear glasses, can’t wear elastic and the mask needs to stay on.
Thank you so much.
Hi! Thanks so much for this design. I don’t know if anyone has mentioned it yet, but to save 2 steps, mark the areas to trim off on both the liner and outer material, put them together folded in half (outer material is right sides together) with the lines matching up, sew the lines, and then trim. That way you don’t have to do each piece individually, and they are already matched up at the points, which was the trickiest step for me. Let me know if that explanation makes sense – I can describe in more detail if needed.
I use a single tie looped through (so it ties at the top of the head) instead of the elastic and it works great. The people I’ve given them to have remarked on how comfortable the masks are and how they work well with glasses. I’ve tried many designs and this is my favorite.Thanks again!!
Thanks for the tips!
This is my third attempt to make a good mask, and BINGO . . . It’s a winner! Thank you for being so thorough, and easy. Making them for my entire family, and then some. The fabric I used was thinner than what is required, but I added an inner liner of what is called diaper material (available in a package in the sewing craft area at Wal-Mart). It is soft, dense, and just perfect. Easy to breathe through.
To fit the paracord through the beads try striping out the iner core fibers (usually 7 strands of nylon). That should reduce the bulk of the cord by about 1/3. Some paracord is made with a polyester braided sheaf. Polyester will stand up better than nylon to a hot iron (300 vs 150 degrees fahrenheit).
Common cotton shoe laces are about the same size and less expensive when purchased locally. Of course they have no inner filler that can be removed 🙁
How should I make adjustments when making the masks for my children. My boys are 5, 7 (down syndrome), and 11 years old.
I’d suggest trying to play with reducing the size when you print. I don’t have patterns for kids because as you know they have different size faces. And we are doing our part by staying at home and social distancing so I can’t test on anyone.
What size craft beads did you use
Linked to the beads on this tutorial page. Did you miss it? Also look at the FAQs.
Hi, can anyone help me with this template. How would I use it for a cricut maker. Has anyone used this template in one of their cutting machines. Any help is much appreciated.
Thanks everyone 😊
If anyone is wanting to get the coffee bag ties, they are available in bulk on amazon and are called Tin Ties!!!
AwePackage Peel-and-Stick Tin Tie – 5-1/2 inch (Black, 100) https://amzn.to/2Ya1MUW
Do you sell your masks
Database of sellers is listed on this same page under FAQs. I don’t sell mine, I’ve only donated the masks I’ve made.
I love your video and I have made a mask already and I love it! Is there away to cut the pattern out on my Cricut?
Brittany,
I cannot thank you enough for this pattern. I’m a quilter, with a stash, so have been making masks since the beginning of the call for masks. I started out making a mask from another pattern which looked like it would work great, but slid off people’s faces. Many, many hours wasted there. Now I am remaking them for all those people using your pattern, and to a person, they are telling me how much better they are. They are quicker to make, needing some carefulness around the seam enclosing the nose piece, but that nose piece is the key. I don’t have beads so have been cutting a one-piece strap 24″ by1.5″ of a soft knit material, I think it may be rayon, feeding it upward through one side and down the other side. I tell the recipient to tie a square knot on the bottom part of the strap to custom fit. I tell them to be meticulous in the removal of the mask, to not let it touch their face. It fits well and does not slide off. I use a large safety pin, threading the end of the strap through the hole on the bottom of the pin rather than piercing it with the sharp point, and it works. For the fabric, I’m using batiks since they are closely woven and have a silky feel. The other things that are helping me make these quickly are tracing the lining piece onto the outer piece, and then pinning the liner in place, since the 3D nature of the mask at this point makes it otherwise a little difficult to line up the two pieces, and making sure I put paper clips on the top side of both the outer mask and liner before I make the darts, so I can tell the top from the bottom.
Thank you again, you are a hero in the mask making world!
Deb
We found a great product for the nose clip! Thank you for your design! It is a great fit better than our other attempts. We were looking for something to use for the nose clips. We can only drink so much coffee! We are using a product called strong line. It is a flat steel wire that has been coated with copper. It is used for stained glass window construction. I had it for my stained glass hobby and it is perfect. A 25 foot roll of .114″ wide by .02″ thick costs about $15 with shipping from Amazon. Our thought is to use white electrical tape to mount it to the cloth then stitch over the tape to keep it in place.God Bless and keep safe!Erin & Brent Perkins
Thank you!
Thank you for creating this! It’s the first mask that fits well.
Brittany!!!
You are a genius!!! Thanks!!! I tried 2 other types of masks and was completely unhappy and unsettled with myself about making them-I did not believe they were safe. Keep up the great work and continue to be smart, safe and healthy.
For people without elastic, beads, or a good nose band-I used t-shirt strips that I knotted on the ends and created a slip knot that is adjustable for the ear straps. I am using 22 gage plastic encased-double strand wire (made in the USA) that I cut to length with a pair of side cutters and then wrap the wire in electrical tape. Genuis!!!
Thank you so much for this pattern/tutorial. The masks turn out very well and your instructions were easy to follow. You obviously put a lot of time and thought into this project. Pretty handy and smart! (Going to make the detergent next).
Hi Linda…..so, when it was secured, there was only one tie at the back of her head and it was at the top of her head?
She basically threaded one cord through the casing, top to bottom on one side and carried the cord through to the other side casing bottom to top????
Hope you can follow this. I can’t wear the elastic so I need ties and want them to be secure.
Hi I don’t have a printer fabric button beads ties wire filter ears or a face. Can you help?
JK!!!
Thanks for this, it’s my favorite.
Ha ha. Thanks for the laugh.
I tried that too, but no luck
could not download and print the templates
I’m sorry I don’t know how to help you. The link is on this page under instructions for the template and instructions. Click on the link, and print.
I got your site address from the woman six feet in front of me at these wing store because I liked her mask so much. She adapted the tie to be paracord that went through one side, around the lower back of The head, back to the front and through the other side of the mask, then tied at the upper back of the head. One piece of paracord for the entire tie! She made it long and connected the ends together so it was one big loop, then used a bead to hold it at the right tightness. Do you have any suggestions for this?
Make the mask as directed, then feed the long strap through the sides instead of sewing two smaller straps through. You’ll have to play with the length of the straps since that isn’t my design.
So, if the square (on the pattern) measures exactly at one inch….then the the mask pattern is (true) the correct size?
My printer prints a little larger and I want to make doubly sure before I cut as I don’t have a lot of fabric.
Thanks!!
Correct. The square must be exactly one inch.
What do you mean by scoring?
Use something (tips of scissors, butter knife, pencil, coin) to run (not cut) along the line to give you a clean fold.
Make sure you check measurements with your printer, I had to print at 104% to get correct measurements/inches.
Wow, love this mask, used flannel for liner and added cotton filter pocket. MAKE SURE you check the measurements with your printer, I found I had to use 104% to get proper measurements. Glad I checked, before I made a whole mask the wrong size. Get your ruler out.
Thank you for sharing this. I have been making masks for my family and this gives me another style to try.
Thanks for developing the mask pattern. My daughter and I have sewn about 80 with you pattern, for family and work family.
Wow! That’s great!
I cannot find the template
It’s on this page. Look for the download instructions link.
Do you have this pattern for 3-4 year old and 7-8 year old?
As mentioned on this page: “Because children are a wide variety of sizes, you will need to downsize the template by printing the medium mask smaller. From limited testing, we found reducing the medium mask by 12% when printing yielded a mask that fit a four year old, but was still too big for a two year old.”
Thank you so much for posting this, it is the fourth design I tried and by far the best, adjustable ear straps are genius and nose wire hack with electrical tape and picture wire works great. I cut up an old pair of ladies winter tights to make the straps, nylon fabric is perfectly stretchy and one pair of tights yields a multitude of straps. Use a toothpick or other small skewer to poke ends through the bead, works like a charm. no need for separate filter pocket, cut up a coffee filter to fit or insert surgical mask, fits nicely inside without needing the pocket
Dear Brittany:
What would you modify on the Large size Exterior and Liner templates to turn it into an XL face mask? My husband and I fit the Large size but my son requires the XL for his long face. Thank you!
You’ll have to try printing the template a little larger and check the dimensions of their face against the template.
When cutting out the fabric pieces for the mask, it sounds like I can put the long side of the pattern on the fold creating one piece OR I can cut two pieces and sew them together making a seam on the long edge. Do I need to subtract the seam allowance from the pattern if I use the one piece method or did I misunderstand completely?
No, you’d need to add a slight seam allowance if not folding the fabric.
Do you have a youth sized template?
No, please read my explanation under the template size section.
This is the most through and well written tutorial for face masks I’ve read/seen anywhere: patterns, video, diagrams and alternate materials. It must have spent weeks to create. Thanks to you, I was able to find an elastic substitute and make more masks. You’re awesome, Brittany!
I want to put a filter inside the filter pocket. Does the pocket have an opening in which I can slip a filter paper? (I’ve read that a HEPA classified vacuum bag is made of material that will keep the virus out.) Do I cut the filter paper the same size as the filter pocket? Please give me guidance. Thank you.
Yes, please download the instructions. Be careful, vacuum bags may have fiberglass in them. Please do your research, I’m not qualified to offer advice on filters.
I just make the inside liners on the wrong side of the fabric. That way the inside is obvious because the pattern is not as bright. Thanks for the pattern.
Thank you for this wonderful tutorial. I was wondering if there are dimensions for children? Thank you!
No, we don’t have any to test the fit on. See this explanation in the tutorial: Because children are a wide variety of sizes, you will need to downsize the template by printing the medium mask smaller. From limited testing, we found reducing the medium mask by 12% when printing yielded a mask that fit a four year old, but was still too big for a two year old.
I can’t find templet to print
Directly under instructions: Labeled ->(Download Printable Instructions and Templates Here)
I watched the tutorial and read instructions- but can you please clarify for me if the filter pocket has an open edge when mask is complete? (For inserting and removing a filter before/after washing) I’m a novice sewer and I couldn’t tell when looking through all the instructions and video. Thank you very much!!
Yes, if you add a filter pocket it is not sewn on the sides.
I’ve reviewed quite a few patterns and instructions for masks and really like this one. One question though, does it really need a liner if you’re going to add a filter pocket? Your pattern without filter pocket is two layers of fabric, with filter pocket it is three layers and then adding the filter itself makes it four layers. If you just had the outer fabric and the filter pocket you would end up with three layers including the filter. I may experiment and try it but I’m just curious as to your thoughts on this as I’m sure you’ve made lots of these already.
Thank you for this pattern. It is easy to follow and truly fits the best of any that I have tried. I am going to try a slight modification to the nose wire – I am going to sew a small pocket over the hem to the wire is removable. I was already planning on using the 2 prong fasteners for file folders – when I saw that someone else recommended. I am making an 85% and 75% versions for my grandkids – 2 and 4 years old – will see if that works.
I have made these masks with some minor changes and they fit very well. I didn’t like all the folding and my wife doesn’t want ties behind the ears since she has to wear them for a very long time every day. So I used the “filter size” and bias taped two small pieces on the side to join the panels, and a 40″ piece of bias tape on the top and bottom for the ties. Works great! Thanks for sharing.
Do you have a child version of this yet?
As posted in the instructions, I do not have children’s sizes: “Because children are a wide variety of sizes, you will need to downsize the template by printing the medium mask smaller. From limited testing, we found reducing the medium mask by 12% when printing yielded a mask that fit a four year old, but was still too big for a two year old.”
Going to try your mask. I like the simplicity of it. Suggestion: For nose piece my nephew, who is a general construction contractor, cut 1/4″ strips from siding trim wrap whic we cut into 4″ ipeces for the nose piece. Then we filed the ends rounded and smooth the for comfort. They work wonderful, sturdy, plyable and practically indestructible!
I just want to say thanks for an awesome pattern! I’ve been sewing masks for friends and family for the past few weeks but ran out of elastic this weekend. I came across your mask and am using stretch knit as the ear loops and it’s working out great. Yours is much better fitting than the prior pleated pattern I’ve been using. Thanks SO much for sharing this!!
Your video, instructions, and pattern are the best thus far!
Brittany, Your mask pattern is brilliant. I evaluated a lot of patterns online before I chose yours. And you’re right, it does fit better. After making several of yours, I went back to try a different pattern in the hopes of eliminating the fogged up glasses problem. Not only did my glasses still fog up with a pattern where the mask swooped down under the eyes, but it was terrifly uncomfortable, so I just have to have fogged glasses. Things I love about your pattern: 1) The incomparable coffee strip for the nose piece. 2) The craft bead to adjust the elastic ear loops. 3) Finally, the way you attached the mask outside to the lining with wrong sides together and the outside fabric double folded over the edges of the lining. Other masks that are sewn right sides together, turned inside out with the edges top stitched don’t achieve the clean finish your does. Having sewn automobile upholstery many years ago, I appreciate the elegance and simplicity of your design. Bravo.
What size do I make the filters that insert into the mask? Thanks
Cut to size and fit inside the filter pocket.
Thanks so much for sharing. Are your masks for sale?
No, this is a list of sellers who do: https://docs.google.com/spreadsheets/d/1a6yqchGZJVuaUw1K2iezY_2ABViFSjog64OmsAEtkjo/edit?usp=sharing
I want to thank you. I feel this is the best one yet. I am not the best sewer and I love your mask.
You are only just brilliant! Great design and instructions and your tip for using fishing line to thread the elastic through the bead worked so well it made me smile. Thanks a million and keep well.
Iam not very phone savy I’ve tried repeatly too get the measurements too come up so I can write it down . I have no way too print or go anywheres too get it printed out. Help please.
The dimensions are on a download scan of the masks in the tutorial under Instructions.
Yes same question as Joyce: Suggestions for using straps instead of elastic to tie at back of head and neck? Sew at each corner or thread through the sides? Length of straps? Thank you!
Thread through the sides and use t-shirt strips or shoe laces or whatever you like.
Is it possible to get the template information with dimensions. I don’t have a printer.
Mitch Regal
It’s right there in on this page. Look under instructions to download the scan with dimensions.
I have very little sewing experience, but I was able to use your templates and make masks for my family. Thank you so much! I even gave my neighbor and extended family some because they are a great, comfortable and necessary design.
I’m curious how the adjustable strap is with men since many have short hair or no hair to cover the excess strap material.
Really? I seriously doubt anyone is concerned about the ear straps when there is a big face mask on their face.
Hi, Joyce. Co-workers and I just finished making several masks for fellow workers. You could make fabric straps (or use bias tape) or use shoe laces. If you want to sew them at the corners you will need 4 pieces each 18″ long. Fabric or bias would require sewing along the edge and on the ends not sewn into the seams. Flat athletic shoe laces are a time saver. If you are able to get the 36″ laces, cut each in half and sew cut end into seams at corners.
If you sew the side “channels” like Brittany demonstrated, 36″ long ties should work well. But the challenge would be figuring out how to keep them from pulling out when you are tying them. Making ties or using shoe laces may make them too thick for fitting in a craft bead so you may have to devise a different system so you don’t pull them out of the channels when you tie them – top first, then bottom ties. It might work better to find the halfway mark of each side and tack the ties in place with a bar tack or a line of stitching through the channel and tie to keep them from pulling through.
Good luck!
HI, Joyce! Co-workers and I just finished sewing a bunch of pleated masks for my place of work. (Wish I saw this one first.) Stores here were sold out of elastic, so we made ties for some of them using bias tape or cutting strips of fabric. If you sew them into the corners, 18″ lengths for each one works well. If you use bias tape, you need stitch the edges before you sew them to the mask.
What worked best for our project were flat shoe laces. Users are saying the shoe laces don’t slip as much as fabric or bias tape ties. If you get the 36″ long laces and cut them in half so you have 4 pieces 18″ long – one to sew into each corner of the mask – you have a nice length for tying bows.
Or you can leave the 36″ laces intact and slip one through each channel after you sew them to the mask.
For the same price as the 36″ laces, I picked up some 54″ laces knowing that they will make ties for one mask and leave me with 2 ties without tips that I can pair with leftover portions from another set of laces. I just have to remember to finish the one end on each of them with a little sewing so they don’t fray.
Can’t wait to use the shoe laces on this pattern. I like the way these look like they fit. And my husband and I both wear glasses…the nose wire should help the masks fit better under the glasses. Starting that tonight!
I need the actual
Measurement of the template I have no printer
Read under the instructions section. There’s a downloadable scan with measurements there.
Thank you so much for putting this together. I want to start making these this weekend. Approximately how much fabric do I need per mask? Thanks!
Less than a fat quarter.
I like this design and especially the tips on nose guards. The measurements for the liner seem inconsistent: in the text you advise folding the fabric 1/2″, and in the drawing the same fold seems to be 3/4″. Could you clarify?
Use the directions in the downloadable instructions. They are more refined.
Thank you so much 🙏🏻
Hi! Can you please tell me… How did the electrical tape stand up in hand washing the mask? Thank you.
Gale, it washes fine. When adhered to itself it provides a decent water-resistant seal. Frankly the wire will break before it breaks down in the wash.
This is nice! No one seems to address the nose thing. I made us pretty nice no-sew masks but if your glasses are fogging, it’s not good enough. I cut a sponge approx 1″ square by 4″ long, put it over the bridge of my nose and tied the mask on tight. It’s from a big soft sponge, one sold to wash your car. So now, I put that piece and coffee filter inside a bandanna. Working.
Suggestions for using straps instead of elastic to tie at back of head and neck? Sew at each corner or thread through the sides? Length of straps?
awesome idea
Hi, I made two masks today with a few modifications. Using the medium liner pattern, I added a quarter inch seam allowance to the edge so it would easier to sew the outer piece and the lining piece right sides together and then turn out. The lining piece is overlocked on the outer edge near the casing. I can then turn the ends of the outer piece to the inside, stitch a casing and insert t-shirt knit tie. Great pattern, I like the fact that the center seam is on the fold .
My masks have been donated to a local senior care center and the local food bank.Thanks
So,- I was only able to find paracord – which has no stretch – but still worked out fine. A helpful hint for anyone trying to get cording or whatever through the bead , try folding a pipe cleaner in half and using the same way you would a needle threader . It worked for this 4 mm paracord! Thanks for the mask pattern and tutorial !
I haven’t sewn in years. For someone like me, the video went way too fast to follow without starting and stopping frequently.
The video is just for visual guidance. You should download and print the instructions so you can make them at your own pace.
Great idea for ear ties and nose belt. We can’t go out in this time of lockdown nor the shops are open. Even online is restricted to groceries and vegetables. At such time we need to recycle. Thank you very much for sharing the recycling ideas. Bless you dear !
Vijaya
From India.
If I want to be able to put a filter in and take it out (coffee or vacuum hepa filter), I’m assuming I can hem the lower edges of fabric (front and back) but not close it up. Would that work?
Try it.
Do you have an extra large template? My husband has a beard and we are trying to get below the beard.
No, but try printing the large template larger or alter your template.
What are your fabric recommendations for the liner layer please.
Any cotton fabric is fine.
I made two of these today and they came out great. The directions and video were good and easy to understand. Thank you!
What size beads would you recommend
The beads I use have a 4mm hole.
Thank you for this pattern! I will be making gor my family and friends!
I have tried many other patterns also. I like this one cause all the sewing is very straightforward. My issue is having to make masks for many family members, so the faster and easier, the better! Also the suggestions for adjustable ear fastening are great. No elastic available locally so I’ve been making fabric ties for my prototype masks…tedious!. One suggestion: I am going to use one layer of non-woven interfacing (Pellon) sewn into the lining layer to provide a good barrier layer without the extra bulk of the filter pocket layer. And will try scaling down the pattern for toddler sizes and older kids sizes. I’d love it if you could do that, since you would be much better at it than I am.
My only issue was that the instruction sheets did not print out, even though all the pattern pieces as well as the gridded ones did. Finally, you had me when you said you were a contractor and builder and you preferred your own masks for construction. I was glad to find the simple and clear directions that your background made possible. I’ll use the online tutorial for directions. Thanks so much!
Because children are a wide variety of sizes, you will need to downsize the template by printing the medium mask smaller. From limited testing, we found reducing the medium mask by 12% when printing yielded a mask that fit a four year old, but was still too big for a two year old.
Thank you for your tutorial. I is very easy to follow. My question is the electrician’s tape. Mine must be old and came open. Will Duct tape work? I was wondering about laundering it.
Yes, use what you have. Duct tape is a good substitute.
I found an alternative material for the nose bridge piece. Try the 2-prong paper fastener bases for file folders. They come in 100-pc boxes and can be purchased on Amazon or at an office supply store. They are very firm, but flexible and hold up well when washed.
How do I made the slide with a button and twine?
Thread twine thought the button and tie it making sure the strap material can still slide through the twine, but also tight enough to hold the strap material at the desired size.
Hello madam… what are the size dimensions of the outer and inner template? I dont have a printer and libraries are close .
Read the page more carefully. The link to the dimensions and a scanned template on graph paper are included in this page under Instructions.
Do you sell your masks
No, but this is the database of people who do: https://docs.google.com/spreadsheets/d/1a6yqchGZJVuaUw1K2iezY_2ABViFSjog64OmsAEtkjo/edit?usp=sharing
Thank you for your tutorial. I will try to use pipe cleaners, but I am laying 3 side-by-side, flat-taped together. I will let you know how it turns out.
I used a stretchy fabric headband, sewed two 3/4” buttons on the headband just above the ears. Then the mask straps wrap around the buttons. Great for sore ears as well as your one ear issue.
Thank you!!! I have spent countless hours… literally weeks looking at mask patterns and tutorials; the reviews as well as CDC, doctor studies, university prototypes… it’s exhausting. I attempted a dozen masks and none fit right, moSt were way too big for my face and then the same one… too small for my husband. One adult one was just a tad small on my nine year old.. So, I gave up!! Until a friend requested a mask; which also was horrible and I came across this one. It’s perfect!!! Thank you!!!!!
So good to hear!
I just came across your instructions and your face mask looks like the most comfortable of all that I’ve seen online. I plan to sew one this afternoon but I have one question. I have a relative who only has one ear. Any suggestions on how to reconfigure the ear elastics such that the mask stays on. Perhaps something around the neck and/or over the head. Looking forward to your ideas. Thanks.
Absolutely you can use straps that feed through the sides and will tie behind the neck and head. Just make sure the straps move freely through the sides so it will gather to keep a good fit.
I thought about doing this as well. Use two different fabrics, but cut both pieces to the outside size. I plan to experiment after work today. I will let you know how it goes.
A SAM splint is foam padded aluminum which is moldable and holds its shape. I have been cutting narrow strips off the end for my nose pieces. Very comfortable to wear. I make the slot open at one end so I can remove the metal before laundering the mask.
I was just asked if the tape would stand sterilization
This is the best video my friend and I have seen!
I am an experienced sewer and designer of sewing patterns. I followed the instructions to the letter. I used the medium pattern to exact scale. The mask is too large for my face. The sides reach halfway up my ears to the back of my head. The top edge sits up to my eyes which is very uncomfortable. If I pull it lower, then the fabric under the chin cuts into my throat uncomfortably. It does, however, fit over my N95 mask well so going out in public isn’t as menacing-looking. But for me, it makes being a wearer of glasses even more difficult. I wear progressives and already have trouble seeing clearly because an N95 mask pushes them out of the necessary line of vision. This mask over the N95 makes wearing glasses that have a specific line of vision impossible. If I try to wear it without the N95, it just fogs up my glasses. I’d have to call it good for a “normal” person but probably a no-go for a wearer of progressives and the medium too large for anyone with a petite or small face.
Excellent design: simple, well-fitted and no curved seams! Thank you for sharing. There is a confusing bit in Step 6, Adding the Optional Filter Pocket. The directions say to fold over the ends 1/2″ twice. But in the diagram below that it shows 3/4″ and states 3/4.” Am I missing something?
Yes, sorry about that. The video and instructions differ. Personally I’d use the 3/4″ fold over.
Maria
what do you suggest for children?
Try reducing the pattern when you print it out. Print 12% less for a four year old. Maybe 15% less for toddler. And try 10% less for an elementary school child. Unfortunately children’s heads are so varied you might have to experiment.
Finally! A simple pattern I can follow and make several masks for work. Many sites are charging for the template. I stayed up until 3 am making two just by having watched a video, but had trouble with the length of the ear loops. I work in a prison – Most in the nation were already overcrowded and understaffed. Very few people think about donating masks for corrections workers. I can do this!
Great (if not the best) pattern! Also great recommendation for nose clips! Thank you!
To make it a bit easier I’ve been sewing two outside pieces together (no inside liner) with right
sides facing each other. Then turn mask right side out and make the folds. Insert the nose clip, or leave a pocket to insert (and hand sew) later. For straps I’ve been using t-shirt strips and rainbow loom elastics to make adjustable straps (have plenty of them laying around). Works like a charm. Thanks again!!
Lena, this is perfect for non-medical community. But, if making for the medical community, make sure your inside liner fabric is different from the outside.
I have watched a lot of madk tutorials lately and I think I’m getting close to trying one. Your tutorial seems to make the most sensible one. Love your reference to MacGuyver. Loved that show. What materials do you suggest for the lining? I saw a suggestion for elastic . Bungee cords. Cut them open and they have strip of elastic
Thank You!
You can use any of the fabrics mentioned. I personally am using sheet and curtain material because it’s white and can be distinguished from the print fabric.
In these times we’re forced to be creative with what we have. I braided 100% cotton yarn for the ear pieces and used small zip ties in place of the bead.
Nena, well done! And way to use what you have. Thanks for sharing.
Can you give more detail on the size of the bead? Thanks
The beads I have have a 4mm hole
Curious if anyone has attempted to use the filter liner WITHOUT the inside, to keep it at two layers? May give it a go…
My concern with using only the filter liner, is there are two areas on the side that would only have one layer of fabric between you and the world, unless you filter is perfectly fitted and doesn’t shift.
Yes please 😄
The link to the tutorial is in the article at the end: https://prettyhandygirl.com/best-fit-facemask/
THANK YOU! This mask is perfect and easy to make. It is very comfortable and molds to the face without feeling like I’m suffocating. I will now make these for my whole family.
I have spent this past week making six different masks and none were comfortable for more than about five minutes. I wore them but couldn’t wait to take them off.
I don’t have a printer to download the pattern. I tried to figure out the lengths of the sides of the pattern but just was not sure if I was correct. Is it possible for you to mark the lengths in inches of the sides to the masks and the insert. Have made 5 masks but by far your pattern looks to fit best as you state. Thank you so much!🙏
The page has been updated with a scan of the template with measurements. Look under the instructions sub heading.
After a few different masks, this one fits the best. One thing to add to your list of possible replacements for the craft bead is if your kids have perler beads (that you iron and flatten into crafts) work great with elastic cord too.
Thanks for the tip!
This is the best one I’ve seen so far. Will you also make a smaller template for kids? Thanks!
I might have to ;-).
Hi! Thank you for this, I’m really excited to make this mask. Do you have the measurements available for the template? I’m don’t have access to a printer at this time.
Yes, they are now linked in this blog post under Instructions. xxxooo
Hello. Thanks for this. This is definitely the best one I’ve used! Do you happen to have a kids pattern? I’m trying to scale of down but am failing miserably!
I don’t, you can experiment by printing at 90% then more or less. It helps to measure the distance between the child’s bridge of their nose to the point of the chin.
Great tutorial and pattern, Brittany. I just may try this one this weekend! I’ve featured you on a DIY Face Mask collection today on my blog. (do-follow, non-pinnable, one image). Let me know if that’s a problem, and thank you! (myweeabode.com)
Thank you Julie!!! More than okay, thanks for sharing.
I couldn’t find what dimensions you use for medium or large. Anxious to start as soon as I know what the dimensions are. Great site!
I sent you an email, but I’ve also updated this post with links to the dimensions for the mask templates. Thanks!
Thank you Brittany! We have some really good masks here but I’m going to make this mask. I’m pretty sure I have all the supplies to make this. You are brilliant!!!
Hooray for not throwing everything away! I just donated so much fabric before this and now I’m kicking myself.
Can you replace the elastic if it gets worn out?
Absolutely! Just remove and thread new straps through the sides of the mask. Another good reason not to stitch the straps into the sides.
I’ve made over a hundred CDC masks from my quilting days stash but they have lots of issues! I donate them to our hospital which uses them to cover their good masks to get further use from the good ones. They also give them to non-nursing staff that need ‘something’. They are so very appreciative for them and send us messages all the time with pics showing their use. Your pattern covers all the problems I see with the simple version and looks very easy to make, also. I know the nurses say their ears hurt after all day using the standard one size fits all and you have solved that problem. The nose ‘pincher’ is a fantastic creation as it allows the user to wash them. The elastic is the hardest thing to come by which is both wonderful since that means many people are making them but so discouraging when trying to find a supply. I’m sharing your link in order for others to see the options. Thank you for this thoughtful, useful, easy, free pattern.
You’re so welcome!
Well that’s a pretty handy tutorial for someone like me who is not a sewing genius by any stretch of the imagination. Now about that filter pocket, I will watch the tutorial video for clarification, however when I was reading the millionth news article on masks over the last week I saw something about using coffee filters inside of homemade masks as a disposable additional layer. I think I will try making a filter pocket that can hold a cut-to-fit coffee filter. Not sure how beneficial that will be, so guess I will have to research that some more too, but for now thanks for creating the detailed instructions… you know… for us non-sewing people.
So much information, I get it! I’d recommend trying different filters. But frankly, I’m subscribing to the at least two layers of fabric and 6′ from others is precaution enough.
I’ll make a mask tomorrow will let you know
it went.
Whenever I see wired nose piece masks, I am wandering about washing.
Have you ever thought about using elastic?
Or make a opening for wire piece in and out.
I am a tailor also and studying better way to create.
Elastic does not have the memory of wire. Encapsulating the wire in electrical tape or plastic will protect it from rusting. But, the mask wires will eventually break after repeated use. Luckily we they are easy to make new ones.