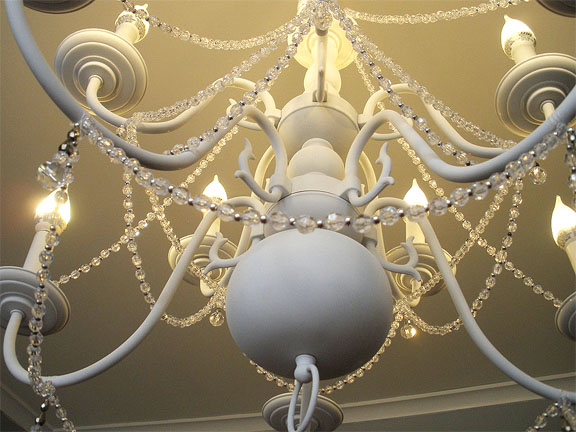
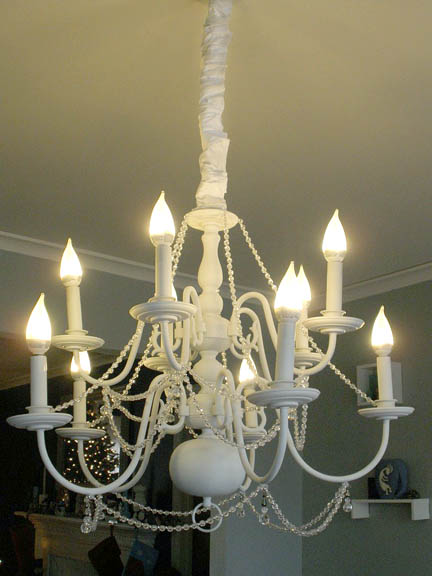
Show Stopping Beaded Chandelier Makeover – Guest Post by Modern Parsonage
Welcome to our second Wednesday in 2012! Today I have a special guest for you: Bri from The Modern Parsonage is here to show you how she created that truly fabulous chandelier you see up there. But, before we get to the tutorial, let me tell you a little about this handy gal (and her partner in DIY crime!) Bri and her husband moved into a home that was previously a Pastor’s family home. They dove head first into the process of renovating the home to be more modern and fitting for the hip couple of professors that they are.
The Modern Parsonage showcases the renovation process, from idea to finished product, tossing in snapshots of design inspiration and everyday life.You can follow them as they transform their home one room (floor to ceiling) at a time. Check out their Staircase renovation, bathroom update, and installing flooring projects.
Okay, take it away Bri!
Let me begin by saying that I started this project thinking I needed a ton of prep work, money, and time to transform a boring, brass light fixture into a show-stopping (if I do say so myself) chandelier. O ye of little faith, I say to my former self. This is a beginner’s project and requires so little skill that I would go so far as to call it a fool-proof way to jazz up even the most tired light or lamp for significantly less than the cost of a new fixture. (Read: under $75)
Start with a cheap chandelier. I found one on my local Craigslist for $25, but I would recommend scouring your hand-me-down shop of choice since these brass fixtures are often the standard for apartments or new builds.
Next, I did some research online and adopted a few misconstrued beliefs that I will now dispel. First, it is perfectly fine to spray paint the plastic-protected electrical cord that runs up the chain. I was not aware of that and wasted quite a bit of time figuring out creative ways to protect the cord while spraying the chain. Second, either fully remove the plastic “candles” or spray paint them the same color as the fixture. I did not know that these were removable and you can still see the tape lines from where I thought I had to cover parts of the plastic. Learn from my mistakes, people.
After you have chosen a diamond-in-the-rough light, acquire the necessary resources. You will need:
- A drop cloth
- A place to hang your light (I hung mine in the basement, but you can just as easily use a tree if the weather is nice)
- Two cans of the spray paint of your choice (it is always better to have extra on hand because spray paint has tricky drying times and you don’t want to run out in the middle of the project). I used matte white and it was just the cheap Ace Hardware brand.
- A ventilator or mask. Always necessary when messing about with spray paint.
- 220 grit Sandpaper
- Deglosser. (This is only if you want to be super thorough. I wiped my chandelier down with just soap and water and the paint adhesion was still great.)
- Beading of your choice. I used roughly 750 beads and got them at Michael’s, but it all depends on your taste.
- White string (I got DandyLine brand and it is super strong).
For the optional chain cover:
- Fabric of your choice (double the length of chain you want to cover and 7 inches wide).
- Fabric glue
- Iron-on Velcro
- Thread
- Also, an iron, that’s pretty important.
Now it’s time to get down to brass tacks. Get it? Because it’s a brass light? Anyway, lightly run your sandpaper over the fixture. Do not press too hard or the metal will scratch. The goal here is to rough up the surface so that the paint can form a strong bond. Next, give it a good once over with a damp cloth (soap and water will do, deglosser if you’re thorough) to remove any dust, grease, or grime. Let the light dry completely.
Don your mask. You will look beautiful, I promise, but more importantly, your lungs will thank you. Find a good spot to hang your light and start spraying.

As you can see, I tried to bundle up the electrical cord in the plastic bag, but that caused a lot of problems, including bare spots of brass. I also taped off the tops of the “candles” instead of just removing them and covering the exposed wire. So yeah, just don’t repeat my follies.
Spray painting is best in short, quick bursts. Long, sweeping motions are not your friend. It will take many, many thin coats so don’t be surprised if you have to use the entirety of two cans.
Once you have your desired level of coverage, let the light dry overnight. When the paint is fully cured, the real fun starts – beadwork. This part takes creativity and is really up to you. I did a lot of window-shopping for fancy-pants lights and finally decided I wanted a chandelier adorned with clear beads and small silver accents, embellished with teardrop crystals for extra pizzazz. I would say this is the longest part of the process; it took me about four hours to get all the beads strung and hung on the light.
With the hard part done, re-install or switch out your fixture (remember, black wire connects to black wire and white to white!).
At this point, if you’re happy with your light as is, you’re done! If you’re like me and have an awful chain and unpainted electrical cord, you may want to consider DIYing a chain cover. Much cheaper, totally easy, and no sewing machine required.
Begin with your fabric swatch and fold over about a 1/4 inch on each side, ironing the edges.
Apply a small line of fabric glue inside the seams to create a permanent hem. When the glue dries (15 minutes to a half hour), sew a running stitch on both long seams. I know this sounds complicated, but trust me, if I can do it, so can you. Pass the needle in and out of the fabric down the edges, knotting each end. (It allows you to scrunch the fabric, which is important.) Gently pull the knotted ends and push the fabric together to your desired length.
Once the scrunching is done, grab your iron-on Velcro and press it on. Run the iron over the whole cord cover to ensure a strong bond. Now all you have to do is wrap it around your chandelier chain, making sure the seam is on the least visible side, and admire!
Isn’t that chandelier beautiful?! I know people would pay a lot of money to bring that chic lady home. Thank you so much Bri from the Modern Parsonage for letting us into her home for the tutorial.
Would you like to be a guest on Pretty Handy Girl? Read my open invitation here.


For some reasom half the pictures are not showing. I omly see an empty box. Why is that? Anyway, I love your chandelier and I hope I can do the same thing to my $10 dollar find at DI. Thank you!
Beverly, I’m so sorry. This was a guest post from Marion and it looks like her blog is down and several of the photos were hosted on her site.
Love this! ive already made my girls each one for their room. im getting ready to string some bling on it though and i have no idea how much to buy. anyone have an estimate on yards to buy of gems and such?
These are gorgeous chandeliers
I just wanted to say that I really appreciate this tutorial! I can’t wait to try the cord cover with my pendant lights!
Well done!
WOW! What a great tutorial! I am excited to try it out! I see old Chandeliers often and for some reason have never thought to do this! It’s like a light bulb went on in my head! lol
Thanks!
Jacinda
I just did the exact same thing to an atrocious brass chandelier! http://themoney-pit.blogspot.com/2012/01/changing-style-of-my-sewing-room-for-1.html
Love how this turned out! Some of the resale stores around here have stopped accepting the shiny brass light fixtures–they need to post this on the doors to give their customers a creative idea for them!
Oh no! That isn’t good news. I’ll have to check with our Habitat ReStore and see if they want to post a picture of Bri’s chandelier in their lighting section.
Very cool!
I’d bedazzle it even more though! — But then I’m one of those ‘too much, is just enough’ kinda guys!
love this. So very pretty. Great job and fantastic tutorial! Thanks!
This is perfect timing as I came up with the same idea over my Christmas break. But I ran into a few snags. I ran out of the Rust-oleon glossy white paint I used about half way through the painting and switched to Krylon (super bad choice – it’s terrible to spray with). Then went back to the Rustoleon paint. I ended up with some bubbling and cracking in the paint, which I have now scraped off and hope I can sand those spots and repaint. I did paint the cording and links and they turned out fine. By doing that I will not need to add the ‘scrunchy’ covering. I used my outdoor decorative flag stand to hang my light from and that worked pretty well since I don’t have a basement or a tree in my townhome. I’m very happy with how it looks thus far and would encourage anyone to try this light redo. As an FYI, there were many of these cast-off lights at our local ‘Reuse’ store for about $15.
Cute cute! Wonderful refreshing of an old brass chandy!!
Oh so much better!!!!!! Way to go.
I am in love with this tutorial, can’t wait to work on it. I had a left over chandelier from an old remodel and didn’t want to throw it out. Thanks for sharing!
I was so scared to approach my dining room (dated by about 30 yrs) brass chandelier.
Once I made up my mind that I could not stand that ugly, brassy, shiny thing anymore, all I did was open up an old can of Chalk Paint (Old Ochre) and start painting with a small brush – just slapping paint on with the method of back and fro I’m so happy I made the first step – it’s 100%improvement – and now I just have to decide if I want to add lamp shades or not !
Way to go!!!