Paint Chip Lamp Shade
Are you as nutso about paint chip projects as I am? I’m semi-worried that I might get arrested next time I’m pulling samples at my local paint department. Is there a law against taking too many?* Okay, so let’s just say that I have collected many samples over the years while contemplating room colors (which is true!)
*Paint chips may be free, but please use consideration when taking paint chips. Try not to take more than 2-3 of each color and definitely don’t take the last of a color. It might be a good idea to ask permission from the paint store employee if you need to take more than a dozen.
But, what do you do with all those left over paint chips once you have decided on your color? It seems a shame to throw them away, doesn’t it.

Why not use them to make a lamp shade?
I actually saw this lamp shade on JossandMain.com last week and thought, “Ooo Ooo Oooo! This gives me an idea of what to make with all those paint chips!”
 Materials:

- Lamp shade (best if it isn’t tapered)
- Paint chips
- Clear packing tape
- White paper tape (low stick)
- X-acto knife
- Cutting surface
- Metal ruler
- Hot glue gun and glue sticks
Tutorial:
Start by laying out your paint chips side-by-side and organize them any way you like.
To judge how many strips you need, rest the seam of your lamp shade on the end of the paint chips and roll it until you reach the seam again. If you still have paint chips under your shade, then you have enough! I had one small gap leftover, so I added two of the same colored chips together so the small strip wouldn’t be as noticeable.

Butt the paint chip strips tightly together. Put paper tape on top of the chips to hold them together.

Gently turn them over and tape the seams with clear packing tape.

Once all the strips have been taped together, trim off the excess tape.

Measure the height of your lampshade and trim your paint chips to the same height.

Test fit your paint chip roll.

Use your hot glue gun to run a line of glue on the seam of your lamp shade. Glue the end of the paint chips to the shade.

Run a line of hot glue on the top and bottom edges of the lampshade and roll the paint chips around the shade. Secure the end by hot gluing it to the shade.

And that is it! A super easy and very colorful home decor project.

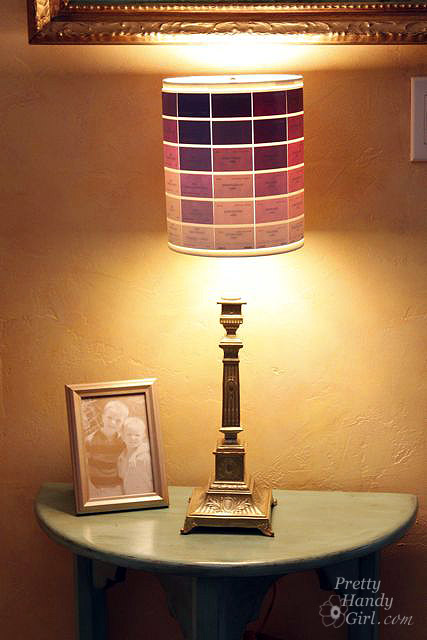
I think it is beautiful whether the light is off…

…or on.

When choosing the paint swatches you wish to use, try pulling colors from a painting or use colors that are compliments to your wall color.

What?! You still want more paint chip home décor ideas?! How about a whole round up of them? Go ahead and scoot your index finger on over to Parentables for 11 Paint Chip Projects to see 9 more amazing paint chip projects:

I guarantee, you’ll never pass through the paint department without grabbing a few paint chips again!


Trackbacks & Pingbacks
-
Make 20 Epic DIY Paper Projects Out Of This Absolutely Free Craft Supply | Traffic Nova says:
February 9, 2015 at 5:55 am
-
The 19 Most Colorful DIY Projects You'll Instantly Fall In Love With « Apprecify says:
January 21, 2015 at 3:00 am
-
The 19 Most Colorful DIY Projects You'll Instantly Fall In Love With - Ape Viral says:
January 21, 2015 at 1:38 am
-
Boring Room But No Money To Redecorate? No Worries, Here Are 19 Cheap Remedies - Beast Viral says:
January 21, 2015 at 12:30 am
-
19 Colorful DIY Projects You Have To Try Out This Year. If You Love Color This Is For You « hipstr news says:
January 20, 2015 at 6:47 pm
-
Boring Room But No Money To Redecorate? No Worries, Here Are 19 Cheap Remedies says:
January 20, 2015 at 6:39 pm
-
These 19 DIY Projects Will Throw Some Color Into Your Boring Life - Beast Viral says:
January 20, 2015 at 6:31 pm
-
Boring Room But No Money To Redecorate? No Worries, Here Are 19 Cheap Remedies - Ape Viral says:
January 20, 2015 at 6:14 pm
-
These 19 DIY Projects Will Throw Some Color Into Your Boring Life says:
January 20, 2015 at 6:07 pm
-
Hacer 20 de Epic bricolaje Proyectos de papel fuera de este Craft Supply Absolutamente gratis | Quitopolis says:
January 15, 2015 at 2:35 pm
-
DIY Paper Projects of Free Supplies You All Have Somewhere in Your House says:
January 14, 2015 at 4:47 am
-
Make 20 Epic DIY Paper Projects Out Of This Absolutely Free Craft Supply - Interesting Videos says:
January 12, 2015 at 8:21 pm
-
Paint Chip Crafts For Those Who Love Colors says:
August 26, 2013 at 1:19 pm
-
DIY Lamp and Lamp Shade Makeovers | Creations by Kara says:
February 8, 2013 at 11:19 am
-
Best of Pretty Handy Girl 2011 | Pretty Handy Girl says:
December 31, 2011 at 6:48 am
« Older CommentsNewer Comments »[…] Pretty Handy Girl […]
[…] Check out how to make it here: […]
[…] Check out how to make it here: […]
[…] Check out how to make it here: […]
[…] Check out how to make it here: […]
[…] Check out how to make it here: […]
[…] Check out how to make it here: […]
[…] Check out how to make it here: […]
[…] Check out how to make it here: […]
[…] Pretty Handy Girl […]
[…] Elegant lampshade […]
[…] Pretty Handy Girl Get the instructions here. […]
[…] Another great project would be to give your lampshade a makeover. Use paint chips to cover the lampshade and you’ll be able to create all sorts of interesting visual effects when you light it up. Use a hot glue gun to adhere the paint chips to the lampshade.{found on prettyhandygirl}. […]
[…] Wrapped Lamp shade from A Night Owl Paint Chip Strip Lampshadefrom Too Much Time on My Hands Paint Chip Lamp Shade from Pretty Handy Girl Sisal Lampshade from Naptime Decorator DIY Monogram Lampshade from […]
[…] Ombré Paint Chip Lampshade […]
Leave a Reply
Want to join the discussion?Feel free to contribute!