Make Your Own Fall Wreath from a Goodwill Sweater

Today I am going to show you how to Make Your Own Fall Wreath. If you’ve been following me for long, you were witness to my one wreath with many different looks for one year. Well, I’m ready for a change. So, I decided to create something completely different.
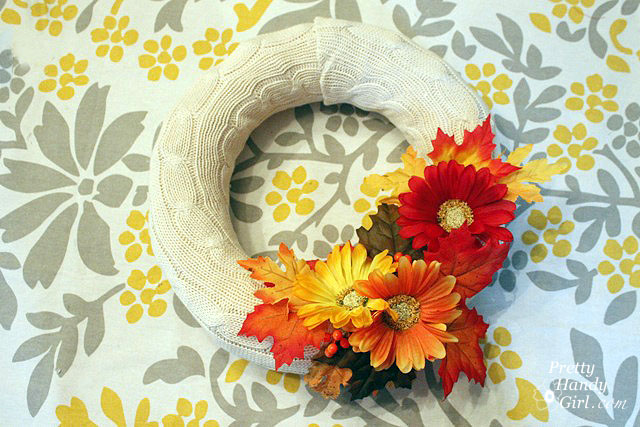
When I think of fall, I think of cooler weather, sweaters, autumn leaves and flowers. This wreath encompasses all those elements.
Lucky for me I had all the materials on hand. Especially the XL cable knit sweater that I picked up at Goodwill thinking I could make sweater vases out of it.
Materials:
(I’ve included affiliate links for your convenience. I earn a small percentage from a purchase using these links. There is no additional cost to you. You can read more about affiliate links here.)

- Wreath form
- Old sweater
- Fall leaf pick
- Ribbon
- Hot glue gun
- Scissors
- Sewing machine (or just needle and thread)
Instructions:
Start by cutting off the sleeve of the sweater.

Cut, the sleeve in half lengthwise. Then put the right sides together.

Stitch the ends together (try to line up the stripes or cable knitting.) Trim off any excess.

Open your sleeves up to give you one long length of sweater material.

Preheat the hot glue gun. Lay the wreath form on top of the sweater material.

Put a bead of hot glue on the back side of the wreath form and glue one edge of the sweater material to the wreath.

Squeeze out another bead of hot glue, wrap the other side of the sweater material up and glue it against the already glued piece.

Realistically, this is the backside of the wreath, but if you have a see through door like I do, you will want to roll under your raw edges to hide the seams.

Work in 3-4″ sections, adhering one side and then the other until you reach the end of your wreath. Cut your sweater material slightly longer than you need, then roll under the raw edge and glue it down.

Your wreath should resemble something like this:

Hot glue some leaves onto the wreath covering one of the seams.

Then add some flowers. And more leaves, and more flowers, until you have burned your fingers to smithereens!
Next tie one loop of ribbon to cover the top seam.

Tie more ribbon to the loop to give your wreath a more “substantial” bow.
And now you have a warm, cozy and colorful fall wreath! What do you think? I just want to snuggle up to it every time I walk through the door.

Have you started to decorate for fall? Do you have your wreath yet? I’d love to hear about your unique wreath project. And if you need more ideas, enjoy these 24 more Fall wreath ideas:

Y’all have a fabulous weekend!


How cute is that?!? I guess I’ve been a ‘wreath snob’ since I used to be a floral designer. I’ve only liked floral wreaths. But this? This is too cute!
LOL! I had no idea there was such a thing as a wreath snob. But, if you say so. And, it does have a few flowers on it, right?! Maybe that is why you like it.
Brittany
That is the prettiest, simplest, cheapest fall wreath I have seen in blogland.
You always do such expert tutorials, too! Thanks, and keep up the good work.
Barbara, thanks for your comment. Glad you liked my fall wreath idea.
Ah yes, it IS time to replace the old wreath with something new and fresh! I new that old straw wreath would come in handy one of these days and what a great use for those old sweaters! Great thing about a wreath is that the sweater won’t get all full of dog and cat hair like the pillow it was going to be! Thanks for sharing!
Love it! I picked up a wreath and some fake leaves and flowers at Goodwill the other day. I was going to wrap it in ribbon, but I love the sweater idea. Thank you!
Denise glad you like it and I’d love to see what you come up with.
Brittany
So cute! I’ve been thinking what to make for my knitting friends Christmas exchange, and this has possibilities!
Marty, I was actually just thinking that I could switch it up by adding holly leaves, berries and a plaid ribbon for Christmas ;-). Have fun with it. Definitely an easy project (except for all the burns.)
Brittany
What a great look. That sweater is just perfect for a fall wreath.
Patricia,
Thanks for your comment. I don’t know about you, but I am definitely READY for fall weather!
Brittany
HI!
Love your projects!
Linked to this on my blog, can’t beat cheap, easy and gorgeous! 🙂
Thank you for your comment and for linking to my project ;-). I love that stacked stone look. And you puppy on the sidebar is the cutest! Is it a border collie or an aussie?
Brittany
Brilliant! Love it.
Thanks Debbie!
I’m pinning this! I think I will stop by Savers tonight and see if I can find an old cheap sweater. I’m not terribly crafty but I just might can pull this off. I will stick in on my front door–since nobody ever uses my front door, it will be very pretty from the road, but hopefully nobody will see it up close!
Melanie,
I think you can make it a beautiful wreath worthy of the door everyone uses 😉
Brittany
Very nice. You are so clever.
Thanks Mary Ellen!
Brittany
Brittany, that is pure genius! It really does make you want to cuddle up, doesn’t it? And today it’s nice and cool and fallish here in the Triangle–sweater weather for the first time in AGES! Your timing is perfect. 🙂
Richella,
Thanks for your comment. I AM REALLY LOVING this fall weather!!! How about you?
Brittany
Yet another great idea! Where do you come up with these things?!
Laura,
Thanks for your comment. Honestly, I enjoy challenging my brain to look at something and think up new ways to use them. Some people like crossword puzzles, I like creating 😉
Brittany
This is so cute and so thrifty. Hop over and share with us at my NIFTY THRIFTY TUESDAY PARTY…hope to see ya there.
Blessings,
Linda
Linda, thanks for the invite! I might add it to next weeks party if that is okay with you. Have a great weekend!
Brittany
How cute!! I love it!!
Thanks Angie ;-).
OMG!!! Love it—so thrifty and creative! I’m pinning it now–This is such a great fall project!
XOXO ANdrea
Thanks Andrea. And don’t you just love Pinterest!!!