How to Use a Pneumatic Finish Nailer and Air Compressor (with video)
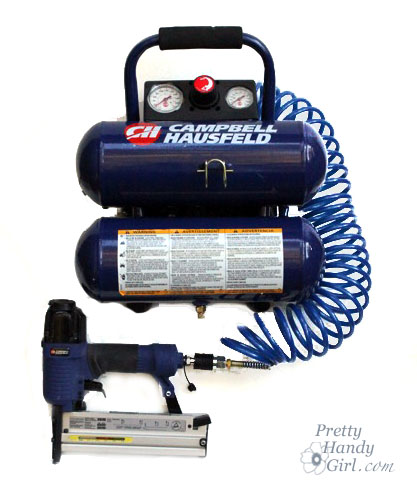
Welcome back for another Tool Tutorial Friday! Today I’m going to introduce you to a 2 gallon compressor and pneumatic finish nailer. I use the Campbell Hausfeld 2 gallon compressor with Pneumatic Finish Nailer. I bought these as a kit when they were on sale at Lowe’s for $69! A good price on this set is $89. There are loads of other brands out there and I’m sure they have other features and capabilities, but frankly I’ve been happy with my set that I’ve had for 2 years. Other kits can cost up to $300. The only drawback with this set is that they can not be used for framing (building walls of a house structure.) But, so far I haven’t needed to do that.
The finish nailer works very well on moulding, trim, board and batten, wainscoting, and other small wood projects.
How to Use a Pneumatic Finish Nailer and Air Compressor
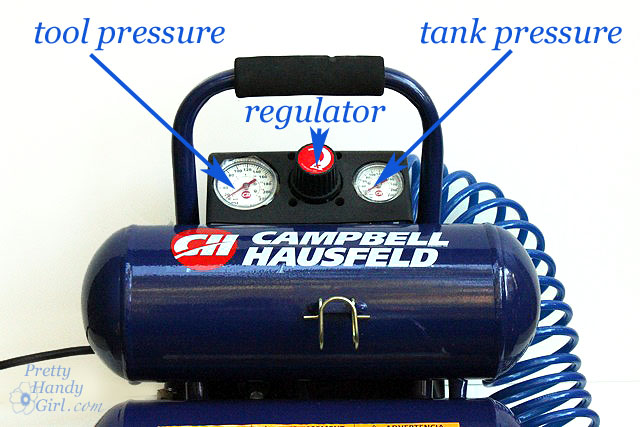
The compressor is a fairly simple tool. When turned on, air builds up in the chambers until it reaches the maximum 110 psi.
The pressure going into the air hose can be controlled by the regulator button. I typically use my compressor and nailer at about 90 psi. But, if the nails are going too far into the wood, I might turn it down to 80 psi. Or if the nails aren’t going in far enough I will turn it up to 100 psi. With continual use, the pressure will drop down. When the pressure is low enough, the compressor will start itself back up to raise the pressure again.
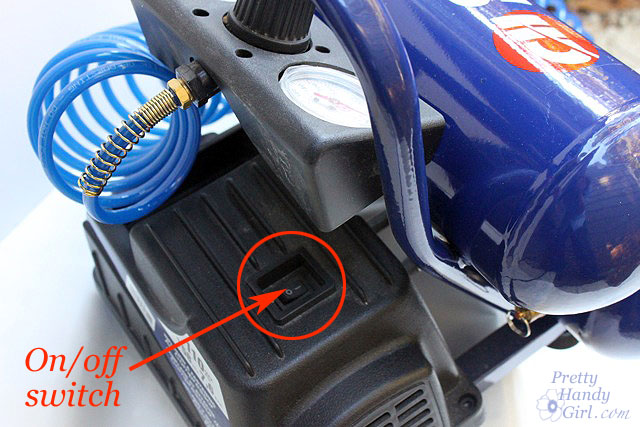
The on/off switch on my compressor is in the back.
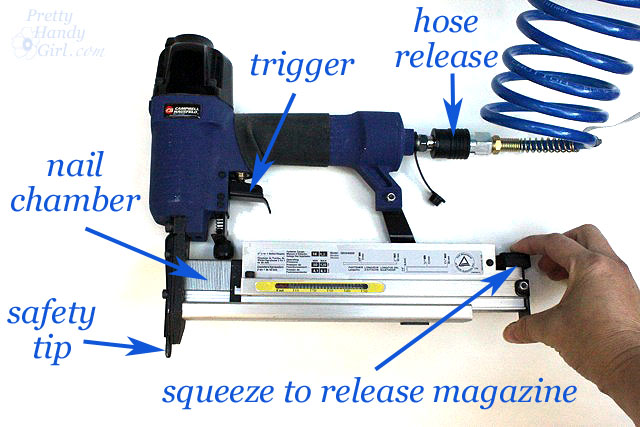
The finish nailer holds small brad nails up to 2″ in length and “U” shaped staples. They are held in the magazine. The safety tip on the nailer must be pressed into the wood before a nail will fire. Otherwise, the gun will not discharge.
While using the nailer and compressor it is very important to use safety goggles and ear protection.
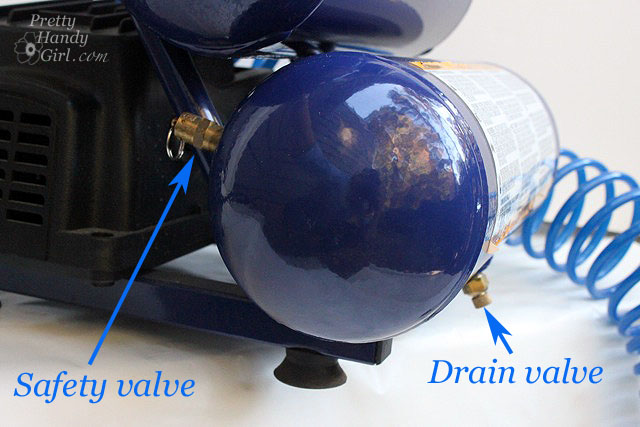
When you are finished using the compressor, it is important to release all the air from the compressor. If you don’t release the air, moisture can build up and rust the tank. Start by reducing the pressure by turning the regulator down. Then pull the safety valve ring. It will close automatically, so you will need pull it a few times or hold it open. I also unscrew the valve at the bottom of the tank to insure it is completely empty before storing. Then I screw the valve back in.
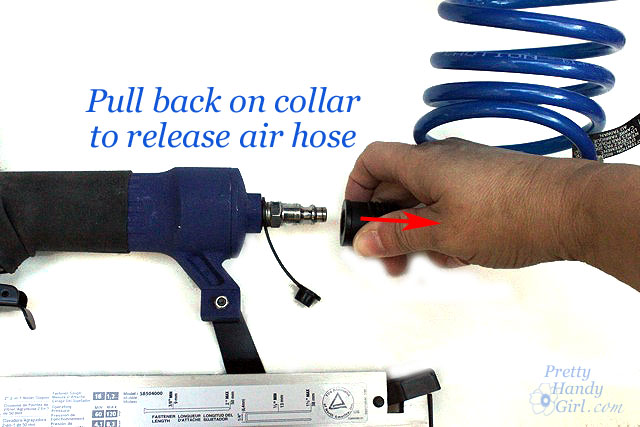
After the tank is empty, release the hose from the nailer. Add a drop or two of penetrating oil onto and in the air inlet on the nailer to keep it well lubricated. Cover the air inlet and then you can store your nailer and compressor.
DISCLAIMER
The viewer assumes all responsibility and liability associated with the hazards of woodworking. Pretty Handy Girl is not responsible for any errors or omissions that may be present in this tutorial. She also assumes no liability for any action or inaction of a viewer.
Please use extreme caution when using power tools. Read your tool manual thoroughly and wear protective safety gear. Take your time familiarizing yourself with a tool before using it. (If you are missing the manual, you can easily find it online by going to the manufacturer’s website or google your saw’s make and model + manual.)
Please recognize that I have tried to put together a basic finish nailer and compressor tutorial to get you started. I have tried my best to show the safest way to use them. That being said, I am not a professional (I only play one on this blog ![]() .)
.)
Without further ado, here is the tutorial video:



Brittany, great tute! This probably is a dumb question but I haven’t used a compressor before. Why do you need to release the pressure from the compressor? What will happen if pressure is not removed?
Thanks!
Thanks for the chance to win!
Good tutorial.Thanks!
Great tutorial and clear pictures. Thanks! I love my nail gun. (By “my” I mean my husband’s but he lets me use it.) 🙂
I don’t know what I would do without my pancake air compressor and accessories. I use a finish nailer, brad nailer, stapler and we even use a big nail gun for the outside projects (although I can barely lift the nail gun, so I stay leave that one for the boys). I also use the air compressor for air up tires & pool floats, and I even have a paint sprayer that attaches to it for bigger painting jobs. Did I mention that I LOVE it? 🙂 Lisa~
Lisa, I am embarrassed to say I never took the bike accessory out of the package. I’ll have to try that out now! What paint sprayer do you have? I’ve been using the plug in kind lately.
I just want to thank you for putting these videos together. They are SO helpful. We are doing a project and I have been debating whether or not I could cut and put up the trim myself. After watching you use this nailer, my confidence level has soared! I don’t have a compressor but will be getting myself one soon after seeing this. Thanks!!
Sherri, good luck on your trim project! Once you get a finish nailer, you will be hooked ;-).
Thanks for another great tutorial! I must admit that the noise on this tool scares me a little…healthy fear, right? 🙂
Melinda, all the more reason to wear ear protection ;-).
Good job! I’ve always been confused about how hubby’s air compressor worked. Thanks for clearing it up! I like your smaller version, looks much more manageable than wheeling that gigantic thing around. Dumb question- what is penetrating oil? 🙂 Would love to win the pink hammer! Any plans to add other colors, like, maybe purple? 😉
SheilaG,
Thanks for you comment. The compressor I have is very light weight and manageable. I wouldn’t have room for a bigger one!
You should contact Tomboy Tools about the hammer color. I think they have some tools in blue, but their primary color is Pink.
Penetrating oil is the same stuff you use on a paper shredder, hair clippers, or anything that has metal parts that you need to keep lubricated to prevent rust.
Oh, thanks for answering my question. I want to start using all these wonderful tools, but have been scared from lack of knowledge. You are an inspiration!
Oh man…DH has been thinking about getting a compressor for years and my response was always “for what?” Darn! Now I’m going to have to bite my tongue and agree with him. I can already hear the “I told you so” coming a mile away.
Brittany you look great in your videos. Your body language shows you’re very knowledgeable and comfortable with your tools. The more I watch, the less scared I am of tools and the more stuff I want to build on my own.
Sandy, thanks for your comment. Well, sometimes we have to admit we’re wrong (so our spouses learn how it is done ;-).
Glad I am taking the fear out of the tools. And thanks for your compliment. It means a lot to me.
I love your compressor! My hubby has a couple of them around here, but they’re all so big and bulky that I can’t use them. Guess I’ll have to ask Santa to bring me one like yours for Christmas!!
Sure would like that pink hammer…so far, every one I’ve bought for myself has disappeared into hubby’s tool box! Maybe a pretty pink one will “scare” him away from MY tools.
I hope you win one too. Then your tool will be safe from his thieving ways ;-D.
Thank you so much!! I recently bought a compressor/finish nailer combo (awesome deal @ Home Depot!) and I hate to admit that it still scares the crap out of me. I have so many plans for it and now, thanks to your video, I’ll be much more confident about using it. Your video was my prize for the day, but if I should happen to get luckier, I’ve been wanting a smaller hammer for some of the projects I do (& I could use it for some of my sewing projects) – the 8 oz. pink magnetic hammer would be great!
Carla, oh girl, this is NOT the tool to be scared of. I haven’t covered them yet, but the two that still scare me are a router and the table saw. So, put on your courage hat and have at it! 😉
Was I ever happy to see this tutorial today! Why? Because I have a big honkin compressor with oodles of attachment just gathering dust because it scares the bajeebers out of me! I actually used it when it was new 6 years ago and still have the non-sliding pocket doors to prove it. *Hint:look to see what’s on the other side of the wall before installing trim! Now that I’ve watched your tutorial I think I’m brave enough to try again. Thanks! Oh. I really like that pink impact drill. Even at only 8volts it would make an awesome tool!
Sharon, Ha good tip about the siding door. I could see myself doing something like that ;-).
I can already tell how much more comfortable you are getting in front of the camera! Keep up the great work. This was super informative. I’m debating the tools I want to invest in as my husband and I embark on our first home purchase.
With my love of board and batten and molding I think that a compressor/finish nailer would be a great investment with a quick return. Would have NEVER known to use an oil to keep it lubricated.
Thank you for your comment. It is SOOOOO hard to see myself on video. I think I have a lot to learn. Your comment has helped my confidence. I think I’m going to do a blooper video at the end, because there is a lot of stuff I had to cut. Some funny, some DUH!
YES!!! I am actually headed out to Harbor Freight today to buy a compressor and nailer! What perfect timing! Do you have any other attachments for your compressor? I know my dad has an attachment so he can inflates tires and such. Thanks so much for this tutorial!
I’m pretty sure the kit I bought has that attachment. I just never used it. 😉
OMgosh!! Were you reading my mind! I just posted yesterday on my nucheysmommy facebook page I didn’t know how to use my dads compressor & finish gun!!!! I cannot believe you posted this today! 🙂 My dads compressor is ginormous & heavy so I was thinking about getting a little guy for me 🙂 Thanks so much for the post!!!!