
How to Repair a Leaky Shower or Tub Faucet

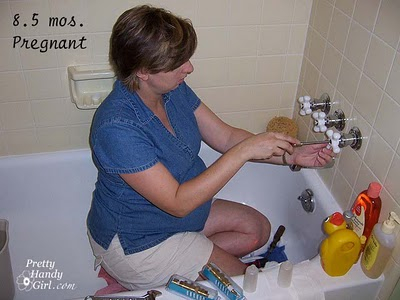
You know that saying, when it rains it pours? That statement has become an actuality in our home. While we are trying to build back from the plumbing leak, one of our tub faucets developed a leak. When I tried to tighten the handles to stop the dripping, this is what happened:

Oops. Luckily, I knew the fix was an easy one, if you can screw in a light bulb, you are qualified to fix a leaky faucet!
I’ve solved this problem in a few tubs and showers (including one on the day I went into labor with my youngest.) Yup, you could say that the faucet wasn’t the only thing that sprung a leak. LOL.
My main complaint is that this was just one more project keeping me from the kitchen.
Leaky Shower or Tub Faucet Tools:
(I’ve included affiliate links for your convenience. I earn a small percentage from a purchase using these links. There is no additional cost to you. You can read more about affiliate links here.)
- IRWIN Vice Grip Pliers
(or monkey wrench)
- Philips head screwdriver
- Flat head screwdriver
- Jar gripper
- Rag
- Optional: bath and tub caulk
Leaky Shower or Tub Faucet Instructions:
Before performing any work on your tub, locate the water shut off and turn off the water to the house! After the water is shut off, turn on the water in the tub to drain any water inside the pipes.
Locate the screw on the faucet handle. Sometimes it is exposed. Sometimes you have to pry the center off the faucet handle. Use your fingernails or a flat head screwdriver to remove the cover.

Remove the screw holding the handle on and pull off the handle. (Our shower handles have a collar just below the handle that needed to be removed as well.)

Unscrew the escutcheon (the collar that fits against the wall.) By the way, this repair is a great little plumbing project that your child can help with. It is easy for him or her to help unscrew the parts once they have been loosened.

If the escutcheon is stuck on tight, cover it with a jar gripper and use the pliers to loosen it without marring the metal.

After the escutcheon has been removed the stem will be exposed. Position the pliers over the rear nut and turn the stem counterclockwise. Once it is loose, you should be able to unscrew it by hand.

If the stem hex nut is recessed into the wall, you will need a stem wrench to reach into the wall.
Have a rag ready to shove into the hole once the stem has been removed. This will prevent any remaining water from dripping into the wall cavity.

Take the old stem to the hardware or plumbing supply store and purchase a new stem that is identical to the one you removed. The part that wears out most often are the two washers. There is one at the end and one around the threaded portion. You could simply replace just the washers, but new stems aren’t expensive and in my case the stem was really showing excessive wear and tear.

Slip the enclosed washer ring onto the new stem.

Gently thread the new stem into the wall. Do not force it or you could damage the threads in your plumbing. Hand tighten the stem.

Use pliers to tighten the stem. (I usually tighten about 1/2 – 3/4 of a turn more.)

Reuse the threaded tube from the old stem on the new one. This is what your escutcheon threads onto.

Thread the old escutcheon back on. Be careful not to over tighten or you risk cracking your tile. For an ultra-tight waterproof seal, spread a thin layer of caulk where the escutcheon meets the wall.

Replace the handle assembly.

Replace the screw holding the handle on and replace the cap if necessary.

Turn the water back on and test the tub or shower faucet. Your leak should be fixed!
If you have the single handle style shower or tub, you might want to look at this tutorial from Family Handyman.
Now, tell me the truth, that doesn’t look so hard does it? Next time you have a leaky shower or tub, save the money you would have paid a plumber and do it yourself. You can also check out other easy plumbing repair tutorials here:

See you in a few..


LOL, thanks for this. I think everything we have is old and needs replacing. We have a shower surround so I am hoping to redo the whole bathroom. I will give you an update when that disaster happens. Haha
As a general rule I do a lot around the house so am no stranger to home improvement.
I’m so glad you do a lot of work around your home. There are definitely DIY projects that don’t always work out for me too.
So I did this, and it worked great, no more leaks from the tub faucet when the diverter is is in shower mode. However, now the Hot and Cold handles leak when the shower is on. What did I do wrong?
TashiAu, it’s possible the valve stems for the hot and cold handles needed replacing as well. That should solve your issue.
Excellent instructions, the best I have come across so far.
The pictures( with annotations) helps to spell out things clearly!
Thanks
Need to replace my broken washer but can’t turn off the faucet. It’s stuck and won’t turn. What do I do?
You can shut off your main water source (either at a shut off in the house or at the street.) Then, you should be able to proceed with the repair. If you have a part that is stuck, try lightly tapping on it with a hammer to break any rust keeping it from turning. Here’s more information about shutting off your water from the street: https://prettyhandygirl.com/water-leaks-polybutylene-pipes-and-mold-what-to-do/
Hi, my shower head repeatedly drips. my landlord fixes it, puts in a new washer (and sometimes shower turn on handle) and a month or two later the drip returns. What is he doing wrong? Yes, the house is old but I think either the fixtures are the wrong size (they are all mismatched, there are four total for hot and cold for shower and bath) or the washer.
Thanks!!
Merri
Merri, hmmm, sounds like it could be one of two things. But, it might take a “real” plumber to diagnose and fix the problem. It is possible that the newer valve stems don’t seat properly in the old plumbing in the wall. Another possibility can be if you are guilty of “cranking” the knobs too tight each time which would cause the washers to wear out faster. I know I’m guilty of this when we do have a leaky shower. Then after I replace the valves I find myself still exerting the same force on the knobs when I don’t need to anymore ;-D.
this looks pretty simple. I may get up the courage to tackle this weekend.
THANKS A MILLION !
Great tutorial only one tip, use teflon tape on the threads when screwing the joints back together it will seal any leaks and make it easier to remove later.
Todd, excellent point. Thanks for the tip!
Thanks so much for your post! Just moved into a place with alot of plumbing issues and need to learn to take care of these things myself 🙂
By tightening tap most of the time it causes leaking.. Great post.. thanks for sharing steps by step on how to correct leaking tap and images also helps a lot… Very helpful post..
I have to fix a leaking faucet handle this morning, and could not find a site that had pictures like this. I am a visual learner, and your pictures are fantastic for a first timer. Thank you. I will certainly return to your site now that I know about it. I appreciate the care you put into the rest of us learning a few good, and sometimes necessary skills.
I’m so lucky today that I was able to read your post which gives me a lot of ideas .thanks for a post
Thank you very much for the advice about the jar gripper. I scratched up the finish when I had to switch out one of my old showerheads recently and that would have prevented it from happening. Luckily, the one I scratched is just a temporary replacement until I find the one I want for Christmas. I should probably get a few more of those grippers to keep around the house for other projects.
You go girl!! Very impressed! I am assuming you had the baby already. Congrats!
Water restoration Irvine CA