How to Add an Outlet Extender

Today I am going to show you How to Add an Outlet Extender. On Monday I showed you how easy it is to install the Flow Wall panels. The only thing that will slow you down is if you run into a light switch or an outlet. But, that’s easily remedied by cutting a hole in the material.
Materials:
(I’ve included affiliate links for your convenience. I earn a small percentage from a purchase using these links. There is no additional cost to you. You can read more about affiliate links here.)
- Outlet extender box
- Phillips head screwdriver
- Flat head screwdriver
- Drill
- 1/2″ spade bit
- Jigsaw or a hand saw
- Clamp
- Work surface
How to Add an Outlet Extender
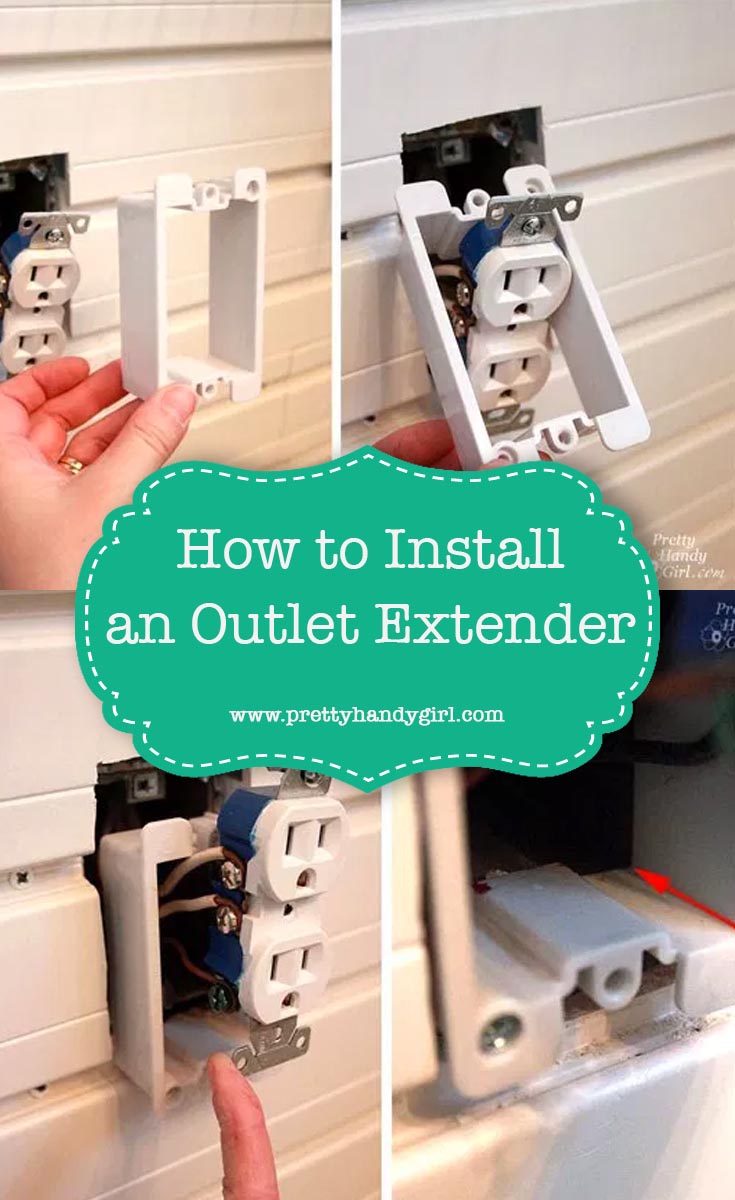
Important: Start by turning off the power to the outlet you are working on and check the outlet for power. After you are certain the power is off, remove the face plate.
How do you know where to cut your hole? Do you eyeball it? Do you cross your fingers? I like to pucker up and kiss it for good luck! Just kidding, but I do grab my bright red lipstick tube.
Use the lipstick to draw around the edges of the outlets.

Then line up the wall panel and press it against the outlet.

When you remove the panel lipstick marks will be left where the outlet is. (Note: the Flow Wall has recessed areas, so only the top outlet shows.) Lay the outlet cover over the lipstick print and trace around the outside edge.

You’ll notice in the picture below that I drew a line slightly inside the tracing of the outlet cover. I use that line to cut on, so you won’t see the junction box hole after the face plate is replaced. Use a 1/2 inch (or larger) spade drill bit to cut holes into each corner of the tracing.

Insert the jigsaw inside one of the pre-drilled holes and start cutting around the rectangle.

Work your way around until you return to where you started. Now you have a hole for your outlet!

If you are more of a video learner, here is a video showing this technique on a piece of beadboard:
Check the fit against your wall. Perfecto!

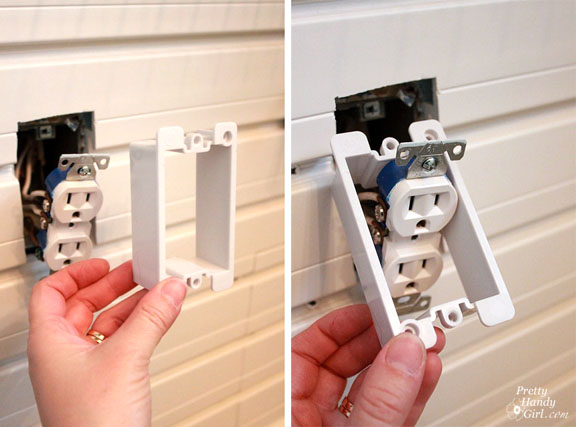
But wait, it’s not perfect when you try to put the outlet face plate back on. When you add any depth to your walls (from tiling, wainscoting, wall treatments or a Flow Wall), you will likely need to extend your outlet box.


Remove the top and bottom screws from your outlet.

Gently, but firmly, pull the outlet outside of the junction box. Thread your outlet extender over the outlet and wires.
Press the extender into the box until it is flush with the “new” wall. The extender should fit into the original outlet box. If there is a gap between the two, you might need a deeper extender.

Replace the outlet using the longer screws that came with the outlet extender.

Screw the face plate back on and…DONE! That wasn’t too hard was it?!

Now you can continue adding the Flow Wall panels ;-).

Stay tuned for the final Laundry Room reveal. You don’t want to miss it!

Pin for later!

I needed some of these last week and couldn’t find them. I was scouring the aisle thinking, “There must be some sort of extender so I don’t have to remove and replace the entire junction box!” But I couldn’t find anything so I had to remove and replace my entire junction box. Drat. Now I KNOW there is such a product and just have to FIND some. (Where did you find these anyway?) Great tutorial. TFS
Loved the way you make it look so easy with your step by step guide photos. You won’t find the lipstick trick printed in the instructions included with the products. It’s the way you present your challenge that makes it fun and you so darn brilliant! Wonderful project!!
Thanks for posting this! I am glad to know outlet extenders exist, and I’ll be picking some up soon. I bought a house last year that has wainscoting in what became my office, but I can’t even charge my cell phone or camera in there because the outlets are so recessed that the prongs on an AC adapter won’t even reach them!
Good information to know, and as usual an excellent tutorial. I’m pinning it for reference, cause I’m sure I’m going to need it at some point!
Have a super weekend!
Deborah
Pretty brilliant with the lipstick! Thanks for sharing your tips 🙂
Thanks for the tip- I had no idea there were outlet extenders available. I love the lipstick trick- I did that when framing our bathroom mirror, only to discover our braces at the corners made it impossible to carve out the spots for the mirror clips. Sometimes I feel like a one-person Laurel & Hardy episode. 🙂
Morning Brittney. What a great tip. I just got my email – you know how you always get blog post via email a day later. I just wish I’d known about this yesterday. We were at my cousins drywall his entire kitchen. We even had to extended the plugs with longer screws. The lipstick is such a smart and exact way to do it. Brilliant idea. I just pinned it on my page ” Tracy Suzanne”.
Thanks for teaching me a new trick!
Hugs…Tracy @ Cotton Pickin Cute
Great Idea with the lipstick!! Thanks
Thank you so much for posting this. We have a few outlets that currently have this problem. I had no idea you could extended the box!!! You just made my day.
I always wanted to know how to do this, especially since I’m using a lot of bead board these days! Great tutorial and very easy to follow along!