I’ve received a few emails and comments letting me know that some of you are going to try to repair your toilets! I just wanted to say, way to go! Plus, some of you had a few questions for me as well.
Here are the questions:
1. Our 1/2 bath toilet seems to chronically clog. We use enzyme stuff to clear it but it just clogs again the next time someone does anything substantial in it. It’s annoying. Any tips?
A. Adjust the amount of water in the tank so it will give more H20 to flush (as shown at the end of Toilet Repairs Part 2). Or use a good accordian style plunger:

If all else fails, you may have a clog and need to snake your toilet out. I’ve seen some snakes that attach to a drill.

Just be careful you don’t scratch the bottom of your toilet bowl when snaking it.
2. What are the symptoms for needing a new fill valve? On ours, you have to push the flush handle down really hard and hold it… or it won’t flush at all on first flush sometimes. Thanks for the great tutorials!
A. It sounds like you either need a new flapper or you might try tightening the chain between the flapper and the lever rod. If you need to replace the flapper, you should probably replace the entire overflow tube/flapper assembly.
And that leads me to today’s tutorial!
How to replace the overflow tube and flapper:
In review, here is what your toilet tank parts are:
And here is the kit I recommend you purchase (costs about $20):

And here are the tools you will need:

- Plumber’s Wrench (must have a wide mouth opening. The Irwin pliers shown have just enough of an opening to work)
- Adjustable Crescent Wrench
- Handsaw (drywall, coping or hack saw will work. Needs to cut through PVC)
- Flat head screwdriver
- Level
- Scissors
- Bucket or basin
- Sponge
- Rags or Towels
- Rubber Gloves
Disclaimer: This tutorial is a general overview of replacing an overflow tube and flapper in your toilet tank. Be sure to follow the directions that come with your toilet parts as there may be changes or additional steps.
If you haven’t done so already, start by turning off the water. There should be a water shut off valve in the wall behind your toilet. Gently turn the knob clockwise to shut the valve.

Next, flush your toilet to drain the water from the tank. If your tank re-fills the water is not completely shut off.

Remove the lid to your tank. Set it in a safe place where it can’t get dropped and broken.

If there is still a lot of water in the bottom of the tank. Lift the flapper chain to drain the tank to the top of the flapper.

Use a sponge to completely soak up all the water remaining in the tank.

Once the tank is completely empty we can start to remove the overflow tube and flapper. But, first you need to disconnect the water supply tube. Because TODAY we are going to take the entire tank off! Don’t be freaked out, you can do this. It is just like unscrewing the screws and removing a light switch cover (only it weighs a lot more.)
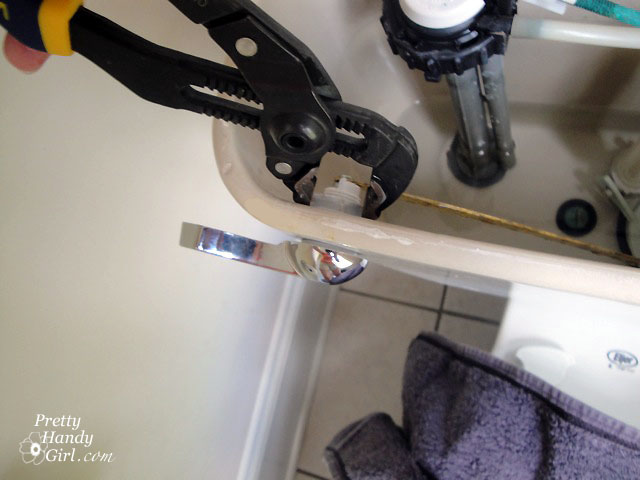
Look underneath the tank to see where the water line feeds into the tank. Using pliers, loosen and then remove the coupling nut from the supply line.
One quick note about supply lines: If your toilet has a plastic or rubber supply line, you should consider replacing it with a braided metal supply line that is less prone to breaking or leaks (in other words they can cause a major flood!) The same advice applies to the water lines under your sink and definitely your clothes washer.

Place the basin or bucket underneath the supply line and gently remove the line from the bottom of the fill valve (gray threaded stem shown below.)

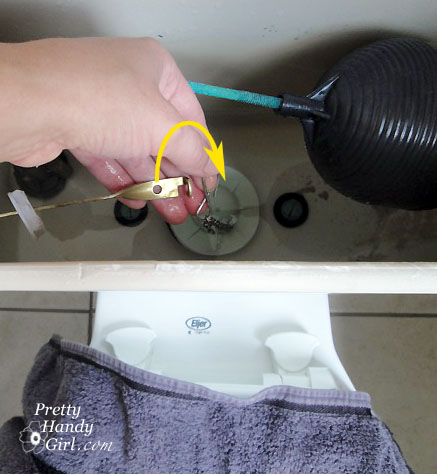
Detach the chain from the lever rod inside the tank.
Remove the rubber gasket by lifting up the sides of the flaps. If your gasket is attached a different way, don’t worry about it, just leave it attached.
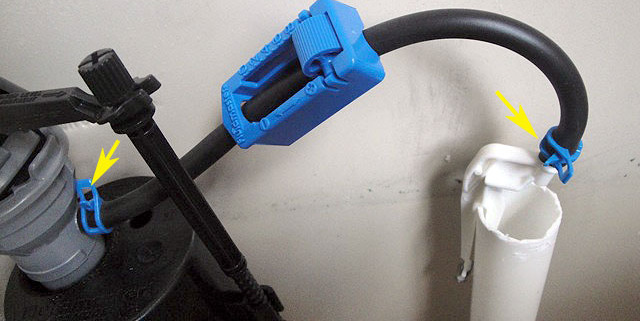
Disconnect the water refill hose from the overflow tube by sliding the anchor hook up and off the overflow.

Use your flat head screwdriver to lose the bolts at the bottom of the tank (on either side of the flapper.) You may need to reach underneath and hold the nut (or wing nut) with pliers as the bolt begins to loosen.


Once the nut (or wing nut) has been removed, you can now lift the tank off the toilet (using both hands.) Ask for help if you are concerned about possibly dropping the tank.

I recommend draping a towel over the toilet seat lid to rest the tank onto.
Remove the rubber gasket in the center of the underside of your tank. You may want to wear gloves (not because of germs, but because the rubber may be deteriorating and can leave black on your hands. But, come to think about it, I have two little boys and their aim isn’t exactly spot on. If you know what I mean.)

Now you need to remove the two bolts that held the tank to the toilet base. Loosen the nut with the pliers or crescent wrench.

Remove the nut and washer.

Repeat to remove the other bolt.

Grab the pliers and loosen the large plastic hex nut that was under the gasket. Then remove the nut. (I’m very thankful that the Irwin Adjustable Hex pliers I have worked perfectly. Otherwise, I would have had to buy a pair of plumbing pliers.)

Now you can remove the overflow tube and flapper assembly from the tank.

If you are replacing all the parts in your tank at once, when the tank is empty is a great time to give it a good cleaning!

Okay, time to put Frankenstein back together again. Grab the new overflow tube and flapper assembly from your kit. Insert the new overflow tube back into the toilet tank. Make sure it is sitting flush against the bottom of the tank (you may need to tilt the tank for it to feed all the way through.) Then set your level up to the line indicated on the fill valve. Make a mark on the overflow tube one inch lower than the mark on the fill valve..

Cut the top of your overflow tube off using a saw. Sand any rough edges if necessary.

Re-insert the flush valve (overflow tube & flapper assembly) into the tank.

Thread the new hex nut onto the bottom of the overflow tube and hand tighten it.

Because I don’t possess the masculine type strength, I use my pliers to turn the hex nut another half a turn until it is snug but not tight enough to crack the tank.

Fit the new rubber gasket over the hex nut as shown below.

Insert two new bolts into the tank with a rubber washer just below the head of the bolt.

Thread a metal washer and a nut onto the bolts from the underside of the tank.
Gently tighten the nut with the crescent wrench. I can’t stress enough how important it is not to overtighten the nut. Or you will crack your toilet tank.
Repeat the same steps to insert the other bolt. The bottom of your tank should look like this:

Carefully replace the tank back onto the toilet base. Being sure to line up the bolts with the holes on the toilet.

Set a level on top of the tank and level it.

Thread the rubber washer, metal washer and then the new wing nut onto the bottom of the bolt. Tighten the wing nuts on both sides. All the while keep an eye on the tank to make sure it stays level.
Attach the flapper chain back onto the lever rod. Make sure there is a slight amount of slack in the chain, but not too much. Trim any excess chain that hangs too close to the flapper.


Re-attach the water supply line making sure the coupling nut is nice and snug.
Turn on the water supply to refill the tank. Test the toilet by flushing it. Make sure the flapper closes and nothing holds it open. Replace the tank lid and enjoy your fully functioning toilet!

Hey, thanks for sticking with me through this “ugly” but necessary tutorial series. Hopefully I haven’t scared you off (judging from the very few comments I received.) I promise I have some more “attractive” tutorials coming soon. Then you can bring back your wonderfully sweet comments.