When I was 18, and bought my first car, and thought I was the coolest girl in town with a little zippy sportscar – sorry, just a little trip down memory lane.  My parents gave me my first tool kit. That tool kit is still with me today and I do use it a lot. The set has a series of sockets, crescent wrenches, interchangeable screwdriver bits, allen (hex) wrenches, needle nose pliers, and locking pliers.
 
That set got me through several repairs (both auto and home). Now, as a homeowner, I have found that there are a few more tools to have on hand.
You will likely want to look for a multi-piece set like this one:
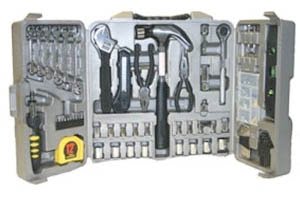
This will give you a wide variety of tools for a low cost. If you want a deal, try shopping for these sets around Father’s Day or Christmas. The set above was listed on Amazon.com for approximately $50 – $60.
Regardless if you are buying these items in a set or separate, these are the tools I recommend:
Homeowner essentials:
  1. Hammer
  2. Screwdrivers – Phillips head and a flat (straight or slotted) head. Try to buy a small and medium size of each.
  3. Allen (Hex) Wrenches in several sizes
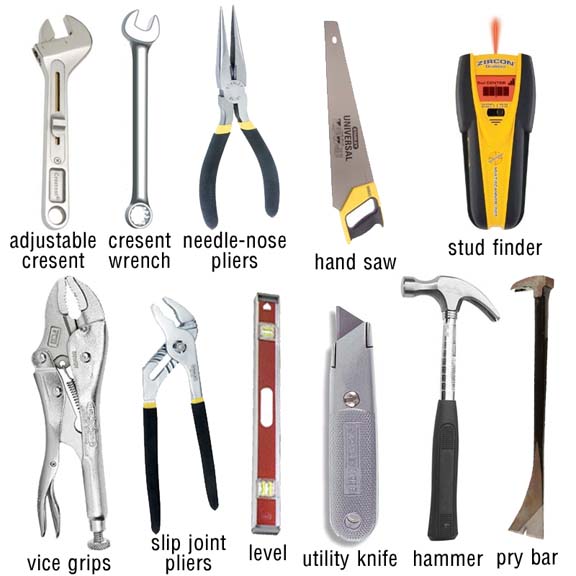
  4. Adjustable Crescent Wrenches – I suggest buying at least two. One 6″ and one 10″
  5. Slip Joint Pliers (handy for overall gripping)
  6. Needle-nosed pliers
  7. Vice grips (Locking pliers)
  8. Tape Measure
  9. Level – 24″ is preferrable
  10. Utility knife (mat knife)
  11. Safety glasses
  12. 12″ Handsaw
  13. Stud Finder
  14. Flashlight
  15. Pry bar (must have a flat sharp side and the other side a notch for pulling nails.)
  16. Tool box or case to keep all of the above in 
  17. My favorite DIY guide to my home: Home Depot’s Home Improvement 1-2-3 – the best $15 I ever spent!
 Screwdriver bits:
 

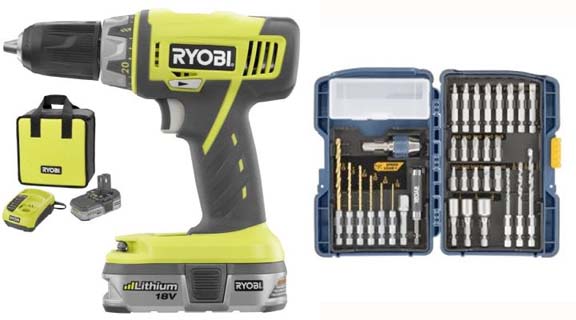
Last but not least, the most indispensable tool I’ve ever owned:
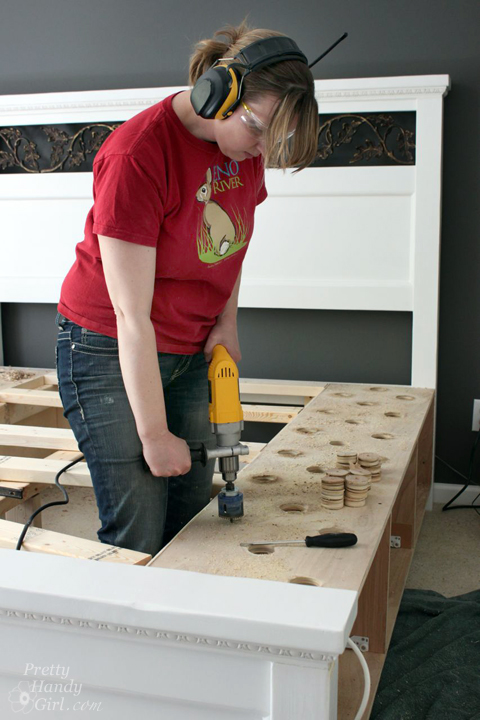
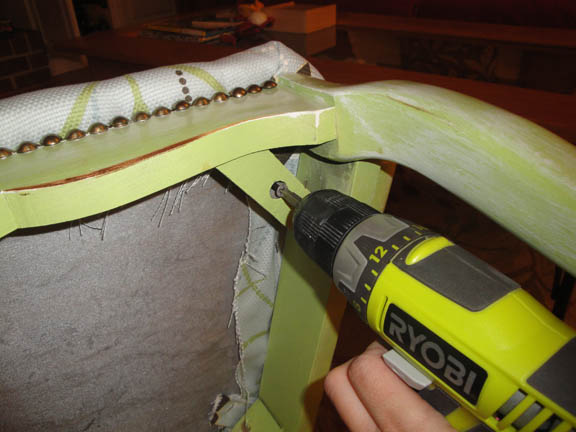
Cordless Drill with screwdriver bits and a small set of drill bits 

For Electrical DIY:
  1. Wiring instruction book or guide
  2. Wire Cutters/Strippers
  3. Electrical Current tester 
    • You only need the simple tester with two probes and an indicator light to test if the power is on. 
For the committed DIYer:
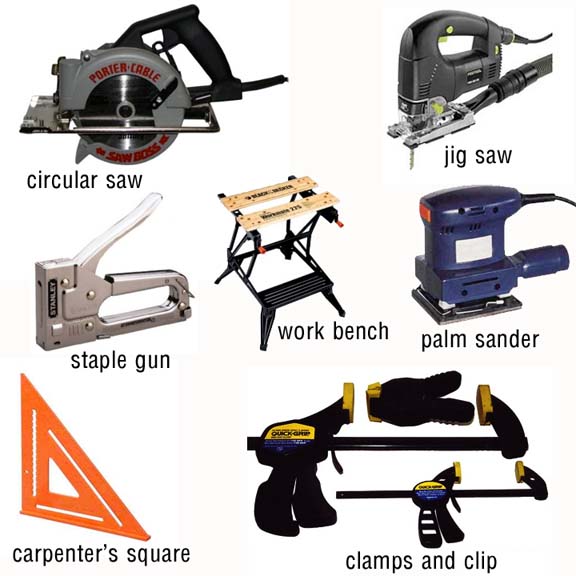
  1. Palm sander
  2. Carpenter’s square
  3. Staple gun
  4. Power Circular Saw 
    • Be sure to hold one in the store and feel how the grip feels in your hand. This is especially important as a woman with a smaller hand size. (more on power tool shopping in another blog post – coming soon!)
  5. Jig Saw
  6. Saw Horses or Folding Work Bench
  7. Clamps – A Variety of Adjustable Clamps and Clips

I hope this list gives you some good information so you won’t feel overwhelmed when buying tools. Definitely ask a sales person for help or opinions. Don’t tell them you are new at this. Ask them for the tool they would purchase if they were buying one for their shop. You should aim to buy a quality tool (especially power tools) that will last your lifetime. A cheap tool will either break or not have the power to do the job you need it to do. However, you don’t need to buy top of the line or break the bank to get a good tool.
Savings Tip: Many of the big box home improvement stores will usually price match tools that are priced cheaper at a competitor if it is the same make and model, plus take 10% off the price. Be sure to bring the ad with you or they will need to call or look up the price online.
 
Home Depots price guarantee:  
NOBODY BEATS OUR PRICES
If any competitor tries, we’ll beat their price by 10%. Guaranteed.*
*If you find a current lower price on an identical, in-stock item from any retailer, we will match the price and beat it by 10%. Excludes special orders, bid pricing, volume discounts, open-box merchandise, labor and installation, sales tax, rebate and free offers, typographical errors and online purchases.
Lowe’s price guarantee:
Everyday Low Prices, Guaranteed
We guarantee our everyday competitive prices. If you find a verifiable lower everyday or advertised price on an identical stock item at any local retail competitor that has the item in stock, we’ll beat their price by 10% when you buy from us. Just bring us the competitor’s current ad or we’ll call to verify the item’s price that you have found. Cash (charge card) and carry purchases only. Competitor’s closeout, special order, discontinued, clearance, liquidation and damaged items are excluded from this offer. On percent-off sales, Lowe’s will match the competitor’s percent-off offer. Limited to reasonable quantities for homeowner and one-house order quantities for cash and carry contractors. Current in-store price, if lower, overrides Lowe’s advertised price. Price guarantee honored at all Lowe’s retail locations. Labor charges for product installation are excluded from our price guarantee offer in our stores with an Installed Sales Program. Visit store for complete details.
Sear’s price guarantee:

If you find a lower price on an identical branded item with the same features (in Home Electronics identical brand and model number) currently available for sale at another local competitor retail store, Sears will match that price plus, give you 10% of the difference. Just bring in the original advertisement to a sales associate at the time of, or within 14 days after, your purchase. More fine print…

Happy Shopping!


Top Ten Reasons to Do-It-Yourself

Top Ten Reasons to Do-It-Yourself

Top 10 Reasons to Do-It-Yourself!

Over the course of the last ten years writing this blog, I’ve met numerous people who have lamented that they wished they had skills like mine. Or have professed that they just didn’t have it in their DNA to be handy. Consequently, I’ve spent a lot of time trying to persuade people that they are handy but just don’t know it yet. Granted, growing up in a family of DIYers helped me take the leap of faith from paying someone else to fix, build, or create something to doing it myself.

If you’re still on the fence about taking on a DIY project, let me give you the Top 10 Reasons to Do It Yourself:

    1. Save Money, Save Money, Save Money. (Do I need to emphasize this again?) When you do something yourself, you keep the money in your pocket that you would have paid otherwise. Why not create a jar and put money in there every time you save money doing it yourself versus buying or paying someone else? Did you know that taking on your own room renovation could save you as much as 50% of the cost to hire out?
    2. Try It. If you fail, Watch and Learn. You’re sink faucet is leaking or your toilet is running. You get ready to pick up the phone to call the plumber but then you remember the bill last time he was at your house. If you are trying to repair something, you will either fix the problem or need to call a repair person anyway. (That being said, recognize your limitations. Don’t take on a complicated electrical project if you don’t know what the black, white, or green wires are!) Go ahead and call that repair person, but stick around and watch how the repair is made. Ask questions. A lot of times you will realize that you could have done the repair yourself and next time you will!
    3. Help is All Around You. If you can read and able to follow directions, there is a 95% chance that you will succeed at your DIY project. There are so many resources to assist you. Here are just a few:
        • Instruction manuals that come with the fixture to install
        • Online resources, try googling “how-to” instructions for the project
        • Ask a professional or home improvement store employee for advice
        • Search for instructional videos on Youtube.com
        • Check out a DIY book at your library
        • Buy a DIY book at your local home improvement store
        • Ask a friend, family member, or neighbor who you know has the skills
    4. The Time is Now. You can complete your project now instead of waiting for someone else to do it.
    5. Get into Your Zone. You may love the process of working with your hands. If you are a parent, you’ll appreciate the fact that unlike children, wood and building is predictable. The materials will bend to your will (or tools.) Personally I find DIY projects relaxing.Modified King Size Farmhouse Bed with Storage Drawers | Pretty Handy Girl
    6. Prevent Alzheimer’s Disease. Learn something new. Studies have shown, that challenging your mind improves your brain functioning and prevents Alzheimer’s.
    7. Lose weight. If you involve yourself in a DIY project, you will probably sweat a little! You will likely be climbing, moving, and generally using your body. Engaging in a DIY project will definitely get you off the computer and keep you moving until the project is done. Talk about finishing your move goals!
    8. Discover a New Skill. How do you know you can’t tile or paint or build? If you never try, you won’t know if you actually have a talent for DIY.
    9. Bragging rights. Simple, but if you DIY something, you must brag about it to the world.
    10. Sense of Accomplishment. Do you remember the last time you tackled something new or difficult? Wasn’t the sense of accomplishment you go when you succeeded HUGE?

Install a Post Mounted Birdhouse | Pretty Handy Girl

That’s the Top 10 Reasons to Do-It-Yourself! Did I forget any? If so, leave me a comment below.

Tomorrow you’ll get your third step in this Guide to Learn How to DIY Anything! Be sure to check your email inbox, it’s going to be a good one.

signature

Ready to jump into your next DIY project now? You’ll find an entire gallery of projects to try here:

Now that my re-upholstered office chair is complete, I wanted to address the dark looming bookcase that I sit next to. I am obsessed with natural light and the color of a room can really effect my mood. We recently painted our office and had ceiling lights installed in the ceiling. Anyone else out there have one of those old houses where the light switch on the wall controls the outlets? I HATE this! Let there be light in all my rooms. Let’s talk about a Quick and Easy Bookcase Facelift.

Now that we have light in the ceiling, I also want to be sure that I take advantage of natural light as well. The majority of the furniture in our office is a dark cherry color. Bookcases, armoires and other recessed furniture will absorb light. I knew I wanted to lighten up the back of the bookcase, but didn’t want to paint it or do anything to destroy the value of the furniture. So, I set to work on this super quick and easy project, making decorative backer boards for the bookcase.

Materials:
Foamcore (32″ x 40″ made 3 backer boards)
Decorative Fabric (leftover from my chair upholstery project)
Batting
Scissors
Hot Glue Gun
Cutting surface
X-acto knife and fresh blade
Metal Ruler (or ruler with a metal edge)
Pencil
Sharpie Marker

First measure the bookcase cubby dimensions.

Next draw out the dimensions on a large piece of foamcore.  Then lay your foamcore on top of your cutting surface. Personally I like the self healing cutting mats. I use them for everything (matting, paper cutting, sewing, craft projects, etc.) I recommend buying at least a 24 x 36″ size. You can find them for about $40 here: https://www.jerrysartarama.com/discount-art-supplies/Mat-and-Paper-Cutters/Creative-Mark-Self-Healing-Cutting-Mats.htm

A Note on Safely Using an X-acto Knife:

First, be sure that you always use a clean and new x-acto blade while you are cutting foamcore. Otherwise, the blade will catch on the foam interior and tear up your board.  I learned the hard way how to use an X-acto knife while in art school. Let’s just say I’m glad that thumb tips grow back. Always use a ruler that is metal or has a metal edge. When holding your ruler, be sure your fingers are WELL AWAY from the edge of the ruler you are cutting on.

Try to cut with your blade on the waste side of the piece you are cutting. That way if the blade slips, it will mess up on the waste edge. For cutting foamcore or mat board, use light pressure and pull your blade through the material and towards you. You will need to make several light cuts until you are through the material completely. You will get a cleaner cut this way as opposed to using heavy pressure and try to cut through your material in one pass.

If your board is larger than your cutting surface, cut half your foamcore, then move the board on the cutting surface to protect the floor or furniture you are cutting on.

If you successfully cut your foamcore backer boards and still have all your fingers, you can now lay your decorative fabric on top of the foamcore. I played with the placement to make sure I liked the pattern that would be shown. Then trace a 1″ border around the boards and cut the fabric.

Next you will want to trace your backer board on top of the batting (no need to add a 1″ border on the batting. Just trace to size.) Then cut the batting.  Lay your fabric right side down, then the batting, and finally put your foamcore backer board on top.

Heat up your glue gun. While you are waiting for it to heat up, trim the corners on your fabric. Trim about 1/2″ away from the corner. This will help you neatly fold your corners when you glue them.

Run a line of glue on the edges of your backer board and fold your fabric over on top of the glue.

When you are done, flip over your board and admire.

Now comes the super easy part! Walk over to your bookcase and insert your backer boards. Tilt the top in first and then push in the bottom. The fabric and batting should allow the board to stay in with tension. Plus, the great thing about using foam core is that it will crush slightly to fit your space.

AND, if you want to use it as a bulletin board you can! I’ve been thinking about using the leftover decorative nail head trim nails (from my chair upholstering project) as push pins. But, for now I’m enjoying the lighter back of my bookcase! And, loving the way it coordinates with my desk chair.

If you are coming here from a link party, this is the final post on my Extreme Rattan Chair Makeover. Click HERE if you want to see the transformation from the beginning. This chair started out as an U-G-L-Y silver painted dining chair that I scored at a yard sale for $5! I handed over my Abe Lincoln and ran before the owner could change her mind. Let’s learn about adding nail head trim now.

Today I will show you how to upholster the front and back of the rattan chair, add nail head trim, and then you can see the final results! Can’t wait, can you?

Well, grab your tools and let’s get crackin’.

Materials Needed:

  • Nail Head Trim* (Purchased every third hole style trim. It cost $1.25 per yd. on Amazon.com)
  • Decorative Nails* 7/16″ x 1/2″ – French Natural (sold in bags of 50 nails for $1.70)
  • Rubber Mallet
  • Wire Cutters
  • Posterboard or Tracing Paper
  • Scissors
  • Batting
  • Cardboard
  • Spray Mount
  • Hot Glue Gun (with glue sticks)
  • Screwdriver or cordless drill

* Just a quick note that I measured the areas on my chair using a sewing tape measure so I knew how much trim I needed. Then made sure I had enough decorative nails to fill in every third hole. Always order a bit extra in case you make a mistake or if you miss measure. Plus, as I will show you, I had to end some sections early and add extra nails.

First thing I did was make a template for the back of my chair. I used a large sheet of poster board (the cheap kind you can buy at the drug store works great!) I used my finger to press hard on the paper and the edge of my chair back opening. When I removed the posterboard, you could see a faint score line. I then cut out the template. (You could alternatively tape several pieces of tracing paper together and draw around the chair backing.)

Then I fit my template into the back and made any cuts until my template was perfect. Next I traced my template onto thicker cardboard and cut out the cardboard for my chair back.

Now I could start cutting out my fabric. You will want to lay your fabric on top of the cardboard and play with the pattern placement until you are happy. Then trace about an inch outside the cardboard and cut out your fabric. This is where I wish I had followed Centsational Girl’s directions for her Cinderella Chair Makeover! She cut out a piece of batting that was the same size as her chair back fabric. She wrapped the batting around the cardboard and stapled it. Then she used the glue gun to attach her fabric to the cardboard. I didn’t see the need since I wouldn’t be resting my back on the back side of the chair. But, what I didn’t realize is that it would hide the folds in the cardboard. Oh well, live and learn. Luckily my chair back faces a wall so no one will see it.

So, next I pulled out my spray mount, after putting a tarp down on the garage floor that extended about 4 feet in every direction from my cardboard. (Did I mention that spray mount can also travel when airborne? Be sure to cover a larger area than you will be spraying and prop up cardboard or more plastic if you are spraying near something you don’t want the spray mount to adhere to.)

I sprayed a light coating on one side of the cardboard. Then laid it on top of the fabric (Next time I will replace the fabric with the batting – having learned my lesson.) Make sure your fabric (batting) is stretched out so there are no wrinkles. Now, if you are using batting, you will want to get your fabric and lay your cardboard sandwich on top of the fabric.

Now it is time to glue the fabric to the cardboard backing. Heat up your glue gun, and run a bead of glue along one edge of your backing. Fold the fabric over the back (being careful not to burn your fingers on the hot glue like I did) and press into the glue. Carefully fold the fabric around your edges.

At the top of my chair was a heart shape, which required that I cut a few slits into the fabric so I could fold the fabric into the cardboard notch.

You are almost ready to insert your backing into your chair. Before you insert the backing, run a line of hot glue all the way around the back of the chair where the rattan meets the chair frame. Then I set my chair back in place. This is where I realized that I should have added the batting. You can see two slight horizontal lines at the top and middle where the cardboard had a fold in it. So, I hope you can learn from my mistake. Although, I really don’t think it looks too bad (does it?)

Nailhead trim time – Make her glamorous!

I pretty much repeated the same process for tracing the back (pressing my finger on the edge of the rattan area.) The front of the rattan was wider than the back. The good news is that once you have your template cut out of posterboard, you can go right to cutting the fabric and batting, instead of cutting a cardboard backer. I used two layers of batting for extra cushion. But, I could have used more.


Cut your fabric about an inch wider than your template on all sides. Trace and cut your 2 + layers of batting to the exact size of your template.

Now you are ready to put your fabric and batting on the chair. I laid my chair down on its back so I could work with gravity holding down the fabric and batting. Starting in a corner, gently fold the excess fabric around the batting and lay your nailhead trim on the edge of the fabric. Use your rubber mallet to hammer in the first nail into the first hole in the trim. Continue along slightly bending your trim to match the curves on your chair.


When you reach a corner, you will need to cut your trim. If you can’t end with a nail hole at the corner, you will want to cut your trim at a hole and add a nail or two next to the hole to finish at the corner. This will ensure that you don’t have the excess trim popping up or catching on anything. Then I cut two extra nail head bumps off my trim so that I could start with a hole again.


Work your way around the whole back of your chair until you have completed the nailhead trim border. I also chose to add nailhead trim along the edge of my chair below the chair cushion. Why not?! At only $1.25 per yard, it has big bang (or should I say Bling!) for little bucks!


Now the moment you have all been waiting for. Time to re-attach your seat cushion to the chair. Lay your cushion back in place, and locate the four mounting screw holes underneath. Use your cordless drill (highly recommended over the screwdriver) to screw in the mounting screws.


Then, set your chair upright and swoon over your “ugly duckling turned into a beautiful swan!” Isn’t she lovely!

This concludes my Extreme Makeover of a Rattan Backed Chair. I hope you will check back soon as I show you some of our office renovation.

signature

The next step in my extreme rattan chair makeover is the upholstery. Time to give your tushie a new cushy!


Re-Upholstering the Chair Seat:

I removed the seat from the chair before I started any of the paint stripping and painting. Removing the seat on a cushioned chair is really simple. Flip your chair over, look for four holes where the mounting screws are located (see red arrows below.)

Re-Upholstering the Chair Seat

Tools You Will Need:

Cordless Drill or Phillips head screwdriver
Flat head screwdriver
Needle-nosed pliers
Scissors
Batting
Fabric
New Foam Cushion (if your foam is in bad shape)
Sharpie Marker
Staple gun w/ staples (I used 5/16″ staples)
Hammer

Grab a screwdriver or cordless drill with a phillips head attachment and unscrew the mounting screws. Be sure to save the screws as you will need them to re-attach the seat later.

If the fabric on your cushion is in good shape and you are using a fabric that is thick enough to cover the old fabric, you can leave the seat intact. In my case, the fabric was very old and stained. Not exactly something I wanted to be sitting on….ewwww!

So, I began the demolition phase of this makeover.

Grab a flat head screwdriver and needle-nose pliers. Wiggle the screwdriver underneath the staples and then use the pliers to pull them out.

Re-Upholstering the Chair Seat
Once the fabric has been removed and all the loose staples have been pulled, take a look at your foam cushion. If it is stained, crumbling, or smelly, you will want to replace it with new foam. Luckily the foam seat was still in good condition and no stains or odors, so I kept it.
I laid my fabric on top of the seat and played with the pattern until I liked the layout on my chair. Then I took my sharpie pen and drew an outline about 3 inches out from the edge of the seat.

Re-Upholstering the Chair Seat

Next, pull out your new batting. I like my seats to be nice and cushy, so I chose two layers of batting.


Next, I laid out my fabric, then the two layers of batting and finally the seat. Make sure that the batting will wrap around to the underside of your seat. Then cut your batting. Usually my batting is about an inch smaller than the fabric on all sides.

Now it is time to get your staple gun and hammer. Start by pulling your fabric up and wrap it over onto the bottom of the seat. Use your staple gun to put in one staple. Hammer in the staple if it is sticking up.

Next you will pull the fabric across from your first staple and affix that side. Repeat this step as shown below:
Re-Upholstering the Chair Seat
Now you can finish stapling the sides and hammering the raised staples. Leave about an inch to two inches from the corners. Pinch the corner fabric together as shown at the left. Then neatly fold it over onto the seat and staple a few staples to secure it.
Re-Upholstering the Chair Seat

Voila! You are done with the seat. Go ahead and set it on your chair and admire your work.

Be sure to join me here as I add the back and the finishing touches!