Fall Accessories for the Screen Porch | Pretty Handy GirlHow to Turn a Craig’s List Bed Frame into a Garden Bench

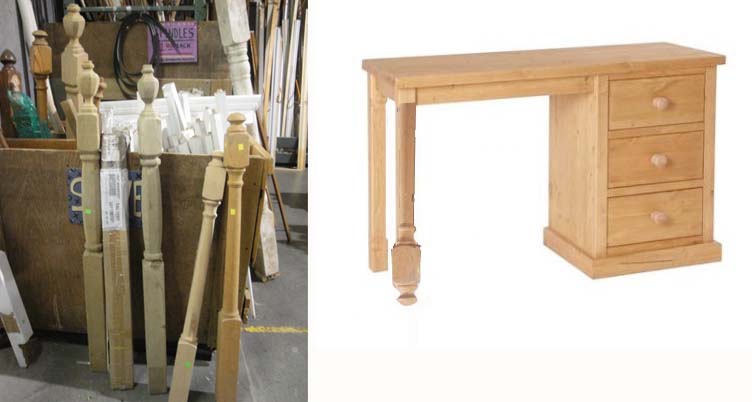
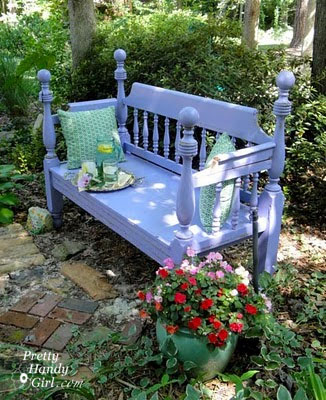
While visiting one of Raleigh’s local shabby chic boutiques, I fell in love with a sweet bench made from an old bed frame. But, the $350 price tag meant that our relationship was not meant to be. I began scouring Craig’s List for the perfect bed frame to make into a bench in our front yard. Finally, I found a full sized cannonball bed frame that looked very similar to this one:

The bed was in good shape. It was made from real wood and it had wooden side rails. Best of all, the price was $40 (and I didn’t have to drive more than 3 miles to buy it!)

After researching the web for ideas on how I wanted my bench to look, I found this site: https://www.robomargo.com/bench.html which has many photos of bed frames turned into benches.

Then I stumbled across Karla’s bed over at: https://itsthelittlethingsthatmakeahouseahome.blogspot.com

Her husband had declared the bed frame a piece of junk when she asked him to turn it into a bench. I can’t help giggling now that I’ve seen the finished project:

Isn’t this bench A-DOR-ABLE!

Here is my best effort at directing you through the transformation from a bed to bench (I neglected to photograph the process on this project since it was a pre-blog project.)

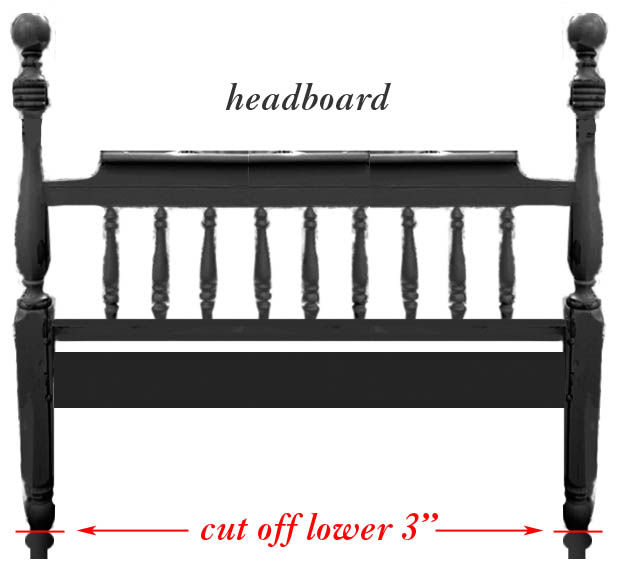
Begin with the headboard and footboard, and set the side rails aside for now.

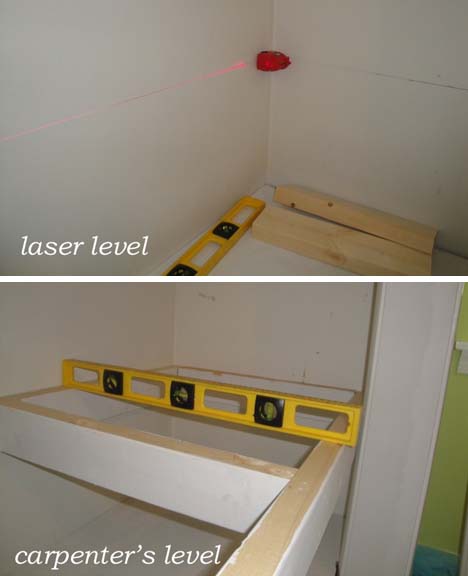
I pre-measured another bench and determined that I preferred a 18″ seat height. Luckily the footboard worked perfectly in my plans. But, I needed to trim 3″ off the bottom of my headboard legs.

Then determine the depth of your bench. I wanted mine to be 18″. (This is a little deeper than a chair (15 – 16″), but it allowed for pillows behind our backs and a more substantial size.

Your footboard needs to be cut in half so it can become your arm rests. You might have to trim more from the center as I did to achieve your desired bed depth.

What you are left with is two sides for your bench:

Now you need to grab one of your side rails and cut it down to size for the front skirt of your bench. Simply measure the distance of your headboard from post to post:

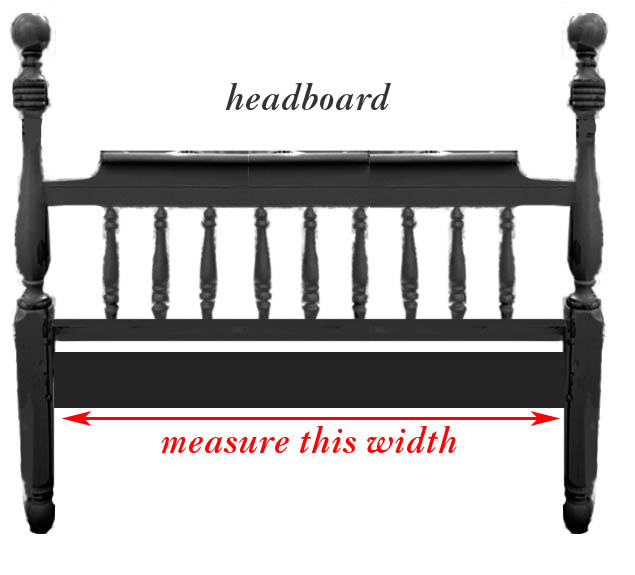
Then cut your side rail to this exact width. (Or if your bed frame came with metal sides, you can use a 1″ x 6″ x 8′ pine board instead.)

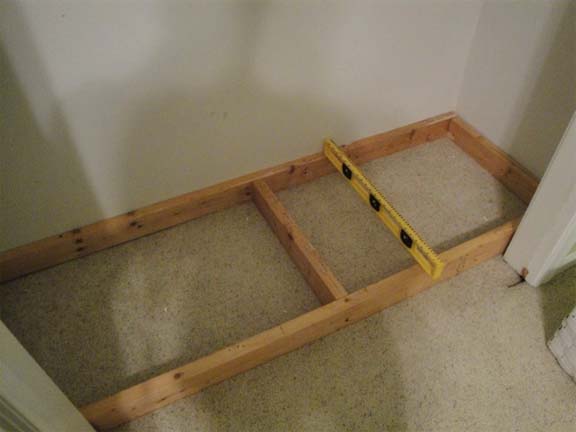
Now you will need to build a frame of 2″ x 4″ boards for stability. This frame needs to be able to fit between the front skirt piece (side rail cut to size) and the back of your bench (the headboard).

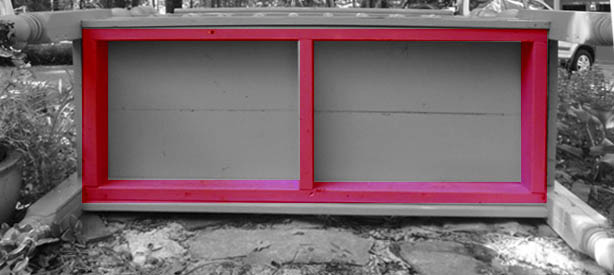
This is a picture of my bench tipped over so you can see the base support structure built of 2 x 4’s (in red).

Now you have all the components to construct your bench frame.

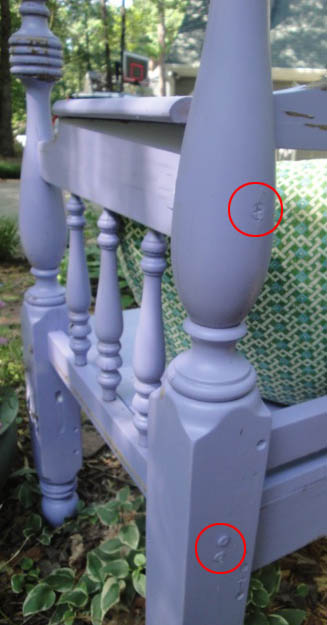
Attach the arm rest to the back of your bench (used to be the headboard) by pre-drilling holes through the bedposts and then screwing in 3″ long wood screws through the post and into the arm rest. Be sure that the arm rests are securely attached.

Here is a picture showing the screws from the back of my bench. and how the arm rest looks when attached.

Next you will attach your 2″ x 4″ frame to the back and sides of your bench. You can use screws, nails, and/or L-brackets to attach it.

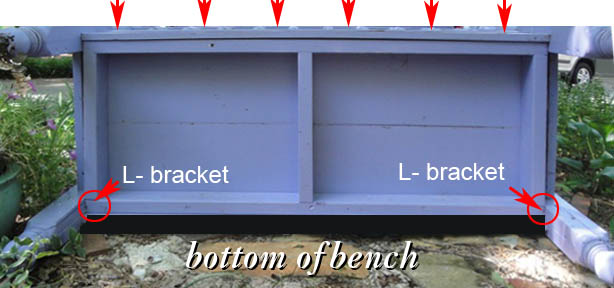
Then, you can attach the front skirt piece (cut down side rail of bed) to the 2″ x 4″ support base using small nails or brads.

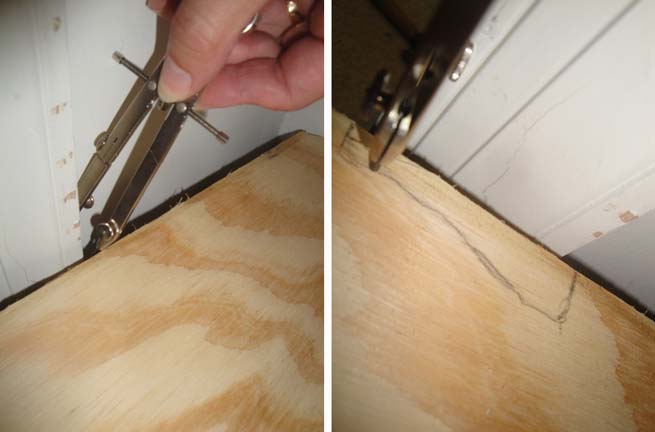
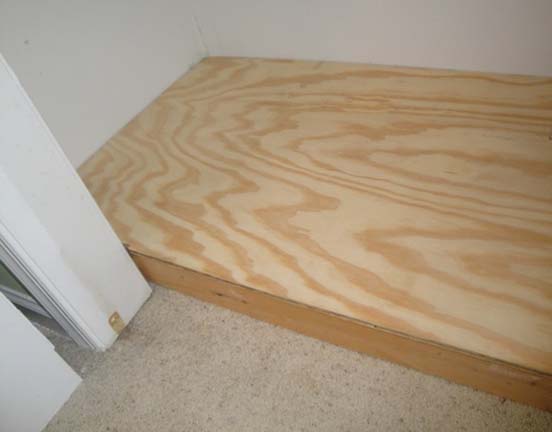
You are almost done with the construction! Time to cut some wood for the seat of your bench. I used two 1″ x 10″ boards cut down to size. Then cut out notches to fit around the corners of the bed posts.

Then use small nails or brads to nail your seat to the bench 2″ x 4″ frame.

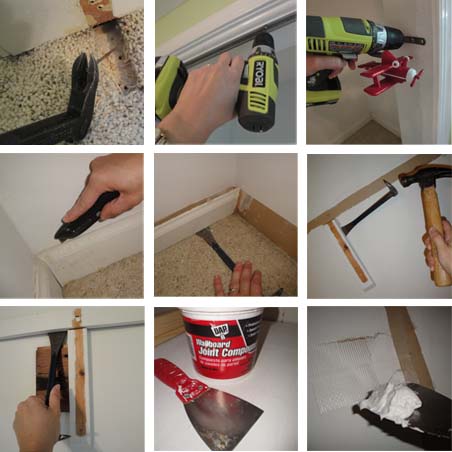
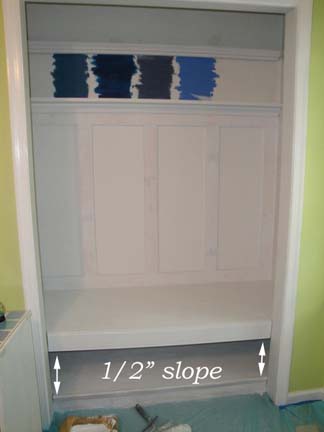
After assembling my bench, I added wood putty to fill my nail holes and then caulked all the seams to keep water out of them.

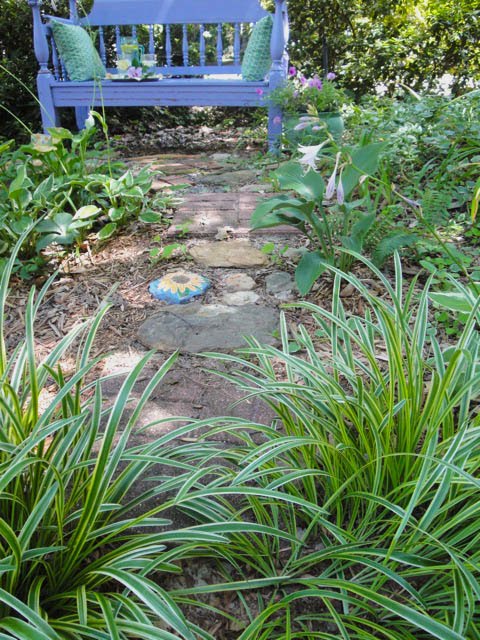
I finished off my bench with one coat of spray primer and 2 coats of Rustoleum French Lilac spray paint (the color my boys picked out!)

Unfortunately, I neglected to coat my bench with polyurethane, so you will notice that the paint has chipped in places. After a few rain storms, I realized that my bed frame was made from several layers of wood that was glued together. So, you will also see some gaps in the wood.

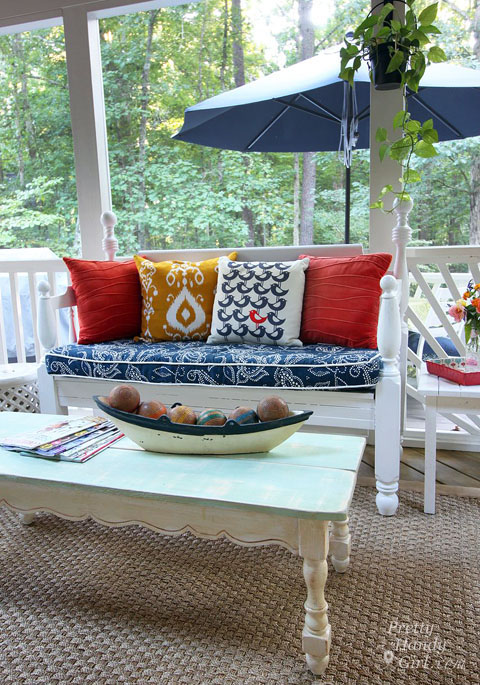
After some time, I repaired and re-painted the bench. To prevent further splitting, my bench spends its days on our screen porch.

Fall Accessories for the Screen Porch | Pretty Handy Girl

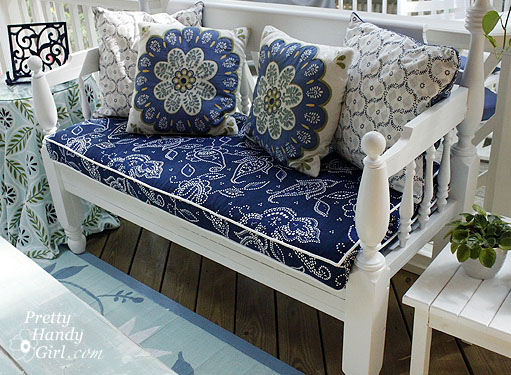
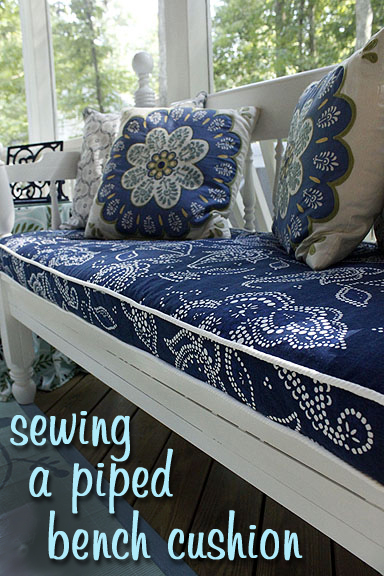
If you want to learn how to make a custom piped bench cushion, head on over to this tutorial:

But, in the meantime, won’t you come join me for some cool lemonade in the shade?

Step right this way.
Did you spot the blooming hostas and hellebores?
 Oh, you were too busy staring at this lavender beauty?
Won’t you sit down in the cool shade…
…and sip some nice cold lemonade with me?
If you want to learn how to grow a beautiful thriving flower garden for your bench to sit in, here’s my Landscaping 101 tutorial on how to grow beautiful garden beds.
beautiful flowering bushes and flowers in front of a green door and gray shuttered house
Happy Spring to you!
signature
Sunprints | Pretty Handy Girl

A few years ago while I was trying to entertain my toddler, we made sun prints on a hot summer day.

What! You’ve never heard of sunprints? Well, you really need to get your crafty hands on this hot product. Visit the Sunprints.org website to see all the details, plus a gallery of sunprint artwork!

Okay, don’t feel bad. I never saw it either until I happened upon this pack at our art museum gift shop. I bought some in the hopes of filling an hour of some weekday while waiting patiently for my hubby to come home.

As nature lovers, we collected grass, leaves, and even weeds from our yard. Then we had a blast laying the leaves on top of the sunprint paper. After 2-5 minutes of exposure, we dipped the paper in cold water. It was fun watching the paper turn blue and the silhouetted images appear before our eyes. (Okay, I won’t pretend that we didn’t enjoy playing in the bucket of cool water too!)

Several of them turned out so nice that I decided to frame them as art. Not only did I like the graphic look of the images, but the soft blue colors really appealed to me. I became so attached to the colors in the artwork that we painted our whole master bedroom the light color of the sunprints.


 Mimosa tree


Clover


Some weed in our garden

I found it a bit difficult to find the perfect square floating frames. Instead, I found regular square frames at Target for $19.99 a piece, and decided to buy them on the spot.  When I got home I had a brilliant idea on how to fake the floating glass frame look.

After we painted the room, I took some mat board and rolled the wall color on the mats. (It works best to use a mat that is somewhat close to the color of your walls.)

When the boards dried, I used my logan mat cutter and created custom mats.

Can you tell they are matted vs. floating? Maybe if you look close, otherwise, they appear to float in the frame!

So, you are accomplished at hanging three pictures so they are equal distance and the same height, right? If not, check back for my post on how to hang pictures to perfection.


Sew Star Pillows
Making Red & Blue Star Pillows

If you read yesterday’s post, you saw two star pillows on my son’s reading nook bench. I promised you the tutorial, so here it is:

These were super easy to make. I made two pillows in just over an hour on my Brother CS6000i sewing machine. This was a great Mother’s Day present from my hubby 2 years ago. (Last year he bought something most men would swoon over – A 10 inch sliding dual bevel compound miter saw. I just love saying that long name!)

This sewing machine is very reasonably priced at $125 and it has loads of decorative stitches!

The first thing I did was print out a star symbol from the computer as large as I could on letter size paper. (Look through your dingbat fonts if you can’t find a star. Mine is Option + H when using zapf dingbats font. But, yours may differ. Or better yet, google star in the images tab.)

Then I traced the star slightly larger than my print out onto white felt. Be sure you are using sharp scissors when you cut the felt or it will tear.

Making Red & Blue Star Pillows

Luckily I had leftover fabric from some pillows I made for Christmas presents and 2 denim cloth napkins handed down to me from my super stepmom!

I simply cut out two squares of red corduroy the same size as the napkins. At this point I should have ironed my fabric, but I was too impatient to finish sewing these starry stunners.

Making Red & Blue Star Pillows

I laid out the stars on the center of the fabric (one on blue and one on red.) Then pinned them in place and stitched the stars onto the fabric.

Making Red & Blue Star Pillows

I used this decorative stitch (I don’t know the name of it…can anyone tell me?), because it made it looked hand-stitched. I used red thread on the blue denim pillow and navy on the red corduroy pillow.

Then I matched up one denim napkin with the red corduroy star front and vice versa for the denim star pillow. After laying out my pillow (gotta love that I kept those hunter green pillows from the 90’s!) on top of the fabric, I pinned the fabric right sides together forming a guide for where my seams would be.


Next I straight stitched the sides together leaving an opening, about half the width, at the bottom to stuff the pillow inside. I checked to make sure the pillow fit before I turned it right side out. Then trimmed my extra salvage edges and made 45 degree cuts at all corners. At this point, I turned the pillow case right side out.

Making Red & Blue Star Pillows

I used the blunt tipped scissors to poke the corners out (broken tipped pencils or other blunt pointy objects work just as well. Wow, that sounds like a murder weapon.) Then stuffed my pillow back inside and pinned the bottom of the pillow together.

Last, I stitched a straight stitch as close to the bottom of the pillow as I could to seal the open edge.

And that is my super-duper, easy and quick guide to creating star pillows.

Making Red & Blue Star Pillows

But, who says you have to make star pillows. Get inspired to make your own pillows! Here are some other ideas:

Poinsettia pillows made with corduroy and felt on Centsational Girl’s blog.  I loved the combination of the textures and the graphic images.

Or adorable pet silhouette pillows. I made a dog portrait pillow for my pretty handy sister and my super talented mom (who both coincidentally own black dogs.)

Next up will be a tutorial on rewiring and adding a switch to the copper wall sconce lamp that hangs in the closet turned reading nook project, that I bought from the Habitat for Humanity ReStore!

Inspired by:
Visit thecsiproject.com
Check out some other Independence Day inspired projects on their site.


and


Project completed just in time to participate at Centsational Girl’s
Check out other Independence Day themed projects on her site as well!


Happy Fourth of July!
Closet Reading Nook | Pretty Handy Girl

Come see this Closet Reading Nook Transformation! Learn how I turned this closet into a Reading Nook in a weekend. This area could also become a built-in desk area at a later date.


Boy's Red, White & Blue Themed Room | Pretty Handy Girl

When is a Closet not a Closet? Reading Nook Transformation!

Have you seen all those cute closets on Pinterest? The ones that were closets but are now a new space like a reading nook or a home office? Well, today I’ll show you how you can give your closet a makeover by turning it into a reading nook!

Boy's Red, White & Blue Themed Room | Pretty Handy Girl

The Back Story:

My husband took the boys camping! Translation: A free weekend – by myself – peace and quiet!

{insert sound of hammers, jigsaw, table saw, and more hammering}

Well, forget the quiet part, I decided to tackle another DIY project I have been thinking about for almost two years. My son’s closet!

My three year old has two full-size closets in his room. And, yet, his toys were always strewn around the room. Here is the “keeping it real” BEFORE picture:

Boy's Room Before | Pretty Handy Girl

Last year I took the doors off one of the closets and put up some curtains so he could have a little hideaway. That was an easy task, but I wanted to give him more storage and a fun spot to sit and read books during quiet time. When I saw this picture in a magazine, I knew I had the perfect solution.

Kym, the homeowner, turned her son’s closet into a private nook. I thought, no problem, I’d complete this project in an easy 2 days. After all, how long can it take to renovate one 6′ x 2′ closet? During stopping points I could squeeze in a pedicure, swim some laps and possibly have a friend over for wine and some chat one evening.  Truth be told, it ended up taking a full 3 days (and nights). If I had a helper, I probably could have knocked it out in a day and a half.

Before and After:

Ready to see how I transformed a standard 2′ x 6′ closet into a multi-functioning reading nook, toy storage, sleepover bed, and creative play space?

How to Turn a Closet Into a Reading Nook:

First (after cleaning up all those toys, of course), is removing hardware, base molding, and patching holes. (This is where I found I didn’t know my own strength and ended up having to patch a larger drywall hole after trying to remove the closet cleats.)

Once the closet is empty it’s time to build!

Materials:

(I’ve included affiliate links for your convenience. I earn a small percentage from a purchase using these links. There is no additional cost to you. You can read more about affiliate links here.)

Optional: trim molding & shelving

Home Office Desk Option:

If you want a home office in your closest, skip the base and only build the framing for the bench, but install it at 29 inches (standard desk height).

Measure and Cut Lumber:

Measure the floor of your closet to determine the size for your base and bench.

Cut all your lumber to size, then build two frames. One for the base and one for the bench.


Your base frame only has to have one center support because it doesn’t have to hold much weight. The bench seat frame needs two center supports at 2′ intervals.

Find and mark the studs in the wall. (Here are 5 different ways to locate studs without a stud finder.) Then secure the base frame to the studs using a few screws.

Cut your finish grade plywood to top the base and bench frames.

Scribing Around Molding:

Here is a little trick for scribing the profile of trim or other obstacles onto your board. Use a compass and set the width to the same distance from the wall to the outside of my door casing. Then draw a line around the casing being careful to keep the compass perpendicular to the casing. Then you can cut out the profile with a jigsaw.


Set the plywood on top of the base. Secure the plywood to the base with a few screws (or wood glue and trim nails.)

Next build the second frame the same way (but add two center supports for the bench.)

To simplify things, you may want to prime as much of the framing as you can before nailing it into place. It is easier to prime wood on sawhorses.

Installing the Bench:

If you have a helper, this process will go easier. If not, you need to temporarily hold the framing before securing it. Cut some scrap blocks to hold the bench or temporarily drive in a few screws.

Measure up 18″ from the floor. This is standard bench height.

Use a level (both a carpenter’s level and laser level if you have them) and level the bench platform before screwing it into the studs. Use at least two screws on each side and several into the back and one on either side of the door frame to secure the bench in place. Set the plywood on top of the bench framing. Secure it with a few screws or wood glue and  trim nails.


Remeber that note about having a helper? I wish I had one because at some point the right hand side of my bench shifted while I was securing it, which resulted in a slight slope. Seriously, I really did level it! I even have the pictures to prove it! Shhhh, don’t tell anyone! My lesson learned is that next time I will either screw the frame in place to hold it or put a brace underneath to keep it from slipping.


Bench Cushion:

Cut the foam cushion for the bench seat. If you haven’t heard, the best way to cut foam is with an electric carving knife! (Huge thank you to my friend and neighbor Karen for the use of her 1970’s electric carving knife.)


You can sew a bench cushion later to cover it. Here’s how to sew a simple bench cushion with piping.

angled bench view

Decorative Molding:

Sewing will have to wait, for now we’re going to finish off this closet reading nook with some decorative molding. This is a personal preference, but I chose to install board and batten molding for the back like I did in this bathroom.

But, if you don’t want to use board and batten, you may like the DIY shiplap look instead.

Then I added decorative molding under the shelves. Did you know that some of the molding in your home, especially crown molding, is made up of several different molding profiles? You can make molding more decorative by using several different pieces and then caulk seams to hide the edges?

Painting Prep:

Before priming all your wood, caulk all the seams and let it dry.


This is the Pretty Handy Girl’s tried-and-true caulking method:

  1. Squeeze out your bead of caulk with a caulk gun.
  2. Keep your finger at the front of the tip of the caulk and use a baby wipe smooth the caulk as it’s dispensed.
  3. Follow up with a clean baby wipe if necessary to smooth any spots.

It’s easy to caulk like a pro if you follow my tutorial.

Once the caulk dries, prime all the wood and trim. Let it dry.

How to Tint Primer:

After trying some Benjamin Moore paint swatches, I settled on a deep navy blue called “Symphony Blue”. I knew I’d need to use some tinted primer before trying to paint such a dark color on the light walls. You can save money by tinting your primer. Simply add 1 part paint to 3 parts primer.


Isn’t the marble effect pretty! Mix well.

Painting:

Always use at least two coats of paint. This makes it easier to clean the walls and eliminates any missed spots.

Paint the trim first. Then cut in around trim with a good quality angled brush.

Use a paint roller to paint in between your cut in lines.

So, are you ready to see this Closet Turned Reading Nook?? The drumroll please…

Boy's Red, White & Blue Themed Room | Pretty Handy Girl
Can’t you hear the Symphonic Chords playing?


The copper wall sconce was also from the Habitat for Humanity ReStore. I scored that gem for only $5! It has a cord that I snaked around the molding and then plugged into the outlet just outside the closet. Click Here to Learn How to Add a switch to a Hard-Wire Light.


Plenty of storage bins for all the toys a three-year-old can hoard.


Star pillows were super easy to make with cloth napkins and fabric I had on hand.


Finally, a nook built for reading, sleepovers…


…or just hanging with big brother.

Wall-mounted IKEA LILLÅNGEN Mirrored Cabinet turned Stuffed Animal Storage | Pretty Handy Girl
Boy's Red, White & Blue Themed Room | Pretty Handy Girl

Boy's Red, White & Blue Themed Room | Pretty Handy Girl
That’s all folks! Bye-bye!

Did you like this transformation? If so, you’ll love more custom spaces in my home!

On Wednesday, I had the morning to myself since the kids were in summer camp.  I decided not to work since it was my birthday. Most people would probably take the free morning to get a massage, or a pedicure, or go shopping. I chose the later. But, the shopping mall wasn’t calling me. My destination was far from the marble floors and glittering displays. I was headed to the industrial part of town where warehouses and construction equipment rental stores reside. I visited my local Habitat for Humanity ReStore.

I am always amazed by the things that are donated to the ReStore. When I enter those doors, my mind begins to whirr. Before me are shelves and aisles of discarded items. Each one calling to me to transform him or her from an ugly frog into a beautiful prince or princess. I happen to possess the magical powers to do just that! It starts with the ability to see into the future (well, maybe just a vision of what could be.) Then it takes some concentration and before you know it…bippity boppity boo! There before me stands a beautiful object and no one can guess at its humble beginnings.

I’d like to give you a look at some of the visions I had.  Won’t you join me on my tour?

First I headed down the furniture aisle. This little knotty pine night stand whispered to me, “Psst, look at my beautiful handles!” She had only been at the ReStore for a few days, so her price was a little steep. But, her drawers were solid and on gliders. Structurally she was solid.

I closed my eyes and when I opened them, I saw this beautiful off white dresser. Freshly painted a crisp white and her handles had a satin black finish. Beautiful!

Then I heard the sounds of water splashing on a classic marble sink. I turned the corner and saw this builder’s special white vanity with brand new brushed nickel faucet.

It didn’t take much to invision this gentleman with a black tuxedo coating of paint and brushed nickle knobs and handles. At $75, he is a diamond in the rough. The sink set alone would cost that!

But, the best is yet to come. Continuing down the cabinet aisle, I see this poor late 70’s kitchen cabinet set. Her handles are charming and exotic. She has some nice curves and pretty lines.

I squint my eyes and begin to see a miraculous transformation! Antique gold handles pop out. Legs grow at her base and a table top sprouts on her head. Oh she will be the belle of the ball as a sideboard in anyone’s dining room.

The next cabinet can not be ignored with a $5 price tag. He begs for someone to take him home.

Imagine a built in cabinet and window seat in a dormer window. Fresh white paint and slate blue trim with black handles.

It doesn’t take too much imagination to see these old newel posts cut down and fitted onto a plain jane desk to add more curvaceous legs:

Now it’s your turn. Imagine these items transforming before you very eyes:

I have a friend who has an old set of lockers by her door. It is her upright family organization center. Each child has a locker and he/she can store shoes, book bag, etc. inside.

I can just see this set of red lacquer cabinets in a retro modern dining room or living room:

A little black paint on the shelves and some feet. Maybe a black marble or granite top?

The ReStore has a large selection of donated lights. Chandeliers twinkle in the light above your head. Envision the shiny gold fading to a beautiful oil rubbed bronze. Another friend shared this link with me detailing such a transformation with Krylon spray paint.

The ReStore staff actually has a display model that someone has transformed into a shiny black chandelier with crystals dripping off her arms.

With an $8 price tag, it is hard to walk away from these beauties. But, I’m seeking something in particular. A new hanging fixture for our foyer.

I find these two potential hanging lights.

At $5 a piece I should bring them both home. But, I decided I prefer the one on the right with his open base and seedy glass. Check out the transformation here!

This glass globe used to be a large exterior hanging light fixture!

Can’t you just see it as a cloche in your garden? At $35, her price was a bit steep for me, but maybe she will still be there in a few weeks with a lower price tag. (Update: I went back to buy this exterior light and the second lantern above, but they were both gone. My loss, but hopefully someone else’s gain.)

As I gather my treasures (the hanging light, an old rickety ladder, some decorative moulding and a copper wall sconce) I am nearly bowled over by the detail on this solid armoire. At $450, it would be a nice addition in someone’s bedroom, but alas our rooms are too small for this towering king.

I hope you enjoyed the tour and check back soon to see the magic I am going to perform on the treasures I bought: copper sconce, decorative moulding, ladder, and hanging lantern.

In the meantime, I have a busy weekend ahead building a built in reading bench with storage in my youngest son’s extra closet.