Having guests over is such an exciting opportunity to catch up and show off your home. Here’s a tour of our guest room for you to enjoy. Come on in, kick your shoes off and stay overnight if you wish!

CountryLiving

The room had humble beginnings. These are the before pictures.

GuestBefore1
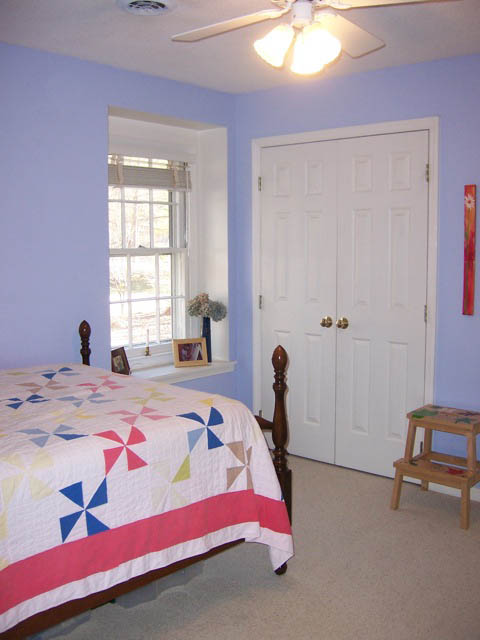
Not a bad color, but just not what I had in mind.
There were several holes that needed patching in the walls.
That gave me another reason to re-paint.

GuestBefore2 
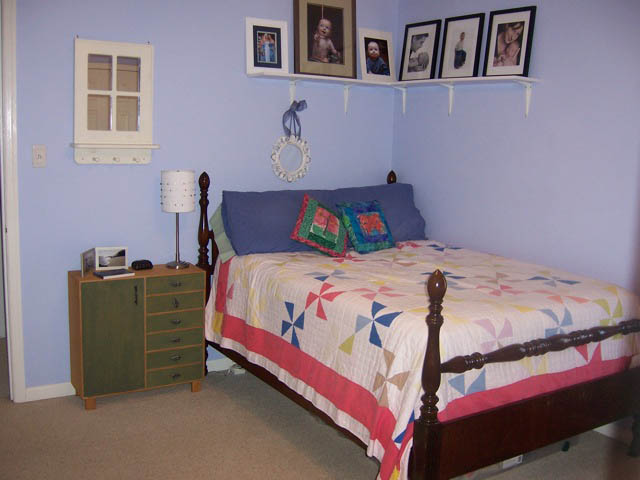
What was I thinking?! That little ikea dresser just does not fit!

Before I show you the after pictures, I have to explain. As the mother of two boys (and the only female in our home), I am careful to keep my decorating from being too flowery, frilly, and – well – girlie. But, after a week of sleeping in the guest room because everyone had the flu except me (you know Mom’s can’t afford to be sick!), I decided to throw my femininity into just this one room. I told Pretty Handsome Guy that it was the one room that I needed to be girlie! He knew better than to protest. I guess he figured it was better if I got it out of my system in just this one space.

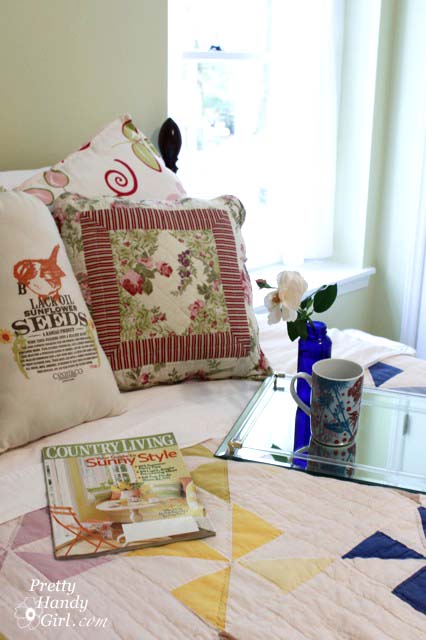
So, here she is, all gloriously girlified:

Roses
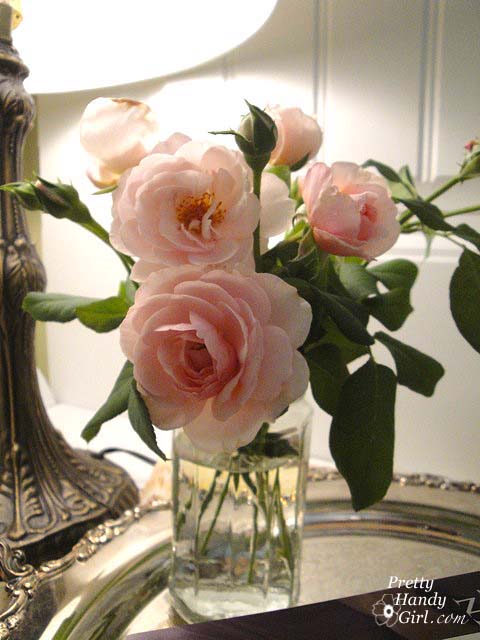
Fresh roses, I wish you had smell-o-vision. Freshly cut roses, displayed in a recycled jelly jar.

Doorknob
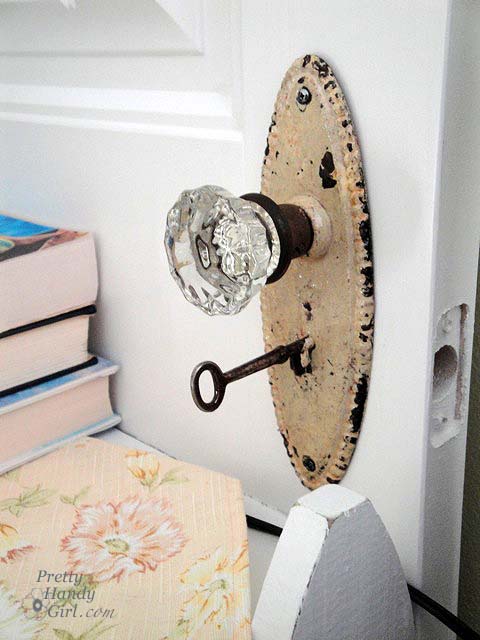
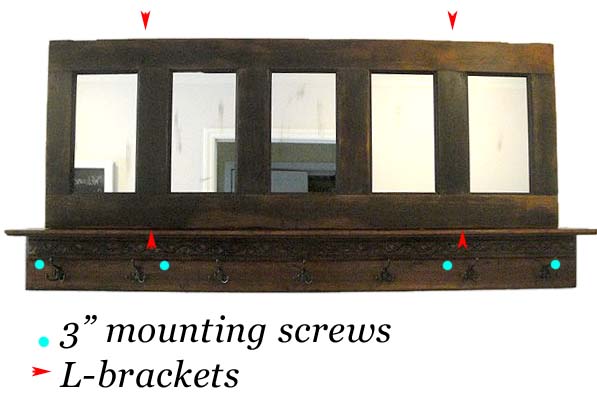
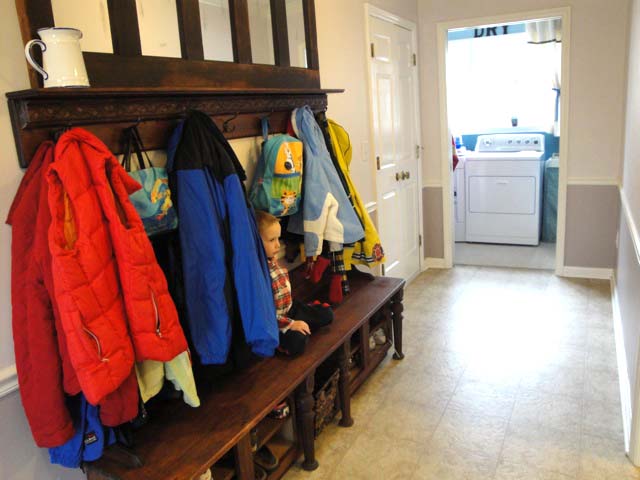
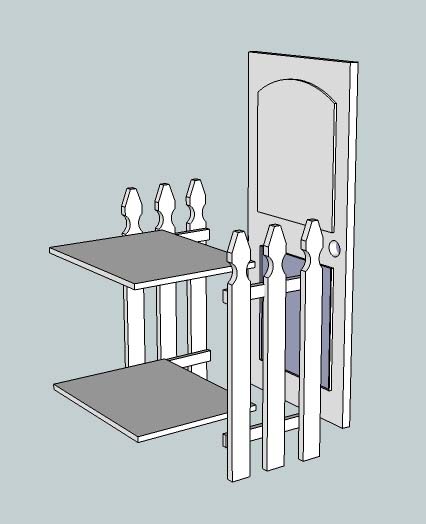
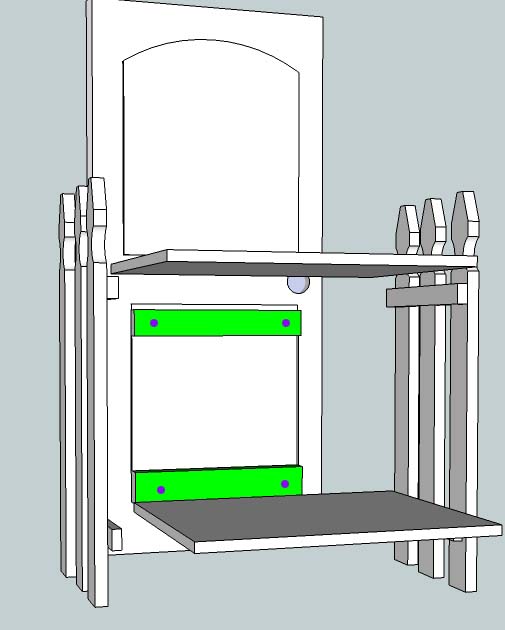
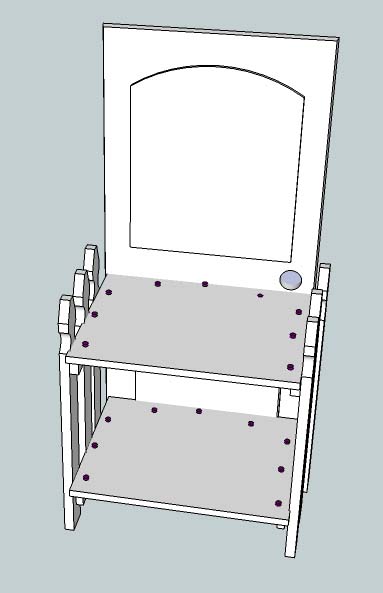
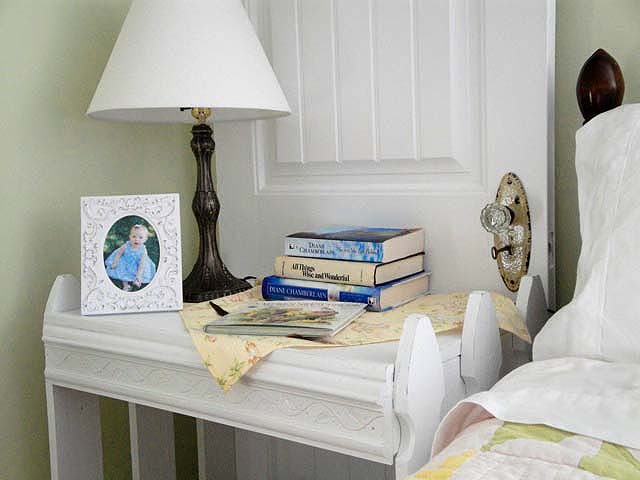
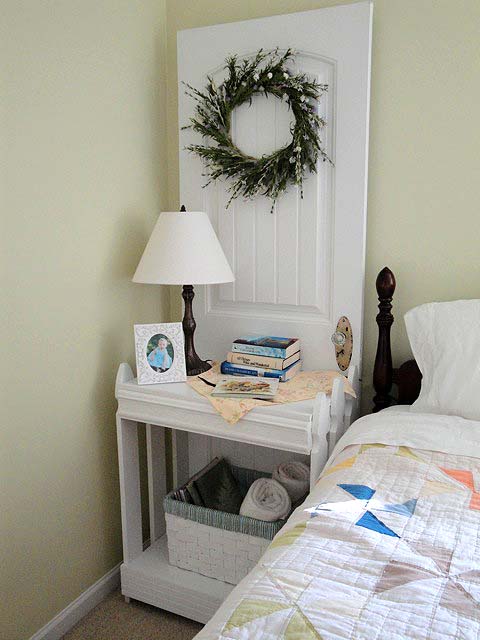
Detail of doorknob from the nightstand made from a curbside door and picket fence.

3.4Nightstand
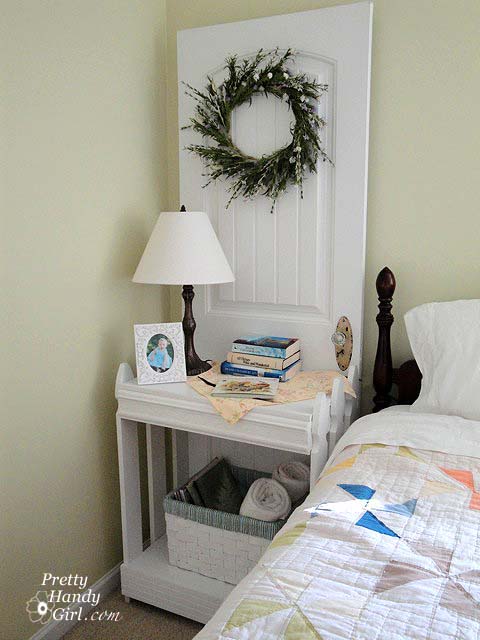
Better view of the nightstand. The lamp is from Goodwil

BirdSeedPillow
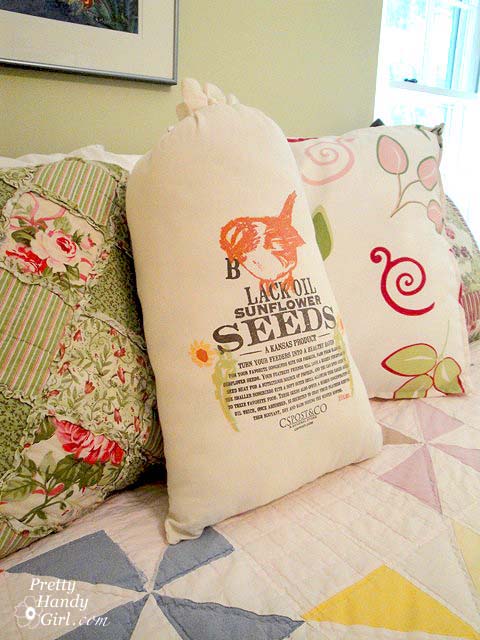
The center pillow was a sack of birdseed that I ordered from here.
Then I washed it and stuffed it with stuffing and just re-tied the top.
The patchwork rose pillow was purchased in a gift shop during our visit here.
 
GuestBed
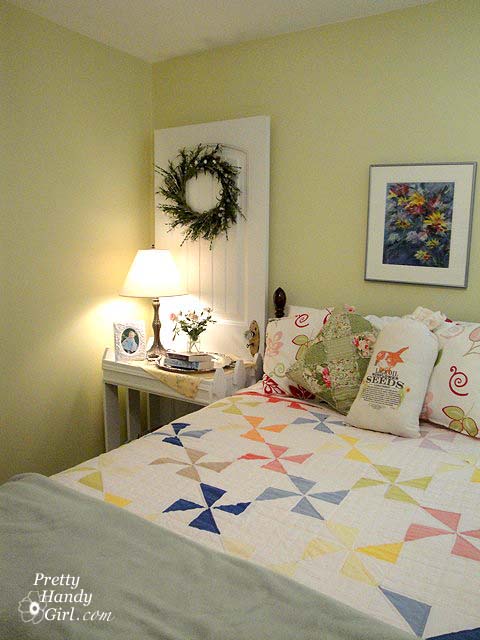
The painting over the bed was painted by the very talented, Shari MacFarlane (who also happens to be my Mom.)

FootofBed

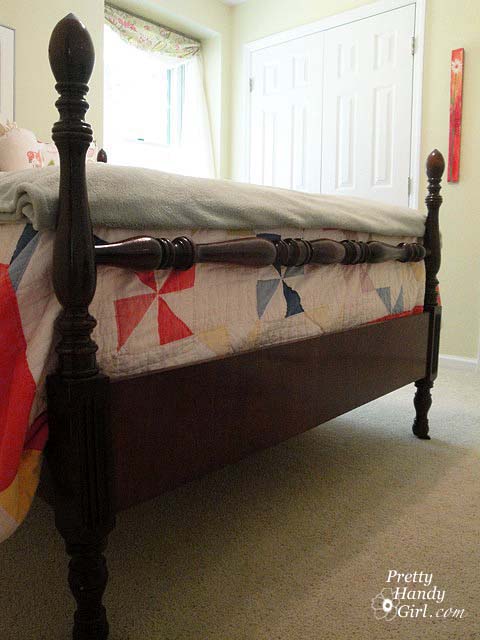
The bed frame was rescued from the curb when we lived in Charlottesville, VA. The side rails were broken, but I found sturdy new ones at a rummage sale the very next week!
I sanded the rails down and stained them to match the headboard and footboard.

Daisyart
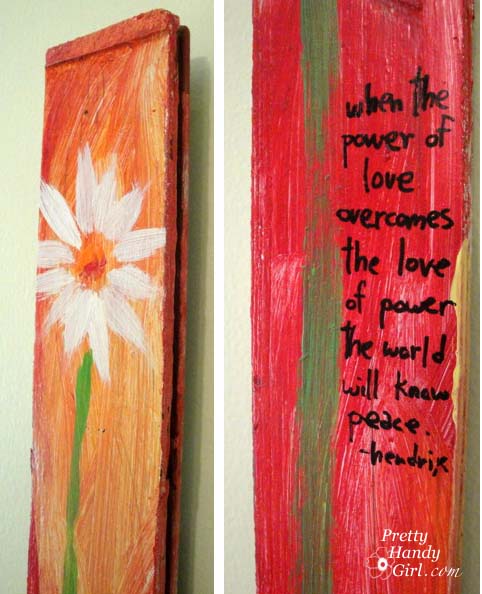
You can just barely see this piece of art from the previous picture. I purchased this little painting from a gallery in Asheville, NC on my first getaway weekend after having kids. The artist signed it Cap Man 2005. It is painted on a salvage floor board.
I just love it and the Jimi Hendrix quote

Flowerscloseup
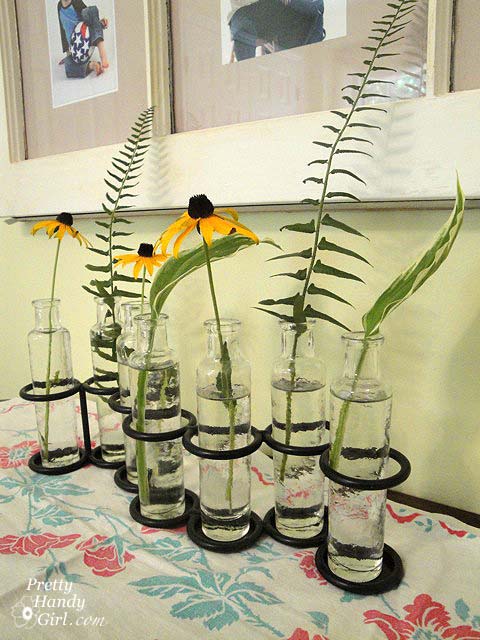
Spray painted floral vases and a peek at my birthday gift from a dear friend.
It was her grandmother’s hand towel!
She was the recipient of this present for her birthday a few years ago.

WindowsonWall

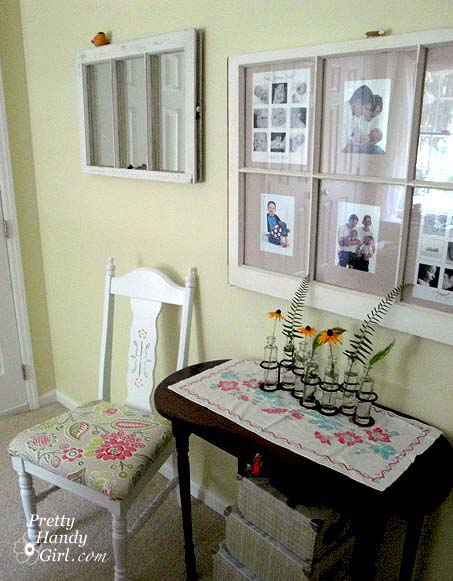
Daisy, the rescued chair and an adorable kidney shaped desk. I think it fell off a pick up truck because it was busted up and upside down on the side of the road.
The desk matched the style of my bed perfectly!

DaisyDesknFlowers
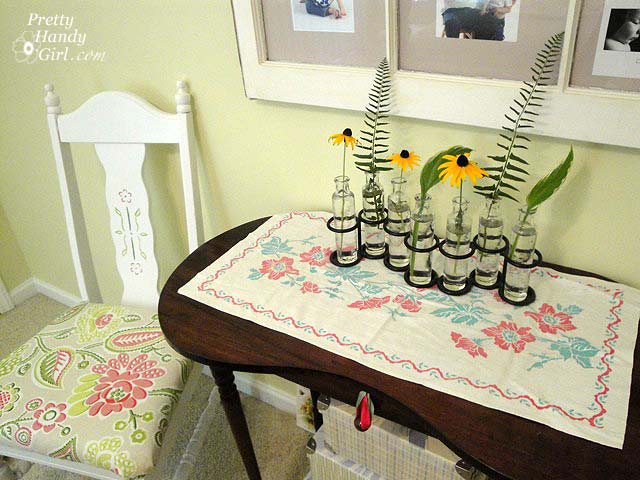
I glued the broken pieces, and re-stained it. Then added a ribbon and bead pull.

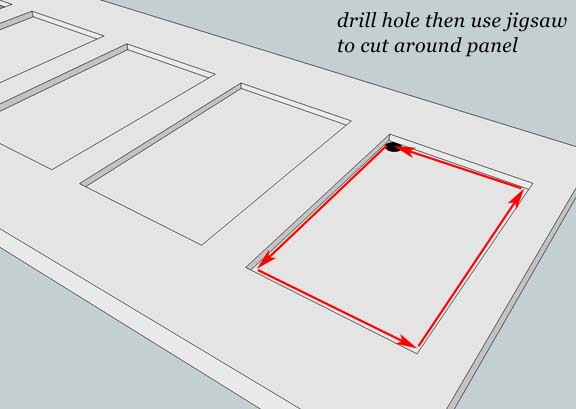
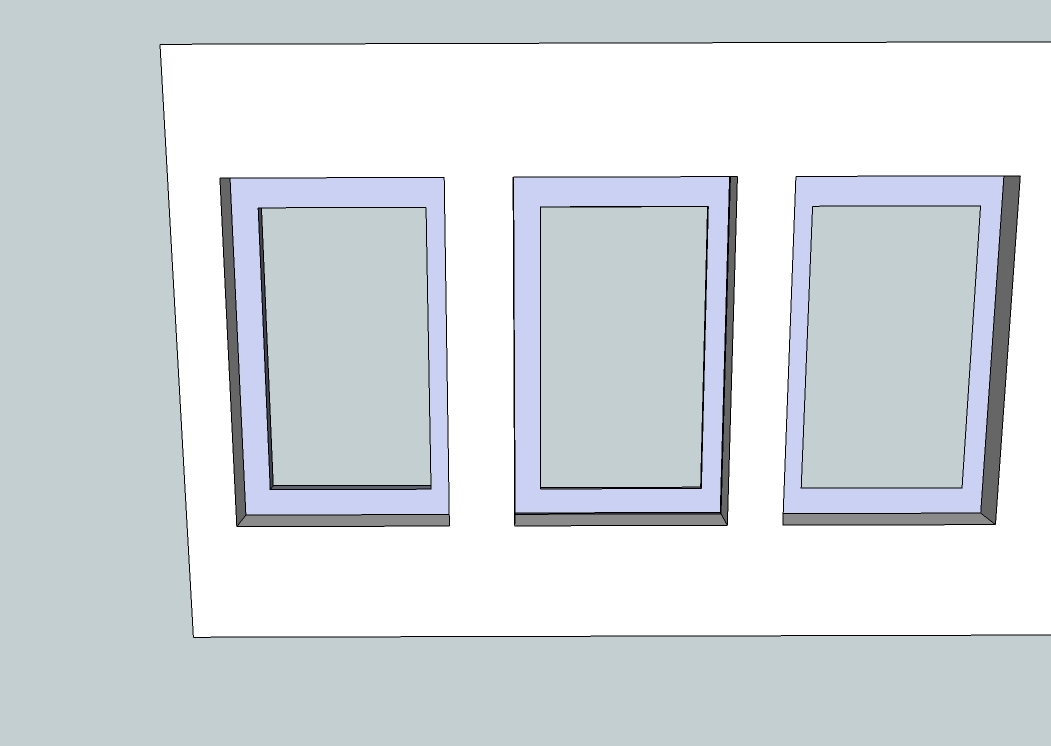
Salvage windows. The larger one was a gift from a friend and fellow blogger. I cut mat board to fit in each individual pane and then used double stick tape to mount family photos on the boards. Then pressed the boards in the back of the window and hot glued around the edges.

WindowDetails

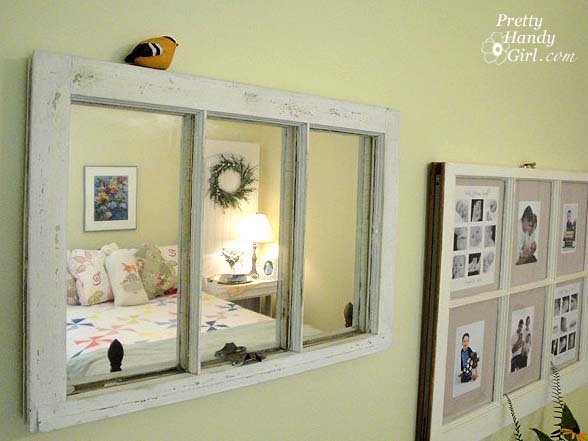
Close up of chipped salvage window. I painted one coat of flat white paint on top of the window and then used packing tape to peel off some of the paint.

downshot

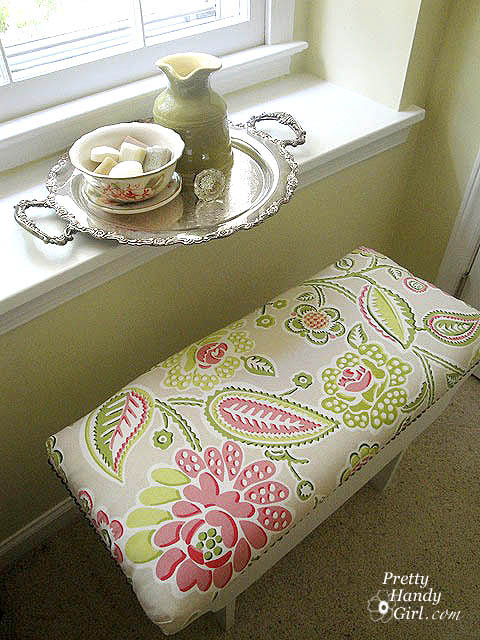
Sweet smelling soaps in a bowl. Pitcher and silver tray from Goodwill. Top view of the upholstered bench.

bench3.4view

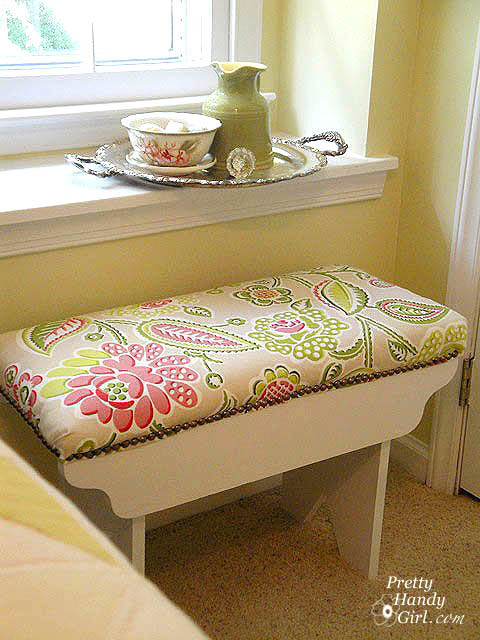
Can you believe it? The bench was also a curbside find!

This concludes my guest room tour. Did you enjoy? You can view my full home tour here. Thanks for visiting.

PHGFancySign

Writing Name in Sand Art | Pretty Handy Girl
This is a fun project to do with your kids (or by yourself) while you are at the beach.

Collect some cool shells, beach glass or driftwood. Use a broken shell with a sharp edge to write your name or message in the sand. Decorate your scene with the shells, etc. Take oodles of pictures. Try different angles and different distances.

When you get home pick out your favorite. And then you can use your favorite photo editing software or one of these great free websites Picnik or Sumo Paint– to make color corrections, cropping, etc.

Print your picture out and put it in a cute frame.

I debated whether or not to add shells and sea glass to the outside of the frame. The kids voted and we decided to add them with hot glue (or you could use E-6000) to the frame.

Then hang your sign on a door or set it up on your desk. You be the boss!

DIY Book with Storage Inside | Pretty Handy Girl

Two weeks ago I was thrilled when one of you wonderful readers signed on to become my 100th follower! What a milestone for a relatively new blog.

This lucky, 100th follower was Sharon, who has an equally amazing blog called This Thrifty House. If you haven’t been to her blog, you have to check out some of her projects!

Here is just a small sample of some of her creative juices flowing:

 
As a BIG thank you to Sharon for signing on as a follower, I had to make her something special. I took pictures and wanted to create a tutorial for you, but I’ve had to sit on my fingers to keep from spilling the beans before she received it.

So, the time has come, Sharon received my package in the mail, and without further delay, here is the tutorial!

Before the end of school I made four of these beautiful decorative books for my sons’ teachers. They looked so pretty that I didn’t have to wrap them in gift wrap.

I simply tied a bow around them and gave them to the teachers. Imagine their surprise when they opened them to find…


a gift card to Borders!

Now they have a pretty book to decorate with and a secret compartment for hiding something.

To make these decorative books with storage you will need:

1 Thick hardback book (I buy these for super cheap at Goodwill or use one of your own)
2 sheets of decorative scrapbook paper (12″ x 12″)
1 sheet of coordinating decorative scrapbook paper for the spine
Rubber cement
Scotch Tape
Xacto blades
Metal ruler (or ruler with a metal edge)
Mod Podge
Gold acrylic paint (optional)
Wax paper (save the liners from cereal boxes and never buy wax paper again)
Heavy weights

and most importantly….patience.

Begin by removing the dust cover or jacket from your book.

Open your book a few pages to determine where you want your hole to be. I usually leave a few pages in the front for more secrecy. Lay your gift card or item to hide on the page and trace out a rectangle guide for cutting. Use your x-acto blade and ruler to cut out one or two pages.

Put a piece of wax paper between your first cut page and the rest of the pages. Put a second piece of wax paper between the back cover of your book and the last page of your book. This keeps the paint/mod podge mixture from getting on the areas of the book you want to keep clean.

Now, mix your mod podge with a small bit of gold acrylic paint and brush the gold mod podge on the three sides of your book pages. Be sure you have covered your pages well.


Now, close your book (being sure that the wax paper is still protecting the back cover and the reserved page.) Get your heavy weight (hooray, finally a use for those heavy free weights that take up valuable closet space.) Do one bicep curl and drop the weight on top of your book.

Wait about 30 minutes for the modge podge to dry. While I’m waiting I put a piece of saran wrap over my mod podge mixture and paint brush and stored it in the fridge to keep it from drying out.

While you wait for the book to dry, you can assemble your decorative book cover.

(1) Butt your two scrapbook pages together and (2) put a piece of scotch tape along the seam.

Use the removed cover of your book (or measure the book) to figure out how tall you want your decorative cover to be. Trim your cover down to the correct height. Next determine how wide you want your decorative spine to be. Mine is the width of the book plus 2 inches. Cut your spine paper to size width-wise.

Center the spine on your book cover and draw a light pencil line on the book cover around the spine edges. (3) Open your rubber cement and coat your spine with a coat of rubber cement. Let it dry slightly while you (4) put another coat on the book cover in between the guide lines you drew on the cover. To get a strong bond with rubber cement you need two coats (one on the surface you are attaching, and the other on the surface you are gluing the piece to. This is standard for rubber cement unless you happen to purchase one coat rubber cement. (5) While the pieces are still tacky, gently lay the spine on top of the cover. You only have one shot at this, so go slow. Press the paper together. (6) Then run your finger along the spine edges wiping up any rubber cement (go ahead, you know you want to make little fake boogies!) Now, take your ruler and xacto and trim off the excess top of the spine.

Set your cover aside and check on your book. If the modge podge is dry, go ahead and open the book. Now, put your patience cap on.

You will continue to keep your one reserve page separate, but use it to draw your guide lines on the first page of the glued pages. Then be sure to protect that one reserve page so you can cover up your jagged cut lines later.

Use your ruler and a VERY sharp brand new xacto blade (you may go through 1 or 2 more blades during this part. Be sure to change your blade if the blade starts to pull pieces of the pages with it instead of cutting through them.) Gently but firmly cut along your guide lines. BE SURE TO KEEP YOUR FINGERS AWAY FROM THE RULER EDGE! (You don’t need to loose a finger, unless you are a two finger typer.)

Score a few times in the same spot being sure to press firm but not too hard as to break your blade. Try to be sure that you are cutting all the way to your corners. My method was to cut 4-5 times along one line, then rotate the book 90 degrees and repeat.

When you have cut through several pages, pull them out (cutting any corners that are still attached.) Now repeat, repeat, repeat……..until you have reached the desired depth for your hidden storage area. Phew, do you have a hand cramp yet? Hopefully that is all you have, no cuts I hope.

Now, clean up any edges of your opening.

Get your gold mod podge out of the fridge and seal the edges of your opening and paint the bottom of your opening.

Then paint the exterior edges around your opening (the first page in your glued stack.) NOW, lay your reserved page on top of this one and you have a clean border!

Put a piece of wax paper on top of your reserve page and pick up your weight. Use your opposite arm and do one bicep curl and drop that weight back on the book! There, you did your workout for today. Feel better?! No? Well then take the next 30 minutes to work out.

After 30 minutes open your book. (1) Lay your decorative cover over your book, making sure the edges are even. (2) Fold the top edge over your book front cover. (3) Then repeat for the back cover.


Stand back and admire.


Too pretty to give away, isn’t it?
Just think how happy the recipient will be!

Again, thank you to all my followers! I will have another surprise gift if I reach 500 followers. Next time I will pick one of you at random. So, tell your friends and family. Send them on over to be empowered at PrettyHandyGirl.com!

We have a great mudroom area in our house, but when we moved in we didn’t have anywhere to store our shoes, and all we had to hang our coats on were a few peg hooks behind the door. Not very efficient or attractive in my opinion. (Especially when my toddler filled the pegs with shoes. Do you think he was trying to tell me something? Let’s talk about this Coat Rack made from an Old Door.

But, soon, we had more storage for coats and shoes! Let’s take a look at how I built this beauty:

I started planning out the storage bench and coat rack at the same time. The coat rack was definitely the less involved project. Below is a picture as I was laying out the project.

I started with a beautiful old antique door that had recessed panels. I cut the panels out with my jigsaw (if you have never cut out an interior shape, you always start by drilling a hole large enough to fit your jig saw blade in. Drill your hole in a corner, then insert your jigsaw and cut the rest of your shape.

Next, I used my router to get rid of the edge of the recessed panels on the back side. As you can see in the Sketch Up drawing below, I left the edge on the front side to support the mirror.

Then I could measure my opening and cut the mirror pieces to fit into the panels. I have a great resource for inexpensive mirror glass. I buy those cheap full length mirrors at discount stores like Target, Kmart or Walmart. Then I rip off the thin plastic frame and the paper backing. Use a glass cutter to score the front of the mirror and then snap the mirror in two pieces.  Then continue to cut until it is down to the size needed.

If you have never cut glass before, here is a short 1 minute video tutorial:

Next I sanded some of the silver off the back of the mirror to try to distress it. It took a while to do, and I’m not exactly thrilled with the distressing. Recently I stumbled across a few posts where paint stripper was used to distress mirrors. I would definitely use this route next time.

After all the mirror panels were cut to size, I laid them in the recess panel holes from the back and then used a thick bead of caulk around the edges to hold the mirror in place.

Next I had to build the shelf that the door would rest on. I recently bought two wall shelfs and brackets from a yard sale. I used one 7″ deep shelf for the vertical edge (or backer board for the hooks to attach to.) I ripped the other shelf down to 5″ inches (on a table saw) and used that to rest on top of the other shelf. To attach the two I simply screwed down through the horizontal shelf and into the backer board every 2 feet or more.

Then I added some decorative moulding using finish nails to secure them. You can see the different pieces on the edge.

I scoured eBay for a week until I found the perfect antique coat hooks. They are adorable and can hold many coats with the three prongs.

After everything was assembled, I located the studs in our mudroom wall and drilled holes into the backer board, then drove 3″ screws into the wall studs.

The antique door rests slightly on the shelf, but it is also held secure by four L brackets that are mounted on the top and bottom.

Be sure that your coat rack is safely secured to the wall for safety reasons.
For this project I don’t recommend using wall anchors.
Take the time to find the studs, you will thank me four years from now when your coat rack is still holding up to children who can and will climb on anything!

I used Minwax Brazillian Rosewood gel stain to stain the bench and shelves. This was the stain color that matched the color of the antique door.

And there you have it! An antique coat rack to match my shoe storage bench.

I just love these eBay hooks! And the detailed moulding makes me happy.
Plus, they allow space for decorating during the holidays!
Holiday Home Tour 2016 | Pretty Handy Girl

Plenty of storage for coats for a family of four or more!

Learn how to build the mudroom shoe storage bench here.


My best friend from elementary school will be flying in today from New York. I have a sweet little retreat all made up for her in our guest room. I promise to post pictures of the whole room in the near future (when the sun – and sons – cooperate with me.)
 
Our guest room is full of discarded treasures: a rebuilt curbside chair, an upholstered bench, a full size bed, and a little curved desk. But, one of the focal pieces in the guest room is a night stand made from a discarded door and leftover picket fence pieces.

 Isn’t it fabulous?!

So, here is the tutorial for you. I hope you will excuse my first attempt at using Google Sketch Up. These sketches should give you a pretty good idea how to construct the night stand.

I started by cutting two boards for the shelves. They were cut to the width of the door and the depth of the picket fence sections.

I cut two cleats out of 2″ x 4″ boards (shown in green).

And screwed them to the door (purple circles), making sure that the top of the cleats were level with the top of the horizontal cross boards on the picket fence.

I braced the picket fence pieces to the door using L-brackets.

I laid the two shelves on top of the cleats and cross boards. And drove screws down to hold it in place (purple circles).

Next, I cut some face boards (shown in aqua below) to the same width as the nightstand front.

I used finish nails to nail them to the front, then added some decorative moulding to the face boards.

I used wood putty to fill all the screw and nail holes, and caulk to smooth the seams of the moulding (see here for more details on caulking and filling nail holes.)

Then I painted the nightstand white and accessorized it. I’m still deciding whether I should distress and glaze the nightstand. Feel free to give me your opinion. I am all ears.

Here is my door & picket fence nightstand, all ready for our first guest since re-decorating the guest room.

Glass knob and door plate was purchased at NoFo in Raleigh.
If you are ever in the Raleigh, NC area, you MUST eat at NoFo,
then shop upstairs after your meal. 
 
Some books written by my favorite author, Diane Chamberlain.
A goodwill lamp and a picture of my niece who lives too far away!*

*(bold comment solely for the purpose of guilting my sister into moving closer.)
Fresh towels and my Country Living magazines.

All beautified and ready for our visitor!

Sharing with the CSI Project White Challenge:

Visit thecsiproject.com