Ahem, may I have the drumroll please?

 Rat-a-tat-a-tat-a-tata…

…and the winning number chosen by Random.org is:

#59 (well, that is random isn’t it!)


Michelle! Wooohooo! Come on down and pick up your prize:

And for everyone else, don’t be blue. I was a busy beaver in September and stood up to Robin’s Stashbusting Challenge. So, when I saw this tutorial written by Jorja over at Puking Pastilles (Great name! Don’t you think? Any other Harry Potter fans?) I knew this was a great way to bust some of my fabric scraps.

I took some of these:

And a few of these:

And cut them like this:

Then did a little of this:

To make this:

And because I already had my stash out, I also made these:

But, I put the most effort and love into this one:

Because it is for someone very special to me! You!

I will choose one of my followers (via Google Friend Follower or FeedBurner) to receive a Pretty and Handy CD/DVD visor wallet. So, you too can roll around town with one of these:

But, wait! There’s more! Inside one of the sleeves will be tucked one of these:

And the best part is that if you are already a follower you will be eligible. You don’t have to do ANYTHING! No tweets, no likes, no comments, nada, zilch, nothing.

One of my Pretty Handy Assistants (Boy #1 and Boy #2) will choose a follower for me at the end of October. So, if you aren’t a follower, head over to my side bar and either click the “Follow” button or add your email address to the FeedBurner subscriber box.

Thanks again to all my readers. I wish you good luck in October!

Now, I have officially said goodbye to Summer. Sniff, sniff.

DIY Glass Window Shelves

I love african violets! They can be fickle, but once they have the right amount of light, and slightly damp soil, they will happily put on a show for you. My violets used to perch on the kitchen window sill, but occasionally they would take a suicidal nose dive into the sink. To save them from inevitable death one day, I installed two glass shelves over the sink.

DIY Glass Window Shelves

Would you like to install your own glass shelves between two kitchen cabinets? It is a relatively easy project, but does require two sets of hands for one step. The directions below will take you through the step-by-step process for installing 2 glass shelves.

DIY Glass Window Shelves Materials:

(I’ve included affiliate links for your convenience. I earn a small percentage from a purchase using these links. There is no additional cost to you. You can read more about affiliate links here.)

3/16 inch tempered glass
quarter round moulding
paint (to match your kitchen cabinets)
medium size paint brush
painters tape
hammer
level
drill w/ bits
finish nails 1.25″ long
nail set
wood putty or caulk
flat toothpick or wood shim

DIY Glass Window Shelves Instructions:

1. First measure your window width and subtracted 0.25″ from the measurement.) Then measure the depth of your kitchen cabinets to the window frame (or tile, whatever sticks out the furthest).

DIY Glass Window Shelves

Take those measurements to a glass manufacturer and have them cut two pieces of 3/16″ tempered glass. Make sure that the edges will be smooth. And, definitely ask for the tempered glass. (My shelves never broke, but I banged them occasionally while being overzealous about washing dishes.)

2. Using the measurement you took for the depth of your cabinets, cut 8 lengths of quarter round (four for each glass shelf you are hanging.)

DIY Glass Window Shelves

3. Prime and then paint the quarter round to match your cabinets.

4. Determine the height where you want your glass shelves to be. (I put each shelf at the same height as my window grill pieces.) Use a level and draw lines on your cabinet on one side of the window.

DIY Glass Window Shelves

5. Pre-drill three holes (the size of your finish nails) into your quarter round.

DIY Glass Window Shelves

6. Using a piece of painters tape, attach once piece of the quarter round to your cabinet. This is your shelf support piece, so make sure that the flat edge is facing up. Gently nail the finish nails through the predrilled holes and into the cabinet. Repeat this step for your other shelf support (on the same side.)

7. Rest one glass shelf on one piece of the installed quarter round. You will need an assistant to help hold the glass shelf up as you level it.

DIY Glass Window Shelves

8. Make a mark on the under side of your glass.

DIY Glass Window Shelves

9. Double check that the mark is level (from front to back), and line your next piece of quarter round below the line. Repeat steps 5 & 6 above until you have the four shelf supports installed.

10. Gently rest your glass shelves on the supports.

DIY Glass Window Shelves

11. Pre-drill holes in your four remaining quarter round strips.

12. Set wood shims (or toothpicks) on top of the glass shelves and up against the cabinets on both ends. Rest your quarter round strips on top of the shims. This should give you a slight space between the glass and the quarter round. Now, tape the quarter round pieces in place and REMOVE BOTH glass shelves and the shims.

DIY Glass Window Shelves

13. Nail your quarter round pieces in place. Use a nail set to countersink (set the nail below the wood surface) all your nails. Fill the nail holes with wood putty or caulk and touch it up with your paint.

14. When the paint has dried, slide in your shelves. The shelves should slide in easily and should not be tight.

DIY Glass Window Shelves

15. Put some plants or other accessories on your new shelves! And enjoy.

DIY Glass Window Shelves

I’ve had some time this week to catch up with some of my girlfriends. Sometimes this means it was a few minutes in the parking lot at preschool. Or a phone conversation. I definitely value their friendships and wish I had more time to spend with them (thankfully most of my girlfriends are mothers as well and recognize time is not something we have a lot of right now).

One of my good friends (who was also born a Cancer), and I were talking yesterday. It is really scary how similar our personalities are. She was naming off several traits that fit both of us to a tee. One of them was the ability to throw ourselves into something, not halfway but whole-heartedly!

I always thought this was a good trait (but certainly recognized how it can be all consuming sometimes). Then she stopped and said, “But there is one difference between you and I. When you see something new you want to learn, you throw yourself into it and revel in the challenge. Whereas, I am sometimes uncertain and afraid of failing.” I realize that we all have this fear of failure to a certain degree. Obviously some more than others.

 I have been skydiving once in my life. Was I scared? Yes!
But that emotion flew out the window, and then I loved it.
I will do it again someday, but not until my children are grown.

One of my challenges has been decorating. I wanted to share this with you because, decorating is not something that came naturally to me. In fact, I am somewhat tentative to even share some of these pictures with you. What I have learned has come from many designers and decorators (check out the list of “a few other sites you might like” on my sidebar) who have graciously shared their secrets and design tips with their readers through their blogs. One in particular has a motto that frees you from the “everything has to be perfect” mentality. The Nesting Place written by the Nester really forced me to forget perfection and “Just Do It!” (Sorry, Nike.) Her tagline says it all: “It doesn’t have to be perfect to be beautiful.” I encourage you to hop (no, make that LEAP) over to her blog and download this FREE eBook on “It Doesn’t Have to Be Perfect to be Beautiful.”

I read the eBook from cover screen to cover screen. And I have thrown away those “perfect” shackles and made my house MY home. And I did it without spending a lot of money.

I have finally embraced Autumn and am willing to share with you my fall vignettes and decorations. I want you to know that I purchased very little this month (thanks to a very special woman over at the T-shirt Diaries. She challenged fellow bloggers to forgo spending anything on crafts, etc. this September.)  If I purchased it this year, I’ll share with you where and how much I spent. If it isn’t listed, I already had it in my stash. But, it is likely that I found it, transformed it from junk, or got some amazing deal on it.

Without further ado, here is my imperfect and inexpensive decorating for fall:

Wreath $12 from Home Goods purchased over summer.


 Bowl & fruit $15 from Craig’s List.


 Vase $2 from Goodwill, beauty berries & nandina berries from our yard.
$3 Goodwill distressed chalkboard frame details HERE.
$5 Pottery Barn inspired lantern from Habitat ReStore. Details HERE.
 
 
$2.49 Goodwill gourd painted HERE.
Books, bird, and birdhouse I already had.
Birdhouse is perched on $6 clearance candlestick from Target. 
 
$2.49 Goodwill Pear turned Ballard Designs knockoff HERE.
Apple from Craig’s List bowl above.
 Two more black candlesticks from Target (forgot price).
Both on clearance. I spray painted them black.


 Pinecones from our yard, orange/red dishtowel from the kitchen.
Basket fillers were free with 3 card Hallmark purchase.
 
Plant & pot clearance at Kroger $3.50
Books & cowbell passed down from our grandparents.
Pinecones & acorns from our yard.
Another dishtowel from the kitchen.
 
 
Urn from tag sale $3. It is heavy cast iron! 
Copper canisters were passed down to me when my grandfather passed away last year.


Splurge wreath! $19 at Michael’s last year.
Added maroon raffia ribbon this year.
 
 Simple 5 minute magnolia wreath, details HERE.


 Two pie pumpkins used as post finials. $2.50 each from Kroger.


 Grocery store pumpkins made into topiary and fringed rope (already had).


My boys love to get into the decorating act. 
They love to put their touch on our kitchen window each new holiday. 

I encourage you all to throw away that “perfect” mentality and try something new this month! It is okay if it doesn’t come out perfect. Love it if it is a reflection of who you are. If you hate it throw it away and use it as a learning experience, but don’t give up. Try it again!

Let’s not forget how we all learned to ride a bike or even walk. Were we afraid to try it? Probably. But, we tried it anyway. Did we give up when we fell the first time? No!

Mag-nolia-fying a Fall Wreath

I promised you that I’m embracing Autumn now that the weather is cooling off. In fact, I’ve been switching out the summer decor for some more seasonally appropriate reds, oranges, brown and greens. I even spent time Mag-nolia-fying a Fall Wreath. What? You don’t know what Mag-nolia-fying means? Well stick around and see how I made this Magnolia Leaf Wreath on the cheap.

Dried Magnolia Wreath | Pretty Handy Girl
Here is a little sneak peek from my mantle:

Mag-nolia-fying a Fall Wreath

My Ballard Design Knockoff Pear has already found a spot to sit.

In an effort to spend less and store less, I’ve been trying to buy just 2-3 wreaths that I can switch up and tailor to meet the season. A few months ago, I bought this little white bud wreath from Target:

Mag-nolia-fying a Fall Wreath
It will be my springboard or base wreath for many seasons to come. The neutral white color works well with any color and I can add other natural elements and ribbons to change the color palette.

When I saw how Centsational Girl, made a beautiful wreath with magnolia leaves, the light bulb went on for me.

Mag-nolia-fying a Fall Wreath
 Centsational Girl’s Wreath

My neighbor has a beautiful magnolia tree, so I asked if I could steal some of its fallen leaves. I filled a grocery bag with the ones that looked most interesting to me. Then brought them home, rinsed the dirt off of them and laid them out to dry.

Mag-nolia-fying a Fall Wreath

After they dried, I started playing with them and found that I they would easily work to mag-nolia-fy the bud wreath. Here’s how to do it:

Materials:

(I’ve included affiliate links for your convenience. I earn a small percentage from a purchase using these links. There is no additional cost to you. You can read more about affiliate links here.)

Instructions:

Tuck magnolia wreaths into the grapevine base frame. I fully intended to hot glue them in place, but they held tight and stayed on their own! The leaves must have been so happy to be offered a second life, so they cooperated.

Mag-nolia-fying a Fall Wreath

Tie a cotton ribbon onto the wreath. You can thread it through the loop that came with the wreath. Or tie around the wreath.

Mag-nolia-fying a Fall Wreath
Here are the results for that super easy mag-nolia-fied fall wreath:

Mag-nolia-fying a Fall Wreath
Hang it on your door and enjoy it until December.

Then you can quickly turn the berry wreath into a Christmas wreath by removing the leaves and adding greenery! Bam!

Mag-nolia-fying a Fall Wreath 24 Fabulous Creative Fall Wreaths
Want more Fall Wreath inspiration? Enjoy these 24 more Fall wreath ideas:

24 Creative Fall Wreaths | Pretty Handy Girl

Happy Fall Y’all!
signature

If you were here the other day to see my dormer window transformation, you may have seen my exterior lights. I’ll be talking about Installing New Exterior Lighting today!

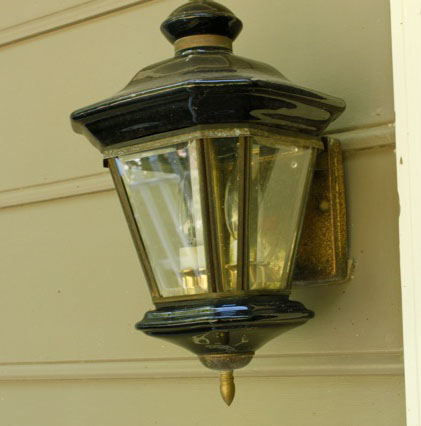
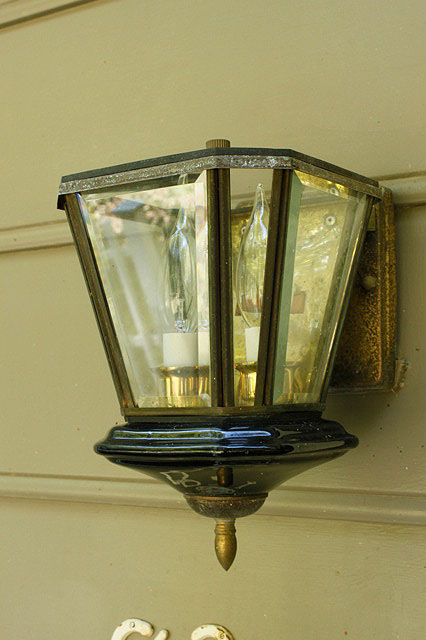
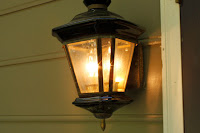
Then again, maybe you didn’t because they are miniscule! Not only are they tiny, but the light sockets were cracked, the brass trim was dated and rusty, and they just weren’t making me smile. And that is what it is all about, isn’t it!

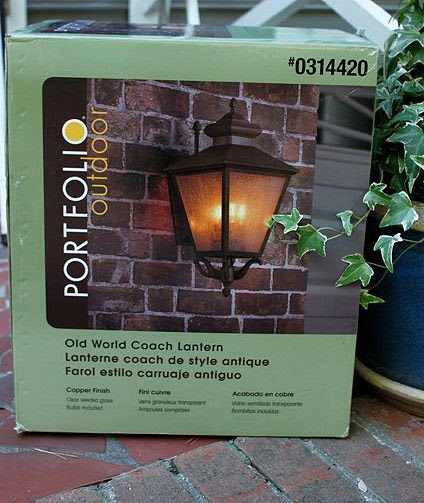
I’ve been looking for affordable exterior lights that fit the style of our home for about a year now. I didn’t want anything too trendy or contemporary because our house has an old world feel, it is a dutch colonial.

I happened to be at Lowe’s buying our new stove (yep, the one that caught fire in this post) and I spied these beauties on clearance for $24! I snatched them up in an instant and high tailed it out of the store before I could find any more things I “needed”.

Materials:

Flat head screwdriver*
Phillips head screwdriver*
power drill with screwdriver bits (if you wish to speed up unscrewing and screwing)
Wire Strippers*
Wire cutter*
New light fixture with instructions

* When working with electricity, It is safest to work with tools that have rubber or plastic handles that won’t conduct electricity, should you forget to turn off the power.

Required Safety Instruction:

Turn off the power to the light fixtures you are working on. Turn your lights on and visually inspect they are lit before turning off the circuit. Then shut off the circuit at your circuit breaker and check to see that the light has gone out.


Remove your new light from the packaging. Check for the instruction manual and all the parts. I like to put screws and small parts in a bowl so I don’t lose them.

Okay, now comes the easy part. Disassemble your old light. Take the top off and keep removing parts until you are down to the bare bones.

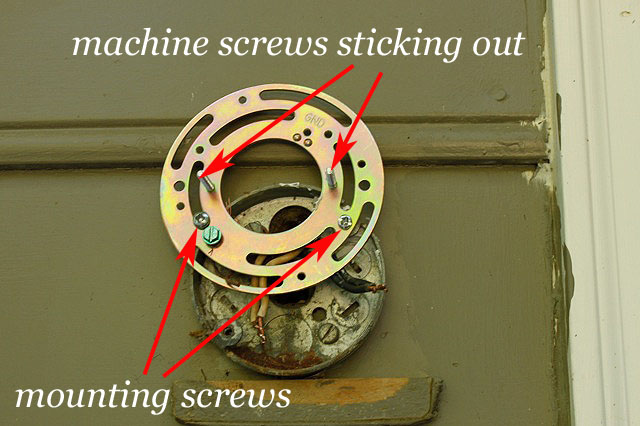
Unscrew the mounting plate from the wall by turning the small ball cap nuts (okay, no snickering, that is what they are really called!)

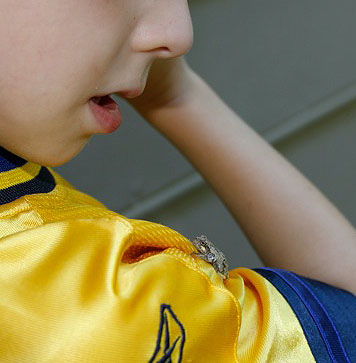
Watch out for critters that might be living behind your fixture! This cute little tree frog jumped out at us. Poor little guy. We actually found him in our house later that day and had to shoo him back outside.


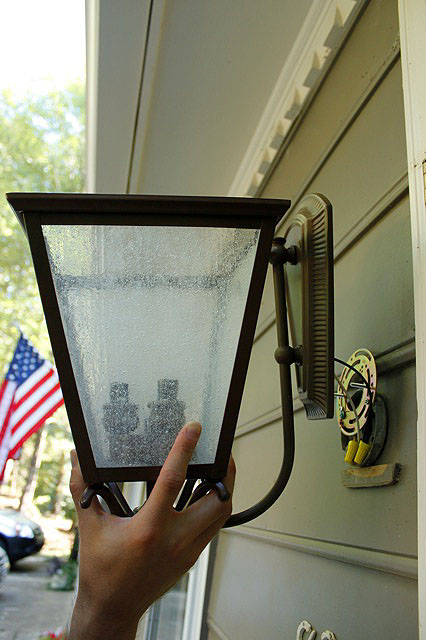
Pay attention to which wires are connected to the white and black wires on your fixtures.


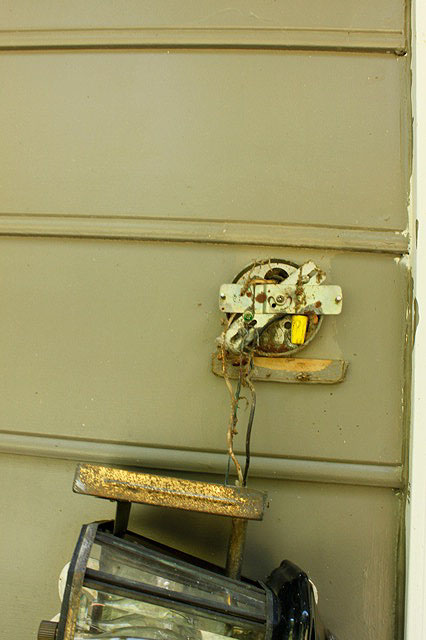
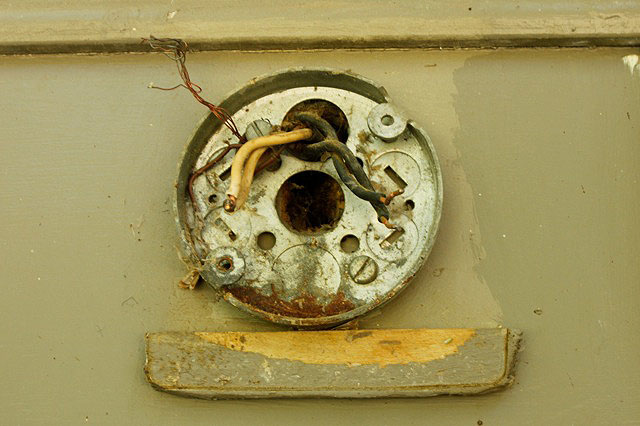
Now you can remove the wire nuts and free your old fixture. (Don’t forget to clean out your junction box (the round, square, or octagon shaped box that is mounted to the wall and contains your house wires.)

Also, take a moment to make sure your junction box is attached firmly to the house. And/or that you have something solid to attach your mounting bracket to. Case in point: this poor light fixture is hanging on by a wire because the mounting bracket was screwed into the foam insulation!

Locate the mounting plate for your new fixture. Thread the machine screws that will attach to your new light from the back of the mounting plate so they are sticking out towards you. Make sure the screws line up with the holes in your light fixture canopy (the metal cover on your light fixture that will rest flush against the wall.)

THEN you can attach it to your junction box. Honestly, this took me the most amount of time because I wanted to move my fixture up a little to compensate for its larger size. It took me too long trying to determine which holes to use for mounting. I did end up putting one screw into the junction box, and then used a wood screw to attach the other side to the siding on our house (which I then caulked to keep it from rotting the siding.)  You will probably be lucky and won’t need to do this step.

Double check to make sure that the plate is snug and attached firmly to the junction box and/or a solid surface.

These next few steps will be much easier if you have an assistant to hold the light fixture while you make the wire connections.

Unless your fixture comes with short wires, trim the excess and strip about 3/4 inch of the insulation from the end of the wires using your wire cutters and wire strippers. Making sure that your wires will fit inside your junction box, go ahead and connect the bare wire (ground wire) from your house to the green ground screw. If your new fixture has a bare or green wire, wrap that around the green ground screw as well.

Separate your white and black wires from your house, ideally you want them to be on opposite sides of the junction box so there is no risk of them touching. Go ahead and use a wire nut to connect your white wires. Then do the same for the black wires. Gently push the wires into the junction box (keeping them apart from each other).

Line up the holes in the canopy on your light fixture with the machine screws sticking out of the mounting plate. Use the ball cap screws that came with your fixture to cap the ends of the machine screws.

Hopefully everything looks good at this point (straight, no exposed wires, etc.) I would recommend turning on the power to check your wire connections and make sure your fixture works before the next step, and before installing the second light (if you have one.)

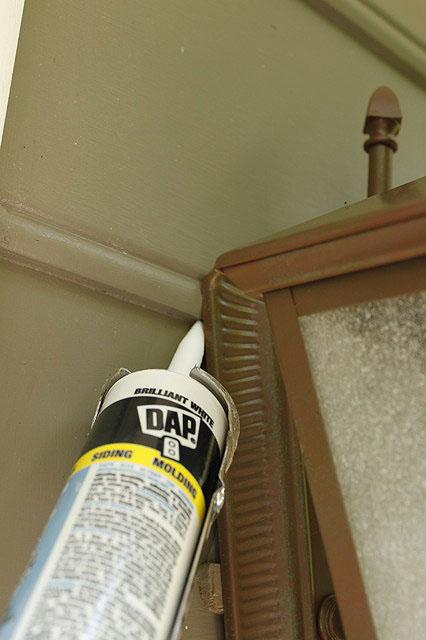
Caulk around the edges of your light fixture to keep water from entering the junction box. Use clear or paintable exterior grade caulk.

Don’t forget to turn off the power again before removing and installing your second light fixture.

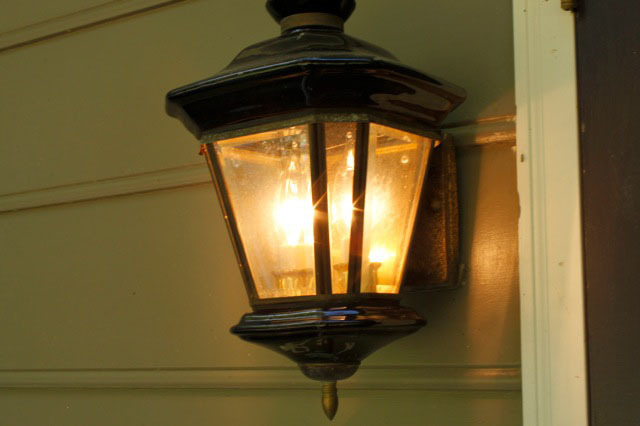
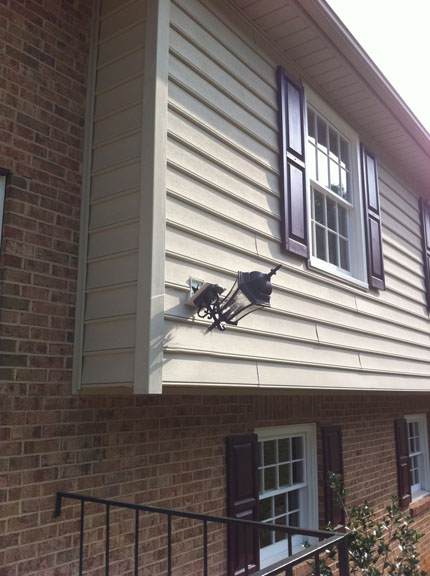
You can see both the old and new light fixtures in the photo below. The one on the left is the new one, and the right is the puny old one.


Once you get the second fixture up and check to see that it works, stand back and admire your handywork!

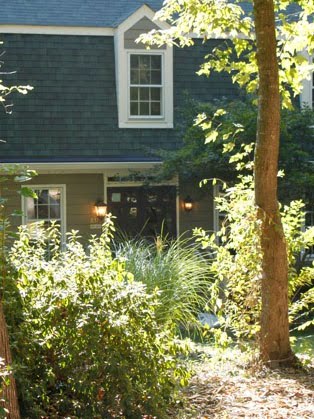
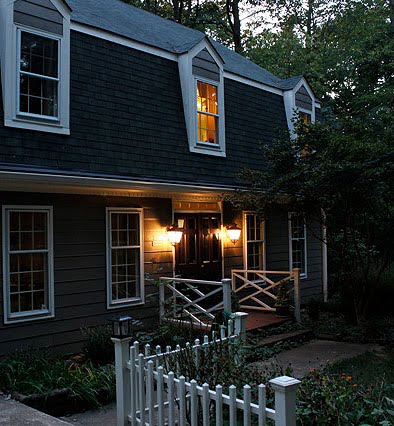
Here are the after pictures of our new exterior light fixtures:

We’re still getting used to the size of the new lamps, but I definitely think they fit the scale of our house better than the old ones.


What do you think? I’m curious if anyone else likes copper (instead of Oil Rubbed Bronze.) Don’t get me wrong. I like ORB, I just didn’t think it fit our home’s style.